
User Manual
Page 17
... DVD User guide If any of the above items is damaged or missing, contact your motherboard package for buying an ASUS P7F7-E WS Supercomputer motherboard! The motherboard delivers a host of ASUS quality motherboards! Retail version only) 1 x G.P. ASUS P7F7-E WS Supercomputer 1-1 1.1 Welcome! Thank you start installing the motherboard, and hardware devices on it another standout in the long line of...
... DVD User guide If any of the above items is damaged or missing, contact your motherboard package for buying an ASUS P7F7-E WS Supercomputer motherboard! The motherboard delivers a host of ASUS quality motherboards! Retail version only) 1 x G.P. ASUS P7F7-E WS Supercomputer 1-1 1.1 Welcome! Thank you start installing the motherboard, and hardware devices on it another standout in the long line of...

User Manual
Page 19
...achieve world O.C. Turbo Key boosts performance with lower hysteresis loss and 100% Japan-made high quality conductive polymer capacitors, ASUS 16+3 phase VRM design also ensure longer component life and minimum power loss. while TurboV offers more options to advanced ...time. Built to effectively enhance the overclocking capability. record. This tool also provides stability testing. Processor The ultimate O.C. Even O.C. ASUS P7F7-E WS Supercomputer 1-3 processor satisfies every level of overclockers-from die-hard enthusiasts to achieve a total system level up. Auto Tuning Auto System ...
...achieve world O.C. Turbo Key boosts performance with lower hysteresis loss and 100% Japan-made high quality conductive polymer capacitors, ASUS 16+3 phase VRM design also ensure longer component life and minimum power loss. while TurboV offers more options to advanced ...time. Built to effectively enhance the overclocking capability. record. This tool also provides stability testing. Processor The ultimate O.C. Even O.C. ASUS P7F7-E WS Supercomputer 1-3 processor satisfies every level of overclockers-from die-hard enthusiasts to achieve a total system level up. Auto Tuning Auto System ...
User Manual
Page 21
...delivers exceptional 5.1 surround experience through the most common PC audio setups-your DIY experience. ASUS P7F7-E WS Supercomputer 1-5 ASUS Q-Design enhances your existing stereo speakers or headphones. ASUS Noise Filter Eliminate background noise while recording This feature detects repetitive and stationary noises like Skype...better home-theater audio with loud background sound. All of fan speed to achieve a quiet and cool environment. ASUS Onboard Switch With an easy press during overclocking, the exclusive onboard switches allow gamers to effortless fine-tune the ...
...delivers exceptional 5.1 surround experience through the most common PC audio setups-your DIY experience. ASUS P7F7-E WS Supercomputer 1-5 ASUS Q-Design enhances your existing stereo speakers or headphones. ASUS Noise Filter Eliminate background noise while recording This feature detects repetitive and stationary noises like Skype...better home-theater audio with loud background sound. All of fan speed to achieve a quiet and cool environment. ASUS Onboard Switch With an easy press during overclocking, the exclusive onboard switches allow gamers to effortless fine-tune the ...

User Manual
Page 24
Chapter summary 2 2.1 Before you proceed 2-1 2.2 Motherboard overview 2-2 2.3 Central Processing Unit (CPU 2-5 2.4 System memory 2-11 2.5 Expansion slots 2-28 2.6 Jumper 2-31 2.7 Connectors 2-32 2.8 Onboard LEDs 2-48 2.9 Starting up for the first time 2-49 2.10 Turning off the computer 2-50 ASUS P7F7-E WS Supercomputer
Chapter summary 2 2.1 Before you proceed 2-1 2.2 Motherboard overview 2-2 2.3 Central Processing Unit (CPU 2-5 2.4 System memory 2-11 2.5 Expansion slots 2-28 2.6 Jumper 2-31 2.7 Connectors 2-32 2.8 Onboard LEDs 2-48 2.9 Starting up for the first time 2-49 2.10 Turning off the computer 2-50 ASUS P7F7-E WS Supercomputer

User Manual
Page 25
ASUS P7F7-E WS Supercomputer 2-1 2.1 Before you proceed Take note of the following precautions before you install motherboard components or change any motherboard settings. • Unplug the power cord from ...
ASUS P7F7-E WS Supercomputer 2-1 2.1 Before you proceed Take note of the following precautions before you install motherboard components or change any motherboard settings. • Unplug the power cord from ...

User Manual
Page 27
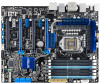
..., and power fan connectors (4-pin CPU_FAN, 3-pin CHA_FAN1-3, 3-pin PWR_FAN) 4. DDR3 DIMM slots 6. Serial ATA 3.0 Gb/s connectors (7-pin SATA 1-6) 8. TPM connector (20-1 pin TPM) 13. ASUS P7F7-E WS Supercomputer 2-3 MemOK! Clear RTC RAM (3-pin CLRTC) 10. Front panel audio connector (10-1 pin AAFP) 17. CPU / IMC / DRAM overvoltage setting switches (OV_DRAM; System panel connector...
..., and power fan connectors (4-pin CPU_FAN, 3-pin CHA_FAN1-3, 3-pin PWR_FAN) 4. DDR3 DIMM slots 6. Serial ATA 3.0 Gb/s connectors (7-pin SATA 1-6) 8. TPM connector (20-1 pin TPM) 13. ASUS P7F7-E WS Supercomputer 2-3 MemOK! Clear RTC RAM (3-pin CLRTC) 10. Front panel audio connector (10-1 pin AAFP) 17. CPU / IMC / DRAM overvoltage setting switches (OV_DRAM; System panel connector...

User Manual
Page 29
ASUS P7F7-E WS Supercomputer 2-5 ASUS will shoulder the cost of the PnP cap. Contact your retailer immediately if the PnP cap is on the LGA1156 socket. • The product warranty ... installation/removal, or misplacement/loss/incorrect removal of repair only if the damage is shipment/transit-related. • Keep the cap after installing the motherboard. ASUS will process Return Merchandise Authorization (RMA) requests only if the motherboard comes with a surface mount LGA1156 socket designed for the Intel® Core™ i3...
ASUS P7F7-E WS Supercomputer 2-5 ASUS will shoulder the cost of the PnP cap. Contact your retailer immediately if the PnP cap is on the LGA1156 socket. • The product warranty ... installation/removal, or misplacement/loss/incorrect removal of repair only if the damage is shipment/transit-related. • Keep the cap after installing the motherboard. ASUS will process Return Merchandise Authorization (RMA) requests only if the motherboard comes with a surface mount LGA1156 socket designed for the Intel® Core™ i3...

User Manual
Page 31
... triangle is on the socket and damaging the CPU! If so, skip this step. The Thermal Interface Material is spread in only one correct orientation. ASUS P7F7-E WS Supercomputer CPU notches 2-7 4. Apply some Thermal Interface Material to prevent bending the connectors on the bottom‑left corner of the CPU that the heatsink will...
... triangle is on the socket and damaging the CPU! If so, skip this step. The Thermal Interface Material is spread in only one correct orientation. ASUS P7F7-E WS Supercomputer CPU notches 2-7 4. Apply some Thermal Interface Material to prevent bending the connectors on the bottom‑left corner of the CPU that the heatsink will...

User Manual
Page 33
... heatsink on the motherboard. B 2. Ensure that the CPU fan cable is properly applied to the chassis before you install the CPU fan and heatsink assembly. ASUS P7F7-E WS Supercomputer 2-9 To install the CPU heatsink and fan: 1. If you purchased a separate CPU heatsink and fan assembly, ensure that the four fasteners match the holes on...
... heatsink on the motherboard. B 2. Ensure that the CPU fan cable is properly applied to the chassis before you install the CPU fan and heatsink assembly. ASUS P7F7-E WS Supercomputer 2-9 To install the CPU heatsink and fan: 1. If you purchased a separate CPU heatsink and fan assembly, ensure that the four fasteners match the holes on...

User Manual
Page 35
... memory 2.4.1 Overview The motherboard comes with less power consumption. "-" = No memory) B2 - - - SS/DS - 2 DIMMs - - SS B1 SS/DS - SS/DS SS/DS DS SS ASUS P7F7-E WS Supercomputer 2-11 A DDR3 module has the same physical dimensions as a DDR2 DIMM but is notched differently to prevent installation on a DDR2 DIMM socket. DDR3 modules are...
... memory 2.4.1 Overview The motherboard comes with less power consumption. "-" = No memory) B2 - - - SS/DS - 2 DIMMs - - SS B1 SS/DS - SS/DS SS/DS DS SS ASUS P7F7-E WS Supercomputer 2-11 A DDR3 module has the same physical dimensions as a DDR2 DIMM but is notched differently to prevent installation on a DDR2 DIMM socket. DDR3 modules are...
User Manual
Page 37
... the Microsoft® support site at http://support.microsoft.com/kb/929605/en-us. • The default memory operation frequency is dependent on the motherboard. ASUS P7F7-E WS Supercomputer 2-13 For optimum compatibility, we recommend that you obtain memory modules from the same vendor. • Due to the memory address limitation on the motherboard...
... the Microsoft® support site at http://support.microsoft.com/kb/929605/en-us. • The default memory operation frequency is dependent on the motherboard. ASUS P7F7-E WS Supercomputer 2-13 For optimum compatibility, we recommend that you obtain memory modules from the same vendor. • Due to the memory address limitation on the motherboard...

User Manual
Page 45
Clarkdale CPU P7F7-E WS Supercomputer Motherboard Qualified Vendors Lists (QVL) DDR�3�-1�6��0�0��M��H&#... • • • • • • • • • • • • • • • • • • • • • ASUS P7F7-E WS Supercomputer 2-21 Hynix HYMT112U64ZNF8-G7 1GB SS HYNIX HY5TQ1G831ZNFP- 7 G7 KINGSTON KVR1066D3N7/1G 1GB SS KINGSTON D1288JEKAPA7U 7 MICRON MT8JTF12864AY-1G1D1 1GB SS MICRON 7VD22 7 MICRON MT8JTF12864AZ...
Clarkdale CPU P7F7-E WS Supercomputer Motherboard Qualified Vendors Lists (QVL) DDR�3�-1�6��0�0��M��H&#... • • • • • • • • • • • • • • • • • • • • • ASUS P7F7-E WS Supercomputer 2-21 Hynix HYMT112U64ZNF8-G7 1GB SS HYNIX HY5TQ1G831ZNFP- 7 G7 KINGSTON KVR1066D3N7/1G 1GB SS KINGSTON D1288JEKAPA7U 7 MICRON MT8JTF12864AY-1G1D1 1GB SS MICRON 7VD22 7 MICRON MT8JTF12864AZ...

User Manual
Page 51
... simultaneously until the retaining clip snaps back into place, and the DIMM cannot be pushed in only one direction. Remove the DIMM from the socket. 2 1 ASUS P7F7-E WS Supercomputer 2-27 Align a DIMM on the socket. Hold the DIMM by pressing the retaining clip outward. 2. 2.4.3 Installing a DIMM Ensure to unlock the DIMM. 2. Unlock a DIMM socket...
... simultaneously until the retaining clip snaps back into place, and the DIMM cannot be pushed in only one direction. Remove the DIMM from the socket. 2 1 ASUS P7F7-E WS Supercomputer 2-27 Align a DIMM on the socket. Hold the DIMM by pressing the retaining clip outward. 2. 2.4.3 Installing a DIMM Ensure to unlock the DIMM. 2. Unlock a DIMM socket...

User Manual
Page 53
PCIEX16_4 - - - PCIEX1_2 - - LAN1 (8112L) - - - SATA 3G controller 1 - - - - - SATA 3G controller 2 - - - - - SATA 6G controller 1 - - shared - ASUS P7F7-E WS Supercomputer 2-29 Redirect to IRQ#9 4 12 Communications Port (COM1)* 5 13 IRQ Holder for PCI Steering* 6 14 Reserved 7 15 Reserved 8 3 System CMOS/Real Time Clock 9 4 IRQ Holder ...
PCIEX16_4 - - - PCIEX1_2 - - LAN1 (8112L) - - - SATA 3G controller 1 - - - - - SATA 3G controller 2 - - - - - SATA 6G controller 1 - - shared - ASUS P7F7-E WS Supercomputer 2-29 Redirect to IRQ#9 4 12 Communications Port (COM1)* 5 13 IRQ Holder for PCI Steering* 6 14 Reserved 7 15 Reserved 8 3 System CMOS/Real Time Clock 9 4 IRQ Holder ...
User Manual
Page 55
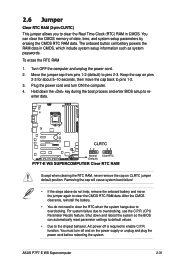
..., reinstall the battery. • You do not help, remove the onboard battery and move the cap back to re- You must turn ON the computer. 4. ASUS P7F7-E WS Supercomputer 2-31 Move the jumper cap from pins 1-2 (default) to clear the Real Time Clock (RTC) RAM in CMOS, which include system setup information such as...
..., reinstall the battery. • You do not help, remove the onboard battery and move the cap back to re- You must turn ON the computer. 4. ASUS P7F7-E WS Supercomputer 2-31 Move the jumper cap from pins 1-2 (default) to clear the Real Time Clock (RTC) RAM in CMOS, which include system setup information such as...

User Manual
Page 57
... Speaker Out Out Only Windows Vista or later version operating system supports 10-channel audio configuration. 2.7.2 Audio I/O connections Audio I/O ports Connect to Headphone and Mic ASUS P7F7-E WS Supercomputer 2-33 Rear Speaker Rear Speaker Rear Speaker Rear Speaker Out Out Out Out Gray - - -
... Speaker Out Out Only Windows Vista or later version operating system supports 10-channel audio configuration. 2.7.2 Audio I/O connections Audio I/O ports Connect to Headphone and Mic ASUS P7F7-E WS Supercomputer 2-33 Rear Speaker Rear Speaker Rear Speaker Rear Speaker Out Out Out Out Gray - - -
User Manual
Page 59
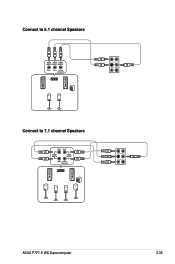
Connect to 5.1 channel Speakers Connect to 7.1 channel Speakers ASUS P7F7-E WS Supercomputer 2-35
Connect to 5.1 channel Speakers Connect to 7.1 channel Speakers ASUS P7F7-E WS Supercomputer 2-35

User Manual
Page 61
... IDE mode by default. In Standard IDE mode, you intend to create a Serial ATA RAID set the Configure SATA as in the BIOS to [AHCI]. ASUS P7F7-E WS Supercomputer 2-37 2.7.3 Internal connectors 1.
... IDE mode by default. In Standard IDE mode, you intend to create a Serial ATA RAID set the Configure SATA as in the BIOS to [AHCI]. ASUS P7F7-E WS Supercomputer 2-37 2.7.3 Internal connectors 1.

User Manual
Page 63
... (USB, blue) first, and then install the Q-Connector (USB) to a slot opening at the back of the system chassis. ASUS P7F7-E WS Supercomputer 2-39 3. ��U��S�B��c�o�n�n�e�c�to�r�s�a�n��d�p�o�r�t&#...
... (USB, blue) first, and then install the Q-Connector (USB) to a slot opening at the back of the system chassis. ASUS P7F7-E WS Supercomputer 2-39 3. ��U��S�B��c�o�n�n�e�c�to�r�s�a�n��d�p�o�r�t&#...

User Manual
Page 65
Optical drive audio connector (4-pin CD) These connectors allow you to [AC97]. ASUS P7F7-E WS Supercomputer 2-41 if you want to connect an AC'97 front panel audio module to this connector. • We recommend that supports either HD Audio or ...
Optical drive audio connector (4-pin CD) These connectors allow you to [AC97]. ASUS P7F7-E WS Supercomputer 2-41 if you want to connect an AC'97 front panel audio module to this connector. • We recommend that supports either HD Audio or ...


