
User Manual
Page 6
... DVD information 4-1 4.2.1 Running the support DVD 4-1 4.2.2 Obtaining the software manuals 4-2 4.3 Software information 4-3 4.3.1 ASUS PC Probe II 4-3 4.3.2 ASUS AI Suite 4-4 4.3.3 ASUS EPU 4-5 4.3.4 ASUS Fan Xpert 4-6 4.3.5 ASUS TurboV 4-7 4.3.6 ASUS Express Gate SSD 4-8 4.3.7 Audio configurations 4-9 4.4 RAID configurations 4-10 4.4.1 RAID definitions 4-10 4.4.2 Installing Serial ATA hard disks 4-11 4.4.3 Setting the RAID item in BIOS 4-11 4.4.4 Intel® Matrix Storage Manager option ROM utility...
... DVD information 4-1 4.2.1 Running the support DVD 4-1 4.2.2 Obtaining the software manuals 4-2 4.3 Software information 4-3 4.3.1 ASUS PC Probe II 4-3 4.3.2 ASUS AI Suite 4-4 4.3.3 ASUS EPU 4-5 4.3.4 ASUS Fan Xpert 4-6 4.3.5 ASUS TurboV 4-7 4.3.6 ASUS Express Gate SSD 4-8 4.3.7 Audio configurations 4-9 4.4 RAID configurations 4-10 4.4.1 RAID definitions 4-10 4.4.2 Installing Serial ATA hard disks 4-11 4.4.3 Setting the RAID item in BIOS 4-11 4.4.4 Intel® Matrix Storage Manager option ROM utility...
User Manual
Page 11
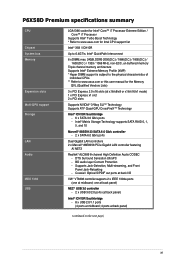
... Panel Jack-Retasking - Intel® QuickPath Interconnect 6 x DIMM, max. 24GB, DDR3 2000(O.C.) / 1866(O.C.) / 1800(O.C.) / 1600(O.C.) / 1333...asus.com or this user manual for Intel CPU support list Intel® X58 / ICH10R Up to www.asus.com for the Memory QVL (Qualified Vendors Lists) 3 x PCI...PCIe Gigabit LAN controller featuring AI NET2 Realtek® ALC889 8-channel High Definition Audio CODEC - BD audio layer Content Protection - P6X58D Premium specifications summary CPU Chipset System bus Memory Expansion slots Multi-GPU support Storage LAN Audio IEEE 1394 USB LGA1366...
... Panel Jack-Retasking - Intel® QuickPath Interconnect 6 x DIMM, max. 24GB, DDR3 2000(O.C.) / 1866(O.C.) / 1800(O.C.) / 1600(O.C.) / 1333...asus.com or this user manual for Intel CPU support list Intel® X58 / ICH10R Up to www.asus.com for the Memory QVL (Qualified Vendors Lists) 3 x PCI...PCIe Gigabit LAN controller featuring AI NET2 Realtek® ALC889 8-channel High Definition Audio CODEC - BD audio layer Content Protection - P6X58D Premium specifications summary CPU Chipset System bus Memory Expansion slots Multi-GPU support Storage LAN Audio IEEE 1394 USB LGA1366...
User Manual
Page 49
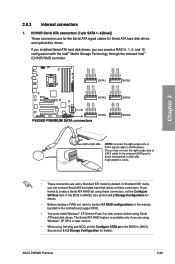
...to create a Serial ATA RAID set to [AHCI]. If you are for the Serial ATA signal cables for Serial ATA hard disk drives and optical disc drives. In Standard IDE mode, you can connect Serial ATA boot/data hard disk drives to [RAID]. ASUS P6X58D Premium 2-29 See section 3.4.2 ...Storage Configuration for details. • Before creating a RAID set the Configure SATA as in the BIOS to Standard IDE mode by default. If you installed ...
...to create a Serial ATA RAID set to [AHCI]. If you are for the Serial ATA signal cables for Serial ATA hard disk drives and optical disc drives. In Standard IDE mode, you can connect Serial ATA boot/data hard disk drives to [RAID]. ASUS P6X58D Premium 2-29 See section 3.4.2 ...Storage Configuration for details. • Before creating a RAID set the Configure SATA as in the BIOS to Standard IDE mode by default. If you installed ...
User Manual
Page 68
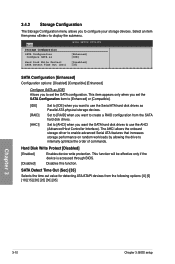
... storage performance on random workloads by allowing the drive to display the submenu. Set to [RAID] when you to set the SATA Configuration item to [Enhanced] or [Compatible]. [IDE] [RAID] [AHCI] Set to [IDE] when you to create a RAID configuration from the following options: [0] [5] [10] [15] [20] [25] [30] [35] Chapter 3 3-10 Chapter...
... storage performance on random workloads by allowing the drive to display the submenu. Set to [RAID] when you to set the SATA Configuration item to [Enhanced] or [Compatible]. [IDE] [RAID] [AHCI] Set to [IDE] when you to create a RAID configuration from the following options: [0] [5] [10] [15] [20] [25] [30] [35] Chapter 3 3-10 Chapter...
User Manual
Page 97
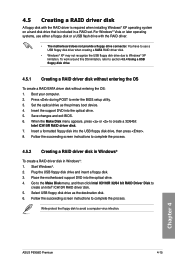
... the drivers, software applications, and utilities that the motherboard supports. Install the necessary drivers to create the RAID/AHCI driver disk. The Manual menu contains the list of your computer. The Make Disk menu contains items... Always install the latest OS version and corresponding updates to install. Click an icon to change at www.asus.com for reference only. Use the setup procedures presented in your hardware. • Motherboard settings and hardware ... 4.2.1 Running the support DVD Place the support DVD into the optical drive. ASUS P6X58D Premium 4-1
... the drivers, software applications, and utilities that the motherboard supports. Install the necessary drivers to create the RAID/AHCI driver disk. The Manual menu contains the list of your computer. The Make Disk menu contains items... Always install the latest OS version and corresponding updates to install. Click an icon to change at www.asus.com for reference only. Use the setup procedures presented in your hardware. • Motherboard settings and hardware ... 4.2.1 Running the support DVD Place the support DVD into the optical drive. ASUS P6X58D Premium 4-1
User Manual
Page 106
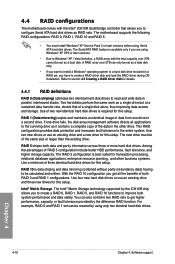
... Windows® operating system to a hard disk drive included in a RAID set, you to create a RAID 0, RAID 1, RAID 5, and RAID 10 functions to section 4.5 Creating a RAID driver disk for this setup. A RAID array over 2TB cannot be calculated and written. Refer to improve both ... 4 4-10 Chapter 4: Software support This RAID configuration provides data protection and increases fault tolerance to create a RAID driver disk and load the RAID driver during OS installation. RAID 5 stripes both RAID 0 and RAID 1 configurations. The RAID 5 configuration is required for this setup. ...
... Windows® operating system to a hard disk drive included in a RAID set, you to create a RAID 0, RAID 1, RAID 5, and RAID 10 functions to section 4.5 Creating a RAID driver disk for this setup. A RAID array over 2TB cannot be calculated and written. Refer to improve both ... 4 4-10 Chapter 4: Software support This RAID configuration provides data protection and increases fault tolerance to create a RAID driver disk and load the RAID driver during OS installation. RAID 5 stripes both RAID 0 and RAID 1 configurations. The RAID 5 configuration is required for this setup. ...
User Manual
Page 107
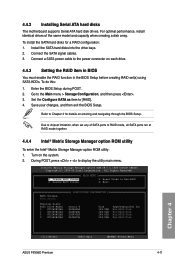
...2003-08 Intel Corporation. Install the SATA hard disks into the drive bays. 2. Turn on entering and navigating through the BIOS Setup. Delete RAID Volume 3. Refer to display the utility main menu. Reset Disks to the Main menu > Storage Configuration, and then press . 3. Physical ...(Vol ID) Non-RAID Disk Non-RAID Disk Non-RAID Disk Non-RAID Disk Chapter 4 [↑↓]-Select [ESC]-Exit [ENTER]-Select Menu ASUS P6X58D Premium 4-11 Go to Non-RAID 4. For optimal performance, install identical drives of SATA ports to RAID mode, all SATA ports run at RAID mode together. 4.4.4 ...
...2003-08 Intel Corporation. Install the SATA hard disks into the drive bays. 2. Turn on entering and navigating through the BIOS Setup. Delete RAID Volume 3. Refer to display the utility main menu. Reset Disks to the Main menu > Storage Configuration, and then press . 3. Physical ...(Vol ID) Non-RAID Disk Non-RAID Disk Non-RAID Disk Non-RAID Disk Chapter 4 [↑↓]-Select [ESC]-Exit [ENTER]-Select Menu ASUS P6X58D Premium 4-11 Go to Non-RAID 4. For optimal performance, install identical drives of SATA ports to RAID mode, all SATA ports run at RAID mode together. 4.4.4 ...

User Manual
Page 108
...ST3160812AS 3 ST3160812AS [ SELECT DISKS ] Serial # 9LS0HJA4 9LS0F4HL 3LS0JYL8 9LS0BJ5H Size 149.0GB 149.0GB 149.0GB 149.0GB Status Non-RAID Disk Non-RAID Disk Non-RAID Disk Non-RAID Disk Select 2 to 6 disks to move through the menus and select the menu options. All Rights Reserved. [ CREATE VOLUME ... unique volume name that has no special characters and is selected, press the up/down arrow key to select a RAID level to create, and then press . 4. When the RAID Level item is 16 characters or less. [↑↓]Change [TAB]-Next [ESC]-Previous Menu [ENTER]-Select 2. The...
...ST3160812AS 3 ST3160812AS [ SELECT DISKS ] Serial # 9LS0HJA4 9LS0F4HL 3LS0JYL8 9LS0BJ5H Size 149.0GB 149.0GB 149.0GB 149.0GB Status Non-RAID Disk Non-RAID Disk Non-RAID Disk Non-RAID Disk Select 2 to 6 disks to move through the menus and select the menu options. All Rights Reserved. [ CREATE VOLUME ... unique volume name that has no special characters and is selected, press the up/down arrow key to select a RAID level to create, and then press . 4. When the RAID Level item is 16 characters or less. [↑↓]Change [TAB]-Next [ESC]-Previous Menu [ENTER]-Select 2. The...

User Manual
Page 109
... WILL BE LOST. When the Create Volume item is selected, enter the RAID volume capacity that you want and press . Chapter 4 ASUS P6X58D Premium 4-13 The following are typical values: RAID 0: 128KB RAID 10: 64KB RAID 5: 64KB We recommend a lower stripe size for server systems, and a... higher stripe size for multimedia computer systems used mainly for RAID 0, 10 and 5 only),and then press...
... WILL BE LOST. When the Create Volume item is selected, enter the RAID volume capacity that you want and press . Chapter 4 ASUS P6X58D Premium 4-13 The following are typical values: RAID 0: 128KB RAID 10: 64KB RAID 5: 64KB We recommend a lower stripe size for server systems, and a... higher stripe size for multimedia computer systems used mainly for RAID 0, 10 and 5 only),and then press...

User Manual
Page 110
...Capacity 298.0GB Status Normal Bootable Yes [ HELP ] Deleting a volume will lose all data on the hard disk drives when you want to non-RAID. The following screen appears: Intel(R) Matrix Storage Manager option ROM v8.0.0.1038 ICH10R wRAID5 Copyright(C) 2003-08 Intel Corporation. To delete... appears: [ CONFIRM EXIT ] Are you sure you want to the DELETE VOLUME menu. From the utility main menu, select 2. Press to delete the RAID set . Are you sure you want to the utility main menu. 4-14 Chapter 4: Software support Chapter 4 Press to exit or press to return to...
...Capacity 298.0GB Status Normal Bootable Yes [ HELP ] Deleting a volume will lose all data on the hard disk drives when you want to non-RAID. The following screen appears: Intel(R) Matrix Storage Manager option ROM v8.0.0.1038 ICH10R wRAID5 Copyright(C) 2003-08 Intel Corporation. To delete... appears: [ CONFIRM EXIT ] Are you sure you want to the DELETE VOLUME menu. From the utility main menu, select 2. Press to delete the RAID set . Are you sure you want to the utility main menu. 4-14 Chapter 4: Software support Chapter 4 Press to exit or press to return to...
User Manual
Page 111
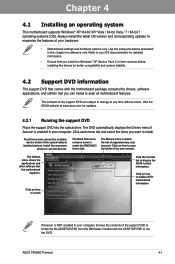
... Disk menu appears, press or to section 4.5.4 Using a USB floppy disk drive. 4.5.1 Creating a RAID driver disk without entering the OS To create a RAID/SATA driver disk without entering the OS: 1. Chapter 4 ASUS P6X58D Premium 4-15 4.5 Creating a RAID driver disk A floppy disk with the RAID driver. • The motherboard does not provide a floppy drive connector. For Windows®...
... Disk menu appears, press or to section 4.5.4 Using a USB floppy disk drive. 4.5.1 Creating a RAID driver disk without entering the OS To create a RAID/SATA driver disk without entering the OS: 1. Chapter 4 ASUS P6X58D Premium 4-15 4.5 Creating a RAID driver disk A floppy disk with the RAID driver. • The motherboard does not provide a floppy drive connector. For Windows®...
User Manual
Page 112
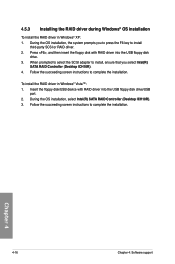
... the USB floppy disk drive. 3. Follow the succeeding screen instructions to complete the installation. Insert the floppy disk/USB device with RAID driver into the USB floppy disk drive/USB port. 2. Follow the succeeding screen instructions to complete the installation. When prompted to ...select the SCSI adapter to install third-party SCSI or RAID driver. 2. During the OS installation, the system prompts you to press the F6 key to install, ensure that you select Intel(R) SATA...
... the USB floppy disk drive. 3. Follow the succeeding screen instructions to complete the installation. Insert the floppy disk/USB device with RAID driver into the USB floppy disk drive/USB port. 2. Follow the succeeding screen instructions to complete the installation. When prompted to ...select the SCSI adapter to install third-party SCSI or RAID driver. 2. During the OS installation, the system prompts you to press the F6 key to install, ensure that you select Intel(R) SATA...

User Manual
Page 113
... from the pop-up window. Double-click the file. Chapter 4 ASUS P6X58D Premium 4-17 Using another computer, plug the USB floppy disk drive, and insert the floppy disk containing the RAID driver. 2. Refer to the floppy disk containing the RAID driver. To solve this issue, add the USB floppy disk drive's... Vendor ID (VID) and Product ID (PID) to the steps below: 1. A window appears, allowing you install the RAID driver from the pop-up window. Right-click My Computer on the Windows® desktop or start menu, and then select Manage from a floppy disk...
... from the pop-up window. Double-click the file. Chapter 4 ASUS P6X58D Premium 4-17 Using another computer, plug the USB floppy disk drive, and insert the floppy disk containing the RAID driver. 2. Refer to the floppy disk containing the RAID driver. To solve this issue, add the USB floppy disk drive's... Vendor ID (VID) and Product ID (PID) to the steps below: 1. A window appears, allowing you install the RAID driver from the pop-up window. Right-click My Computer on the Windows® desktop or start menu, and then select Manage from a floppy disk...


