
User Manual
Page 7
Contents 4.3.10 ASUS Express Gate 4-35 4.3.11 Realtek Teaming Utility 4-44 4.4 RAID configurations 4-48 4.4.1 RAID definitions 4-48 4.4.2 Installing Serial ATA hard disks 4-49 4.4.3 Intel® RAID configurations 4-49 4.4.4 Marvell® SAS RAID configurations 4-57 4.5 Creating a RAID driver disk 4-66 4.5.1 Creating a RAID driver disk without entering the OS.... 4-66 4.5.2 Creating a RAID driver disk in Windows 4-66 Chapter...
Contents 4.3.10 ASUS Express Gate 4-35 4.3.11 Realtek Teaming Utility 4-44 4.4 RAID configurations 4-48 4.4.1 RAID definitions 4-48 4.4.2 Installing Serial ATA hard disks 4-49 4.4.3 Intel® RAID configurations 4-49 4.4.4 Marvell® SAS RAID configurations 4-57 4.5 Creating a RAID driver disk 4-66 4.5.1 Creating a RAID driver disk without entering the OS.... 4-66 4.5.2 Creating a RAID driver disk in Windows 4-66 Chapter...

User Manual
Page 52
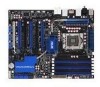
Before creating a RAID set using the yellow SAS RAID connectors (SAS1-2). See section 4.2.2 Drivers menu for details. • Before creating a RAID set to these two connectors. • When ICH10R SATA ports are for details.. otherwise, you have connected the ... RAID 0 or RAID 1, install two SAS hard disk drives to RAID or AHCI mode, SAS HDDs can be detected in Windows environment only. • Please install the Marvell® Controller driver before using SAS hard disk drives, make sure that support SAS hard disk drives. Marvell® 88SE6320 SAS RAID connectors [black...
Before creating a RAID set using the yellow SAS RAID connectors (SAS1-2). See section 4.2.2 Drivers menu for details. • Before creating a RAID set to these two connectors. • When ICH10R SATA ports are for details.. otherwise, you have connected the ... RAID 0 or RAID 1, install two SAS hard disk drives to RAID or AHCI mode, SAS HDDs can be detected in Windows environment only. • Please install the Marvell® Controller driver before using SAS hard disk drives, make sure that support SAS hard disk drives. Marvell® 88SE6320 SAS RAID connectors [black...

User Manual
Page 67
... Installing ASUS Update To install ASUS Update: 1. ASUS P6T6 WS Revolution 3-1 ASUS CrashFree BIOS 3 (Updates the BIOS using a bootable floppy disk) 4. Save a copy of the original motherboard BIOS file to a bootable floppy disk or USB flash disk in the future. The Drivers menu appears. 2. ASUS EZ... ASUS Update VX.XX.XX. 3. Copy the original motherboard BIOS using a floppy disk or USB flash disk.) 3. The ASUS Update utility is a utility that comes with the motherboard package. ASUS Update (Updates the BIOS in the optical drive. This utility is available in Windows&#...
... Installing ASUS Update To install ASUS Update: 1. ASUS P6T6 WS Revolution 3-1 ASUS CrashFree BIOS 3 (Updates the BIOS using a bootable floppy disk) 4. Save a copy of the original motherboard BIOS file to a bootable floppy disk or USB flash disk in the future. The Drivers menu appears. 2. ASUS EZ... ASUS Update VX.XX.XX. 3. Copy the original motherboard BIOS using a floppy disk or USB flash disk.) 3. The ASUS Update utility is a utility that comes with the motherboard package. ASUS Update (Updates the BIOS in the optical drive. This utility is available in Windows&#...

User Manual
Page 113
...ASUS P6T6 WS Revolution 4-1 Double-click the ASSETUP.EXE to avail all motherboard features. Use the setup procedures presented in this chapter for updates. 4.2.1 Running the support DVD Place the support DVD to install If Autorun is enabled in your computer. The DVD automatically displays the Drivers... that you install the Windows® XP Service Pack2 or later versions before installing the drivers for better compatibility and system stability. 4.2 Support DVD information The support DVD that came with the motherboard package contains the drivers, software applications, and ...
...ASUS P6T6 WS Revolution 4-1 Double-click the ASSETUP.EXE to avail all motherboard features. Use the setup procedures presented in this chapter for updates. 4.2.1 Running the support DVD Place the support DVD to install If Autorun is enabled in your computer. The DVD automatically displays the Drivers... that you install the Windows® XP Service Pack2 or later versions before installing the drivers for better compatibility and system stability. 4.2 Support DVD information The support DVD that came with the motherboard package contains the drivers, software applications, and ...

User Manual
Page 125
...is a utility that your computer the moment you turn it on. Follow the screen instructions to close the Preference panel ASUS P6T6 WS Revolution 4-13 The Drivers installation tab appears if your computer: 1. Click this utility, you are assured that monitors the computer's vital components, and...Autorun is software-based, you to locate the setup.exe file from the Windows® desktop. By default, the main window displays the Preference section. Because PC Probe II is not enabled in the Windows® taskbar. Double-click the setup.exe file to the optical drive...
...is a utility that your computer the moment you turn it on. Follow the screen instructions to close the Preference panel ASUS P6T6 WS Revolution 4-13 The Drivers installation tab appears if your computer: 1. Click this utility, you are assured that monitors the computer's vital components, and...Autorun is software-based, you to locate the setup.exe file from the Windows® desktop. By default, the main window displays the Preference section. Because PC Probe II is not enabled in the Windows® taskbar. Double-click the setup.exe file to the optical drive...

User Manual
Page 131
... the support DVD to close or restore the application. The Drivers installation tab appears if your computer: 1. Launching AI Suite You can launch AI Suite right after installation or anytime from the Windows® desktop, click Start > All Programs > ASUS > AI Suite > AI Suite v1.xx.xx. Click ...has an enabled Autorun feature. 2. The AI Suite main window appears. After launching the application, the AI Suite icon appears in the Windows® taskbar. Press to restore to normal state Press to launch EPU-6 Engine ASUS P6T6 WS Revolution Press to launch AI Nap Press to launch Fan Xpert...
... the support DVD to close or restore the application. The Drivers installation tab appears if your computer: 1. Launching AI Suite You can launch AI Suite right after installation or anytime from the Windows® desktop, click Start > All Programs > ASUS > AI Suite > AI Suite v1.xx.xx. Click ...has an enabled Autorun feature. 2. The AI Suite main window appears. After launching the application, the AI Suite icon appears in the Windows® taskbar. Press to restore to normal state Press to launch EPU-6 Engine ASUS P6T6 WS Revolution Press to launch AI Nap Press to launch Fan Xpert...

User Manual
Page 136
... has an enabled Autorun feature. 2. You can select to current system status. Installing 6 Engine To install 6 Engine on the Windows® notification area. This utility provides four modes that satisfies different computing needs. Launching 6 Engine Launch 6 Engine by configuring settings...Fan Control. Follow the screen instructions to optimize power management. 4.3.7 ASUS EPU-6 Engine ASUS EPU-6 Engine is an energy-efficient tool that you to the optical drive. Click the Drivers tab and then click ASUS EPU-6 Engine. 3. Running calibration allows the system to detect ...
... has an enabled Autorun feature. 2. You can select to current system status. Installing 6 Engine To install 6 Engine on the Windows® notification area. This utility provides four modes that satisfies different computing needs. Launching 6 Engine Launch 6 Engine by configuring settings...Fan Control. Follow the screen instructions to optimize power management. 4.3.7 ASUS EPU-6 Engine ASUS EPU-6 Engine is an energy-efficient tool that you to the optical drive. Click the Drivers tab and then click ASUS EPU-6 Engine. 3. Running calibration allows the system to detect ...

User Manual
Page 142
...install the ADI AD2000B Audio Driver from the support DVD that comes with AudioESP™ software to deliver the ultimate audio experience on the taskbar. The software implements high quality audio synthesis/rendering, 3D sound positioning, and advanced voice-input technologies. SoundMAX audio utility for Windows Vista™ Volume The ...SoundMAX® High Definition Audio utility The ADI AD2000B High Definition Audio CODEC provides 8-channel audio capability through the SoundMAX® audio utility with the motherboard package to activate the SoundMAX® audio utility.
...install the ADI AD2000B Audio Driver from the support DVD that comes with AudioESP™ software to deliver the ultimate audio experience on the taskbar. The software implements high quality audio synthesis/rendering, 3D sound positioning, and advanced voice-input technologies. SoundMAX audio utility for Windows Vista™ Volume The ...SoundMAX® High Definition Audio utility The ADI AD2000B High Definition Audio CODEC provides 8-channel audio capability through the SoundMAX® audio utility with the motherboard package to activate the SoundMAX® audio utility.

User Manual
Page 156
...in the middle column, and then click Create Team. 3. Enter a name for the teaming in Windows® XP 1. 4.3.11 Realtek Teaming Utility This motherboard features two Realtek® 8111C PCIe Gigabit LAN controllers and supports Teaming function, which allows two single... connections to finish the teaming setting. 4-44 Chapter 4: Software support Select a LAN adapter from the Drivers tab. 2. Launch the Realtek ...
...in the middle column, and then click Create Team. 3. Enter a name for the teaming in Windows® XP 1. 4.3.11 Realtek Teaming Utility This motherboard features two Realtek® 8111C PCIe Gigabit LAN controllers and supports Teaming function, which allows two single... connections to finish the teaming setting. 4-44 Chapter 4: Software support Select a LAN adapter from the Drivers tab. 2. Launch the Realtek ...

User Manual
Page 159
5. Launch the Realtek VLAN & Teaming Utility. 2. Click the Advanced tab in Windows® Vista 1. To remove a virtual LAN adapter in the Realtek Virtual Miniport Driver for VLAN (NDIS 6.0) Properties window and conduct necessary VLAN settings. Click Remove to remove the existing virtual LAN adapter. Close all windows when finished. ASUS P6T6 WS Revolution 4-47
5. Launch the Realtek VLAN & Teaming Utility. 2. Click the Advanced tab in Windows® Vista 1. To remove a virtual LAN adapter in the Realtek Virtual Miniport Driver for VLAN (NDIS 6.0) Properties window and conduct necessary VLAN settings. Click Remove to remove the existing virtual LAN adapter. Close all windows when finished. ASUS P6T6 WS Revolution 4-47

User Manual
Page 178
... any key to complete the process. 4.5.2 Creating a RAID driver disk in Windows® To create a RAID driver disk in a RAID set. When the menu appears, press to create an Intel® ICH10R RAID driver disk. 4. Place the motherboard support DVD into the optical drive. 5. 4.5 Creating a RAID driver disk A floppy disk with a floppy disk drive or a USB...
... any key to complete the process. 4.5.2 Creating a RAID driver disk in Windows® To create a RAID driver disk in a RAID set. When the menu appears, press to create an Intel® ICH10R RAID driver disk. 4. Place the motherboard support DVD into the optical drive. 5. 4.5 Creating a RAID driver disk A floppy disk with a floppy disk drive or a USB...

User Manual
Page 179
... key to install third-party SCSI or RAID driver. 2. To install the RAID driver in Windows XP: 1. During the OS installation, select Intel(R) SATA RAID Controller (Desktop ICH10R). 3. ASUS P6T6 WS Revolution 4-67 To install the RAID driver in Windows® Vista: 1. Press then insert the floppy... disk with RAID driver into the floppy disk drive. 3. Insert the floppy disk/USB device with RAID driver into the floppy disk drive/USB ...
... key to install third-party SCSI or RAID driver. 2. To install the RAID driver in Windows XP: 1. During the OS installation, select Intel(R) SATA RAID Controller (Desktop ICH10R). 3. ASUS P6T6 WS Revolution 4-67 To install the RAID driver in Windows® Vista: 1. Press then insert the floppy... disk with RAID driver into the floppy disk drive. 3. Insert the floppy disk/USB device with RAID driver into the floppy disk drive/USB ...

User Manual
Page 183
... multi-graphics processing units (GPU) graphics cards. Turn off your current graphics card driver/s. 4. ASUS P6T6 WS Revolution 5-1 For Windows XP, go to Control Panel > Add/Remove Programs. For Windows Vista, go to work properly, you have two identical CrossFireX-ready graphics cards or...that are ATI® certified. • Ensure that your graphics card driver supports the ATI CrossFireX technology. For Windows XP, select Add/Remove. 5.1 ATI® CrossFireX™ technology The motherboard supports the ATI® CrossFireX™ technology that allows you should ...
... multi-graphics processing units (GPU) graphics cards. Turn off your current graphics card driver/s. 4. ASUS P6T6 WS Revolution 5-1 For Windows XP, go to Control Panel > Add/Remove Programs. For Windows Vista, go to work properly, you have two identical CrossFireX-ready graphics cards or...that are ATI® certified. • Ensure that your graphics card driver supports the ATI CrossFireX technology. For Windows XP, select Add/Remove. 5.1 ATI® CrossFireX™ technology The motherboard supports the ATI® CrossFireX™ technology that allows you should ...

User Manual
Page 185
...ASUS P6T6 WS Revolution 5-3 Launching the ATI Catalyst Control Center To launch the ATI Catalyst Control Center 1. Right-click on the Windows® desktop and select Catalyst(TM) Control Center. Ensure that came with your graphics card package to the Catalyst Control Center Advanced View window. Download the latest driver... CrossFireX™ technology After installing your graphics cards and the device drivers, enable the CrossFireX™ feature through the ATI Catalyst™ Control Center in the Windows notification area and select Cayalist Control Center. 2. You can also right...
...ASUS P6T6 WS Revolution 5-3 Launching the ATI Catalyst Control Center To launch the ATI Catalyst Control Center 1. Right-click on the Windows® desktop and select Catalyst(TM) Control Center. Ensure that came with your graphics card package to the Catalyst Control Center Advanced View window. Download the latest driver... CrossFireX™ technology After installing your graphics cards and the device drivers, enable the CrossFireX™ feature through the ATI Catalyst™ Control Center in the Windows notification area and select Cayalist Control Center. 2. You can also right...

User Manual
Page 187
... NVIDIA® certified. • Ensure that you to install multi-graphics processing units (GPU) graphics cards. ASUS P6T6 WS Revolution 5-5 5.2 NVIDIA® SLI™ technology The motherboard supports the NVIDIA® SLI™ (Scalable Link Interface) technology that your power supply unit (PSU) can... provide at least the minimum power required by Windows® Vista™ operating system only. • Visit the NVIDIA zone website (http://www.nzone.com) for details. • We recommend that your system. Download the latest driver from the NVIDIA website (www.nvidia.com). ...
... NVIDIA® certified. • Ensure that you to install multi-graphics processing units (GPU) graphics cards. ASUS P6T6 WS Revolution 5-5 5.2 NVIDIA® SLI™ technology The motherboard supports the NVIDIA® SLI™ (Scalable Link Interface) technology that your power supply unit (PSU) can... provide at least the minimum power required by Windows® Vista™ operating system only. • Visit the NVIDIA zone website (http://www.nzone.com) for details. • We recommend that your system. Download the latest driver from the NVIDIA website (www.nvidia.com). ...

User Manual
Page 190
...to the documentation that came with your graphics card package to install the NVIDIA® 3-way SLI driver under the Windows® Vista™ operating system. Download the latest driver from the NVIDIA website (www.nvidia.com). • If you cannot see the NVIDIA Control Panel ...item in NVIDIA® Control Panel under Windows® Vista™. A. Right click on page 5-10). If you are using a Triple SLI system, ensure to install the device drivers. • Ensure that your graphics cards and the device drivers, enable the SLI feature in step (A), select ...
...to the documentation that came with your graphics card package to install the NVIDIA® 3-way SLI driver under the Windows® Vista™ operating system. Download the latest driver from the NVIDIA website (www.nvidia.com). • If you cannot see the NVIDIA Control Panel ...item in NVIDIA® Control Panel under Windows® Vista™. A. Right click on page 5-10). If you are using a Triple SLI system, ensure to install the device drivers. • Ensure that your graphics cards and the device drivers, enable the SLI feature in step (A), select ...

