
User Manual
Page 2
...TO CHANGE AT ANY TIME WITHOUT NOTICE, AND SHOULD NOT BE CONSTRUED AS A COMMITMENT BY ASUS. ASUS ASSUMES NO RESPONSIBILITY OR LIABILITY FOR ANY ERRORS OR INACCURACIES THAT MAY APPEAR IN THIS MANUAL, INCLUDING THE PRODUCTS AND SOFTWARE DESCRIBED IN IT. or (2) the serial number of ASUSTeK COMPUTER... by any language in writing by the purchaser for identification or explanation and to the owners' benefit, without intent to infringe. ASUS PROVIDES THIS MANUAL "AS IS" WITHOUT WARRANTY OF ANY KIND, EITHER EXPRESS OR IMPLIED, INCLUDING BUT NOT LIMITED TO THE IMPLIED WARRANTIES OR CONDITIONS...
...TO CHANGE AT ANY TIME WITHOUT NOTICE, AND SHOULD NOT BE CONSTRUED AS A COMMITMENT BY ASUS. ASUS ASSUMES NO RESPONSIBILITY OR LIABILITY FOR ANY ERRORS OR INACCURACIES THAT MAY APPEAR IN THIS MANUAL, INCLUDING THE PRODUCTS AND SOFTWARE DESCRIBED IN IT. or (2) the serial number of ASUSTeK COMPUTER... by any language in writing by the purchaser for identification or explanation and to the owners' benefit, without intent to infringe. ASUS PROVIDES THIS MANUAL "AS IS" WITHOUT WARRANTY OF ANY KIND, EITHER EXPRESS OR IMPLIED, INCLUDING BUT NOT LIMITED TO THE IMPLIED WARRANTIES OR CONDITIONS...
User Manual
Page 6
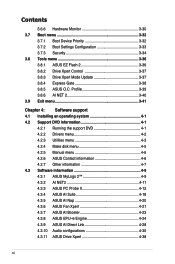
... 4-1 4.2.1 Running the support DVD 4-1 4.2.2 Drivers menu 4-2 4.2.3 Utilities menu 4-3 4.2.4 Make disk menu 4-5 4.2.5 Manual menu 4-6 4.2.6 ASUS Contact information 4-6 4.2.7 Other information 4-7 4.3 Software information 4-9 4.3.1 ASUS MyLogo 2 4-9 4.3.2 AI NET2 4-11 4.3.3 ASUS PC Probe II 4-12 4.3.4 ASUS AI Suite 4-18 4.3.5 ASUS AI Nap 4-20 4.3.6 ASUS Fan Xpert 4-21 4.3.7 ASUS AI Booster 4-23 4.3.8 ASUS EPU-6 Engine 4-24 4.3.9 ASUS AI Direct Link 4-28 4.3.10 Audio configurations 4-30 4.3.11...
... 4-1 4.2.1 Running the support DVD 4-1 4.2.2 Drivers menu 4-2 4.2.3 Utilities menu 4-3 4.2.4 Make disk menu 4-5 4.2.5 Manual menu 4-6 4.2.6 ASUS Contact information 4-6 4.2.7 Other information 4-7 4.3 Software information 4-9 4.3.1 ASUS MyLogo 2 4-9 4.3.2 AI NET2 4-11 4.3.3 ASUS PC Probe II 4-12 4.3.4 ASUS AI Suite 4-18 4.3.5 ASUS AI Nap 4-20 4.3.6 ASUS Fan Xpert 4-21 4.3.7 ASUS AI Booster 4-23 4.3.8 ASUS EPU-6 Engine 4-24 4.3.9 ASUS AI Direct Link 4-28 4.3.10 Audio configurations 4-30 4.3.11...
User Manual
Page 9
If possible, disconnect all power cables from the existing system before you are using the product, make sure all the manuals that came with the product, contact a qualified service technician or your retailer. Do not place the product in municipal waste. Check ... contact your area. If you encounter technical problems with the package. • Before using , contact your retailer. Operation safety • Before installing the motherboard and adding devices on a stable surface. • If you detect any area where it may become wet. • Place the product on it by...
If possible, disconnect all power cables from the existing system before you are using the product, make sure all the manuals that came with the product, contact a qualified service technician or your retailer. Do not place the product in municipal waste. Check ... contact your area. If you encounter technical problems with the package. • Before using , contact your retailer. Operation safety • Before installing the motherboard and adding devices on a stable surface. • If you detect any area where it may become wet. • Place the product on it by...
User Manual
Page 11
... sure that you MUST follow to complete a task. IMPORTANT: Instructions that you perform certain tasks properly, take note of the following symbols used in this manual. Example: Means that you complete a task. Typography Bold text Italics Command Indicates a menu or an item to help you must press the Enter or Return...
... sure that you MUST follow to complete a task. IMPORTANT: Instructions that you perform certain tasks properly, take note of the following symbols used in this manual. Example: Means that you complete a task. Typography Bold text Italics Command Indicates a menu or an item to help you must press the Enter or Return...
User Manual
Page 12
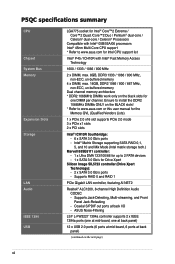
...0,1, 5, and 10 and Mix Mode (Intel matrix storage tech.) Marvell 88SE6111 controller: - 1 x Ultra DMA 133/100/66 for up to www.asus.com or this user manual for the Memory QVL (Qualified Vendors Lists). 1 x PCIe 2.0 x16 slot supports PCIe 2.0 mode 3 x PCIe x1 slots 2 x PCI slots Intel... NET2 Realtek® ALC1200, 8-channel High Definition Audio CODEC - Supports Jack-Detecting, Multi-streaming, and Front Panel Jack-Retasking - P5QC specifications summary CPU Chipset System Bus Memory Expansion Slots Storage LAN Audio IEEE 1394 USB LGA775 socket for Intel® Core™2 Extreme...
...0,1, 5, and 10 and Mix Mode (Intel matrix storage tech.) Marvell 88SE6111 controller: - 1 x Ultra DMA 133/100/66 for up to www.asus.com or this user manual for the Memory QVL (Qualified Vendors Lists). 1 x PCIe 2.0 x16 slot supports PCIe 2.0 mode 3 x PCIe x1 slots 2 x PCI slots Intel... NET2 Realtek® ALC1200, 8-channel High Definition Audio CODEC - Supports Jack-Detecting, Multi-streaming, and Front Panel Jack-Retasking - P5QC specifications summary CPU Chipset System Bus Memory Expansion Slots Storage LAN Audio IEEE 1394 USB LGA775 socket for Intel® Core™2 Extreme...
User Manual
Page 38
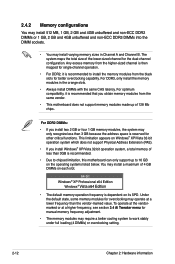
... If you obtain memory modules from the black slots for better overclocking capability. You may require a better cooling system to chipset limitation, this motherboard can only support up of 128 Mb chips. Any excess memory from the higher-sized channel is then mapped for single-channel operation. •...and non‑ECC DDR3 DIMMs into the DIMM sockets. • You may operate at a higher frequency, see section 3.4 Ai Tweaker menu for manual memory frequency adjustment. • The memory modules may install a maximum of 4 GB DIMMs on each slot. 64-bit Windows® XP Professional x64...
... If you obtain memory modules from the black slots for better overclocking capability. You may require a better cooling system to chipset limitation, this motherboard can only support up of 128 Mb chips. Any excess memory from the higher-sized channel is then mapped for single-channel operation. •...and non‑ECC DDR3 DIMMs into the DIMM sockets. • You may operate at a higher frequency, see section 3.4 Ai Tweaker menu for manual memory frequency adjustment. • The memory modules may install a maximum of 4 GB DIMMs on each slot. 64-bit Windows® XP Professional x64...
User Manual
Page 54
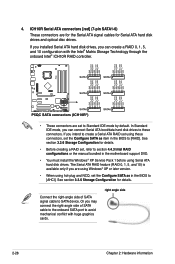
.... right angle side 2-28 Chapter 2: Hardware information In Standard IDE mode, you intend to create a Serial ATA RAID set the Configure SATA as in the motherboard support DVD. • You must install the Windows® XP Service Pack 1 before using these connectors. ICH10R Serial ATA connectors [red] (7-pin SATA1-6) These connectors... Intel® Matrix Storage Technology through the onboard Intel® ICH10R RAID controller. • These connectors are set to section 4.4.3 Intel RAID configurations or the manual bundled in the BIOS to [RAID].
.... right angle side 2-28 Chapter 2: Hardware information In Standard IDE mode, you intend to create a Serial ATA RAID set the Configure SATA as in the motherboard support DVD. • You must install the Windows® XP Service Pack 1 before using these connectors. ICH10R Serial ATA connectors [red] (7-pin SATA1-6) These connectors... Intel® Matrix Storage Technology through the onboard Intel® ICH10R RAID controller. • These connectors are set to section 4.4.3 Intel RAID configurations or the manual bundled in the BIOS to [RAID].

User Manual
Page 83
... system to malfunction. 3.4 Ai Tweaker menu The Ai Tweaker menu items allow you to individually set overclocking parameters. ASUS P5QC 3-15 OC Charger [Auto] Ai Clock Twister [Auto] Ai Transaction Booster [Auto] Options Manual Auto Select Screen Select Item Enter Go to achieve desired CPU internal frequency. Loads the optimal settings for the...
... system to malfunction. 3.4 Ai Tweaker menu The Ai Tweaker menu items allow you to individually set overclocking parameters. ASUS P5QC 3-15 OC Charger [Auto] Ai Clock Twister [Auto] Ai Transaction Booster [Auto] Options Manual Auto Select Screen Select Item Enter Go to achieve desired CPU internal frequency. Loads the optimal settings for the...
User Manual
Page 84
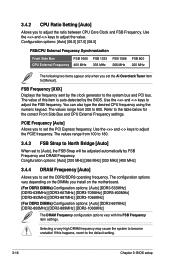
...Bridge [Auto] When set the Ai Overclock Tuner item to set the DDR2/DDR3 operating frequency. PCIE Frequency [Auto] Allows you to [Manual]. Selecting a very high DRAM frequency may cause the system to 800. Use the and keys to adjust the PCIE frequency. Use the ...Core Clock and FSB Frequency. Congifuration options: [Auto] [200 MHz] [266 MHz] [333 MHz] [400 MHz] 3.4.4 DRAM Frequency [Auto] Allows you install on the motherboard. (For DDR3 DIMMs) Configuration options: [Auto] [DDR3-533MHz] [DDR3-639MHz] [DDR3-667MHz] [DDR3-709MHz] [DDR3-800MHz] [DDR3-852MHz] [DDR3-887MHz] [DDR3-...
...Bridge [Auto] When set the Ai Overclock Tuner item to set the DDR2/DDR3 operating frequency. PCIE Frequency [Auto] Allows you to [Manual]. Selecting a very high DRAM frequency may cause the system to 800. Use the and keys to adjust the PCIE frequency. Use the ...Core Clock and FSB Frequency. Congifuration options: [Auto] [200 MHz] [266 MHz] [333 MHz] [400 MHz] 3.4.4 DRAM Frequency [Auto] Allows you install on the motherboard. (For DDR3 DIMMs) Configuration options: [Auto] [DDR3-533MHz] [DDR3-639MHz] [DDR3-667MHz] [DDR3-709MHz] [DDR3-800MHz] [DDR3-852MHz] [DDR3-887MHz] [DDR3-...
User Manual
Page 85
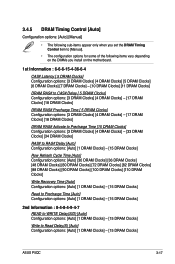
...; The following sub-items appear only when you set the DRAM Timing Control item to [Manual]. • The configuration options for some of the following items vary depending on the DIMMs you install on the motherboard. 1st Information : 6-6-6-15-4-36-6-4 CAS# Latency [ 5 DRAM Clocks] Configuration options: [3 DRAM Clocks] [4 DRAM Clocks] [5 DRAM Clocks... to WRITE Delay(S/D) [Auto] Configuration options: [Auto] [1 DRAM Clocks] - [15 DRAM Clocks] Write to Read Delay(S) [Auto] Configuration options: [Auto] [1 DRAM Clocks] - [15 DRAM Clocks] ASUS P5QC 3-17
...; The following sub-items appear only when you set the DRAM Timing Control item to [Manual]. • The configuration options for some of the following items vary depending on the DIMMs you install on the motherboard. 1st Information : 6-6-6-15-4-36-6-4 CAS# Latency [ 5 DRAM Clocks] Configuration options: [3 DRAM Clocks] [4 DRAM Clocks] [5 DRAM Clocks... to WRITE Delay(S/D) [Auto] Configuration options: [Auto] [1 DRAM Clocks] - [15 DRAM Clocks] Write to Read Delay(S) [Auto] Configuration options: [Auto] [1 DRAM Clocks] - [15 DRAM Clocks] ASUS P5QC 3-17
User Manual
Page 87
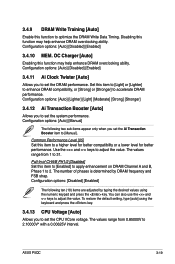
...) items are adjusted by DRAM frequency and FSB strap. The values range from 1 to adjust the value. 3.4.9 DRAM Write Training [Auto] Enable this function to [Manual]. ASUS P5QC 3-19 Pull-In of phases is determined by typing the desired values using the keyboard and press the key. 3.4.13 CPU Voltage [Auto] Allows you...
...) items are adjusted by DRAM frequency and FSB strap. The values range from 1 to adjust the value. 3.4.9 DRAM Write Training [Auto] Enable this function to [Manual]. ASUS P5QC 3-19 Pull-In of phases is determined by typing the desired values using the keyboard and press the key. 3.4.13 CPU Voltage [Auto] Allows you...
User Manual
Page 118
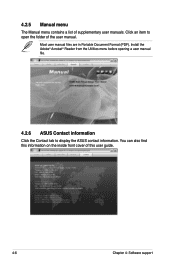
Most user manual files are in Portable Document Format (PDF). 4.2.5 Manual menu The Manual menu contains a list of this information on the inside front cover of supplementary user manuals. Install the Adobe® Acrobat® Reader from the Utilities menu before opening a user manual file. 4.2.6 ASUS Contact information Click the Contact tab to open the folder of the user manual. Click an item to display the ASUS contact information. You can also find this user guide. 4-6 Chapter 4: Software support
Most user manual files are in Portable Document Format (PDF). 4.2.5 Manual menu The Manual menu contains a list of this information on the inside front cover of supplementary user manuals. Install the Adobe® Acrobat® Reader from the Utilities menu before opening a user manual file. 4.2.6 ASUS Contact information Click the Contact tab to open the folder of the user manual. Click an item to display the ASUS contact information. You can also find this user guide. 4-6 Chapter 4: Software support
User Manual
Page 135
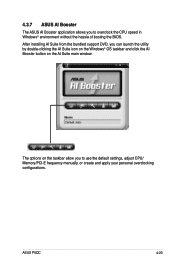
After installing AI Suite from the bundled support DVD, you to overclock the CPU speed in WIndows® environment without the hassle of booting the BIOS. ASUS P5QC 4-23 The options on the taskbar allow you can launch the utility by double-clicking the AI Suite icon on the Windows® OS taskbar and click the AI Booster button on the AI Suite main window. 4.3.7 ASUS AI Booster The ASUS AI Booster application allows you to use the default settings, adjust CPU/ Memory/PCI-E frequency manually, or create and apply your personal overclocking configurations.
After installing AI Suite from the bundled support DVD, you to overclock the CPU speed in WIndows® environment without the hassle of booting the BIOS. ASUS P5QC 4-23 The options on the taskbar allow you can launch the utility by double-clicking the AI Suite icon on the Windows® OS taskbar and click the AI Booster button on the AI Suite main window. 4.3.7 ASUS AI Booster The ASUS AI Booster application allows you to use the default settings, adjust CPU/ Memory/PCI-E frequency manually, or create and apply your personal overclocking configurations.
User Manual
Page 167
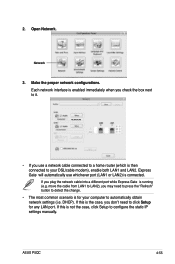
..., you may need to configure the static IP settings manually. If you use whichever port (LAN1 or LAN2) is not the case, click Setup to click Setup for your DSL/cable modem), enable both LAN1 and LAN2. If this is connected. Network 3. ASUS P5QC 4-55 2. Open Network. move the cable from LAN1 to...
..., you may need to configure the static IP settings manually. If you use whichever port (LAN1 or LAN2) is not the case, click Setup to click Setup for your DSL/cable modem), enable both LAN1 and LAN2. If this is connected. Network 3. ASUS P5QC 4-55 2. Open Network. move the cable from LAN1 to...


