
User Manual
Page 1
P5Q WS Motherboard
P5Q WS Motherboard

User Manual
Page 3
Contents Contents...iii Notices...vii Safety information viii About this guide ix P5Q WS specifications summary xi Chapter 1: Product introduction 1.1 Welcome 1-1 1.2 Package contents 1-1 1.3 Special features 1-2 1.3.1 Product highlights 1-2 1.3.2 ASUS unique features 1-4 1.3.3 ASUS Intelligent Performance & Overclocking features.. 1-7 Chapter 2: Hardware information 2.1 Before you proceed 2-1 Onboard LED 2-1 2.2 Motherboard overview 2-2 2.2.1 Motherboard layout 2-2 2.2.2 Layout contents 2-3 2.2.3 Placement direction 2-4 2.2.4 Screw holes 2-4 2.3 Central Processing Unit (CPU...
Contents Contents...iii Notices...vii Safety information viii About this guide ix P5Q WS specifications summary xi Chapter 1: Product introduction 1.1 Welcome 1-1 1.2 Package contents 1-1 1.3 Special features 1-2 1.3.1 Product highlights 1-2 1.3.2 ASUS unique features 1-4 1.3.3 ASUS Intelligent Performance & Overclocking features.. 1-7 Chapter 2: Hardware information 2.1 Before you proceed 2-1 Onboard LED 2-1 2.2 Motherboard overview 2-2 2.2.1 Motherboard layout 2-2 2.2.2 Layout contents 2-3 2.2.3 Placement direction 2-4 2.2.4 Screw holes 2-4 2.3 Central Processing Unit (CPU...

User Manual
Page 8
... • Before using the product, make sure all power cables are using an adpater or extension cord. Operation safety • Before installing the motherboard and adding devices on a stable surface. • If you add a device. • Before connecting or removing signal cables from the... motherboard, ensure that all cables are correctly connected and the power cables are connected. viii Safety information Electrical safety • To prevent electrical shock ...
... • Before using the product, make sure all power cables are using an adpater or extension cord. Operation safety • Before installing the motherboard and adding devices on a stable surface. • If you add a device. • Before connecting or removing signal cables from the... motherboard, ensure that all cables are correctly connected and the power cables are connected. viii Safety information Electrical safety • To prevent electrical shock ...

User Manual
Page 9
... added by your dealer. It includes description of the support DVD that comes with the motherboard package and the software. • Appendix: CPU features The Appendix describes the CPU features and technologies that may have to the ASUS contact information. 2. Where to find more information Refer to change system settings through the...
... added by your dealer. It includes description of the support DVD that comes with the motherboard package and the software. • Appendix: CPU features The Appendix describes the CPU features and technologies that may have to the ASUS contact information. 2. Where to find more information Refer to change system settings through the...

User Manual
Page 15
This chapter describes the motherboard features and the new technologies it supports. 1Product introduction
This chapter describes the motherboard features and the new technologies it supports. 1Product introduction
User Manual
Page 17
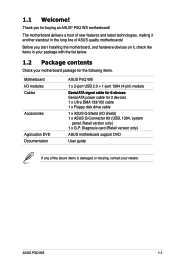
... features and latest technologies, making it , check the items in the long line of the above items is damaged or missing, contact your motherboard package for the following items. Motherboard ASUS P5Q WS I/O modules 1 x 2-port USB 2.0 + 1-port 1394 (4-pin) module Cables S�e�r�ia�l �AT�A��si�g�na...
... features and latest technologies, making it , check the items in the long line of the above items is damaged or missing, contact your motherboard package for the following items. Motherboard ASUS P5Q WS I/O modules 1 x 2-port USB 2.0 + 1-port 1394 (4-pin) module Cables S�e�r�ia�l �AT�A��si�g�na...

User Manual
Page 18
...65533;2�-�2�2��a�n�d� 2-26 for details. 1-2 Chapter 1: Product Introduction PCIe 2.0 This motherboard supports the latest PCIe 2.0 device for high-speed data retrieval and saves. This enhances system performance while still providing ... contents to safeguard consumers' health while minimizing the impact on the environment. 1.3 Special features 1.3.1 Product highlights Green ASUS This motherboard and its packaging comply with the European Union's Restriction on the use of available memory bandwidth and reduces the latency...
...65533;2�-�2�2��a�n�d� 2-26 for details. 1-2 Chapter 1: Product Introduction PCIe 2.0 This motherboard supports the latest PCIe 2.0 device for high-speed data retrieval and saves. This enhances system performance while still providing ... contents to safeguard consumers' health while minimizing the impact on the environment. 1.3 Special features 1.3.1 Product highlights Green ASUS This motherboard and its packaging comply with the European Union's Restriction on the use of available memory bandwidth and reduces the latency...

User Manual
Page 19
... with high performance RAID 0, 1, 5, and 10 functions, and the Marvell® controller provides another two external Serial ATA connectors for RAID 0 and 1 functions, making this motherboard an ideal solution to enhance hard disk performance and data back up protection without any added arbitration or latency. This capability ensures rapid transfer of... high-quality 192KHz/24-bit audio output that simultaneously sends different audio streams to LAN without the cost of data from WAN to different destinations. ASUS P5Q WS 1-3
... with high performance RAID 0, 1, 5, and 10 functions, and the Marvell® controller provides another two external Serial ATA connectors for RAID 0 and 1 functions, making this motherboard an ideal solution to enhance hard disk performance and data back up protection without any added arbitration or latency. This capability ensures rapid transfer of... high-quality 192KHz/24-bit audio output that simultaneously sends different audio streams to LAN without the cost of data from WAN to different destinations. ASUS P5Q WS 1-3
User Manual
Page 20
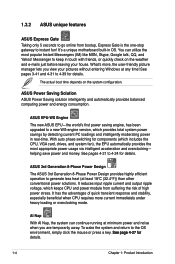
... and intelligently moderating power in OS. See pages 3-41 and 4-31 to 4-39 for details. ASUS EPU-WS Engine The new ASUS EPU-the world's first power saving engine, has been upgraded to 4-24 for details. It's a unique motherboard built-in real-time. You can continue running at least 18°C (32.4°F)) than...
... and intelligently moderating power in OS. See pages 3-41 and 4-31 to 4-39 for details. ASUS EPU-WS Engine The new ASUS EPU-the world's first power saving engine, has been upgraded to 4-24 for details. It's a unique motherboard built-in real-time. You can continue running at least 18°C (32.4°F)) than...
User Manual
Page 21
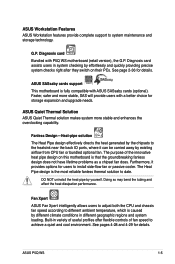
... allows users to adjust both the CPU and chassis fan speed according to system maintenance and storage technology. ASUS SASsaby cards support This motherboard is that the groundbreaking fanless design does not have lifetime problems as a chipset fan does. The purpose of... precise system checks right after they switch on this motherboard is fully compatible with P5Q WS motherboard (retail version), the G.P. Built-in system checking by yourself. Doing so may bend the tubing and affect the heat dissipation performance. ASUS P5Q WS 1-5 Furthermore, it can be carried away by the...
... allows users to adjust both the CPU and chassis fan speed according to system maintenance and storage technology. ASUS SASsaby cards support This motherboard is that the groundbreaking fanless design does not have lifetime problems as a chipset fan does. The purpose of... precise system checks right after they switch on this motherboard is fully compatible with P5Q WS motherboard (retail version), the G.P. Built-in system checking by yourself. Doing so may bend the tubing and affect the heat dissipation performance. ASUS P5Q WS 1-5 Furthermore, it can be carried away by the...

User Manual
Page 22
...or back up your favorite settings. Update your motherboard against static electricity and shields it convenient and easy to launch the utility and update the BIOS without entering the OS. ASUS Q-Shield The specially designed ASUS Q-Shield does without preparing a bootable diskette or...the CMOS or a separate file, giving users freedom to conveniently store or load multiple BIOS settings. ASUS Q-Connector ASUS Q-Connector allows you easy ways to the motherboard. Profile that allows users to share and distribute their favorite settings. �S�e�e��p&#...
...or back up your favorite settings. Update your motherboard against static electricity and shields it convenient and easy to launch the utility and update the BIOS without entering the OS. ASUS Q-Shield The specially designed ASUS Q-Shield does without preparing a bootable diskette or...the CMOS or a separate file, giving users freedom to conveniently store or load multiple BIOS settings. ASUS Q-Connector ASUS Q-Connector allows you easy ways to the motherboard. Profile that allows users to share and distribute their favorite settings. �S�e�e��p&#...

User Manual
Page 23
...;�4�-�3�0��f�o�r�d��e�ta��il�s�. ASUS MyLogo2™ This feature allows you to convert your favorite photo into a 256-color boot logo for the... ultimate customized overclocking configuration. feature of the motherboard BIOS allows automatic re-setting to overclocking. Simply shut down and reboot the system, and the BIOS automatically ... finetune voltages to open the system chassis and clear the RTC data. ASUS P5Q WS 1-7
...;�4�-�3�0��f�o�r�d��e�ta��il�s�. ASUS MyLogo2™ This feature allows you to convert your favorite photo into a 256-color boot logo for the... ultimate customized overclocking configuration. feature of the motherboard BIOS allows automatic re-setting to overclocking. Simply shut down and reboot the system, and the BIOS automatically ... finetune voltages to open the system chassis and clear the RTC data. ASUS P5Q WS 1-7

User Manual
Page 25
It includes description of the jumpers and connectors on the motherboard. 2 Hardware information This chapter lists the hardware setup procedures that you have to perform when installing system components.
It includes description of the jumpers and connectors on the motherboard. 2 Hardware information This chapter lists the hardware setup procedures that you have to perform when installing system components.

User Manual
Page 26
Chapter summary 2 2.1 Before you proceed 2-1 2.2 Motherboard overview 2-2 2.3 Central Processing Unit (CPU 2-5 2.4 System memory 2-11 2.5 Expansion slots 2-16 2.6 Jumpers 2-19 2.7 Connectors 2-22 2.8 G.P. Diagnosis card installation 2-36 2.9 Starting up for the first time 2-38 2.10 Turning off the computer 2-39 ASUS P5Q WS
Chapter summary 2 2.1 Before you proceed 2-1 2.2 Motherboard overview 2-2 2.3 Central Processing Unit (CPU 2-5 2.4 System memory 2-11 2.5 Expansion slots 2-16 2.6 Jumpers 2-19 2.7 Connectors 2-22 2.8 G.P. Diagnosis card installation 2-36 2.9 Starting up for the first time 2-38 2.10 Turning off the computer 2-39 ASUS P5Q WS

User Manual
Page 27
... wrist strap or touch a safely grounded object or a metal object, such as the power supply case, before you install motherboard components or change any motherboard settings. • Unplug the power cord from the power supply. The illustration below shows the location of the following precautions before...the system is switched off mode. Onboard LED The motherboard comes with the component. • Before you install or remove any component, ensure that the ATX power supply is ON, in sleep mode, or in any motherboard component. ASUS P5Q WS 2-1 2.1 Before you proceed Take note of the ...
... wrist strap or touch a safely grounded object or a metal object, such as the power supply case, before you install motherboard components or change any motherboard settings. • Unplug the power cord from the power supply. The illustration below shows the location of the following precautions before...the system is switched off mode. Onboard LED The motherboard comes with the component. • Before you install or remove any component, ensure that the ATX power supply is ON, in sleep mode, or in any motherboard component. ASUS P5Q WS 2-1 2.1 Before you proceed Take note of the ...

User Manual
Page 28
2.2 Motherboard overview 2.2.1 Motherboard layout Refer to 2.7 Connectors for more information about rear panel connectors and internal connectors. 2-2 Chapter 2: Hardware information
2.2 Motherboard overview 2.2.1 Motherboard layout Refer to 2.7 Connectors for more information about rear panel connectors and internal connectors. 2-2 Chapter 2: Hardware information

User Manual
Page 30
Doing so can damage the motherboard. Place this side towards the rear of the chassis as indicated in the image below. 2.2.4 Screw holes Place nine (9) screws into the chassis in the correct orientation. The edge with external ports goes to the chassis. DO NOT overtighten the screws! 2.2.3 Placement direction When installing the motherboard, make sure that you place it into the holes indicated by circles to secure the motherboard to the rear part of the chassis 2-4 Chapter 2: Hardware information
Doing so can damage the motherboard. Place this side towards the rear of the chassis as indicated in the image below. 2.2.4 Screw holes Place nine (9) screws into the chassis in the correct orientation. The edge with external ports goes to the chassis. DO NOT overtighten the screws! 2.2.3 Placement direction When installing the motherboard, make sure that you place it into the holes indicated by circles to secure the motherboard to the rear part of the chassis 2-4 Chapter 2: Hardware information

User Manual
Page 31
... on the LGA775 socket. • The product warranty does not cover damage to the PnP cap/socket contacts/motherboard components. ASUS will process Return Merchandise Authorization (RMA) requests only if the motherboard comes with a surface mount LGA775 socket designed for the Intel® Core™2 Extreme / Core™2.../ Celeron® Processors. • Make sure that the PnP cap is shipment/transit-related. • Keep the cap after installing the motherboard. ASUS P5Q WS 2-5 ASUS will shoulder the cost of the motherboard, make sure that all power cables are not bent.
... on the LGA775 socket. • The product warranty does not cover damage to the PnP cap/socket contacts/motherboard components. ASUS will process Return Merchandise Authorization (RMA) requests only if the motherboard comes with a surface mount LGA775 socket designed for the Intel® Core™2 Extreme / Core™2.../ Celeron® Processors. • Make sure that the PnP cap is shipment/transit-related. • Keep the cap after installing the motherboard. ASUS P5Q WS 2-5 ASUS will shoulder the cost of the motherboard, make sure that all power cables are not bent.

User Manual
Page 32
... socket on your left (B) until it to the socket pins, do not remove the PnP cap unless you and the load lever is on the motherboard. Press the load lever with your thumb (A), then move it is facing towards you are installing a CPU. Retention tab A B Load lever 3. Lift the load plate...
... socket on your left (B) until it to the socket pins, do not remove the PnP cap unless you and the load lever is on the motherboard. Press the load lever with your thumb (A), then move it is facing towards you are installing a CPU. Retention tab A B Load lever 3. Lift the load plate...
User Manual
Page 34
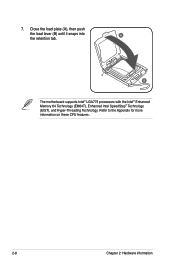
B The motherboard supports Intel® LGA775 processors with the Intel® Enhanced Memory 64 Technology (EM64T), Enhanced Intel SpeedStep® Technology (EIST), and Hyper-Threading Technology. Close the load plate (A), then push the load lever (B) until it snaps into A the retention tab. Refer to the Appendix for more information on these CPU features. 2-8 Chapter 2: Hardware information 7.
B The motherboard supports Intel® LGA775 processors with the Intel® Enhanced Memory 64 Technology (EM64T), Enhanced Intel SpeedStep® Technology (EIST), and Hyper-Threading Technology. Close the load plate (A), then push the load lever (B) until it snaps into A the retention tab. Refer to the Appendix for more information on these CPU features. 2-8 Chapter 2: Hardware information 7.


