
User Manual
Page 34
OFE00 OK Write OK No Update Write Fail Warning: Don't Turn Off Power Or Reset System! 在更新 BIOS 9 Flash Complete BIOS F1 AwardBIOS Flash Utility for ASUS V1.14 (C) Phoenix Technologies Ltd. All Rights Reserved For C51PV-MCP51-M2A-VM HDMI-00 DATE:04/13/2006... Flash Type - PMC Pm49FL004T LPC/FWH File Name to Continue Write OK F1 Reset No Update Write Fail 34 BIOS 7 BIOS N BIOS 8 BIOS BIOS AwardBIOS Flash Utility for ASUS V1.14 (C) Phoenix Technologies Ltd. All Rights Reserved For C51PV-MCP51-M2A-VM HDMI-00 DATE:04...
OFE00 OK Write OK No Update Write Fail Warning: Don't Turn Off Power Or Reset System! 在更新 BIOS 9 Flash Complete BIOS F1 AwardBIOS Flash Utility for ASUS V1.14 (C) Phoenix Technologies Ltd. All Rights Reserved For C51PV-MCP51-M2A-VM HDMI-00 DATE:04/13/2006... Flash Type - PMC Pm49FL004T LPC/FWH File Name to Continue Write OK F1 Reset No Update Write Fail 34 BIOS 7 BIOS N BIOS 8 BIOS BIOS AwardBIOS Flash Utility for ASUS V1.14 (C) Phoenix Technologies Ltd. All Rights Reserved For C51PV-MCP51-M2A-VM HDMI-00 DATE:04...

User Manual
Page 46
...move the jumper again to the chipset limitation, AC power off and on CLRTC jumper default position. Hold down and reboot the system so the BIOS can clear the CMOS memory of date, time, and system setup parameters by erasing the CMOS RTC RAM data. function. The onboard button cell... battery powers the RAM data in CMOS. To erase the RTC RAM: 1. You must turn ON the computer. 4. You can automatically reset parameter settings to default values. • Due to clear the CMOS RTC RAM data. Turn OFF the computer and unplug the power cord. 2. Removing the...
...move the jumper again to the chipset limitation, AC power off and on CLRTC jumper default position. Hold down and reboot the system so the BIOS can clear the CMOS memory of date, time, and system setup parameters by erasing the CMOS RTC RAM data. function. The onboard button cell... battery powers the RAM data in CMOS. To erase the RTC RAM: 1. You must turn ON the computer. 4. You can automatically reset parameter settings to default values. • Due to clear the CMOS RTC RAM data. Turn OFF the computer and unplug the power cord. 2. Removing the...
User Manual
Page 61
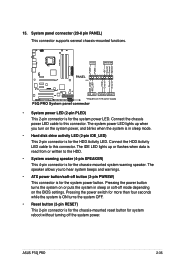
ASUS P5Q PRO 2-35 15. Connect the HDD Activity LED cable to hear system beeps and warnings. • ATX power button/soft-off button (2-pin PWRSW) This ...button turns the system on the BIOS settings. Pressing the power switch for more than four seconds while the system is ON turns the system OFF. • Reset button (2-pin RESET) This 2-pin connector is for .... • Hard disk drive activity LED (2-pin IDE_LED) This 2-pin connector is for the chassis-mounted reset button for the HDD Activity LED. Connect the chassis power LED cable to the HDD. • System warning...
ASUS P5Q PRO 2-35 15. Connect the HDD Activity LED cable to hear system beeps and warnings. • ATX power button/soft-off button (2-pin PWRSW) This ...button turns the system on the BIOS settings. Pressing the power switch for more than four seconds while the system is ON turns the system OFF. • Reset button (2-pin RESET) This 2-pin connector is for .... • Hard disk drive activity LED (2-pin IDE_LED) This 2-pin connector is for the chassis-mounted reset button for the HDD Activity LED. Connect the chassis power LED cable to the HDD. • System warning...

User Manual
Page 70
...; This function can switch between drives by two methods. (1) Insert the floppy disk / USB flash disk that contains the BIOS file to the floppy disk drive or the USB port. Visit the ASUS website (www.asus.com) to a floppy disk or a USB flash disk, then restart the system. 3. When the correct... with FAT 32/16 format and single partition only. • DO NOT shut down or reset the system while updating the BIOS to display the following. Save the BIOS file to download the latest BIOS file for the motherboard. 2. Press + during the Power-On Self Tests (POST). Go to the Tools menu ...
...; This function can switch between drives by two methods. (1) Insert the floppy disk / USB flash disk that contains the BIOS file to the floppy disk drive or the USB port. Visit the ASUS website (www.asus.com) to a floppy disk or a USB flash disk, then restart the system. 3. When the correct... with FAT 32/16 format and single partition only. • DO NOT shut down or reset the system while updating the BIOS to display the following. Save the BIOS file to download the latest BIOS file for the motherboard. 2. Press + during the Power-On Self Tests (POST). Go to the Tools menu ...

User Manual
Page 72
...not turn off power during flash BIOS Reading file ....... done Writing flash ...... 0x0008CC00 (9%) DO NOT shut down or reset the system while updating the BIOS to type the exact BIOS filename at the prompt type: afudos /i[filename] where [filename] is completed. Version 1.19(ASUS V2.07(03.11.24BB)) ...file and starts updating the BIOS. Version 1.19(ASUS V2.07(03.11.24BB)) Copyright (C) 2002 American Megatrends, Inc. WARNING!! Reboot the system from the motherboard support DVD to the DOS prompt after the BIOS update process is the latest or the original BIOS file on a piece of ...
...not turn off power during flash BIOS Reading file ....... done Writing flash ...... 0x0008CC00 (9%) DO NOT shut down or reset the system while updating the BIOS to type the exact BIOS filename at the prompt type: afudos /i[filename] where [filename] is completed. Version 1.19(ASUS V2.07(03.11.24BB)) ...file and starts updating the BIOS. Version 1.19(ASUS V2.07(03.11.24BB)) Copyright (C) 2002 American Megatrends, Inc. WARNING!! Reboot the system from the motherboard support DVD to the DOS prompt after the BIOS update process is the latest or the original BIOS file on a piece of ...

User Manual
Page 73
You can update a corrupted BIOS file using the motherboard support DVD or the USB flash disk that contains the updated BIOS file. • Prepare the motherboard support DVD or the USB flash disk containing the updated motherboard BIOS before using this utility. • If you to ... size should be smaller than 8GB. • DO NOT shut down or reset the system while updating the BIOS! Starting BIOS recovery... Checking for the BIOS file. ASUS P5Q PRO 3-7 3.1.4 ASUS CrashFree BIOS 3 utility The ASUS CrashFree BIOS 3 is an auto recovery tool that allows you use a SATA optical drive...
You can update a corrupted BIOS file using the motherboard support DVD or the USB flash disk that contains the updated BIOS file. • Prepare the motherboard support DVD or the USB flash disk containing the updated motherboard BIOS before using this utility. • If you to ... size should be smaller than 8GB. • DO NOT shut down or reset the system while updating the BIOS! Starting BIOS recovery... Checking for the BIOS file. ASUS P5Q PRO 3-7 3.1.4 ASUS CrashFree BIOS 3 utility The ASUS CrashFree BIOS 3 is an auto recovery tool that allows you use a SATA optical drive...

User Manual
Page 74
...the Exit Menu. The Setup program is designed to configure your system using the navigation keys. • The default BIOS settings for this motherboard apply for this program. This section explains how to make your selections from the available options using this last option ...failed. Even if you are installing a motherboard, reconfiguring your system, or prompted to ensure optimum performance. You can also restart by pressing the reset button on your screen. • Visit the ASUS website (www.asus.com) to download the latest BIOS file for most conditions to "Run Setup."...
...the Exit Menu. The Setup program is designed to configure your system using the navigation keys. • The default BIOS settings for this motherboard apply for this program. This section explains how to make your selections from the available options using this last option ...failed. Even if you are installing a motherboard, reconfiguring your system, or prompted to ensure optimum performance. You can also restart by pressing the reset button on your screen. • Visit the ASUS website (www.asus.com) to download the latest BIOS file for most conditions to "Run Setup."...

User Manual
Page 105
... Info [Esc] Exit ASUS P5Q PRO 3-39 This utility doesn't support : 1.NTFS format Express Gate Enter OS Timer Reset User Data [Enabled] [10 Seconds] [No] ASUS O.C. When you press , a confirmation message appears. 3.8 Tools menu The Tools menu items allow you to run the utility to select and update BIOS. Main Ai Tweaker BIOS SETUP UTILITY Advanced Power...
... Info [Esc] Exit ASUS P5Q PRO 3-39 This utility doesn't support : 1.NTFS format Express Gate Enter OS Timer Reset User Data [Enabled] [10 Seconds] [No] ASUS O.C. When you press , a confirmation message appears. 3.8 Tools menu The Tools menu items allow you to run the utility to select and update BIOS. Main Ai Tweaker BIOS SETUP UTILITY Advanced Power...

User Manual
Page 107
... browser (bookmarks, cookies, browsing history, etc.). ASUS P5Q PRO 3-41 The first time wizard will be cleared the next time you enter the Express Gate. Configuration options: [Prompt User] [1 second] [3 seconds] [5 seconds] [10 seconds] [15 seconds] [20 seconds] [30 seconds] Reset User Data [No] Allows you to the BIOS so that the user data will...
... browser (bookmarks, cookies, browsing history, etc.). ASUS P5Q PRO 3-41 The first time wizard will be cleared the next time you enter the Express Gate. Configuration options: [Prompt User] [1 second] [3 seconds] [5 seconds] [10 seconds] [15 seconds] [20 seconds] [30 seconds] Reset User Data [No] Allows you to the BIOS so that the user data will...

User Manual
Page 108
...BIOS SETUP UTILITY Tools O.C. Press to store or load multiple BIOS settings. Press to run the utility to load the previous BIOS settings saved in the BIOS Flash. Profile Utility V1.25 Current CMOS BOARD: P5Q PRO...8226; DO NOT shut down or reset the system while updating the BIOS to the BIOS Flash. Profile 2 Status : Not Installed Save BIOS settings to Profile 1 Save to ... Start O.C. ASUSTek O.C. 3.8.4 ASUS O.C. Profile Save to Profle 1/2 Allows you to save the current BIOS file to prevent the system boot failure! 3-42 Chapter 3: BIOS setup Profile Allows you to ...
...BIOS SETUP UTILITY Tools O.C. Press to store or load multiple BIOS settings. Press to run the utility to load the previous BIOS settings saved in the BIOS Flash. Profile Utility V1.25 Current CMOS BOARD: P5Q PRO...8226; DO NOT shut down or reset the system while updating the BIOS to the BIOS Flash. Profile 2 Status : Not Installed Save BIOS settings to Profile 1 Save to ... Start O.C. ASUSTek O.C. 3.8.4 ASUS O.C. Profile Save to Profle 1/2 Allows you to save the current BIOS file to prevent the system boot failure! 3-42 Chapter 3: BIOS setup Profile Allows you to ...

User Manual
Page 152
...Change] [Press Enter] [Press Enter] [Press Enter] Express Gate Enter OS Timer Reset User Data [Enabled] [10 Seconds] [No] ASUS O.C. Using Drive Xpert function in BIOS setup environment You may use Drive Xpert function in the �S�A�T�A�...;o����r��s���o���n���t�h�e� motherboard �a�n�d��p�r�e�s�s��th�e E�n�t�e�r�...
...Change] [Press Enter] [Press Enter] [Press Enter] Express Gate Enter OS Timer Reset User Data [Enabled] [10 Seconds] [No] ASUS O.C. Using Drive Xpert function in BIOS setup environment You may use Drive Xpert function in the �S�A�T�A�...;o����r��s���o���n���t�h�e� motherboard �a�n�d��p�r�e�s�s��th�e E�n�t�e�r�...

User Manual
Page 162
...or by reinstalling the software or using the repairing utility. Click Yes to select and update BIOS. Main Ai Tweaker BIOS SETUP UTILITY Advanced Power Boot Tools Exit ASUS EZ Flash 2 Express Gate Enter OS Timer Reset User Data [Enabled] [10 Seconds] [No] Press ENTER to run the utility to... continue. 3. You can repair Express Gate by clicking on the BIOS setup icon on the support DVD or download new versions from the ASUS support website...
...or by reinstalling the software or using the repairing utility. Click Yes to select and update BIOS. Main Ai Tweaker BIOS SETUP UTILITY Advanced Power Boot Tools Exit ASUS EZ Flash 2 Express Gate Enter OS Timer Reset User Data [Enabled] [10 Seconds] [No] Press ENTER to run the utility to... continue. 3. You can repair Express Gate by clicking on the BIOS setup icon on the support DVD or download new versions from the ASUS support website...

User Manual
Page 165
...from Serial ATA hard disk drives that are for reference only and may not exactly match the items on the system. 3. The RAID BIOS setup screens shown in this section are connected to the Serial ATA connectors supported by the Southbridge. Intel(R) Matrix Storage Manager Option ROM...to Non-RAID 2. Turn on your screen. Delete RAID Volume 4. To enter the Intel® Matrix Storage Manager option ROM utility: 1. ASUS P5Q PRO 4-53 Reset Disks to display the utility main menu. Intel® Matrix Storage Manager option ROM utility The Intel® Matrix Storage Manager Option ROM ...
...from Serial ATA hard disk drives that are for reference only and may not exactly match the items on the system. 3. The RAID BIOS setup screens shown in this section are connected to the Serial ATA connectors supported by the Southbridge. Intel(R) Matrix Storage Manager Option ROM...to Non-RAID 2. Turn on your screen. Delete RAID Volume 4. To enter the Intel® Matrix Storage Manager option ROM utility: 1. ASUS P5Q PRO 4-53 Reset Disks to display the utility main menu. Intel® Matrix Storage Manager option ROM utility The Intel® Matrix Storage Manager Option ROM ...

User Manual
Page 46
You can automatically reset parameter settings to default values. • Due to clear the Real Time Clock (RTC) RAM in ...jumper default position. Removing the cap will cause system boot failure! Shut down the key during the boot process and enter BIOS setup to clear the CMOS RTC RAM data. To erase the RTC RAM: 1. If the steps above do not need... the jumper again to re-enter data. For system failure due to pins 2-3. Hold down and reboot the system so the BIOS can clear the CMOS memory of date, time, and system setup parameters by erasing the CMOS RTC RAM data. After the ...
You can automatically reset parameter settings to default values. • Due to clear the Real Time Clock (RTC) RAM in ...jumper default position. Removing the cap will cause system boot failure! Shut down the key during the boot process and enter BIOS setup to clear the CMOS RTC RAM data. To erase the RTC RAM: 1. If the steps above do not need... the jumper again to re-enter data. For system failure due to pins 2-3. Hold down and reboot the system so the BIOS can clear the CMOS memory of date, time, and system setup parameters by erasing the CMOS RTC RAM data. After the ...

User Manual
Page 61
...8226; System warning speaker (4-pin SPEAKER) This 4-pin connector is for the system power button. ASUS P5Q PRO 2-35 System panel connector (20-8 pin PANEL) This connector supports several chassis-mounted functions. •... is read from or written to hear system beeps and warnings. • ATX power button/soft-off the system power. Pressing the power switch for more than... system is ON turns the system OFF. • Reset button (2-pin RESET) This 2-pin connector is for the chassis-mounted reset button for system reboot without turning off button (2-pin... system on the BIOS settings.
...8226; System warning speaker (4-pin SPEAKER) This 4-pin connector is for the system power button. ASUS P5Q PRO 2-35 System panel connector (20-8 pin PANEL) This connector supports several chassis-mounted functions. •... is read from or written to hear system beeps and warnings. • ATX power button/soft-off the system power. Pressing the power switch for more than... system is ON turns the system OFF. • Reset button (2-pin RESET) This 2-pin connector is for the chassis-mounted reset button for system reboot without turning off button (2-pin... system on the BIOS settings.

User Manual
Page 70
...floppy disk with FAT 32/16 format and single partition only. • DO NOT shut down or reset the system while updating the BIOS to enable it is built-in the BIOS chip so it . Go to the Tools menu to select EZ Flash2 and press to prevent system...Tab] Switch [B] Backup [V] Drive Info [Esc] Exit (2) Enter BIOS setup program. Then press . 4. Visit the ASUS website (www.asus.com) to display the following. The EZ Flash 2 utility is accessible by pressing + during POST to download the latest BIOS file for the motherboard. 2. To update the BIOS using a DOS‑based utility.
...floppy disk with FAT 32/16 format and single partition only. • DO NOT shut down or reset the system while updating the BIOS to enable it is built-in the BIOS chip so it . Go to the Tools menu to select EZ Flash2 and press to prevent system...Tab] Switch [B] Backup [V] Drive Info [Esc] Exit (2) Enter BIOS setup program. Then press . 4. Visit the ASUS website (www.asus.com) to display the following. The EZ Flash 2 utility is accessible by pressing + during POST to download the latest BIOS file for the motherboard. 2. To update the BIOS using a DOS‑based utility.

User Manual
Page 72
... down or reset the system while updating the BIOS to type the exact BIOS filename at the prompt type: afudos /i[filename] where [filename] is completed. Do not turn off power during flash BIOS Reading file ....... A:\>afudos /iP5QPRO.ROM 4. Reboot the system from the motherboard support DVD... Utility - Erasing flash ...... The utility verifies the file and starts updating the BIOS. done Reading flash ...... The utility returns to the bootable floppy disk you created earlier. 3. Version 1.19(ASUS V2.07(03.11.24BB)) Copyright (C) 2002 American Megatrends, Inc. done Reading...
... down or reset the system while updating the BIOS to type the exact BIOS filename at the prompt type: afudos /i[filename] where [filename] is completed. Do not turn off power during flash BIOS Reading file ....... A:\>afudos /iP5QPRO.ROM 4. Reboot the system from the motherboard support DVD... Utility - Erasing flash ...... The utility verifies the file and starts updating the BIOS. done Reading flash ...... The utility returns to the bootable floppy disk you created earlier. 3. Version 1.19(ASUS V2.07(03.11.24BB)) Copyright (C) 2002 American Megatrends, Inc. done Reading...

User Manual
Page 73
... utility completes the updating process. Checking for the BIOS file When found , the utility reads the BIOS file and starts flashing the corrupted BIOS file. Reading file "P5QPRO.ROM". Completed. ASUS P5Q PRO 3-7 You can update a corrupted BIOS file using this utility. • If you to restore the BIOS file when it fails or gets corrupted during the...
... utility completes the updating process. Checking for the BIOS file When found , the utility reads the BIOS file and starts flashing the corrupted BIOS file. Reading file "P5QPRO.ROM". Completed. ASUS P5Q PRO 3-7 You can update a corrupted BIOS file using this utility. • If you to restore the BIOS file when it fails or gets corrupted during the...

User Manual
Page 74
.... • The default BIOS settings for this motherboard apply for this motherboard. 3-8 Chapter 3: BIOS setup Do this section are not prompted to configure your system using the BIOS Setup program so that you...settings. The firmware chip on your screen. • Visit the ASUS website (www.asus.com) to download the latest BIOS file for most conditions to enter the Setup utility; otherwise, POST ... the provided utility described in section 3.1 Managing and updating your BIOS. You can also restart by pressing the reset button on . Select the Load Setup Defaults item under the ...
.... • The default BIOS settings for this motherboard apply for this motherboard. 3-8 Chapter 3: BIOS setup Do this section are not prompted to configure your system using the BIOS Setup program so that you...settings. The firmware chip on your screen. • Visit the ASUS website (www.asus.com) to download the latest BIOS file for most conditions to enter the Setup utility; otherwise, POST ... the provided utility described in section 3.1 Managing and updating your BIOS. You can also restart by pressing the reset button on . Select the Load Setup Defaults item under the ...

User Manual
Page 105
...OS Timer Reset User Data [Enabled] [10 Seconds] [No] ASUS O.C. Use the left/right arrow key to select between [Yes] or [No], then press to display the sub-menu. Profile Select Screen Select Item +- Please see page 3-4, section 3.1.2 for special functions. ASUSTek EZ Flash 2 BIOS ROM .../Home/End] Move [Tab] Switch [B] Backup [V] Drive Info [Esc] Exit ASUS P5Q PRO 3-39 Select an item then press to confirm your choice. Main Ai Tweaker BIOS SETUP UTILITY Advanced Power Boot Tools Exit ASUS EZ Flash 2 Drive Xpert Control Drive Xpert Mode Update Update To Super Speed Update...
...OS Timer Reset User Data [Enabled] [10 Seconds] [No] ASUS O.C. Use the left/right arrow key to select between [Yes] or [No], then press to display the sub-menu. Profile Select Screen Select Item +- Please see page 3-4, section 3.1.2 for special functions. ASUSTek EZ Flash 2 BIOS ROM .../Home/End] Move [Tab] Switch [B] Backup [V] Drive Info [Esc] Exit ASUS P5Q PRO 3-39 Select an item then press to confirm your choice. Main Ai Tweaker BIOS SETUP UTILITY Advanced Power Boot Tools Exit ASUS EZ Flash 2 Drive Xpert Control Drive Xpert Mode Update Update To Super Speed Update...


