
User Manual
Page 2
... NO RESPONSIBILITY OR LIABILITY FOR ANY ERRORS OR INACCURACIES THAT MAY APPEAR IN THIS MANUAL, INCLUDING THE PRODUCTS AND SOFTWARE DESCRIBED IN IT. IN NO EVENT SHALL ASUS, ITS DIRECTORS, OFFICERS, EMPLOYEES OR AGENTS BE LIABLE FOR ANY INDIRECT, SPECIAL, INCIDENTAL, OR CONSEQUENTIAL DAMAGES (INCLUDING DAMAGES... BEEN ADVISED OF THE POSSIBILITY OF SUCH DAMAGES ARISING FROM ANY DEFECT OR ERROR IN THIS MANUAL OR PRODUCT. or (2) the serial number of ASUSTeK COMPUTER INC. ("ASUS"). ASUS PROVIDES THIS MANUAL "AS IS" WITHOUT WARRANTY OF ANY KIND, EITHER EXPRESS OR IMPLIED, INCLUDING BUT NOT LIMITED ...
... NO RESPONSIBILITY OR LIABILITY FOR ANY ERRORS OR INACCURACIES THAT MAY APPEAR IN THIS MANUAL, INCLUDING THE PRODUCTS AND SOFTWARE DESCRIBED IN IT. IN NO EVENT SHALL ASUS, ITS DIRECTORS, OFFICERS, EMPLOYEES OR AGENTS BE LIABLE FOR ANY INDIRECT, SPECIAL, INCIDENTAL, OR CONSEQUENTIAL DAMAGES (INCLUDING DAMAGES... BEEN ADVISED OF THE POSSIBILITY OF SUCH DAMAGES ARISING FROM ANY DEFECT OR ERROR IN THIS MANUAL OR PRODUCT. or (2) the serial number of ASUSTeK COMPUTER INC. ("ASUS"). ASUS PROVIDES THIS MANUAL "AS IS" WITHOUT WARRANTY OF ANY KIND, EITHER EXPRESS OR IMPLIED, INCLUDING BUT NOT LIMITED ...

User Manual
Page 5
...2.7.1 Boot Device Priority 2-35 2.7.2 Boot Settings Configuration 2-36 2.7.3 Security 2-37 2.8 Tools menu 2-39 2.8.1 ASUS EZ Flash 2 2-39 2.8.2 Express Gate 2-40 2.8.3 ASUS O.C. Profile 2-41 2.8.4 AI Net 2 2-42 2.9 Exit menu 2-43 Chapter 3: Software support 3.1 Installing...3.2.1 Running the support DVD 3-2 3.2.2 Drivers menu 3-3 3.2.3 Utilities menu 3-4 3.2.4 Make disk menu 3-6 3.2.5 Manual menu 3-7 3.2.6 ASUS Contact information 3-7 3.2.7 Other information 3-8 3.3 ASUS Express Gate 3-10 3.4 Creating a RAID driver disk 3-19 3.4.1 Creating a RAID driver disk without entering the...
...2.7.1 Boot Device Priority 2-35 2.7.2 Boot Settings Configuration 2-36 2.7.3 Security 2-37 2.8 Tools menu 2-39 2.8.1 ASUS EZ Flash 2 2-39 2.8.2 Express Gate 2-40 2.8.3 ASUS O.C. Profile 2-41 2.8.4 AI Net 2 2-42 2.9 Exit menu 2-43 Chapter 3: Software support 3.1 Installing...3.2.1 Running the support DVD 3-2 3.2.2 Drivers menu 3-3 3.2.3 Utilities menu 3-4 3.2.4 Make disk menu 3-6 3.2.5 Manual menu 3-7 3.2.6 ASUS Contact information 3-7 3.2.7 Other information 3-8 3.3 ASUS Express Gate 3-10 3.4 Creating a RAID driver disk 3-19 3.4.1 Creating a RAID driver disk without entering the...

User Manual
Page 7
...is set to the correct voltage in municipal waste. If you add a device. • Before connecting or removing signal cables from the motherboard, ensure that the power cables for disposal of the electrical outlet you encounter technical problems with the package. • Before using the product,...dealer immediately. • To avoid short circuits, keep paper clips, screws, and staples away from the system, ensure that all the manuals that your retailer. Check local regulations for the devices are unplugged before the signal cables are using an adpater or extension cord. Safety ...
...is set to the correct voltage in municipal waste. If you add a device. • Before connecting or removing signal cables from the motherboard, ensure that the power cables for disposal of the electrical outlet you encounter technical problems with the package. • Before using the product,...dealer immediately. • To avoid short circuits, keep paper clips, screws, and staples away from the system, ensure that all the manuals that your retailer. Check local regulations for the devices are unplugged before the signal cables are using an adpater or extension cord. Safety ...

User Manual
Page 9
... to select. Keys enclosed in this guide To make sure that you perform certain tasks properly, take note of the following symbols used throughout this manual. Typography Bold text Italics Indicates a menu or an item to help you complete a task. Example: means that you must press two or more keys simultaneously...
... to select. Keys enclosed in this guide To make sure that you perform certain tasks properly, take note of the following symbols used throughout this manual. Typography Bold text Italics Indicates a menu or an item to help you complete a task. Example: means that you must press two or more keys simultaneously...

User Manual
Page 10
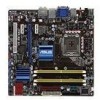
...Realtek® 8111C PCIe Gigabit LAN controller featuring AI NET2 Realtek® ALC1200 8-channel High-Definition Audio codec - Supports up to www.asus.com or this user manual for Intel® Core™2 Extreme / Core™2 Quad / Core™2 Duo / Pentium® dual-core / Celeron&#..., OpenGL®2.1, Pixel Shader 4.0 1 x PCIe 2.0 x16 slot 2 x PCIe x1 slot 1 x PCI slot Southbridge - 6 x Serial ATA 3 Gb/s ports - P5Q-EM specifications summary CPU Chipset System bus Memory VGA Expansion slots Storage LAN Audio IEEE 1394 USB LGA775 socket for the Memory QVL (Qualified Vendors Lists...
...Realtek® 8111C PCIe Gigabit LAN controller featuring AI NET2 Realtek® ALC1200 8-channel High-Definition Audio codec - Supports up to www.asus.com or this user manual for Intel® Core™2 Extreme / Core™2 Quad / Core™2 Duo / Pentium® dual-core / Celeron&#..., OpenGL®2.1, Pixel Shader 4.0 1 x PCIe 2.0 x16 slot 2 x PCIe x1 slot 1 x PCI slot Southbridge - 6 x Serial ATA 3 Gb/s ports - P5Q-EM specifications summary CPU Chipset System bus Memory VGA Expansion slots Storage LAN Audio IEEE 1394 USB LGA775 socket for the Memory QVL (Qualified Vendors Lists...
User Manual
Page 32
...x64 Edition • The default memory operation frequency is recommended. • This motherboard does not support memory modules made up of 256 Mb chips. • Due to chipset limitation, this motherboard can manually adjust DRAM Frequency in Channel A and Channel B. Any excess memory from the ...higher-sized channel is then mapped for manual memory frequency adjustment. • The memory modules may require a better cooling...
...x64 Edition • The default memory operation frequency is recommended. • This motherboard does not support memory modules made up of 256 Mb chips. • Due to chipset limitation, this motherboard can manually adjust DRAM Frequency in Channel A and Channel B. Any excess memory from the ...higher-sized channel is then mapped for manual memory frequency adjustment. • The memory modules may require a better cooling...

User Manual
Page 48
... these connectors, set the Configure SATA as in the BIOS to create a Serial ATA RAID set the Configure SATA as item in the motherboard support DVD. • You must install the Windows® XP/Vista Service Pack before using these connectors. Connect the right-angle side...8226; Before creating a RAID set to SATA device. ICH10R Serial ATA connectors [red] (7-pin SATA1-6) These connectors are set , refer to the manual bundled in the BIOS to avoid mechanical conflict with the Intel® Matrix Storage Technology through the onboard Intel® ICH10R RAID controller. •...
... these connectors, set the Configure SATA as in the BIOS to create a Serial ATA RAID set the Configure SATA as item in the motherboard support DVD. • You must install the Windows® XP/Vista Service Pack before using these connectors. Connect the right-angle side...8226; Before creating a RAID set to SATA device. ICH10R Serial ATA connectors [red] (7-pin SATA1-6) These connectors are set , refer to the manual bundled in the BIOS to avoid mechanical conflict with the Intel® Matrix Storage Technology through the onboard Intel® ICH10R RAID controller. •...

User Manual
Page 76
..., Inc. 2.4.1 Configure System performance Settings Ai Overclock Tuner [Auto] Allows selection of the following items vary depending on the motherboard. Main Ai Tweaker BIOS SETUP UTILITY Advanced Power Boot Tools Exit Configure System Performance Settings Ai Overclock Tuner [Auto] CPU Ratio...Auto] Ai Transaction Booster [Auto] C/P : B1 B2 B3 B4 LVL : 12 12 12 12 ******** Please key in numbers directly! ******** Options Manual Auto Select Screen Select Item Enter Go to North Bridge [Auto] DRAM Frequency [Auto] DRAM Timing Control [Auto] 1st Information : 5-5-5-15-3-44...
..., Inc. 2.4.1 Configure System performance Settings Ai Overclock Tuner [Auto] Allows selection of the following items vary depending on the motherboard. Main Ai Tweaker BIOS SETUP UTILITY Advanced Power Boot Tools Exit Configure System Performance Settings Ai Overclock Tuner [Auto] CPU Ratio...Auto] Ai Transaction Booster [Auto] C/P : B1 B2 B3 B4 LVL : 12 12 12 12 ******** Please key in numbers directly! ******** Options Manual Auto Select Screen Select Item Enter Go to North Bridge [Auto] DRAM Frequency [Auto] DRAM Timing Control [Auto] 1st Information : 5-5-5-15-3-44...

User Manual
Page 77
...• • 800 • • ASUS P5Q-EM DRAM Frequency (MHz) 800 960 1002 1064 1111 1200 • • • • • • • • • • 2-19 Use the and keys to adjust the value. You can manually adjust DRAM Frequency. Use the and keys to ...and keys to adjust the frequency. Configuration options: [Auto] [06.0] [07.0]-[XX.X] The following two items appear only when you to [Manual]. The value of this item is auto-detected by the clock generator to FSB Frequency settings. Congifuration options: [Auto] [200 MHz] ...
...• • 800 • • ASUS P5Q-EM DRAM Frequency (MHz) 800 960 1002 1064 1111 1200 • • • • • • • • • • 2-19 Use the and keys to adjust the value. You can manually adjust DRAM Frequency. Use the and keys to ...and keys to adjust the frequency. Configuration options: [Auto] [06.0] [07.0]-[XX.X] The following two items appear only when you to [Manual]. The value of this item is auto-detected by the clock generator to FSB Frequency settings. Congifuration options: [Auto] [200 MHz] ...
User Manual
Page 78
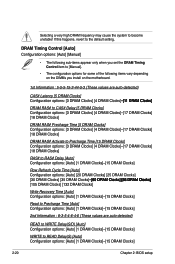
...; The following sub-items apprear only when you set the DRAM Timing Control item to [Manual]. • The configuration options for some of the following items vary depending on the DIMMs you install on the motherboard. 1st Information : 5-5-5-15-3-44-5-3 (These values are auto-detected) CAS# Latency [5 DRAM Clocks] Configuration options: [3 DRAM...
...; The following sub-items apprear only when you set the DRAM Timing Control item to [Manual]. • The configuration options for some of the following items vary depending on the DIMMs you install on the motherboard. 1st Information : 5-5-5-15-3-44-5-3 (These values are auto-detected) CAS# Latency [5 DRAM Clocks] Configuration options: [3 DRAM...

User Manual
Page 80
... from 1.20V to the CPU documentation before setting the CPU voltage. Ai Transaction Booster [Auto] Allows you set the Ai Transaction Booster item to [Manual]. Configuration options: [Auto] [Manual] The following six items are adjusted by DRAM frequency and FSB strap. The number of CHA/B PH1-5 [Disabled] Set this item to 5. Refer...
... from 1.20V to the CPU documentation before setting the CPU voltage. Ai Transaction Booster [Auto] Allows you set the Ai Transaction Booster item to [Manual]. Configuration options: [Auto] [Manual] The following six items are adjusted by DRAM frequency and FSB strap. The number of CHA/B PH1-5 [Disabled] Set this item to 5. Refer...

User Manual
Page 109
3.2.5 Manual menu The Manual menu contains a list of this information on the inside front cover of supplementary user manuals. You can also find this user guide. Most user manual files are in Portable Document Format (PDF). Install the Adobe® Acrobat® Reader before opening a user manual file. 3.2.6 ASUS Contact information Click the Contact tab to open the folder of the user manual. ASUS P5Q-EM 3-7 Click an item to display the ASUS contact information.
3.2.5 Manual menu The Manual menu contains a list of this information on the inside front cover of supplementary user manuals. You can also find this user guide. Most user manual files are in Portable Document Format (PDF). Install the Adobe® Acrobat® Reader before opening a user manual file. 3.2.6 ASUS Contact information Click the Contact tab to open the folder of the user manual. ASUS P5Q-EM 3-7 Click an item to display the ASUS contact information.

User Manual
Page 118
... router in between), click Setup for your computer to as PPPoE. If this is not the case, click Setup to configure the static IP settings manually. • If you check the box next to your dial-up account. Each network interface is enabled immediately when you use a network cable connected to...
... router in between), click Setup for your computer to as PPPoE. If this is not the case, click Setup to configure the static IP settings manually. • If you check the box next to your dial-up account. Each network interface is enabled immediately when you use a network cable connected to...


