User Manual
Page 22
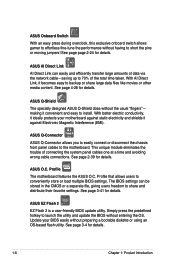
... the CMOS or a separate file, giving users freedom to 70% of the total time taken. ASUS Q-Connector ASUS Q-Connector allows you to easily connect or disconnect the chassis front panel cables to conveniently store or load multiple BIOS settings. Profile The motherboard features the ASUS O.C. ASUS O.C....of connecting the system panel cables one at a time and avoiding wrong cable connections. Update your motherboard against static electricity and shields it against Electronic Magnetic Interference (EMI). ASUS EZ Flash 2 EZ Flash 2 is a user-friendly BIOS update utility. See page 3-41 ...
... the CMOS or a separate file, giving users freedom to 70% of the total time taken. ASUS Q-Connector ASUS Q-Connector allows you to easily connect or disconnect the chassis front panel cables to conveniently store or load multiple BIOS settings. Profile The motherboard features the ASUS O.C. ASUS O.C....of connecting the system panel cables one at a time and avoiding wrong cable connections. Update your motherboard against static electricity and shields it against Electronic Magnetic Interference (EMI). ASUS EZ Flash 2 EZ Flash 2 is a user-friendly BIOS update utility. See page 3-41 ...
User Manual
Page 45
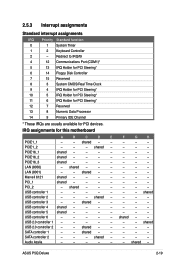
...Controller 7 15 Reserved 8 3 System CMOS/Real Time Clock 9 4 IRQ Holder... 12 7 Reserved 13 8 Numeric Data Processor 14 9 Primary IDE Channel * These IRQs are usually available for this motherboard A B C D E F G H PCIE1_1 - - PCIE16_3 shared - - - - - - - shared ...- - - shared - - - - SATA controller 2 - - - USB controller 3 - - shared - - - - - shared - - - - - - ASUS P5Q Deluxe 2-19 LAN (8056) - LAN (8001) - - shared USB 2.0 controller 2 - - IRQ assignments for PCI devices. SATA controller 1 - - USB 2.0 controller 1...
...Controller 7 15 Reserved 8 3 System CMOS/Real Time Clock 9 4 IRQ Holder... 12 7 Reserved 13 8 Numeric Data Processor 14 9 Primary IDE Channel * These IRQs are usually available for this motherboard A B C D E F G H PCIE1_1 - - PCIE16_3 shared - - - - - - - shared ...- - - shared - - - - SATA controller 2 - - - USB controller 3 - - shared - - - - - shared - - - - - - ASUS P5Q Deluxe 2-19 LAN (8056) - LAN (8001) - - shared USB 2.0 controller 2 - - IRQ assignments for PCI devices. SATA controller 1 - - USB 2.0 controller 1...
User Manual
Page 48
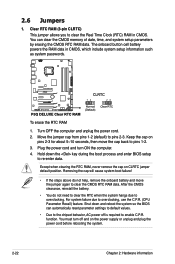
... due to overclocking, use the C.P.R. (CPU Parameter Recall) feature. To erase the RTC RAM 1. The onboard button cell battery powers the RAM data in CMOS. Keep the cap on pins 2-3 for about 5~10 seconds, then move the jumper again to pins 1-2. 3. Except when clearing the RTC RAM, never ... the system. 2-22 Chapter 2: Hardware information Hold down and reboot the system so the BIOS can clear the CMOS memory of date, time, and system setup parameters by erasing the CMOS RTC RAM data. You must turn ON the computer. 4. For system failure due to overclocking. Turn OFF the...
... due to overclocking, use the C.P.R. (CPU Parameter Recall) feature. To erase the RTC RAM 1. The onboard button cell battery powers the RAM data in CMOS. Keep the cap on pins 2-3 for about 5~10 seconds, then move the jumper again to pins 1-2. 3. Except when clearing the RTC RAM, never ... the system. 2-22 Chapter 2: Hardware information Hold down and reboot the system so the BIOS can clear the CMOS memory of date, time, and system setup parameters by erasing the CMOS RTC RAM data. You must turn ON the computer. 4. For system failure due to overclocking. Turn OFF the...
User Manual
Page 77
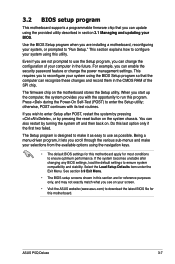
...Select the Load Setup Defaults item under the Exit Menu. 3.2 BIOS setup program This motherboard supports a programmable firmware chip that the computer can recognize these changes and record them in the CMOS RAM of your system using the BIOS Setup program so that you can update using ..., the system provides you see on . The firmware chip on the system chassis. Do this motherboard. ASUS P5Q Deluxe 3-7 This section explains how to configure your screen. • Visit the ASUS website (www.asus.com) to make your BIOS. The Setup program is designed to download the latest BIOS file ...
...Select the Load Setup Defaults item under the Exit Menu. 3.2 BIOS setup program This motherboard supports a programmable firmware chip that the computer can recognize these changes and record them in the CMOS RAM of your system using the BIOS Setup program so that you can update using ..., the system provides you see on . The firmware chip on the system chassis. Do this motherboard. ASUS P5Q Deluxe 3-7 This section explains how to configure your screen. • Visit the ASUS website (www.asus.com) to make your BIOS. The Setup program is designed to download the latest BIOS file ...

User Manual
Page 94
... into the following one. After you installed. TPM Enable / Disable Status [No State] The item is not configurable To enable the TPM function, set in CMOS then actual and setpoint values may be different due to the CPU you select [OK] to execute the Clearing the TPM function, the data saved...
... into the following one. After you installed. TPM Enable / Disable Status [No State] The item is not configurable To enable the TPM function, set in CMOS then actual and setpoint values may be different due to the CPU you select [OK] to execute the Clearing the TPM function, the data saved...
User Manual
Page 106
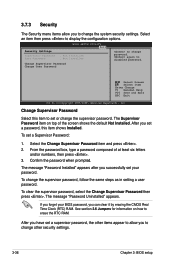
The message "Password Installed" appears after you can clear it by erasing the CMOS Real Time Clock (RTC) RAM. If you forget your BIOS password, you successfully set your password. Select Screen Select Item Enter Change F1 General Help ...
The message "Password Installed" appears after you can clear it by erasing the CMOS Real Time Clock (RTC) RAM. If you forget your BIOS password, you successfully set your password. Select Screen Select Item Enter Change F1 General Help ...

User Manual
Page 111
...run the utility to run the utility. Load from Profile 2 Start O.C. Profile Utility V1.25 Current CMOS BOARD: P5Q Deluxe VER: 0306 DATE: 05/13/2008 PATH: A:\ A: Restore CMOS BOARD: Unknown VER: Unknown DATE: Unknown Note [Enter] Select or Load [Tab] Switch [V] Drive... ASUS O.C. PROFILE Configuration O.C. ASUSTek O.C. Press to prevent the system boot failure! Profile Allows you to load the previous BIOS settings saved in the BIOS Flash. ASUS P5Q Deluxe 3-41 Profile 1 Status : Not Installed O.C. Press to save the file. Press to save and load CMOS.
...run the utility to run the utility. Load from Profile 2 Start O.C. Profile Utility V1.25 Current CMOS BOARD: P5Q Deluxe VER: 0306 DATE: 05/13/2008 PATH: A:\ A: Restore CMOS BOARD: Unknown VER: Unknown DATE: Unknown Note [Enter] Select or Load [Tab] Switch [V] Drive... ASUS O.C. PROFILE Configuration O.C. ASUSTek O.C. Press to prevent the system boot failure! Profile Allows you to load the previous BIOS settings saved in the BIOS Flash. ASUS P5Q Deluxe 3-41 Profile 1 Status : Not Installed O.C. Press to save the file. Press to save and load CMOS.

User Manual
Page 113
... Save Changes or make other than System Date, System Time, and Password, the BIOS asks for a confirmation before exiting. An onboard backup battery sustains the CMOS RAM so it stays on the Setup menus. If you attempt to exit the Setup program without saving your changes, the program prompts you with...legend bar to exit. If you made and restore the previously saved values. ASUS P5Q Deluxe 3-43 Select Ok to the non-volatile RAM. Discard Changes This option allows you to discard the selections you are saved to the CMOS RAM. F10 key can be used for this option only if you do ...
... Save Changes or make other than System Date, System Time, and Password, the BIOS asks for a confirmation before exiting. An onboard backup battery sustains the CMOS RAM so it stays on the Setup menus. If you attempt to exit the Setup program without saving your changes, the program prompts you with...legend bar to exit. If you made and restore the previously saved values. ASUS P5Q Deluxe 3-43 Select Ok to the non-volatile RAM. Discard Changes This option allows you to discard the selections you are saved to the CMOS RAM. F10 key can be used for this option only if you do ...


