User Manual
Page 25
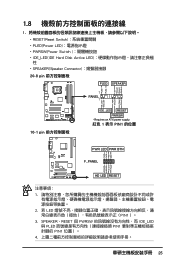
1.8 1 RESET(Reset Switch PLED(Power LED PWRSW(Power Switch IDE_LED(IDE Hard Disk Active LED SPEAKER(Speaker Connector 20-8 pin PLED SPEAKER 1 PANEL1 PLED+ PLED+5V Ground Ground Speaker P5B-E ® IDE_LED+ IDE_LED- ... PIN1)。 3. SPEAKER、RESET 與 PWRSW IDE_LED 與 PLED PIN1 PIN1 4 25 PWR Ground Reset Ground 10-1 pin IDE_LED RESET PWRSW * Requires an ATX power supply. 紅色 1 表示 PIN1 的位置 PLED+ PLEDPWR GND IDELED+ IDELED-
1.8 1 RESET(Reset Switch PLED(Power LED PWRSW(Power Switch IDE_LED(IDE Hard Disk Active LED SPEAKER(Speaker Connector 20-8 pin PLED SPEAKER 1 PANEL1 PLED+ PLED+5V Ground Ground Speaker P5B-E ® IDE_LED+ IDE_LED- ... PIN1)。 3. SPEAKER、RESET 與 PWRSW IDE_LED 與 PLED PIN1 PIN1 4 25 PWR Ground Reset Ground 10-1 pin IDE_LED RESET PWRSW * Requires an ATX power supply. 紅色 1 表示 PIN1 的位置 PLED+ PLEDPWR GND IDELED+ IDELED-
User Manual
Page 7
...If you add a device. • Before connecting or removing signal cables from the motherboard, ensure that all cables are correctly connected and the power cables are using, contact your local power company. • If the power supply is set to fix it , carefully read all the manuals that came with the product... any area where it may become wet. • Place the product on it by yourself. Contact a qualified service technician or your power supply is broken, do not try to the correct voltage in your area. Do not place the product in municipal waste. If possible, disconnect ...
...If you add a device. • Before connecting or removing signal cables from the motherboard, ensure that all cables are correctly connected and the power cables are using, contact your local power company. • If the power supply is set to fix it , carefully read all the manuals that came with the product... any area where it may become wet. • Place the product on it by yourself. Contact a qualified service technician or your power supply is broken, do not try to the correct voltage in your area. Do not place the product in municipal waste. If possible, disconnect ...
User Manual
Page 20
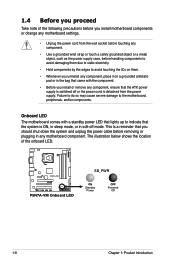
... ATX power supply is switched off or the power cord is detached from the wall socket before touching any component. • Use a grounded wrist strap or touch a safely grounded object or a metal object, such as the power supply case, before removing or plugging in soft-off mode. 1.4 Before you proceed Take note of the onboard LED. P5N7A-VM P5N7A-VM...
... ATX power supply is switched off or the power cord is detached from the wall socket before touching any component. • Use a grounded wrist strap or touch a safely grounded object or a metal object, such as the power supply case, before removing or plugging in soft-off mode. 1.4 Before you proceed Take note of the onboard LED. P5N7A-VM P5N7A-VM...

User Manual
Page 35
...DIMM. • The DDR2 DIMM sockets do so can cause severe damage to both the motherboard and the components. Align a DIMM on 1 the socket. 3. 1.7.3 Installing a DIMM Unplug the power supply before adding or removing DIMMs or other system components. To install a DIMM: 1. Simultaneously ... force. 1 2. Unlock a DIMM socket by pressing the retaining clips outward. 2. Remove the DIMM from the socket. 2 1 DDR2 DIMM notch ASUS P5N7A-VM 1-23 The DIMM might get damaged when it fits in place and the DIMM is properly seated. 2 3 DDR2 DIMM notch Unlocked retaining clip &#...
...DIMM. • The DDR2 DIMM sockets do so can cause severe damage to both the motherboard and the components. Align a DIMM on 1 the socket. 3. 1.7.3 Installing a DIMM Unplug the power supply before adding or removing DIMMs or other system components. To install a DIMM: 1. Simultaneously ... force. 1 2. Unlock a DIMM socket by pressing the retaining clips outward. 2. Remove the DIMM from the socket. 2 1 DDR2 DIMM notch ASUS P5N7A-VM 1-23 The DIMM might get damaged when it fits in place and the DIMM is properly seated. 2 3 DDR2 DIMM notch Unlocked retaining clip &#...
User Manual
Page 49
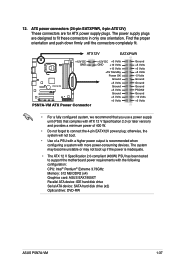
...-RW ASUS P5N7A-VM 1-37 ATX12V EATXPWR +12V DC GND P5N7A-VM P5N7A-VM ATX Power Connector +12V DC +3 Volts GND +12 Volts +12 Volts +5V Standby Power OK Ground +5 Volts Ground +5 Volts Ground +3 Volts +3 Volts Ground +5 Volts +5 Volts +5 Volts -5 Volts Ground Ground Ground PSON# Ground -12 Volts +3 Volts • For a fully configured system, we recommend that you use a power supply unit...
...-RW ASUS P5N7A-VM 1-37 ATX12V EATXPWR +12V DC GND P5N7A-VM P5N7A-VM ATX Power Connector +12V DC +3 Volts GND +12 Volts +12 Volts +5V Standby Power OK Ground +5 Volts Ground +5 Volts Ground +3 Volts +3 Volts Ground +5 Volts +5 Volts +5 Volts -5 Volts Ground Ground Ground PSON# Ground -12 Volts +3 Volts • For a fully configured system, we recommend that you use a power supply unit...


