User Manual
Page 3
... vii About this guide viii P5N7A-VM specifications summary x Chapter 1: Product introduction 1.1 Welcome 1-2 1.2 Package contents 1-2 1.3 Special features 1-2 1.3.1 Product highlights 1-2 1.3.2 ASUS Special Features 1-5 1.3.3 ASUS Stylish Features 1-7 1.3.4 ASUS Intelligent Overclocking features 1-7 1.4 Before you proceed 1-8 1.5 Motherboard overview 1-9 1.5.1 Placement direction 1-9 1.5.2 Screw holes 1-9 1.5.3 Motherboard layout 1-10 1.6 Central Processing Unit (CPU 1-11 1.6.1 Installling the CPU 1-11 1.6.2 Installling the CPU heatsink and fan 1-14 1.6.3 Uninstalling...
... vii About this guide viii P5N7A-VM specifications summary x Chapter 1: Product introduction 1.1 Welcome 1-2 1.2 Package contents 1-2 1.3 Special features 1-2 1.3.1 Product highlights 1-2 1.3.2 ASUS Special Features 1-5 1.3.3 ASUS Stylish Features 1-7 1.3.4 ASUS Intelligent Overclocking features 1-7 1.4 Before you proceed 1-8 1.5 Motherboard overview 1-9 1.5.1 Placement direction 1-9 1.5.2 Screw holes 1-9 1.5.3 Motherboard layout 1-10 1.6 Central Processing Unit (CPU 1-11 1.6.1 Installling the CPU 1-11 1.6.2 Installling the CPU heatsink and fan 1-14 1.6.3 Uninstalling...
User Manual
Page 26
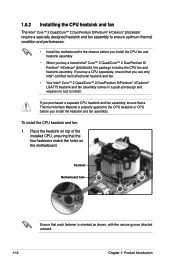
...; Core™ 2 Quad/Core™ 2 Duo/Pentium D/Pentium® 4/Celeron® processor require a specially designed heatsink and fan assembly to ensure optimum thermal condition and performance. • Install the motherboard to the chassis before you install the heatsink and fan assembly. If you buy a boxed Intel® Core™ 2 Quad/Core™ 2 Duo...
...; Core™ 2 Quad/Core™ 2 Duo/Pentium D/Pentium® 4/Celeron® processor require a specially designed heatsink and fan assembly to ensure optimum thermal condition and performance. • Install the motherboard to the chassis before you install the heatsink and fan assembly. If you buy a boxed Intel® Core™ 2 Quad/Core™ 2 Duo...
User Manual
Page 27
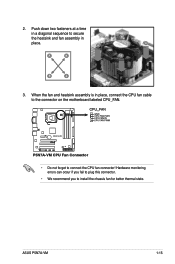
A A A B B B A 3. ASUS P5N7A-VM 1-15 P5N7A-VM P5N7A-VM CPU Fan Connector • Do not forget to install the chassis fan for better thermal state. Hardware monitoring errors can occur if you fail to plug this connector. • We recommend you to connect the CPU fan connector! 2. Push down two fasteners at a time in a diagonal sequence to secure the heatsink and fan assembly in place, connect the CPU fan cable to the connector on the motherboard labeled CPU_FAN. When the fan and heatsink assembly is in B place.
A A A B B B A 3. ASUS P5N7A-VM 1-15 P5N7A-VM P5N7A-VM CPU Fan Connector • Do not forget to install the chassis fan for better thermal state. Hardware monitoring errors can occur if you fail to plug this connector. • We recommend you to connect the CPU fan connector! 2. Push down two fasteners at a time in a diagonal sequence to secure the heatsink and fan assembly in place, connect the CPU fan cable to the connector on the motherboard labeled CPU_FAN. When the fan and heatsink assembly is in B place.
User Manual
Page 28
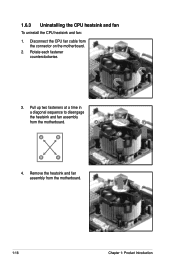
A A B A B B A 4. Pull up two fasteners at a time in a diagonal sequence to disengage the heatsink and fan assembly B from the connector on the motherboard. 2. 1.6.3 Uninstalling the CPU heatsink and fan To uninstall the CPU heatsink and fan: 1. Disconnect the CPU fan cable from the motherboard. Rotate each fastener counterclockwise. 3. Remove the heatsink and fan assembly from the motherboard. 1-16 Chapter 1: Product Introduction
A A B A B B A 4. Pull up two fasteners at a time in a diagonal sequence to disengage the heatsink and fan assembly B from the connector on the motherboard. 2. 1.6.3 Uninstalling the CPU heatsink and fan To uninstall the CPU heatsink and fan: 1. Disconnect the CPU fan cable from the motherboard. Rotate each fastener counterclockwise. 3. Remove the heatsink and fan assembly from the motherboard. 1-16 Chapter 1: Product Introduction
