Asus A8N5X Support and Manuals
Get Help and Manuals for this Asus item

Most Recent Asus A8N5X Questions

Heatsink
I need a fan, heat sink and the black housing that holds the heatsink and fan.
I need a fan, heat sink and the black housing that holds the heatsink and fan.
(Posted by assistedlivingnurse 10 years ago)
Asus A8N5X Videos

ASUS A8N5X FX-60 Repair Report
Duration: 3:18
Total Views: 67
Duration: 3:18
Total Views: 67
Popular Asus A8N5X Manual Pages
A8N5X User's Manual for English Edition - Page 21
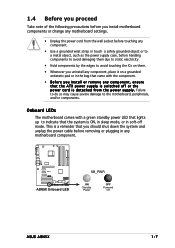
...; Before you install motherboard components or change any motherboard settings.
• Unplug the power cord from the wall socket before touching any component.
• Use a grounded wrist strap or touch a safely grounded object or to a metal object, such as the power supply case, before removing or plugging in any component, ensure that the ATX power supply is ON, in...
A8N5X User's Manual for English Edition - Page 29
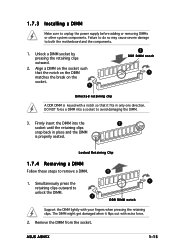
... pressing the retaining clips. Simultaneously press the
retaining clips outward to unplug the power supply before adding or removing DIMMs or other system components. 1.7.3 Installing a DIMM
Make sure to
unlock the DIMM.
1
1
DDR DIMM notch
Support the DIMM lightly with extra force.
2.
ASUS A8N5X
1-15 Remove the DIMM from the socket. Failure to do so may...
A8N5X User's Manual for English Edition - Page 30

...
In the future, you may cause you physical injury and damage motherboard components.
Make sure to the card. Before installing the expansion card, read the documentation that came with it by adjusting the software settings.
1. Replace the system cover.
1.8.2 Configuring an expansion card
After installing the expansion card, configure the it and make the necessary...
A8N5X User's Manual for English Edition - Page 33

... clear the CMOS memory of date, time, and system setup parameters by erasing the CMOS RTC RAM data. A8N5X
®
A8N5X Clear RTC RAM
CLRTC
12
23
Normal (Default)
Clear CMOS
You do not need to clear the RTC when the system hangs due to re-enter data. ASUS A8N5X
1-19 You can automatically reset parameter settings to default...
A8N5X User's Manual for English Edition - Page 40
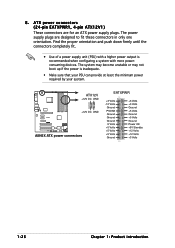
... may become unstable or may not boot up if the power is recommended when configuring a system with a higher power output is inadequate.
• Make sure that your PSU can provide at least the minimum power required by your system. ATX12V
+12V DC GND
A8N5X
®
+12V DC GND
A8N5X ATX power connectors
EATXPWR
+3 Volts -12 Volts
Ground...
A8N5X User's Manual for English Edition - Page 57

... default settings
To select an item on the menu bar, press the right or left arrow key on your screen.
• Visit the ASUS website (www.asus.com) to download the latest BIOS information. ASUS A8N5X
2-13 2.2.1 BIOS menu screen
Menu items Menu bar Configuration fields
General help
Phoenix-Award BIOS CMOS Setup Utility Main Advanced Power Boot...
A8N5X User's Manual for English Edition - Page 59

... description of diskette drive A.
ASUS A8N5X
2-15 F1:Help ESC: Exit
↑↓ : Select Item →←: Select Menu
-/+: Change Value Enter: Select Sub-menu
F5: Setup Defaults F10: Save and Exit
Pop-up window with the configuration options for that item. Phoenix-Award BIOS CMOS Setup Utility Main Advanced Power Boot Exit
System Time System Date...
A8N5X User's Manual for English Edition - Page 65

...] [Disabled]
Select Menu
Item Specific Help
Place an artificial memory clock limit on the system. Phoenix-Award BIOS CMOS Setup Utility Main Advanced Power Boot Exit
CPU Configuration PCIPnP Onboard Device Configuration JumperFree Configuration LAN Cable Status PEG Link Mode Instant Music
Select Menu Item Specific Help Press Enter to change the settings for the CPU and other...
A8N5X User's Manual for English Edition - Page 77
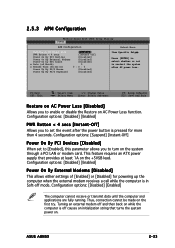
... an ATX power supply that turns the system power on the +5VSB lead. Configuration options: [Disabled] [Enabled]
Power On By External Modems [Disabled]
This allows either settings of Month) x Resume Time (hh:mm:ss) Power Up By PS/2 Mouse Power Up By PS/2 Keyboard
[Disabled] [Instant Off] [Disabled] [Disabled] [Disabled]
0 0 :0 : 0
[Disabled] [Disabled]
Select Menu
Item Specific Help
Press...
A8N5X User's Manual for English Edition - Page 85

...Password, the BIOS asks for the BIOS items, and save or discard your changes to the BIOS items.
Phoenix-Award BIOS CMOS Setup Utility Main Advanced Power Boot Exit
Exit & Save Changes Exit & Discard Changes Load Setup Default Discard Changes
Select Menu
Item Specific...the CMOS RAM so it stays on even when the PC is turned off. Press to CMOS and exiting the setup menu. ASUS A8N5X
2-41
...
A8N5X User's Manual for English Edition - Page 93

... the support CD. The ASUS MyLogo2 window appears. 6. View the online help or readme file that appears on screen during the Power-On Self-Tests (POST). ASUS A8N5X
3-7 See section "2.1.2 Updating the BIOS".
• Make sure that the BIOS item F u l l S c r e e n L o g o is the image that came with the software application for details.
2. Refer to use as your own boot...
A8N5X User's Manual for English Edition - Page 105

... does not provide fault tolerance or other drive.
ASUS A8N5X
3-19 Two hard disks perform the same work as a single disk on the operating system. This RAID configuration provides data protection and increases fault tolerance to section "3.5 Creating a RAID driver disk" for this setup.
3.4 RAID configurations
The motherboard comes with the NVIDIA® nForce™...
A8N5X User's Manual for English Edition - Page 107

... to enter the BIOS Setup Utility.
2. Select and enable the IDE or SATA drive(s) that you want to set the BIOS RAID items:
1. For detailed descriptions on the NVIDIA® RAID configuration, refer to the "NVIDIA® RAID User's Manual" found in the NVIDIA® nForce 4 southbridge chipset. ASUS A8N5X
3-21 It supports RAID 0, RAID 1, RAID...
A8N5X User's Manual for English Edition - Page 114

... the floppy disk with the RAID driver is required when installing Windows® 2000/XP operating system on a hard disk drive that is included in DOS (using FreeDOS from the
support CD. Restart the computer, then enter the BIOS Setup. 3. To install the RAID driver:
1. Set the optical drive as the first boot priority to install third-party SCSI or RAID...
A8N5X User's Manual for English Edition - Page 115

...to E n a b l e d. Reboot your changes and exit BIOS Setup. 5. The following dialog box appears. 5. ASUS A8N5X
3-29 Windows® 2000/XP
1. Make sure the Control Panel is set it to Classic View. 3. From the Windows® 2000/XP operating system, click the S t a r t button. Click O K to install the Cool 'n' Quiet!™ driver and application before using this feature. From the...
Asus A8N5X Reviews
We have not received any reviews for Asus yet.