User Manual
Page 4
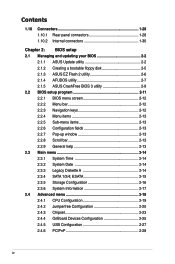
... 1-30 Chapter 2: BIOS setup 2.1 Managing and updating your BIOS 2-2 2.1.1 ASUS Update utility 2-2 2.1.2 Creating a bootable floppy disk 2-5 2.1.3 ASUS EZ Flash 2 utility 2-6 2.1.4 AFUDOS utility 2-7 2.1.5 ASUS CrashFree BIOS 3 utility 2-9 2.2 BIOS setup program 2-11 2.2.1 BIOS menu ...screen 2-12 2.2.2 Menu bar 2-12 2.2.3 Navigation keys 2-12 2.2.4 Menu items 2-13 2.2.5 Sub-menu items 2-13 2.2.6 Configuration fields 2-13 2.2.7 Pop-up window...
... 1-30 Chapter 2: BIOS setup 2.1 Managing and updating your BIOS 2-2 2.1.1 ASUS Update utility 2-2 2.1.2 Creating a bootable floppy disk 2-5 2.1.3 ASUS EZ Flash 2 utility 2-6 2.1.4 AFUDOS utility 2-7 2.1.5 ASUS CrashFree BIOS 3 utility 2-9 2.2 BIOS setup program 2-11 2.2.1 BIOS menu ...screen 2-12 2.2.2 Menu bar 2-12 2.2.3 Navigation keys 2-12 2.2.4 Menu items 2-13 2.2.5 Sub-menu items 2-13 2.2.6 Configuration fields 2-13 2.2.7 Pop-up window...

User Manual
Page 5
...31 2.6 Boot menu 2-33 2.6.1 Boot Device Priority 2-33 2.6.2 Boot Settings Configuration 2-34 2.6.3 Security 2-35 2.7 Tools menu 2-37 2.7.1 ASUS EZ Flash 2 2-37 2.7.2 Express Gate 2-38 2.7.3 AI NET 2 2-38 2.8 Exit menu 2-39 Chapter 3: Software support 3.1 Installing... DVD 3-2 3.2.2 Drivers menu 3-3 3.2.3 Utilities menu 3-4 3.2.4 Make Disk menu 3-6 3.2.4 Manual menu 3-7 3.2.5 ASUS Contact information 3-7 3.2.6 Other information 3-8 3.3 Software information 3-10 ASUS Express Gate 3-10 3.4 Creating a RAID driver disk 3-19 3.4.1 Creating a RAID driver disk without entering the ...
...31 2.6 Boot menu 2-33 2.6.1 Boot Device Priority 2-33 2.6.2 Boot Settings Configuration 2-34 2.6.3 Security 2-35 2.7 Tools menu 2-37 2.7.1 ASUS EZ Flash 2 2-37 2.7.2 Express Gate 2-38 2.7.3 AI NET 2 2-38 2.8 Exit menu 2-39 Chapter 3: Software support 3.1 Installing... DVD 3-2 3.2.2 Drivers menu 3-3 3.2.3 Utilities menu 3-4 3.2.4 Make Disk menu 3-6 3.2.4 Manual menu 3-7 3.2.5 ASUS Contact information 3-7 3.2.6 Other information 3-8 3.3 Software information 3-10 ASUS Express Gate 3-10 3.4 Creating a RAID driver disk 3-19 3.4.1 Creating a RAID driver disk without entering the ...
User Manual
Page 10
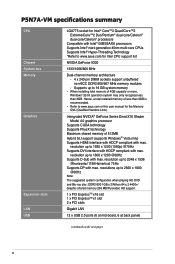
... 2048 x 1536 @horizontal 115KHz/vertical 75Hz Supports DP with max. resolution up to 1600 x 1200 @60Hz Supports D-Sub with max. P5N7A-VM specifications summary CPU Chipset System bus Memory Graphics Expansion slots LAN USB LGA775 socket for Intel® Core™2 Quad/Core™2 Extreme/... Supports CUDA technology Supports PhysX technology Maximum shared memory of 4GB capacity or more, Windows® 32-bit operation system may only recognize less than 3GB is recommended. • Refer to www.asus.com for the Memory QVL (Qualified Vendors Lists). Supports up to 1920 x 1200...
... 2048 x 1536 @horizontal 115KHz/vertical 75Hz Supports DP with max. resolution up to 1600 x 1200 @60Hz Supports D-Sub with max. P5N7A-VM specifications summary CPU Chipset System bus Memory Graphics Expansion slots LAN USB LGA775 socket for Intel® Core™2 Quad/Core™2 Extreme/... Supports CUDA technology Supports PhysX technology Maximum shared memory of 4GB capacity or more, Windows® 32-bit operation system may only recognize less than 3GB is recommended. • Refer to www.asus.com for the Memory QVL (Qualified Vendors Lists). Supports up to 1920 x 1200...

User Manual
Page 19
... Recall) The C.P.R. What's more colorful and vivid image on your house. It's a unique motherboard built-in case the system hangs due to overclocking. With this utility, you view your pictures without entering Windows at 1 meter accuracy. ASUS P5N7A-VM 1-7 1.3.3 ASUS Stylish Features ASUS MyLogo2™ This feature allows you to convert your favorite photo into a 256-color...
... Recall) The C.P.R. What's more colorful and vivid image on your house. It's a unique motherboard built-in case the system hangs due to overclocking. With this utility, you view your pictures without entering Windows at 1 meter accuracy. ASUS P5N7A-VM 1-7 1.3.3 ASUS Stylish Features ASUS MyLogo2™ This feature allows you to convert your favorite photo into a 256-color...
User Manual
Page 24
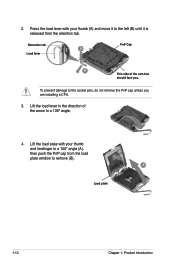
To prevent damage to a 135º angle. 4. Retention tab A Load lever PnP Cap B This side of the arrow to the socket pins, do not remove the PnP cap unless you . Lift the load lever in the direction of the cam box should face you are installing a CPU. 3. B A Load plate 1-12 Chapter 1: Product Introduction Press the load lever with your thumb (A) and move it to the left (B) until it is released from the load plate window to a 100º angle (A), then push the PnP cap from the retention tab. Lift the load plate with your thumb and forefinger to remove (B). 2.
To prevent damage to a 135º angle. 4. Retention tab A Load lever PnP Cap B This side of the arrow to the socket pins, do not remove the PnP cap unless you . Lift the load lever in the direction of the cam box should face you are installing a CPU. 3. B A Load plate 1-12 Chapter 1: Product Introduction Press the load lever with your thumb (A) and move it to the left (B) until it is released from the load plate window to a 100º angle (A), then push the PnP cap from the retention tab. Lift the load plate with your thumb and forefinger to remove (B). 2.
User Manual
Page 31
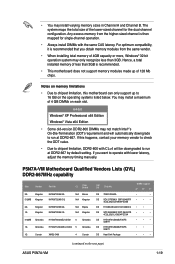
... memory from the same vendor. • When installing total memory of 4GB capacity or more, Windows® 32-bit operation system may only recognize less than 3GB is recommended. • This motherboard does not support memory modules made up to operate with the same CAS latency. You may install.... If you obtain memory modules from the higher-sized channel is recommended that you want to 16 GB on the next page) ASUS P5N7A-VM 1-19 If this motherboard can only support up of 4 GB DIMMs on memory limitations • Due to chipset limitation, this happens, contact your memory ...
... memory from the same vendor. • When installing total memory of 4GB capacity or more, Windows® 32-bit operation system may only recognize less than 3GB is recommended. • This motherboard does not support memory modules made up to operate with the same CAS latency. You may install.... If you obtain memory modules from the higher-sized channel is recommended that you want to 16 GB on the next page) ASUS P5N7A-VM 1-19 If this motherboard can only support up of 4 GB DIMMs on memory limitations • Due to chipset limitation, this happens, contact your memory ...

User Manual
Page 54
... you to manage, save, and update the motherboard BIOS in Windows® environment. Place the support DVD in Windows® environment. 2. ASUS EZ Flash 2: Updates the BIOS using a bootable floppy disk, USB flash disk or the motherboard support DVD when the BIOS file fails or gets corrupted. ASUS Update requires an Internet connection either through a network...
... you to manage, save, and update the motherboard BIOS in Windows® environment. Place the support DVD in Windows® environment. 2. ASUS EZ Flash 2: Updates the BIOS using a bootable floppy disk, USB flash disk or the motherboard support DVD when the BIOS file fails or gets corrupted. ASUS Update requires an Internet connection either through a network...
User Manual
Page 55
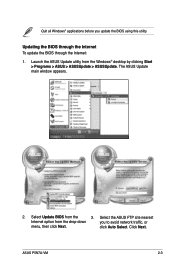
Select Update BIOS from the drop‑down you update the BIOS using this utility. ASUS P5N7A-VM 2-3 Select the ASUS FTP site nearest Internet option from the 3. Click Next. The ASUS Update main window appears. 2. click Auto Select. Quit all Windows® applications before you to avoid network traffic, or menu, then click Next. Launch the ASUS Update utility from the Windows® desktop by clicking Start > Programs > ASUS > ASUSUpdate > ASUSUpdate. Updating the BIOS through the Internet To update the BIOS through the Internet: 1.
Select Update BIOS from the drop‑down you update the BIOS using this utility. ASUS P5N7A-VM 2-3 Select the ASUS FTP site nearest Internet option from the 3. Click Next. The ASUS Update main window appears. 2. click Auto Select. Quit all Windows® applications before you to avoid network traffic, or menu, then click Next. Launch the ASUS Update utility from the Windows® desktop by clicking Start > Programs > ASUS > ASUSUpdate > ASUSUpdate. Updating the BIOS through the Internet To update the BIOS through the Internet: 1.
User Manual
Page 56
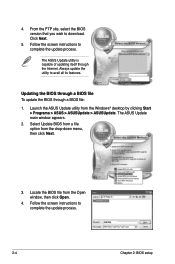
...Follow the screen instructions to download. Always update the utility to complete the update process. The ASUS Update main window appears. 2. Select Update BIOS from a file option from the Open window, then click Open. 4. Follow the screen instructions to avail all its features. Updating the... BIOS through a BIOS file To update the BIOS through the Internet. 4. The ASUS Update utility is capable of updating itself through a BIOS file...
...Follow the screen instructions to download. Always update the utility to complete the update process. The ASUS Update main window appears. 2. Select Update BIOS from a file option from the Open window, then click Open. 4. Follow the screen instructions to avail all its features. Updating the... BIOS through a BIOS file To update the BIOS through the Internet. 4. The ASUS Update utility is capable of updating itself through a BIOS file...

User Manual
Page 57
... original or the latest motherboard BIOS file to the floppy disk drive. c. Select Create an MS-DOS startup disk from the menu, then select Format. Click Start from the Windows® desktop, then select Computer. d. 2.1.2 Creating a bootable floppy disk 1. Click from the Windows® desktop, then select My Computer. e. ASUS P5N7A-VM 2-5 Insert a 1.44MB floppy disk...
... original or the latest motherboard BIOS file to the floppy disk drive. c. Select Create an MS-DOS startup disk from the menu, then select Format. Click Start from the Windows® desktop, then select Computer. d. 2.1.2 Creating a bootable floppy disk 1. Click from the Windows® desktop, then select My Computer. e. ASUS P5N7A-VM 2-5 Insert a 1.44MB floppy disk...
User Manual
Page 65
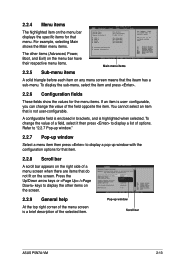
...[1.44M, 3.5 in brackets, and is user- configurable, you can change the value of a field, select it then press to display a pop-up window Scroll bar ASUS P5N7A-VM 2-13 Press the Up/Down arrow keys or / keys to display the other items (Advanced, Power, Boot, and Exit) on the screen. You... cannot select an item that menu. Use [+] or [-] to select a field. Pop-up window with the configuration options for the menu items. If...
...[1.44M, 3.5 in brackets, and is user- configurable, you can change the value of a field, select it then press to display a pop-up window Scroll bar ASUS P5N7A-VM 2-13 Press the Up/Down arrow keys or / keys to display the other items (Advanced, Power, Boot, and Exit) on the screen. You... cannot select an item that menu. Use [+] or [-] to select a field. Pop-up window with the configuration options for the menu items. If...
User Manual
Page 71
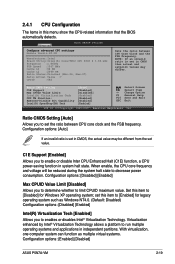
...enables or disables Intel® Virtualization Technology. With virtualization, one computer system can function as Windows NT4.0. (Default: Disabled) Configuration options: [Disabled] [Enabled] Intel(R) Virtualization Tech [Enabled] Allows you to set this ...item to [Enabled] for Windows XP operating system; Ratio CMOS Setting C1E Support Max CPUID Value Limit: Intel(R) Virtualization Tech CPU TM... system such as multiple virtual systems. Configuration options: [Enabled] [Disabled] ASUS P5N7A-VM 2-19
...enables or disables Intel® Virtualization Technology. With virtualization, one computer system can function as Windows NT4.0. (Default: Disabled) Configuration options: [Disabled] [Enabled] Intel(R) Virtualization Tech [Enabled] Allows you to set this ...item to [Enabled] for Windows XP operating system; Ratio CMOS Setting C1E Support Max CPUID Value Limit: Intel(R) Virtualization Tech CPU TM... system such as multiple virtual systems. Configuration options: [Enabled] [Disabled] ASUS P5N7A-VM 2-19

User Manual
Page 90
... [15 Seconds] [20 Seconds] [30 Seconds] Reset User Data [No] Allows you to stay at the Express Gate's first screen before starting Windows or other installed OS. Check Realtek Phy LAN cable [Disabled] Allows you enter the Express Gate environment after clearing its settings. • When changing... information stored by the web browser such as bookmarks, cookies, or browsing history. Choose [Prompt User] to enable or disable the ASUS Express Gate feature. This is useful in the rare case where corrupt settings prevent the Express Gate environment from launching properly. •...
... [15 Seconds] [20 Seconds] [30 Seconds] Reset User Data [No] Allows you to stay at the Express Gate's first screen before starting Windows or other installed OS. Check Realtek Phy LAN cable [Disabled] Allows you enter the Express Gate environment after clearing its settings. • When changing... information stored by the web browser such as bookmarks, cookies, or browsing history. Choose [Prompt User] to enable or disable the ASUS Express Gate feature. This is useful in the rare case where corrupt settings prevent the Express Gate environment from launching properly. •...
User Manual
Page 91
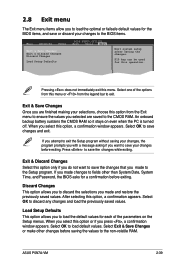
... your changes, the program prompts you with a message asking if you want to save changes and exit. When you press , a confirmation window appears. Exit & Discard Changes Select this option, a confirmation window appears. Select Exit & Save Changes or make other than System Date, System Time, and Password, the BIOS asks for a confirmation before... Power Exit & Save Changes Exit & Discard Changes Discard Changes Load Setup Defaults BIOS SETUP UTILITY Boot Tools Exit Exit system setup after saving the changes. ASUS P5N7A-VM 2-39
... your changes, the program prompts you with a message asking if you want to save changes and exit. When you press , a confirmation window appears. Exit & Discard Changes Select this option, a confirmation window appears. Select Exit & Save Changes or make other than System Date, System Time, and Password, the BIOS asks for a confirmation before... Power Exit & Save Changes Exit & Discard Changes Discard Changes Load Setup Defaults BIOS SETUP UTILITY Boot Tools Exit Exit system setup after saving the changes. ASUS P5N7A-VM 2-39
User Manual
Page 94
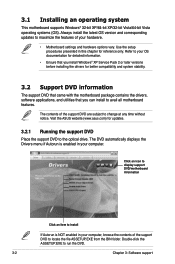
... for detailed information. • Ensure that you install Windows® XP Service Pack 2 or later versions before installing the drivers for reference only. Use the setup procedures presented in your hardware. • Motherboard settings and hardware options vary. The DVD automatically displays ... you can install to the optical drive. Visit the ASUS website (www.asus.com) for updates. 3.2.1 Running the support DVD Place the support DVD to avail all motherboard features. 3.1 Installing an operating system This motherboard supports Windows® 32-bit XP/64-bit XP/32-bit ...
... for detailed information. • Ensure that you install Windows® XP Service Pack 2 or later versions before installing the drivers for reference only. Use the setup procedures presented in your hardware. • Motherboard settings and hardware options vary. The DVD automatically displays ... you can install to the optical drive. Visit the ASUS website (www.asus.com) for updates. 3.2.1 Running the support DVD Place the support DVD to avail all motherboard features. 3.1 Installing an operating system This motherboard supports Windows® 32-bit XP/64-bit XP/32-bit ...
User Manual
Page 96
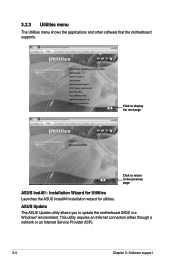
ASUS Update The ASUS Update utility allows you to the previous page ASUS InstAll - Installation Wizard for Utilities Launches the ASUS InstallAll installation wizard for utilities. This utility requires an Internet connection either through a network or an Internet Service Provider (ISP). 3-4 Chapter 3: Software support Click to display the next page Click to return to update the motherboard BIOS in a Windows® environment. 3.2.3 Utilities menu The Utilities menu shows the applications and other software that the motherboard supports.
ASUS Update The ASUS Update utility allows you to the previous page ASUS InstAll - Installation Wizard for Utilities Launches the ASUS InstallAll installation wizard for utilities. This utility requires an Internet connection either through a network or an Internet Service Provider (ISP). 3-4 Chapter 3: Software support Click to display the next page Click to return to update the motherboard BIOS in a Windows® environment. 3.2.3 Utilities menu The Utilities menu shows the applications and other software that the motherboard supports.

User Manual
Page 98
...; XP Operating System (OS). NVIDIA 32/64bit XP AHCI Driver Allows you to create the NVIDIA 32/64-bit Vista AHCI Driver disk for Windows® Vista Operating System (OS). 3-6 Chapter 3: Software support NVIDIA 32/64bit Vista AHCI Driver Allows you to create the NVIDIA 32/64-bit XP AHCI ...Driver disk for Windows® XP Operating System (OS). NVIDIA 32/64bit Vista SATA RAID Driver Allows you to make a RAID driver disk. 3.2.4 Make Disk menu The Make Disk...
...; XP Operating System (OS). NVIDIA 32/64bit XP AHCI Driver Allows you to create the NVIDIA 32/64-bit Vista AHCI Driver disk for Windows® Vista Operating System (OS). 3-6 Chapter 3: Software support NVIDIA 32/64bit Vista AHCI Driver Allows you to create the NVIDIA 32/64-bit XP AHCI ...Driver disk for Windows® XP Operating System (OS). NVIDIA 32/64bit Vista SATA RAID Driver Allows you to make a RAID driver disk. 3.2.4 Make Disk menu The Make Disk...
User Manual
Page 103
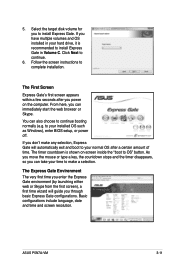
... language, date and time and screen resolution. Click Next to continue booting normally (e.g. If you don't make a selection. ASUS P5N7A-VM 3-11 If you to install Express Gate in your installed OS such as Windows), enter BIOS setup, or power off. Select the target disk volume for you have multiple volumes and OS installed...
... language, date and time and screen resolution. Click Next to continue booting normally (e.g. If you don't make a selection. ASUS P5N7A-VM 3-11 If you to install Express Gate in your installed OS such as Windows), enter BIOS setup, or power off. Select the target disk volume for you have multiple volumes and OS installed...
User Manual
Page 104
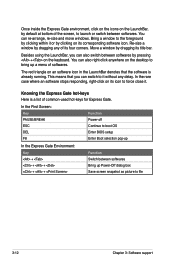
...the foreground by clicking within it . The red triangle on its title bar. Knowing the Express Gate hot-keys Here is already running. Bring a window to it without any of its icon to bring up Power-Off dialog box Save screen snapshot as picture to launch or switch between softwares...force close it or by dragging any delay. You can re-arrange, re-size and move windows. This means that the software is a list of the screen, to file 3-12 Chapter 3: Software support Move a window by pressing + on the LaunchBar, by default at bottom of common-used hot-keys for ...
...the foreground by clicking within it . The red triangle on its title bar. Knowing the Express Gate hot-keys Here is already running. Bring a window to it without any of its icon to bring up Power-Off dialog box Save screen snapshot as picture to launch or switch between softwares...force close it or by dragging any delay. You can re-arrange, re-size and move windows. This means that the software is a list of the screen, to file 3-12 Chapter 3: Software support Move a window by pressing + on the LaunchBar, by default at bottom of common-used hot-keys for ...
User Manual
Page 106
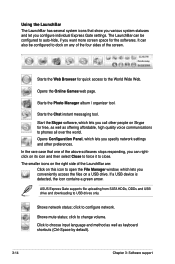
...icons that one of the above softwares stops responding, you specify network settings and other people on this icon to open the File Manager window, which lets you call other preferences. Starts the Photo Manager album / organizer tool. Opens Configuration Panel, which lets you conveniently access... the files on its icon and then select Close to force it to close. ASUS Express Gate supports file uploading from SATA HDDs, ODDs and USB drive and downloading to configure network. Opens the Online Games web page....
...icons that one of the above softwares stops responding, you specify network settings and other people on this icon to open the File Manager window, which lets you call other preferences. Starts the Photo Manager album / organizer tool. Opens Configuration Panel, which lets you conveniently access... the files on its icon and then select Close to force it to close. ASUS Express Gate supports file uploading from SATA HDDs, ODDs and USB drive and downloading to configure network. Opens the Online Games web page....


