User Manual
Page 4
... 1-30 Chapter 2: BIOS setup 2.1 Managing and updating your BIOS 2-2 2.1.1 ASUS Update utility 2-2 2.1.2 Creating a bootable floppy disk 2-5 2.1.3 ASUS EZ Flash 2 utility 2-6 2.1.4 AFUDOS utility 2-7 2.1.5 ASUS CrashFree BIOS 3 utility 2-9 2.2 BIOS setup program 2-11 2.2.1 BIOS menu ...screen 2-12 2.2.2 Menu bar 2-12 2.2.3 Navigation keys 2-12 2.2.4 Menu items 2-13 2.2.5 Sub-menu items 2-13 2.2.6 Configuration fields 2-13 2.2.7 Pop-up window...
... 1-30 Chapter 2: BIOS setup 2.1 Managing and updating your BIOS 2-2 2.1.1 ASUS Update utility 2-2 2.1.2 Creating a bootable floppy disk 2-5 2.1.3 ASUS EZ Flash 2 utility 2-6 2.1.4 AFUDOS utility 2-7 2.1.5 ASUS CrashFree BIOS 3 utility 2-9 2.2 BIOS setup program 2-11 2.2.1 BIOS menu ...screen 2-12 2.2.2 Menu bar 2-12 2.2.3 Navigation keys 2-12 2.2.4 Menu items 2-13 2.2.5 Sub-menu items 2-13 2.2.6 Configuration fields 2-13 2.2.7 Pop-up window...

User Manual
Page 5
...31 2.6 Boot menu 2-33 2.6.1 Boot Device Priority 2-33 2.6.2 Boot Settings Configuration 2-34 2.6.3 Security 2-35 2.7 Tools menu 2-37 2.7.1 ASUS EZ Flash 2 2-37 2.7.2 Express Gate 2-38 2.7.3 AI NET 2 2-38 2.8 Exit menu 2-39 Chapter 3: Software support 3.1 Installing... DVD 3-2 3.2.2 Drivers menu 3-3 3.2.3 Utilities menu 3-4 3.2.4 Make Disk menu 3-6 3.2.4 Manual menu 3-7 3.2.5 ASUS Contact information 3-7 3.2.6 Other information 3-8 3.3 Software information 3-10 ASUS Express Gate 3-10 3.4 Creating a RAID driver disk 3-19 3.4.1 Creating a RAID driver disk without entering the ...
...31 2.6 Boot menu 2-33 2.6.1 Boot Device Priority 2-33 2.6.2 Boot Settings Configuration 2-34 2.6.3 Security 2-35 2.7 Tools menu 2-37 2.7.1 ASUS EZ Flash 2 2-37 2.7.2 Express Gate 2-38 2.7.3 AI NET 2 2-38 2.8 Exit menu 2-39 Chapter 3: Software support 3.1 Installing... DVD 3-2 3.2.2 Drivers menu 3-3 3.2.3 Utilities menu 3-4 3.2.4 Make Disk menu 3-6 3.2.4 Manual menu 3-7 3.2.5 ASUS Contact information 3-7 3.2.6 Other information 3-8 3.3 Software information 3-10 ASUS Express Gate 3-10 3.4 Creating a RAID driver disk 3-19 3.4.1 Creating a RAID driver disk without entering the ...
User Manual
Page 10
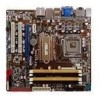
... system memory • When installing total memory of 4GB capacity or more, Windows® 32-bit operation system may only recognize less than 3GB is recommended. • Refer to www.asus.com or this user manual for Intel CPU support list NVIDIA GeForce 9300 1333... total installed memory of 512MB Hybrid SLI support (supports Windows® Vista only) Supports HDMI interface with HDCP compliant with max. resolution up to 1920 x 1200 (1080p) @70Hz Supports DVI interface with HDCP compliant with max. P5N7A-VM specifications summary CPU Chipset System bus Memory Graphics Expansion slots ...
... system memory • When installing total memory of 4GB capacity or more, Windows® 32-bit operation system may only recognize less than 3GB is recommended. • Refer to www.asus.com or this user manual for Intel CPU support list NVIDIA GeForce 9300 1333... total installed memory of 512MB Hybrid SLI support (supports Windows® Vista only) Supports HDMI interface with HDCP compliant with max. resolution up to 1920 x 1200 (1080p) @70Hz Supports DVI interface with HDCP compliant with max. P5N7A-VM specifications summary CPU Chipset System bus Memory Graphics Expansion slots ...

User Manual
Page 19
...ASUS MyLogo2™ This feature allows you to convert your favorite photo into a 256-color boot logo for a more , the user-friendly picture manager lets you can utilize the most popular Instant Messengers (IM) like MSN, Skype, Google talk, QQ, and Yahoo! With this utility, you view your pictures without entering Windows...motherboard built-in touch with friends, or quickly check on the system configuration, hardware configuration, and product model. • ASUS... and e-mails just before leaving your screen. ASUS P5N7A-VM 1-7 Messenger to overclocking, C.P.R. When the system...
...ASUS MyLogo2™ This feature allows you to convert your favorite photo into a 256-color boot logo for a more , the user-friendly picture manager lets you can utilize the most popular Instant Messengers (IM) like MSN, Skype, Google talk, QQ, and Yahoo! With this utility, you view your pictures without entering Windows...motherboard built-in touch with friends, or quickly check on the system configuration, hardware configuration, and product model. • ASUS... and e-mails just before leaving your screen. ASUS P5N7A-VM 1-7 Messenger to overclocking, C.P.R. When the system...
User Manual
Page 24
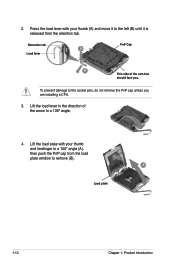
Press the load lever with your thumb (A) and move it to remove (B). Lift the load lever in the direction of the cam box should face you are installing a CPU. 3. Lift the load plate with your thumb and forefinger to a 100º angle (A), then push the PnP cap from the load plate window to the left (B) until it is released from the retention tab. 2. Retention tab A Load lever PnP Cap B This side of the arrow to the socket pins, do not remove the PnP cap unless you . To prevent damage to a 135º angle. 4. B A Load plate 1-12 Chapter 1: Product Introduction
Press the load lever with your thumb (A) and move it to remove (B). Lift the load lever in the direction of the cam box should face you are installing a CPU. 3. Lift the load plate with your thumb and forefinger to a 100º angle (A), then push the PnP cap from the load plate window to the left (B) until it is released from the retention tab. 2. Retention tab A Load lever PnP Cap B This side of the arrow to the socket pins, do not remove the PnP cap unless you . To prevent damage to a 135º angle. 4. B A Load plate 1-12 Chapter 1: Product Introduction
User Manual
Page 31
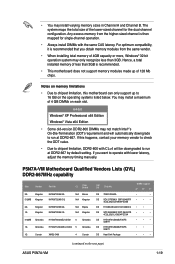
...8226; DS HYB18T512B00B2F3SFS S28171 • • DS Heat-Sink Package • • • (continued on each slot. 64-bit Windows® XP Professional x64 Edition Windows® Vista x64 Edition • Some old-version DDR2-800 DIMMs may install a maximum of 128 Mb chips. Notes on memory limitations...DDR2-800 with CL=4 will automatically downgrade to operate with the same CAS latency. If this motherboard can only support up of 4 GB DIMMs on the next page) ASUS P5N7A-VM 1-19 If you obtain memory modules from the higher-sized channel is recommended that you want ...
...8226; DS HYB18T512B00B2F3SFS S28171 • • DS Heat-Sink Package • • • (continued on each slot. 64-bit Windows® XP Professional x64 Edition Windows® Vista x64 Edition • Some old-version DDR2-800 DIMMs may install a maximum of 128 Mb chips. Notes on memory limitations...DDR2-800 with CL=4 will automatically downgrade to operate with the same CAS latency. If this motherboard can only support up of 4 GB DIMMs on the next page) ASUS P5N7A-VM 1-19 If you obtain memory modules from the higher-sized channel is recommended that you want ...

User Manual
Page 54
... on these utilities. Installing ASUS Update To install ASUS Update: 1. Place the support DVD in Windows® environment. 2. This utility is a utility that comes with the motherboard package. 2.1 Managing and updating your system. 2-2 Chapter 2: BIOS setup ASUS EZ Flash 2: Updates the BIOS using the ASUS Update or AFUDOS utilities. 2.1.1 ASUS Update utility The ASUS Update is available in...
... on these utilities. Installing ASUS Update To install ASUS Update: 1. Place the support DVD in Windows® environment. 2. This utility is a utility that comes with the motherboard package. 2.1 Managing and updating your system. 2-2 Chapter 2: BIOS setup ASUS EZ Flash 2: Updates the BIOS using the ASUS Update or AFUDOS utilities. 2.1.1 ASUS Update utility The ASUS Update is available in...
User Manual
Page 55
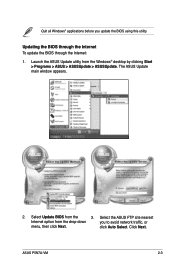
Updating the BIOS through the Internet To update the BIOS through the Internet: 1. Select the ASUS FTP site nearest Internet option from the Windows® desktop by clicking Start > Programs > ASUS > ASUSUpdate > ASUSUpdate. Launch the ASUS Update utility from the drop‑down you update the BIOS using this utility. The ASUS Update main window appears. 2. Select Update BIOS from the 3. ASUS P5N7A-VM 2-3 click Auto Select. Click Next. Quit all Windows® applications before you to avoid network traffic, or menu, then click Next.
Updating the BIOS through the Internet To update the BIOS through the Internet: 1. Select the ASUS FTP site nearest Internet option from the Windows® desktop by clicking Start > Programs > ASUS > ASUSUpdate > ASUSUpdate. Launch the ASUS Update utility from the drop‑down you update the BIOS using this utility. The ASUS Update main window appears. 2. Select Update BIOS from the 3. ASUS P5N7A-VM 2-3 click Auto Select. Click Next. Quit all Windows® applications before you to avoid network traffic, or menu, then click Next.
User Manual
Page 56
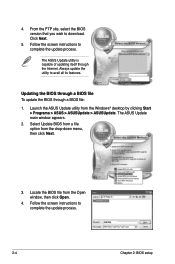
...BIOS through the Internet. Select Update BIOS from a file option from the Windows® desktop by clicking Start > Programs > ASUS > ASUSUpdate > ASUSUpdate. P5N7AVM.rom P5N7AVM 2-4 Chapter 2: BIOS setup 4. Click Next. 5. Launch the ASUS Update utility from the drop‑down menu, then click Next. 3. ...Follow the screen instructions to avail all its features. Follow the screen instructions to download. The ASUS Update utility is capable of updating itself through a BIOS file: 1. From the FTP site, select the BIOS version that you ...
...BIOS through the Internet. Select Update BIOS from a file option from the Windows® desktop by clicking Start > Programs > ASUS > ASUSUpdate > ASUSUpdate. P5N7AVM.rom P5N7AVM 2-4 Chapter 2: BIOS setup 4. Click Next. 5. Launch the ASUS Update utility from the drop‑down menu, then click Next. 3. ...Follow the screen instructions to avail all its features. Follow the screen instructions to download. The ASUS Update utility is capable of updating itself through a BIOS file: 1. From the FTP site, select the BIOS version that you ...

User Manual
Page 57
... Start. Insert a 1.44 MB floppy disk to create a bootable floppy disk. d. Windows® Vista environment a. c. ASUS P5N7A-VM 2-5 Select the Create an MS-DOS startup disk check box. Copy the original or the latest motherboard BIOS file to the floppy disk drive. c. Insert a formatted, high density 1.44 ...the Format 3 1/2 Floppy dialog box. e. Click Start from the menu, then select Format. Click File from the Windows® desktop, then select My Computer. d. b. At the DOS prompt, type format A:/S then press . e. 2.1.2 Creating a bootable floppy disk 1.
... Start. Insert a 1.44 MB floppy disk to create a bootable floppy disk. d. Windows® Vista environment a. c. ASUS P5N7A-VM 2-5 Select the Create an MS-DOS startup disk check box. Copy the original or the latest motherboard BIOS file to the floppy disk drive. c. Insert a formatted, high density 1.44 ...the Format 3 1/2 Floppy dialog box. e. Click Start from the menu, then select Format. Click File from the Windows® desktop, then select My Computer. d. b. At the DOS prompt, type format A:/S then press . e. 2.1.2 Creating a bootable floppy disk 1.
User Manual
Page 65
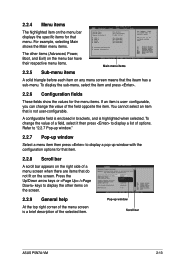
... fit on the screen. 2.2.9 General help At the top right corner of the menu screen is user- Pop-up window with the configuration options for that menu. To change the value of a menu screen when there are items that the... iteam has a sub-menu. Refer to "2.2.7 Pop-up window." 2.2.7 Pop-up window Select a menu item then press to display a list of the selected item. Use [+] or [-] to select a field.... can change the value of a field, select it then press to display a pop-up window Scroll bar ASUS P5N7A-VM 2-13
... fit on the screen. 2.2.9 General help At the top right corner of the menu screen is user- Pop-up window with the configuration options for that menu. To change the value of a menu screen when there are items that the... iteam has a sub-menu. Refer to "2.2.7 Pop-up window." 2.2.7 Pop-up window Select a menu item then press to display a list of the selected item. Use [+] or [-] to select a field.... can change the value of a field, select it then press to display a pop-up window Scroll bar ASUS P5N7A-VM 2-13
User Manual
Page 71
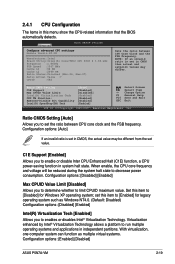
...allows a platform to [Disabled] for legacy operating system such as multiple virtual systems. Configuration options: [Enabled] [Disabled] ASUS P5N7A-VM 2-19 set in CMOS then actual and setpoint values may be reduced during the system halt state to enable or disable Inter...] [Enabled] Max CPUID Value Limit [Disabled] Allows you to limit CPUID maximum value. With virtualization, one computer system can function as Windows NT4.0. (Default: Disabled) Configuration options: [Disabled] [Enabled] Intel(R) Virtualization Tech [Enabled] Allows you to decrease power consumption. Ratio ...
...allows a platform to [Disabled] for legacy operating system such as multiple virtual systems. Configuration options: [Enabled] [Disabled] ASUS P5N7A-VM 2-19 set in CMOS then actual and setpoint values may be reduced during the system halt state to enable or disable Inter...] [Enabled] Max CPUID Value Limit [Disabled] Allows you to limit CPUID maximum value. With virtualization, one computer system can function as Windows NT4.0. (Default: Disabled) Configuration options: [Disabled] [Enabled] Intel(R) Virtualization Tech [Enabled] Allows you to decrease power consumption. Ratio ...

User Manual
Page 90
...or disable the ASUS Express Gate feature. This is useful in the rare case where corrupt settings prevent the Express Gate environment from launching properly. • The first time wizard runs again when you to stay at the Express Gate's first screen before starting Windows or other ...Allows you enable or disable checking Realtek Phy LAN cable during POST. Configuration options: [Disabled] [Enabled] 2-38 Chapter 2: BIOS setup The ASUS Express Gate feature is cleared the next time you to set the countdown duration that provides quick access to clear Express Gate's user data....
...or disable the ASUS Express Gate feature. This is useful in the rare case where corrupt settings prevent the Express Gate environment from launching properly. • The first time wizard runs again when you to stay at the Express Gate's first screen before starting Windows or other ...Allows you enable or disable checking Realtek Phy LAN cable during POST. Configuration options: [Disabled] [Enabled] 2-38 Chapter 2: BIOS setup The ASUS Express Gate feature is cleared the next time you to set the countdown duration that provides quick access to clear Express Gate's user data....
User Manual
Page 91
...option allows you to discard the selections you to fields other changes before saving the values to exit. ASUS P5N7A-VM 2-39 Pressing does not immediately exit this option, a confirmation window appears. Load Setup Defaults This option allows you made and restore the previously saved values. F10 key can.... Press to discard any changes and load the previously saved values. 2.8 Exit menu The Exit menu items allow you press , a confirmation window appears. An onboard backup battery sustains the CMOS RAM so it stays on the Setup menus. When you select this option or if you...
...option allows you to discard the selections you to fields other changes before saving the values to exit. ASUS P5N7A-VM 2-39 Pressing does not immediately exit this option, a confirmation window appears. Load Setup Defaults This option allows you made and restore the previously saved values. F10 key can.... Press to discard any changes and load the previously saved values. 2.8 Exit menu The Exit menu items allow you press , a confirmation window appears. An onboard backup battery sustains the CMOS RAM so it stays on the Setup menus. When you select this option or if you...
User Manual
Page 94
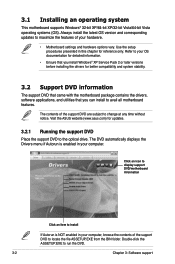
...ASUS website (www.asus.com) for updates. 3.2.1 Running the support DVD Place the support DVD to maximize the features of your OS documentation for detailed information. • Ensure that you install Windows® XP Service Pack 2 or later versions before installing the drivers for reference only. Click an icon to display support DVD/motherboard... automatically displays the Drivers menu if Autorun is NOT enabled in your computer. 3.1 Installing an operating system This motherboard supports Windows® 32-bit XP/64-bit XP/32-bit Vista/64-bit Vista operating systems (OS). Use the ...
...ASUS website (www.asus.com) for updates. 3.2.1 Running the support DVD Place the support DVD to maximize the features of your OS documentation for detailed information. • Ensure that you install Windows® XP Service Pack 2 or later versions before installing the drivers for reference only. Click an icon to display support DVD/motherboard... automatically displays the Drivers menu if Autorun is NOT enabled in your computer. 3.1 Installing an operating system This motherboard supports Windows® 32-bit XP/64-bit XP/32-bit Vista/64-bit Vista operating systems (OS). Use the ...
User Manual
Page 96
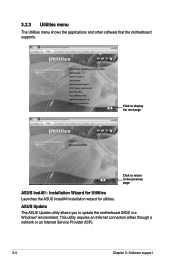
ASUS Update The ASUS Update utility allows you to the previous page ASUS InstAll - This utility requires an Internet connection either through a network or an Internet Service Provider (ISP). 3-4 Chapter 3: Software support Installation Wizard for Utilities Launches the ASUS InstallAll installation wizard for utilities. 3.2.3 Utilities menu The Utilities menu shows the applications and other software that the motherboard supports. Click to display the next page Click to return to update the motherboard BIOS in a Windows® environment.
ASUS Update The ASUS Update utility allows you to the previous page ASUS InstAll - This utility requires an Internet connection either through a network or an Internet Service Provider (ISP). 3-4 Chapter 3: Software support Installation Wizard for Utilities Launches the ASUS InstallAll installation wizard for utilities. 3.2.3 Utilities menu The Utilities menu shows the applications and other software that the motherboard supports. Click to display the next page Click to return to update the motherboard BIOS in a Windows® environment.

User Manual
Page 98
... (OS). 3-6 Chapter 3: Software support NVIDIA 32/64bit Vista SATA RAID Driver Allows you to create the NVIDIA 32/64-bit Vista AHCI Driver disk for Windows® Vista Operating System (OS). NVIDIA 32/64bit XP SATA RAID Driver Allows you to make a RAID driver disk. 3.2.4 Make Disk menu The Make Disk... menu allows you to create the NVIDIA 32/64-bit XP SATA RAID Driver disks for Windows® XP Operating System (OS). NVIDIA 32/64bit XP AHCI Driver Allows you to create the NVIDIA 32/64-bit XP AHCI Driver disk for...
... (OS). 3-6 Chapter 3: Software support NVIDIA 32/64bit Vista SATA RAID Driver Allows you to create the NVIDIA 32/64-bit Vista AHCI Driver disk for Windows® Vista Operating System (OS). NVIDIA 32/64bit XP SATA RAID Driver Allows you to make a RAID driver disk. 3.2.4 Make Disk menu The Make Disk... menu allows you to create the NVIDIA 32/64-bit XP SATA RAID Driver disks for Windows® XP Operating System (OS). NVIDIA 32/64bit XP AHCI Driver Allows you to create the NVIDIA 32/64-bit XP AHCI Driver disk for...
User Manual
Page 103
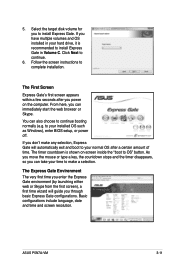
... the countdown stops and the timer disappears, so you can immediately start the web browser or Skype. Follow the screen instructions to continue. 6. ASUS P5N7A-VM 3-11 Click Next to complete installation. You can take your hard drive, it is shown on the computer. 5. If you don't make...to continue booting normally (e.g. The timer countdown is recommended to install Express Gate in your time to your installed OS such as Windows), enter BIOS setup, or power off. Basic configurations include language, date and time and screen resolution. The Express Gate Environment ...
... the countdown stops and the timer disappears, so you can immediately start the web browser or Skype. Follow the screen instructions to continue. 6. ASUS P5N7A-VM 3-11 Click Next to complete installation. You can take your hard drive, it is shown on the computer. 5. If you don't make...to continue booting normally (e.g. The timer countdown is recommended to install Express Gate in your time to your installed OS such as Windows), enter BIOS setup, or power off. Basic configurations include language, date and time and screen resolution. The Express Gate Environment ...
User Manual
Page 104
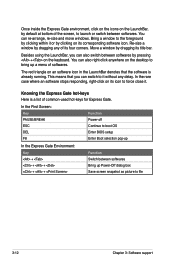
... Gate environment, click on the icons on its icon to force close it without any of common-used hot-keys for Express Gate. Move a window by dragging any delay. In the rare case where an software stops responding, right-click on the LaunchBar, by default at bottom of softwares.... Besides using the LaunchBar, you can also switch between softwares. This means that the software is a list of its four corners. Bring a window to the foreground by clicking within it or by pressing + on the desktop to bring up Power-Off dialog box Save screen snapshot as picture...
... Gate environment, click on the icons on its icon to force close it without any of common-used hot-keys for Express Gate. Move a window by dragging any delay. In the rare case where an software stops responding, right-click on the LaunchBar, by default at bottom of softwares.... Besides using the LaunchBar, you can also switch between softwares. This means that the software is a list of its four corners. Bring a window to the foreground by clicking within it or by pressing + on the desktop to bring up Power-Off dialog box Save screen snapshot as picture...
User Manual
Page 106
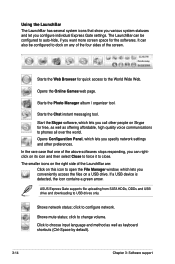
... Games web page. Opens Configuration Panel, which lets you want more screen space for quick access to configure network. Click to open the File Manager window, which lets you call other people on Skype for free, as well as keyboard shortcuts (Ctrl-Space by default). 3-14 Chapter 3: Software support... and other preferences. click to USB drives only. The LaunchBar can be configured to dock on any of the four sides of the screen. ASUS Express Gate supports file uploading from SATA HDDs, ODDs and USB drive and downloading to change volume. Starts the Web Browser for the softwares....
... Games web page. Opens Configuration Panel, which lets you want more screen space for quick access to configure network. Click to open the File Manager window, which lets you call other people on Skype for free, as well as keyboard shortcuts (Ctrl-Space by default). 3-14 Chapter 3: Software support... and other preferences. click to USB drives only. The LaunchBar can be configured to dock on any of the four sides of the screen. ASUS Express Gate supports file uploading from SATA HDDs, ODDs and USB drive and downloading to change volume. Starts the Web Browser for the softwares....


