P5LD2 Deluxe User's Manual for English Edition
Page 4
...setup 4.1 Managing and updating your BIOS 4-1 4.1.1 Creating a bootable floppy disk 4-1 4.1.2 AFUDOS utility 4-2 4.1.3 ASUS CrashFree BIOS 2 utility 4-5 4.1.4 ASUS EZ Flash utility 4-7 4.1.5 ASUS Update utility 4-8 4.2 BIOS setup program 4-11 4.2.1 BIOS menu screen 4-12 4.2.2 Menu bar 4-12 4.2.3... Navigation keys 4-12 4.2.4 Menu items 4-13 4.2.5 Sub-menu items 4-13 4.2.6 Configuration fields 4-13 4.2.7 Pop-up window 4-13 4.2.8...
...setup 4.1 Managing and updating your BIOS 4-1 4.1.1 Creating a bootable floppy disk 4-1 4.1.2 AFUDOS utility 4-2 4.1.3 ASUS CrashFree BIOS 2 utility 4-5 4.1.4 ASUS EZ Flash utility 4-7 4.1.5 ASUS Update utility 4-8 4.2 BIOS setup program 4-11 4.2.1 BIOS menu screen 4-12 4.2.2 Menu bar 4-12 4.2.3... Navigation keys 4-12 4.2.4 Menu items 4-13 4.2.5 Sub-menu items 4-13 4.2.6 Configuration fields 4-13 4.2.7 Pop-up window 4-13 4.2.8...

P5LD2 Deluxe User's Manual for English Edition
Page 32
... remove (B). Gold triangle mark 2-8 Chapter 2: Hardware information Position the CPU over the socket, making sure that the gold triangle is released from the load plate window to the socket pins, do not remove the PnP cap unless you . B A Load plate 5. Lift the load plate with your thumb and forefinger to a 100...
... remove (B). Gold triangle mark 2-8 Chapter 2: Hardware information Position the CPU over the socket, making sure that the gold triangle is released from the load plate window to the socket pins, do not remove the PnP cap unless you . B A Load plate 5. Lift the load plate with your thumb and forefinger to a 100...
P5LD2 Deluxe User's Manual for English Edition
Page 51
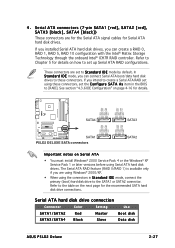
...d a r d I D E mode, you are for the Serial ATA signal cables for details on Serial ATA • You must install Windows® 2000 Service Pack 4 or the Windows® XP Service Pack 1 or later versions before using these connectors. The Serial ATA RAID feature (RAID 0/RAID 1) is available only if you... Serial ATA hard disk drive connection Connector Color Setting Use SATA1/SATA2 Red Master Boot disk SATA3/SATA4 Black Slave Data disk ASUS P5LD2 Deluxe 2-27 If you can connect Serial ATA boot/data hard disk drives to Chapter 5 for Serial ATA hard disk drives. ...
...d a r d I D E mode, you are for the Serial ATA signal cables for details on Serial ATA • You must install Windows® 2000 Service Pack 4 or the Windows® XP Service Pack 1 or later versions before using these connectors. The Serial ATA RAID feature (RAID 0/RAID 1) is available only if you... Serial ATA hard disk drive connection Connector Color Setting Use SATA1/SATA2 Red Master Boot disk SATA3/SATA4 Black Slave Data disk ASUS P5LD2 Deluxe 2-27 If you can connect Serial ATA boot/data hard disk drives to Chapter 5 for Serial ATA hard disk drives. ...

P5LD2 Deluxe User's Manual for English Edition
Page 62
... sure that the S h u t D o w n option button is ON, pressing the power switch for details. 3-2 Chapter 3: Powering up The power supply should turn off after Windows® shuts down the computer. 3. Pressing the power switch for more than four seconds puts the system to sleep mode or to shut down . Click... r t button then click S h u t D o w n . . . 2. Click the T u r n O f f button to soft-off after Windows® shuts down. 3.2.2 Using the dual function power switch While the system is selected, then click the O K button to section "4.5 Power Menu" in Chapter 4 for...
... sure that the S h u t D o w n option button is ON, pressing the power switch for details. 3-2 Chapter 3: Powering up The power supply should turn off after Windows® shuts down the computer. 3. Pressing the power switch for more than four seconds puts the system to sleep mode or to shut down . Click... r t button then click S h u t D o w n . . . 2. Click the T u r n O f f button to soft-off after Windows® shuts down. 3.2.2 Using the dual function power switch While the system is selected, then click the O K button to section "4.5 Power Menu" in Chapter 4 for...

P5LD2 Deluxe User's Manual for English Edition
Page 65
....) 4. Save a copy of the following utilities allow you need to restore the BIOS in the future. Click S t a r t from the menu, then select F o r m a t. Click F i l e from the Windows® desktop, then select M y C o m p u t e r. A S U S E Z F l a s h (Updates the BIOS in case you to manage and update the motherboard Basic Input/Output System (BIOS) setup. 1. b. W i n d o w s® X P u s e r s : Select C r e a t e a n M S - D O S s t... disk. Insert a 1.44 MB floppy disk to the floppy disk drive. Select the 3 1/2 Floppy Drive icon. d. ASUS P5LD2 Deluxe 4-1
....) 4. Save a copy of the following utilities allow you need to restore the BIOS in the future. Click S t a r t from the menu, then select F o r m a t. Click F i l e from the Windows® desktop, then select M y C o m p u t e r. A S U S E Z F l a s h (Updates the BIOS in case you to manage and update the motherboard Basic Input/Output System (BIOS) setup. 1. b. W i n d o w s® X P u s e r s : Select C r e a t e a n M S - D O S s t... disk. Insert a 1.44 MB floppy disk to the floppy disk drive. Select the 3 1/2 Floppy Drive icon. d. ASUS P5LD2 Deluxe 4-1

P5LD2 Deluxe User's Manual for English Edition
Page 66
... same as backup when the BIOS fails or gets corrupted during the updating process. This utility also allows you created earlier. 2. Insert the Windows® 2000 CD to continue. 2. Windows® 2000 environment To create a set of boot disks for reference only. Insert a formatted, high density 1.44 MB floppy disk into the... utility (afudos.exe) from the motherboard support CD to the bootable floppy disk you to save the file. • The succeeding BIOS screens are for Windows® 2000: a.
... same as backup when the BIOS fails or gets corrupted during the updating process. This utility also allows you created earlier. 2. Insert the Windows® 2000 CD to continue. 2. Windows® 2000 environment To create a set of boot disks for reference only. Insert a formatted, high density 1.44 MB floppy disk into the... utility (afudos.exe) from the motherboard support CD to the bootable floppy disk you to save the file. • The succeeding BIOS screens are for Windows® 2000: a.

P5LD2 Deluxe User's Manual for English Edition
Page 72
...then click I n s t a l l A S U S U p d a t e V X . See page 5-4 for the U t i l i t i e s screen menu. 3. Installing ASUS Update To install ASUS Update: 1. X X. ASUS Update requires an Internet connection either through a network or an Internet Service Provider (ISP). Quit all Windows® applications before you to: • Save the current BIOS file • Download the latest BIOS..., save, and update the motherboard BIOS in Windows® environment. Place the support CD in the support CD that allows you to your system. The ASUS Update utility allows you update the BIOS using ...
...then click I n s t a l l A S U S U p d a t e V X . See page 5-4 for the U t i l i t i e s screen menu. 3. Installing ASUS Update To install ASUS Update: 1. X X. ASUS Update requires an Internet connection either through a network or an Internet Service Provider (ISP). Quit all Windows® applications before you to: • Save the current BIOS file • Download the latest BIOS..., save, and update the motherboard BIOS in Windows® environment. Place the support CD in the support CD that allows you to your system. The ASUS Update utility allows you update the BIOS using ...

P5LD2 Deluxe User's Manual for English Edition
Page 73
The ASUS Update main window appears. 2. Updating the BIOS through the Internet To update the BIOS through the Internet: 1. Click N e x t. ASUS P5LD2 Deluxe 4-9 N e x t. Select the ASUS FTP site t h e I O S f r o m 3. Select U p d a t e B I n t e r n e t option from the Windows® desktop by clicking S t a r t > P r o g r a m s > A S U S > A S U S U p d a t e > A S U S U p d a t e. Launch the ASUS Update utility from the nearest you to avoid network drop-down menu, then click traffic, or click A u t o S e l e c t.
The ASUS Update main window appears. 2. Updating the BIOS through the Internet To update the BIOS through the Internet: 1. Click N e x t. ASUS P5LD2 Deluxe 4-9 N e x t. Select the ASUS FTP site t h e I O S f r o m 3. Select U p d a t e B I n t e r n e t option from the Windows® desktop by clicking S t a r t > P r o g r a m s > A S U S > A S U S U p d a t e > A S U S U p d a t e. Launch the ASUS Update utility from the nearest you to avoid network drop-down menu, then click traffic, or click A u t o S e l e c t.

P5LD2 Deluxe User's Manual for English Edition
Page 74
...BIOS through a BIOS file To update the BIOS through the Internet. The ASUS Update main window appears. 2. The ASUS Update utility is capable of updating itself through a BIOS file: 1. From... that you wish to avail all its features. Locate the BIOS file from the Windows® desktop by clicking S t a r t > P r o g r a m s > A S U S > A S U S U p d a t e > A S U S U p d a t e. Follow the screen instructions to complete the update process. 4-10 Chapter 4: BIOS setup Launch the ASUS Update utility from the O p e n window, then click S a v e. 4. Select U p d a t e B I O S f...
...BIOS through a BIOS file To update the BIOS through the Internet. The ASUS Update main window appears. 2. The ASUS Update utility is capable of updating itself through a BIOS file: 1. From... that you wish to avail all its features. Locate the BIOS file from the Windows® desktop by clicking S t a r t > P r o g r a m s > A S U S > A S U S U p d a t e > A S U S U p d a t e. Follow the screen instructions to complete the update process. 4-10 Chapter 4: BIOS setup Launch the ASUS Update utility from the O p e n window, then click S a v e. 4. Select U p d a t e B I O S f...

P5LD2 Deluxe User's Manual for English Edition
Page 77
...-up window Select a menu item then press to select a field. Select Screen Select Item +- You cannot select an item that the iteam has a sub-menu. Advanced Chipset settings WARNING: Setting wrong values in ] [English] :[ST320413A] :[ASUS CD-S340] :[Not Detected] :[Not Detected] :[Not Detected] :[Not ...Detected] Use [ENTER], [TAB] or [SHIFT-TAB] to display a pop-up window Scroll bar ASUS P5LD2 Deluxe 4-13 4.2.4 Menu items The highlighted item on the menu bar displays the specific items for that do not fit on the screen. For ...
...-up window Select a menu item then press to select a field. Select Screen Select Item +- You cannot select an item that the iteam has a sub-menu. Advanced Chipset settings WARNING: Setting wrong values in ] [English] :[ST320413A] :[ASUS CD-S340] :[Not Detected] :[Not Detected] :[Not Detected] :[Not ...Detected] Use [ENTER], [TAB] or [SHIFT-TAB] to display a pop-up window Scroll bar ASUS P5LD2 Deluxe 4-13 4.2.4 Menu items The highlighted item on the menu bar displays the specific items for that do not fit on the screen. For ...

P5LD2 Deluxe User's Manual for English Edition
Page 81
It is recommend that you set to [RAID]. The P-ATA+S-ATA and P-ATA options are using native OS including Windows® 2000/XP. If you do not install any of the IDE operation mode depending on Serial ATA and Parallel ATA ports...switch. A T A. IDE Detect Time Out [35] Selects the time out value for detecting ATA/ATAPI devices. Configuration options: [0] [5] [10] [15] [20] [25] [30] [35] ASUS P5LD2 Deluxe 4-17 Onboard Serial-ATA BOOTROM [Disabled] Enables or disables the onboard Serial ATA boot ROM. Configuration options: [Disabled] [Enabled] The A L P E a n d A S P and its ...
It is recommend that you set to [RAID]. The P-ATA+S-ATA and P-ATA options are using native OS including Windows® 2000/XP. If you do not install any of the IDE operation mode depending on Serial ATA and Parallel ATA ports...switch. A T A. IDE Detect Time Out [35] Selects the time out value for detecting ATA/ATAPI devices. Configuration options: [0] [5] [10] [15] [20] [25] [30] [35] ASUS P5LD2 Deluxe 4-17 Onboard Serial-ATA BOOTROM [Disabled] Enables or disables the onboard Serial ATA boot ROM. Configuration options: [Disabled] [Enabled] The A L P E a n d A S P and its ...

P5LD2 Deluxe User's Manual for English Edition
Page 93
...Enable or disable High Definition Audio Controller. LAN Option ROM [Disabled] This item allows you to Enabled. Configuration options: [Disabled] [Enabled] ASUS P5LD2 Deluxe 4-29 Configuration options: [Enabled] [Disabled] Front Panel Support Type [HD Audio] Allows you to set to enable or disable the onboard PCI... Configuration options: [Disabled] [Enabled] The Gigabit LAN controller does not support S5 Wake-On-LAN function under DOS mode or Windows® ME. HD Audio Controller [Enabled] Allows you to enable or disable the high-definition audio CODEC. Configuration options: [...
...Enable or disable High Definition Audio Controller. LAN Option ROM [Disabled] This item allows you to Enabled. Configuration options: [Disabled] [Enabled] ASUS P5LD2 Deluxe 4-29 Configuration options: [Enabled] [Disabled] Front Panel Support Type [HD Audio] Allows you to set to enable or disable the onboard PCI... Configuration options: [Disabled] [Enabled] The Gigabit LAN controller does not support S5 Wake-On-LAN function under DOS mode or Windows® ME. HD Audio Controller [Enabled] Allows you to enable or disable the high-definition audio CODEC. Configuration options: [...

P5LD2 Deluxe User's Manual for English Edition
Page 107
... to exit. Press to Sub-screen F1 General Help F10 Save and Exit ESC Exit Pressing does not immediately exit this option, a confirmation window appears. Discard Changes Allows you to discard the selections you select this menu. Select Screen Select Item Enter Go to save the changes while exiting... backup battery sustains the CMOS RAM so it stays on even when the computer is turned off. If you made to the Setup program. ASUS P5LD2 Deluxe 4-43 4.7 Exit menu The Exit menu items allow you to load the optimal or failsafe default values for a confirmation before exiting. F10...
... to exit. Press to Sub-screen F1 General Help F10 Save and Exit ESC Exit Pressing does not immediately exit this option, a confirmation window appears. Discard Changes Allows you to discard the selections you select this menu. Select Screen Select Item Enter Go to save the changes while exiting... backup battery sustains the CMOS RAM so it stays on even when the computer is turned off. If you made to the Setup program. ASUS P5LD2 Deluxe 4-43 4.7 Exit menu The Exit menu items allow you to load the optimal or failsafe default values for a confirmation before exiting. F10...

P5LD2 Deluxe User's Manual for English Edition
Page 108
Select O k to the non-volatile RAM. 4-44 Chapter 4: BIOS setup Load Setup Defaults Allows you press , a confirmation window appears. When you select this option or if you to load the default values for each of the parameters on the Setup menus. Select E x i t & S a v e C h a n g e s or make other changes before saving the values to load default values.
Select O k to the non-volatile RAM. 4-44 Chapter 4: BIOS setup Load Setup Defaults Allows you press , a confirmation window appears. When you select this option or if you to load the default values for each of the parameters on the Setup menus. Select E x i t & S a v e C h a n g e s or make other changes before saving the values to load default values.

P5LD2 Deluxe User's Manual for English Edition
Page 111
...; XP Service Pack1 or later versions before installing the drivers for reference only. 5.1 Installing an operating system This motherboard supports Windows® 2000/2003 Server/XP operating systems (OS). ASUS P5LD2 Deluxe 5-1 Use the setup procedures presented in your hardware. • Motherboard settings and hardware options vary. Refer to your computer, browse the contents...
...; XP Service Pack1 or later versions before installing the drivers for reference only. 5.1 Installing an operating system This motherboard supports Windows® 2000/2003 Server/XP operating systems (OS). ASUS P5LD2 Deluxe 5-1 Use the setup procedures presented in your hardware. • Motherboard settings and hardware options vary. Refer to your computer, browse the contents...

P5LD2 Deluxe User's Manual for English Edition
Page 112
... before you install the Intel® Chipset Inf Update Program. This driver enables Plug-n-Play INF support for the USB 1.1/2.0 drivers. QFE Update Installs the Windows® XP Service Pack 1 component update for the Intel® chipset components on the motherboard. Intel Chipset Inf Update Program This item installs the Intel...
... before you install the Intel® Chipset Inf Update Program. This driver enables Plug-n-Play INF support for the USB 1.1/2.0 drivers. QFE Update Installs the Windows® XP Service Pack 1 component update for the Intel® chipset components on the motherboard. Intel Chipset Inf Update Program This item installs the Intel...

P5LD2 Deluxe User's Manual for English Edition
Page 119
... Settings Configuration". • You can create your original BIOS file, or obtain the latest BIOS version from the drop down menu, then click N e x t. 5. Launch the ASUS Update utility. Check the option L a u n c h M y L o g o t o r e p l a c e s y s t e m b o o t l o g o b e f o r e f l a s h i n g B I O S f r o m a f i l e ... r e e n L o g o is the image that will conveniently guide you through the installation. ASUS P5ND2-SLI Deluxe 5-9 The ASUS MyLogo2 window appears. 6. 5.3 Software information Most of your own boot logo image in the support CD have wizards that ...
... Settings Configuration". • You can create your original BIOS file, or obtain the latest BIOS version from the drop down menu, then click N e x t. 5. Launch the ASUS Update utility. Check the option L a u n c h M y L o g o t o r e p l a c e s y s t e m b o o t l o g o b e f o r e f l a s h i n g B I O S f r o m a f i l e ... r e e n L o g o is the image that will conveniently guide you through the installation. ASUS P5ND2-SLI Deluxe 5-9 The ASUS MyLogo2 window appears. 6. 5.3 Software information Most of your own boot logo image in the support CD have wizards that ...

P5LD2 Deluxe User's Manual for English Edition
Page 120
When the screen returns to the ASUS Update utility, flash the original BIOS to display the new boot logo during POST. 5-10 Chapter 5: Software support After flashing the BIOS, restart the computer to load the new boot logo. 10. When the logo images appear on the right window pane, select an image to your desired size by clicking on the R a t i o box. 9. 7. Adjust the boot image to enlarge by selecting a value on it. 8.
When the screen returns to the ASUS Update utility, flash the original BIOS to display the new boot logo during POST. 5-10 Chapter 5: Software support After flashing the BIOS, restart the computer to load the new boot logo. 10. When the logo images appear on the right window pane, select an image to your desired size by clicking on the R a t i o box. 9. 7. Adjust the boot image to enlarge by selecting a value on it. 8.

P5LD2 Deluxe User's Manual for English Edition
Page 121
Using the Virtual Cable Tester™ To use the the Marvell® Virtual Cable Tester™ utility: 1. Click V i r t u a l C a b l e T e s t e r from the Windows® desktop by clicking S t a r t > A l l P r o g r a m s > M a r v e l l > V i r t u a l C a b l e T e s t e r. 2. 5.3.2 AI NET 2 The Marvell® Virtual Cable Tester™ (...100 meters at one meter accuracy. Launch the VCT utility from the menu to display the screen below. 3. ASUS P5ND2-SLI Deluxe 5-11 The VCT detects and reports open and shorted cables, impedance mismatches, pair swaps, pair polarity problems, ...
Using the Virtual Cable Tester™ To use the the Marvell® Virtual Cable Tester™ utility: 1. Click V i r t u a l C a b l e T e s t e r from the Windows® desktop by clicking S t a r t > A l l P r o g r a m s > M a r v e l l > V i r t u a l C a b l e T e s t e r. 2. 5.3.2 AI NET 2 The Marvell® Virtual Cable Tester™ (...100 meters at one meter accuracy. Launch the VCT utility from the menu to display the screen below. 3. ASUS P5ND2-SLI Deluxe 5-11 The VCT detects and reports open and shorted cables, impedance mismatches, pair swaps, pair polarity problems, ...

P5LD2 Deluxe User's Manual for English Edition
Page 122
... Realtek HD Audio Manager icon on your PC. Enjoy true home theatre experience with the motherboard package. Realtek HD Audio Manager Configuration options Control settings window Realtek HD Audio Manager Exit button Minimize button Information button Tool button D o l b y® f e a t u r e launch buttons 5-12 Chapter 5: Software support From the taskbar, double-click on...
... Realtek HD Audio Manager icon on your PC. Enjoy true home theatre experience with the motherboard package. Realtek HD Audio Manager Configuration options Control settings window Realtek HD Audio Manager Exit button Minimize button Information button Tool button D o l b y® f e a t u r e launch buttons 5-12 Chapter 5: Software support From the taskbar, double-click on...


