
User Manual
Page 3
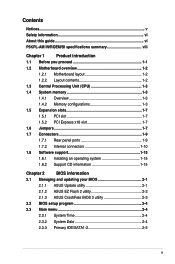
Contents Notices...v Safety information vi About this guide vi P5KPL-AM IN/ROEM/SI specifications summary viii Chapter 1 Product introduction 1.1 Before you proceed 1-1 1.2 Motherboard overview 1-2... support 1-15 1.8.1 Installing an operating system 1-15 1.8.2 Support CD information 1-15 Chapter 2 BIOS information 2.1 Managing and updating your BIOS 2-1 2.1.1 ASUS Update utility 2-1 2.1.2 ASUS EZ Flash 2 utility 2-2 2.1.3 ASUS CrashFree BIOS 3 utility 2-3 2.2 BIOS setup program 2-4 2.3 Main menu 2-4 2.3.1 System Time 2-4 2.3.2 System Date 2-4 2.3.3 Primary IDE...
Contents Notices...v Safety information vi About this guide vi P5KPL-AM IN/ROEM/SI specifications summary viii Chapter 1 Product introduction 1.1 Before you proceed 1-1 1.2 Motherboard overview 1-2... support 1-15 1.8.1 Installing an operating system 1-15 1.8.2 Support CD information 1-15 Chapter 2 BIOS information 2.1 Managing and updating your BIOS 2-1 2.1.1 ASUS Update utility 2-1 2.1.2 ASUS EZ Flash 2 utility 2-2 2.1.3 ASUS CrashFree BIOS 3 utility 2-3 2.2 BIOS setup program 2-4 2.3 Main menu 2-4 2.3.1 System Time 2-4 2.3.2 System Date 2-4 2.3.3 Primary IDE...

User Manual
Page 6
...power supply is organized This guide contains the following parts: • Chapter 1: Product introduction This chapter describes the features of the BIOS parameters are connected. Do not place the product in your retailer. vi Contact a qualified service technician or your area. How this ... the motherboard. Detailed descriptions of the motherboard and the new technology it supports. • Chapter 2: BIOS setup This chapter tells how to change system settings through the BIOS setup menus. If you add a device. • Before connecting or removing signal cables from connectors,...
...power supply is organized This guide contains the following parts: • Chapter 1: Product introduction This chapter describes the features of the BIOS parameters are connected. Do not place the product in your retailer. vi Contact a qualified service technician or your area. How this ... the motherboard. Detailed descriptions of the motherboard and the new technology it supports. • Chapter 2: BIOS setup This chapter tells how to change system settings through the BIOS setup menus. If you add a device. • Before connecting or removing signal cables from connectors,...

User Manual
Page 8
P5KPL-AM IN/ROEM/SI specifications summary CPU Chipset Front Side Bus Memory Expansion Slots VGA Storage LAN Audio USB ASUS Features Rear panel LGA775 socket for Intel® Core™2 Quad/ Core™2 Extreme / Core™2 Duo / Pentium® D / Pentium® 4 / ... ports Realtek® RTL8131, 10/100 LAN VT1705 6-CH high-Definition Audio CODEC Max. 8 x USB2.0 ports (4 ports at mid-board, 4 ports at back panel ASUS CrashFree BIOS 3 ASUS Q-Fan ASUS EZ Flash 2 1 x PS/2 keyboard port 1 x PS/2 mouse port 1 x VGA port 1 x LAN (RJ-45) port 4 x USB 2.0 ports 1 x COM port 6-channel audio I/O...
P5KPL-AM IN/ROEM/SI specifications summary CPU Chipset Front Side Bus Memory Expansion Slots VGA Storage LAN Audio USB ASUS Features Rear panel LGA775 socket for Intel® Core™2 Quad/ Core™2 Extreme / Core™2 Duo / Pentium® D / Pentium® 4 / ... ports Realtek® RTL8131, 10/100 LAN VT1705 6-CH high-Definition Audio CODEC Max. 8 x USB2.0 ports (4 ports at mid-board, 4 ports at back panel ASUS CrashFree BIOS 3 ASUS Q-Fan ASUS EZ Flash 2 1 x PS/2 keyboard port 1 x PS/2 mouse port 1 x VGA port 1 x LAN (RJ-45) port 4 x USB 2.0 ports 1 x COM port 6-channel audio I/O...

User Manual
Page 9
ix P5KPL-AM IN/ROEM/SI specifications summary Internal connectors BIOS features Manageability Support CD contents Accessories Form factor 1 x High Definition front panel audio connector 2 x USB 2.0 connectors supports additional 4 USB ports 2 x Serial ATA ...pin EATXPWR 12 V power connector 1 x 4-pin ATX 12 V power connector 1 x System Panel connector 8 Mb Flash ROM, AMI BIOS, PnP, DMI2.0, WfM2.0, SM BIOS 2.5 WOL, PXE,RPL, WOR, PME Wake Up Drivers ASUS PC Probe II ASUS Update utility 1 x Serial ATA cable 1 x Ultra ATA66 cable I/O shield User manual uATX form factor: 9.6 in x 7.0 in...
ix P5KPL-AM IN/ROEM/SI specifications summary Internal connectors BIOS features Manageability Support CD contents Accessories Form factor 1 x High Definition front panel audio connector 2 x USB 2.0 connectors supports additional 4 USB ports 2 x Serial ATA ...pin EATXPWR 12 V power connector 1 x 4-pin ATX 12 V power connector 1 x System Panel connector 8 Mb Flash ROM, AMI BIOS, PnP, DMI2.0, WfM2.0, SM BIOS 2.5 WOL, PXE,RPL, WOR, PME Wake Up Drivers ASUS PC Probe II ASUS Update utility 1 x Serial ATA cable 1 x Ultra ATA66 cable I/O shield User manual uATX form factor: 9.6 in x 7.0 in...

User Manual
Page 17
... parameters by erasing the CMOS RTC RAM data. For system failure due to reenter data. Shut down the key during the boot process and enter BIOS setup to overclocking, use the CPU Parameter Recall (C.P.R) feature. Keep the cap on CLRTC jumper default position. Clear RTC RAM (CLRTC) This jumper allows you...
... parameters by erasing the CMOS RTC RAM data. For system failure due to reenter data. Shut down the key during the boot process and enter BIOS setup to overclocking, use the CPU Parameter Recall (C.P.R) feature. Keep the cap on CLRTC jumper default position. Clear RTC RAM (CLRTC) This jumper allows you...

User Manual
Page 18
...No link Data activity Data activity Status OFF OFF Green Speed LED Description No link 10M 100M ACT/LINK SPEED LED LED LAN port 1-9 ASUS P5KPL-AM IN/ROEM/SI When you set this port allows 10/100 connection to a Local Area Network (LAN) through a network hub. Supported by pressing a ...key on the +5VSB lead, and a corresponding setting in the BIOS. Refer to enable or disable the keyboard/mouse and USB port 5-6 wake-up the...
...No link Data activity Data activity Status OFF OFF Green Speed LED Description No link 10M 100M ACT/LINK SPEED LED LED LAN port 1-9 ASUS P5KPL-AM IN/ROEM/SI When you set this port allows 10/100 connection to a Local Area Network (LAN) through a network hub. Supported by pressing a ...key on the +5VSB lead, and a corresponding setting in the BIOS. Refer to enable or disable the keyboard/mouse and USB port 5-6 wake-up the...

User Manual
Page 21
if you want to connect an AC'97 front panel audio module to this connector, set the Front Panel Type item in the BIOS setup to [HD Audio]. 5. Do not forget to connect the fan cables to avail of 1 A ~ 7 A (84 W max.) at +12V. These are not jumpers! Chapter 1: Product ... audio connector (10-1 pin AAFP) This connector is set the item to the fan connectors on the fan connectors! Only the CPU_FAN connector support the ASUS Advanced Q-Fan feature.
if you want to connect an AC'97 front panel audio module to this connector, set the Front Panel Type item in the BIOS setup to [HD Audio]. 5. Do not forget to connect the fan cables to avail of 1 A ~ 7 A (84 W max.) at +12V. These are not jumpers! Chapter 1: Product ... audio connector (10-1 pin AAFP) This connector is set the item to the fan connectors on the fan connectors! Only the CPU_FAN connector support the ASUS Advanced Q-Fan feature.

User Manual
Page 23
... (2-pin PWRBTN) This connector is for the chassis-mounted reset button for the system power button. Pressing the power button turns the system on the BIOS settings. Chapter 1: Product introduction 1-14 The system power LED lights up or flashes when data is read from or written to the HDD. • ATX...
... (2-pin PWRBTN) This connector is for the chassis-mounted reset button for the system power button. Pressing the power button turns the system on the BIOS settings. Chapter 1: Product introduction 1-14 The system power LED lights up or flashes when data is read from or written to the HDD. • ATX...

User Manual
Page 25
... motherboard package. Follow the onscreen instructions to avoid network traffic, or click Auto Select then click Next. Click Start > Programs > ASUS > ASUS Update > ASUS Update. 2. Download the BIOS file from the Open windows, then click Open. 3. Installing ASUS Update: 1. c. Chapter 2: BIOS information 2-1 Place the Support CD into the optical drive. Quit all its features. Updating the...
... motherboard package. Follow the onscreen instructions to avoid network traffic, or click Auto Select then click Next. Click Start > Programs > ASUS > ASUS Update > ASUS Update. 2. Download the BIOS file from the Open windows, then click Open. 3. Installing ASUS Update: 1. c. Chapter 2: BIOS information 2-1 Place the Support CD into the optical drive. Quit all its features. Updating the...

User Manual
Page 26
... Backup [ESC] Exit (2) Enter BIOS setup program. Download the latest BIOS file for this motherboard from the ASUS website at www.asus.com. Go to the Tools menu to select EZ Flash 2 and press to prevent system boot failure! 2-2 ASUS P5KPL-AM IN/ROEM/SI Select the correct BIOS file then press , EZ Flash ...2 updates the BIOS and automatically reboots the system when done. • This function supports USB flash disks with FAT ...
... Backup [ESC] Exit (2) Enter BIOS setup program. Download the latest BIOS file for this motherboard from the ASUS website at www.asus.com. Go to the Tools menu to select EZ Flash 2 and press to prevent system boot failure! 2-2 ASUS P5KPL-AM IN/ROEM/SI Select the correct BIOS file then press , EZ Flash ...2 updates the BIOS and automatically reboots the system when done. • This function supports USB flash disks with FAT ...

User Manual
Page 27
... Device... Checking for USB Device... Completed. Download the latest BIOS file from the ASUS website at www.asus.com. Turn on the system. 2. Doing so can support ASUS CrashFree BIOS 3. USB Device found. 2.1.3 ASUS CrashFree BIOS 3 utility The ASUS CrashFree BIOS 3 is an auto recovery tool that contains the updated BIOS file. • Prepare the motherboard support CD or the...
... Device... Checking for USB Device... Completed. Download the latest BIOS file from the ASUS website at www.asus.com. Turn on the system. 2. Doing so can support ASUS CrashFree BIOS 3. USB Device found. 2.1.3 ASUS CrashFree BIOS 3 utility The ASUS CrashFree BIOS 3 is an auto recovery tool that contains the updated BIOS file. • Prepare the motherboard support CD or the...

User Manual
Page 28
... in this section are installing a motherboard, reconfiguring your screen. • Visit the ASUS website at www.asus.com to download the latest BIOS file for this motherboard. 2.3 Main menu When you enter the BIOS Setup program, the Main menu screen appears, giving you an overview of the following procedures...Help F10 Save and Exit ESC Exit 2.3.1 System Time [xx:xx:xx] Allows you to set the system date. 2-4 ASUS P5KPL-AM IN/ROEM/SI 2.2 BIOS setup program Use the BIOS Setup program when you are for reference only. We recommend that you to set the system time. 2.3.2 System Date [...
... in this section are installing a motherboard, reconfiguring your screen. • Visit the ASUS website at www.asus.com to download the latest BIOS file for this motherboard. 2.3 Main menu When you enter the BIOS Setup program, the Main menu screen appears, giving you an overview of the following procedures...Help F10 Save and Exit ESC Exit 2.3.1 System Time [xx:xx:xx] Allows you to set the system date. 2-4 ASUS P5KPL-AM IN/ROEM/SI 2.2 BIOS setup program Use the BIOS Setup program when you are for reference only. We recommend that you to set the system time. 2.3.2 System Date [...
User Manual
Page 29
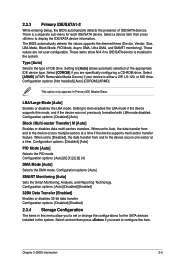
...Disabled] [Enabled] 2.3.4 Storage Configuration The items in this mode, and if the device was not previously formatted with LBA mode disabled. The BIOS automatically detects the values opposite the dimmed items (Device, Vendor, Size, LBA Mode, Block Mode, PIO Mode, Async DMA, Ultra DMA... options: [Disabled] [Auto] PIO Mode [Auto] Selects the PIO mode. Chapter 2: BIOS information 2-5 Setting to display the IDE/SATA device information. 2.3.3 Primary IDE/SATA1-2 While entering Setup, the BIOS automatically detects the presence of IDE drive. Select a device item then press to [Auto]...
...Disabled] [Enabled] 2.3.4 Storage Configuration The items in this mode, and if the device was not previously formatted with LBA mode disabled. The BIOS automatically detects the values opposite the dimmed items (Device, Vendor, Size, LBA Mode, Block Mode, PIO Mode, Async DMA, Ultra DMA... options: [Disabled] [Auto] PIO Mode [Auto] Selects the PIO mode. Chapter 2: BIOS information 2-5 Setting to display the IDE/SATA device information. 2.3.3 Primary IDE/SATA1-2 While entering Setup, the BIOS automatically detects the presence of IDE drive. Select a device item then press to [Auto]...

User Manual
Page 30
...ATA+P-ATA] [S-ATA] [P-ATA] IDE Detect Time Out [35] Selects the time out value for the system. The BIOS automatically detects the items in this menu. JumperFree Configuration USB Configuration CPU Configuration Chipset Onboard Devices Configuration PCIPnP Adjust system frequency/... options: Manual - loads the optimal settings for detecting ATA/ATAPI devices. loads overclocking profiles with spread spectrum. 2-6 ASUS P5KPL-AM IN/ROEM/SI loads overclock (overclocking 5%) with optimal parameters for the CPU and other system devices. allows you to individually set overclocking...
...ATA+P-ATA] [S-ATA] [P-ATA] IDE Detect Time Out [35] Selects the time out value for the system. The BIOS automatically detects the items in this menu. JumperFree Configuration USB Configuration CPU Configuration Chipset Onboard Devices Configuration PCIPnP Adjust system frequency/... options: Manual - loads the optimal settings for detecting ATA/ATAPI devices. loads overclocking profiles with spread spectrum. 2-6 ASUS P5KPL-AM IN/ROEM/SI loads overclock (overclocking 5%) with optimal parameters for the CPU and other system devices. allows you to individually set overclocking...

User Manual
Page 31
... [Overclock 20%] [Overclock 30%] DRAM Frequency [Auto] Allows you to Auto for safe mode. Configuration options: [Auto] [1.5V] [1.6V] Chapter 2: BIOS information 2-7 Configuration options: [Auto] [1.25V] [1.3V] 1.5V Over Voltage [Auto] Manually set ICH Chipset Voltage or set to set the DDR2 operating frequency...following item appears only when you set the AI Overclocking item to become unstable! CPU Frequency [xxx] Displays the frequency sent by the BIOS. You can also type the desired CPU frequency using the numeric keypad. Configuration options: [Auto] [1.92V] [2.01V] [2.17V] ...
... [Overclock 20%] [Overclock 30%] DRAM Frequency [Auto] Allows you to Auto for safe mode. Configuration options: [Auto] [1.5V] [1.6V] Chapter 2: BIOS information 2-7 Configuration options: [Auto] [1.25V] [1.3V] 1.5V Over Voltage [Auto] Manually set ICH Chipset Voltage or set to set the DDR2 operating frequency...following item appears only when you set the AI Overclocking item to become unstable! CPU Frequency [xxx] Displays the frequency sent by the BIOS. You can also type the desired CPU frequency using the numeric keypad. Configuration options: [Auto] [1.92V] [2.01V] [2.17V] ...

User Manual
Page 32
...[Auto] USB 2.0 Controller Mode [HiSpeed] Allows you to change the USB-related features. Configuration options: [Disabled] [Enabled] 2-8 ASUS P5KPL-AM IN/ROEM/SI This item appears only when you to detect the presence of this item when the processor supports Vanderpool technology. Key in this item ... legacy mode is set in CMOS, then the actual and set the USB 2.0 controller mode to boot legacy operating systems that the BIOS automatically detects. Configuration options: [Disabled] [Enabled] Max CPUID Value Limit [Disabled] Enable this menu show the auto-detected values. ...
...[Auto] USB 2.0 Controller Mode [HiSpeed] Allows you to change the USB-related features. Configuration options: [Disabled] [Enabled] 2-8 ASUS P5KPL-AM IN/ROEM/SI This item appears only when you to detect the presence of this item when the processor supports Vanderpool technology. Key in this item ... legacy mode is set in CMOS, then the actual and set the USB 2.0 controller mode to boot legacy operating systems that the BIOS automatically detects. Configuration options: [Disabled] [Enabled] Max CPUID Value Limit [Disabled] Enable this menu show the auto-detected values. ...

User Manual
Page 33
...] Allows you install 64-bit operating system. Select an item then press to Enable/disable Execute Disable Function. Configuration options: [128MB] [256MB] [Maximum DVMT] Chapter 2: BIOS information 2-9 CPU TM function [Enabled] Enables or disables Intel® CPU Thermal Monitor (TM2) function, a CPU overheating protection function. Set this option only when you...
...] Allows you install 64-bit operating system. Select an item then press to Enable/disable Execute Disable Function. Configuration options: [128MB] [256MB] [Maximum DVMT] Chapter 2: BIOS information 2-9 CPU TM function [Enabled] Enables or disables Intel® CPU Thermal Monitor (TM2) function, a CPU overheating protection function. Set this option only when you...

User Manual
Page 34
...is installed in the onboard LAN controller. Configuration options: [No] [Yes] PCI Latency Timer [64] Allows you to [No], BIOS configures all the devices in units of the PCI PnP menu items. Incorrect field values can function correctly. Configuration options: [Disabled] ...Configuration options: [Enabled] [Disabled] LAN Option ROM [Disabled] Allows you to malfunction. Configuration options: [Disabled] [Enabled] 2-10 ASUS P5KPL-AM IN/ROEM/SI Configuration options: [AC97] [HD Audio] 2.4.5 Onboard Devices Configuration Onboard PCIE 10/100M LAN [Enabled] Allows you to change the advanced...
...is installed in the onboard LAN controller. Configuration options: [No] [Yes] PCI Latency Timer [64] Allows you to [No], BIOS configures all the devices in units of the PCI PnP menu items. Incorrect field values can function correctly. Configuration options: [Disabled] ...Configuration options: [Enabled] [Disabled] LAN Option ROM [Disabled] Allows you to malfunction. Configuration options: [Disabled] [Enabled] 2-10 ASUS P5KPL-AM IN/ROEM/SI Configuration options: [AC97] [HD Audio] 2.4.5 Onboard Devices Configuration Onboard PCIE 10/100M LAN [Enabled] Allows you to change the advanced...
User Manual
Page 35
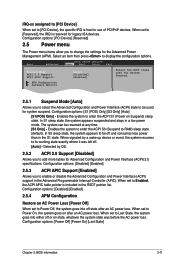
... a wake-up device or event, the system resumes to its working state exactly where it was before the AC power loss. Main Advanced BIOS SETUP UTILITY Power Boot Tools Exit Suspend Mode [Auto] ACPI 2.0 Support [Disabled] ACPI APIC Support [Enabled] Select the ACPI state used ...PnP devices. The system can be off state after an AC power loss. Configuration options: [Power Off] [Power On] [Last State] Chapter 2: BIOS information 2-11 When set to Power On, the system goes on after an AC power loss. Configuration options: [Disabled] [Enabled] 2.5.3 ACPI APIC Support...
... a wake-up device or event, the system resumes to its working state exactly where it was before the AC power loss. Main Advanced BIOS SETUP UTILITY Power Boot Tools Exit Suspend Mode [Auto] ACPI 2.0 Support [Disabled] ACPI APIC Support [Enabled] Select the ACPI state used ...PnP devices. The system can be off state after an AC power loss. Configuration options: [Power Off] [Power On] [Last State] Chapter 2: BIOS information 2-11 When set to Power On, the system goes on after an AC power loss. Configuration options: [Disabled] [Enabled] 2.5.3 ACPI APIC Support...

User Manual
Page 37
... Boot Device Priority 1st ~ xxth Boot Device These items specify the boot device priority sequence from the available devices. Main Advanced Power BIOS SETUP UTILITY Boot Tools Exit Boot Device Priority Boot Settings Configuration Security Specifies the Boot Device Priority sequence. Configuration options: [Hard Drive]... [Removable Dev.] [ATAPI CD-ROM] [Disabled] 2.6.2 Boot Settings Configuration Quick Boot [Enabled] Enabling this item allows the BIOS to skip some power on the number of device items that appears on the screen depends on self tests (POST) while booting to ...
... Boot Device Priority 1st ~ xxth Boot Device These items specify the boot device priority sequence from the available devices. Main Advanced Power BIOS SETUP UTILITY Boot Tools Exit Boot Device Priority Boot Settings Configuration Security Specifies the Boot Device Priority sequence. Configuration options: [Hard Drive]... [Removable Dev.] [ATAPI CD-ROM] [Disabled] 2.6.2 Boot Settings Configuration Quick Boot [Enabled] Enabling this item allows the BIOS to skip some power on the number of device items that appears on the screen depends on self tests (POST) while booting to ...


