User Manual
Page 4
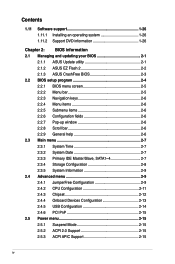
Contents 1.11 Software support 1-26 1.11.1 Installing an operating system 1-26 1.11.2 Support DVD information 1-26 Chapter 2: BIOS information 2.1 Managing and updating your BIOS 2-1 2.1.1 ASUS Update utility 2-1 2.1.2 ASUS EZ Flash 2 2-2 2.1.3 ASUS CrashFree BIOS 2-3 2.2 BIOS setup program 2-4 2.2.1 BIOS menu screen 2-5 2.2.2 Menu bar 2-5 2.2.3 Navigation keys 2-6 2.2.4 Menu items 2-6 2.2.5 Submenu items 2-6 2.2.6 Configuration fields 2-6 2.2.7 Pop-up window 2-6 2.2.8 Scroll bar 2-6 2.2.9 General help 2-6 2.3 Main menu 2-7 2.3.1 System...
Contents 1.11 Software support 1-26 1.11.1 Installing an operating system 1-26 1.11.2 Support DVD information 1-26 Chapter 2: BIOS information 2.1 Managing and updating your BIOS 2-1 2.1.1 ASUS Update utility 2-1 2.1.2 ASUS EZ Flash 2 2-2 2.1.3 ASUS CrashFree BIOS 2-3 2.2 BIOS setup program 2-4 2.2.1 BIOS menu screen 2-5 2.2.2 Menu bar 2-5 2.2.3 Navigation keys 2-6 2.2.4 Menu items 2-6 2.2.5 Submenu items 2-6 2.2.6 Configuration fields 2-6 2.2.7 Pop-up window 2-6 2.2.8 Scroll bar 2-6 2.2.9 General help 2-6 2.3 Main menu 2-7 2.3.1 System...
User Manual
Page 7
...your power supply is organized This guide contains the following parts: • Chapter 1: Product introduction This chapter describes the features of the BIOS parameters are using an adapter or extension cord. Do not place the product in your local power company. • If the power supply... is broken, do not try to fix it supports. • Chapter 2: BIOS information This chapter tells how to change system settings through the BIOS Setup menus. How this guide This user guide contains the information you encounter technical problems with the package. &#...
...your power supply is organized This guide contains the following parts: • Chapter 1: Product introduction This chapter describes the features of the BIOS parameters are using an adapter or extension cord. Do not place the product in your local power company. • If the power supply... is broken, do not try to fix it supports. • Chapter 2: BIOS information This chapter tells how to change system settings through the BIOS Setup menus. How this guide This user guide contains the information you encounter technical problems with the package. &#...
User Manual
Page 10
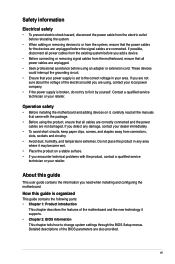
P5G41T-M LE specifications summary ASUS unique features Back panel I/O ports Internal connectors BIOS Manageability Accessories Support DVD Form factor ASUS CrashFree BIOS 3 ASUS AI NET 2 ASUS Q-Fan ASUS EZ Flash 2 ASUS MyLogo 2 ASUS Anti-Surge Protection ASUS Turbo Key ASUS Express Gate ASUS EPU-4 Engine 1 x PS/2 keyboard port 1 x PS/2 mouse port 1 x DVI-D port 1 x VGA port 1 x LAN (RJ-45) port 4 x USB 2.0/1.1 ports 3 x audio jacks 2 x USB 2.0/1.1 connectors...
P5G41T-M LE specifications summary ASUS unique features Back panel I/O ports Internal connectors BIOS Manageability Accessories Support DVD Form factor ASUS CrashFree BIOS 3 ASUS AI NET 2 ASUS Q-Fan ASUS EZ Flash 2 ASUS MyLogo 2 ASUS Anti-Surge Protection ASUS Turbo Key ASUS Express Gate ASUS EPU-4 Engine 1 x PS/2 keyboard port 1 x PS/2 mouse port 1 x DVI-D port 1 x VGA port 1 x LAN (RJ-45) port 4 x USB 2.0/1.1 ports 3 x audio jacks 2 x USB 2.0/1.1 connectors...
User Manual
Page 13
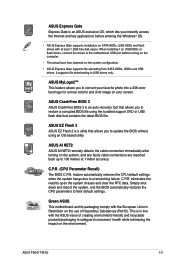
...health while minimizing the impact on the system configuration. • ASUS Express Gate supports file uploading from SATA HDDs, ODDs and USB drives. ASUS P5G41T-M LE 1-3 ASUS MyLogo2™ This feature allows you to update the BIOS without using the bundled support DVD or USB flash disk that ...contains the latest BIOS file. ASUS EZ Flash 2 ASUS EZ Flash 2 is a utility that allows you ...
...health while minimizing the impact on the system configuration. • ASUS Express Gate supports file uploading from SATA HDDs, ODDs and USB drives. ASUS P5G41T-M LE 1-3 ASUS MyLogo2™ This feature allows you to update the BIOS without using the bundled support DVD or USB flash disk that ...contains the latest BIOS file. ASUS EZ Flash 2 ASUS EZ Flash 2 is a utility that allows you ...
User Manual
Page 26
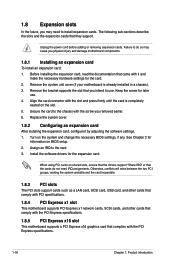
... that came with the PCI Express specifications. 1-16 Chapter 1: Product introduction Keep the screw for information on the system and change the necessary BIOS settings, if any. Turn on BIOS setup. 2. See Chapter 2 for later use . The following sub‑sections describe the slots and the expansion cards that the cards do...
... that came with the PCI Express specifications. 1-16 Chapter 1: Product introduction Keep the screw for information on the system and change the necessary BIOS settings, if any. Turn on BIOS setup. 2. See Chapter 2 for later use . The following sub‑sections describe the slots and the expansion cards that the cards do...
User Manual
Page 27
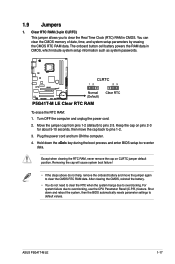
Plug the power cord and turn ON the computer. 4. ASUS P5G41T-M LE 1-17 After clearing the CMOS, reinstall the battery. •...5-10 seconds, then move the jumper again to overclocking. Shut down the key during the boot process and enter BIOS setup to pins 2-3. Move the jumper cap from pins 1-2 (default) to re-enter data. To erase the... RTC RAM: 1. Hold down and reboot the system, then the BIOS automatically resets parameter settings to overclocking, use the CPU Parameter Recall (C.P.R.) feature. The onboard button cell battery powers ...
Plug the power cord and turn ON the computer. 4. ASUS P5G41T-M LE 1-17 After clearing the CMOS, reinstall the battery. •...5-10 seconds, then move the jumper again to overclocking. Shut down the key during the boot process and enter BIOS setup to pins 2-3. Move the jumper cap from pins 1-2 (default) to re-enter data. To erase the... RTC RAM: 1. Hold down and reboot the system, then the BIOS automatically resets parameter settings to overclocking, use the CPU Parameter Recall (C.P.R.) feature. The onboard button cell battery powers ...
User Manual
Page 29
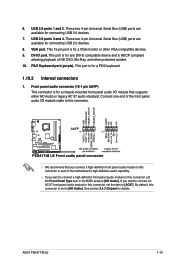
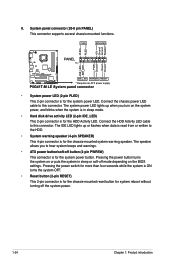
... you connect a high-definition front panel audio module to this connector, set the item to [HD Audio]. VGA port. DVI-D port. PS/2 Keyboard port (purple). ASUS P5G41T-M LE 1-19 6. These two 4-pin Universal Serial Bus (USB) ports are available for connecting USB 2.0 devices. 7. These two 4-pin Universal Serial Bus (USB) ports are available... front panel audio I /O module cable to this connector is for connecting USB 2.0 devices. 8. By default, this connector, set the Front Panel Type item in the BIOS setup to [AC97].
... you connect a high-definition front panel audio module to this connector, set the item to [HD Audio]. VGA port. DVI-D port. PS/2 Keyboard port (purple). ASUS P5G41T-M LE 1-19 6. These two 4-pin Universal Serial Bus (USB) ports are available for connecting USB 2.0 devices. 7. These two 4-pin Universal Serial Bus (USB) ports are available... front panel audio I /O module cable to this connector is for connecting USB 2.0 devices. 8. By default, this connector, set the Front Panel Type item in the BIOS setup to [AC97].
User Manual
Page 34
... warnings. • ATX power button/soft-off button (2-pin PWRSW) This connector is for the system power LED. The speaker allows you turn on the BIOS settings. The IDE LED lights up when you to the HDD. • System warning speaker (4-pin SPEAKER) This 4-pin connector is for the HDD Activity...
... warnings. • ATX power button/soft-off button (2-pin PWRSW) This connector is for the system power LED. The speaker allows you turn on the BIOS settings. The IDE LED lights up when you to the HDD. • System warning speaker (4-pin SPEAKER) This 4-pin connector is for the HDD Activity...
User Manual
Page 37
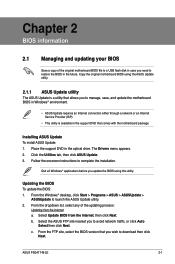
... Next. From the Windows® desktop, click Start > Programs > ASUS > ASUSUpdate > ASUSUpdate to complete the installation. Select Update BIOS from the Internet a. ASUS P5G41T-M LE 2-1 Updating the BIOS To update the BIOS: 1. b. Select the ASUS FTP site nearest you update the BIOS using the ASUS Update utility. 2.1.1 ASUS Update utility The ASUS Update is a utility that comes with the motherboard package. From...
... Next. From the Windows® desktop, click Start > Programs > ASUS > ASUSUpdate > ASUSUpdate to complete the installation. Select Update BIOS from the Internet a. ASUS P5G41T-M LE 2-1 Updating the BIOS To update the BIOS: 1. b. Select the ASUS FTP site nearest you update the BIOS using the ASUS Update utility. 2.1.1 ASUS Update utility The ASUS Update is a utility that comes with the motherboard package. From...
User Manual
Page 38
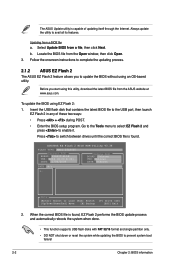
...disk that contains the latest BIOS file to update the BIOS without using this utility, download the latest BIOS file from a BIOS file a. Select Update BIOS from the Open window, then click Open. 3. Updating from the ASUS website at www.asus.com. The ASUS Update utility is capable of... these two ways: • Press + during POST. • Enter the BIOS setup program. To update the BIOS using EZ Flash 2: 1. ASUSTek EZ Flash 2 BIOS ROM Utility V3.36 FLASH TYPE: MXIC 25L8005 Current ROM BOARD: P5G41T-M-LE...
...disk that contains the latest BIOS file to update the BIOS without using this utility, download the latest BIOS file from a BIOS file a. Select Update BIOS from the Open window, then click Open. 3. Updating from the ASUS website at www.asus.com. The ASUS Update utility is capable of... these two ways: • Press + during POST. • Enter the BIOS setup program. To update the BIOS using EZ Flash 2: 1. ASUSTek EZ Flash 2 BIOS ROM Utility V3.36 FLASH TYPE: MXIC 25L8005 Current ROM BOARD: P5G41T-M-LE...
User Manual
Page 39
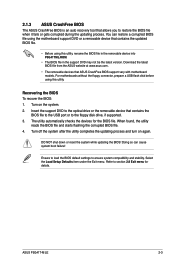
Recovering the BIOS To recover the BIOS: 1. ASUS P5G41T-M LE 2-3 Refer to section 2.8 Exit menu for the BIOS file. Turn on again. Insert the support DVD to the optical drive or the removable device that allows you to restore the BIOS file when it fails or gets corrupted during the updating... automatically checks the devices for details. Select the Load Setup Defaults item under the Exit menu. 2.1.3 ASUS CrashFree BIOS The ASUS CrashFree BIOS is an auto recovery tool that contains the BIOS file to the USB port or to the floppy disk drive, if supported. 3. You can cause...
Recovering the BIOS To recover the BIOS: 1. ASUS P5G41T-M LE 2-3 Refer to section 2.8 Exit menu for the BIOS file. Turn on again. Insert the support DVD to the optical drive or the removable device that allows you to restore the BIOS file when it fails or gets corrupted during the updating... automatically checks the devices for details. Select the Load Setup Defaults item under the Exit menu. 2.1.3 ASUS CrashFree BIOS The ASUS CrashFree BIOS is an auto recovery tool that contains the BIOS file to the USB port or to the floppy disk drive, if supported. 3. You can cause...
User Manual
Page 40
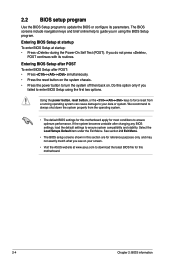
... Using the power button, reset button, or the ++ keys to force reset from the operating system. • The default BIOS settings for most conditions to your screen. • Visit the ASUS website at startup: • Press during the Power-On Self Test (POST). We recommend to always shut down the system properly...
... Using the power button, reset button, or the ++ keys to force reset from the operating system. • The default BIOS settings for most conditions to your screen. • Visit the ASUS website at startup: • Press during the Power-On Self Test (POST). We recommend to always shut down the system properly...
User Manual
Page 41
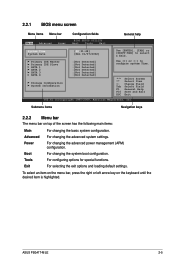
... bar The menu bar on the keyboard until the desired item is highlighted. Tools For configuring options for special functions. ASUS P5G41T-M LE 2-5 2.2.1 BIOS menu screen Menu items Menu bar Main Advanced Power Configuration fields BIOS SETUP UTILITY Boot Tools Exit General help System Time [00:31:48] System Date [Mon 01/07/2002] Use...
... bar The menu bar on the keyboard until the desired item is highlighted. Tools For configuring options for special functions. ASUS P5G41T-M LE 2-5 2.2.1 BIOS menu screen Menu items Menu bar Main Advanced Power Configuration fields BIOS SETUP UTILITY Boot Tools Exit General help System Time [00:31:48] System Date [Mon 01/07/2002] Use...
User Manual
Page 42
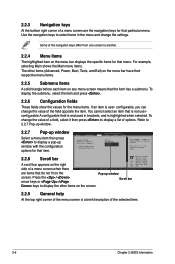
... screen. 2.2.9 General help At the top right corner of the menu screen is a brief description of the selected item. 2-6 Chapter 2: BIOS information Press the / arrow keys or / keys to display a pop-up window screen. For example, selecting Main shows the Main menu items.... The other items on the right side of a menu screen when there Select Screen Select Item +- Main Advanced BIOS SETUP UTILITY Power Boot Tools Exit Suspend Mode ACPI 2.0 Support ACPI APIC support APM Configuration Hardware Monitor [Auto] [Disabled] [EDniOsapabtbilloendesd] Enabled...
... screen. 2.2.9 General help At the top right corner of the menu screen is a brief description of the selected item. 2-6 Chapter 2: BIOS information Press the / arrow keys or / keys to display a pop-up window screen. For example, selecting Main shows the Main menu items.... The other items on the right side of a menu screen when there Select Screen Select Item +- Main Advanced BIOS SETUP UTILITY Power Boot Tools Exit Suspend Mode ACPI 2.0 Support ACPI APIC support APM Configuration Hardware Monitor [Auto] [Disabled] [EDniOsapabtbilloendesd] Enabled...
User Manual
Page 43
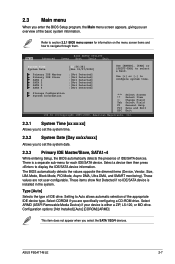
Storage Configuration System Information Select Screen Select Item +- ASUS P5G41T-M LE 2-7 Main Advanced BIOS SETUP UTILITY Power Boot Tools Exit System Time System Date Primary IDE Master Primary IDE Slave SATA 1 SATA 2 SATA 3 SATA 4 [12:56:38] [Mon 01...] [Auto] [CDROM] [ARMD] This item does not appear when you to set the system date. 2.3.3 Primary IDE Master/Slave, SATA1~4 While entering Setup, the BIOS automatically detects the presence of the appropriate IDE device type. Select a device item then press to configure system time. Use [+] or [-] to display the IDE...
Storage Configuration System Information Select Screen Select Item +- ASUS P5G41T-M LE 2-7 Main Advanced BIOS SETUP UTILITY Power Boot Tools Exit System Time System Date Primary IDE Master Primary IDE Slave SATA 1 SATA 2 SATA 3 SATA 4 [12:56:38] [Mon 01...] [Auto] [CDROM] [ARMD] This item does not appear when you to set the system date. 2.3.3 Primary IDE Master/Slave, SATA1~4 While entering Setup, the BIOS automatically detects the presence of the appropriate IDE device type. Select a device item then press to configure system time. Use [+] or [-] to display the IDE...
User Manual
Page 44
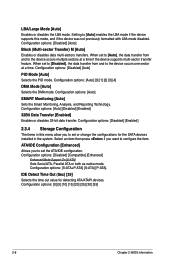
.... Configuration options: [S-ATA+P-ATA] [S-ATA] [P-ATA]. LBA/Large Mode [Auto] Enables or disables the LBA mode. Configuration options: [0] [5] [10] [15] [20] [25] [30] [35] 2-8 Chapter 2: BIOS information
.... Configuration options: [S-ATA+P-ATA] [S-ATA] [P-ATA]. LBA/Large Mode [Auto] Enables or disables the LBA mode. Configuration options: [0] [5] [10] [15] [20] [25] [30] [35] 2-8 Chapter 2: BIOS information
User Manual
Page 45
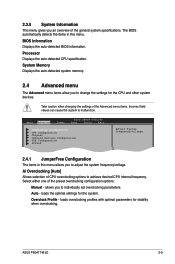
... you to malfunction. Overclock Profile - loads overclocking profiles with optimal parameters for the system. Main Advanced Power BIOS SETUP UTILITY Boot Tools Exit JumperFree Configuration CPU Configuration Chipset Onboard Devices Configuration USB Configuration PCIPnP Adjust System frequency... field values can cause the system to individually set overclocking parameters. ASUS P5G41T-M LE 2-9 Take caution when changing the settings of CPU overclocking options to adjust the system frequency/voltage. The BIOS automatically detects the items in this menu. Auto -
... you to malfunction. Overclock Profile - loads overclocking profiles with optimal parameters for the system. Main Advanced Power BIOS SETUP UTILITY Boot Tools Exit JumperFree Configuration CPU Configuration Chipset Onboard Devices Configuration USB Configuration PCIPnP Adjust System frequency... field values can cause the system to individually set overclocking parameters. ASUS P5G41T-M LE 2-9 Take caution when changing the settings of CPU overclocking options to adjust the system frequency/voltage. The BIOS automatically detects the items in this menu. Auto -
User Manual
Page 46
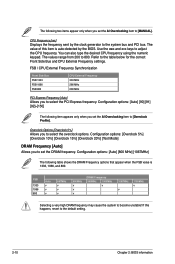
...Overclock Profile]. You can also type the desired CPU frequency using the numeric keypad. CPU Frequency [xxx] Displays the frequency sent by the BIOS. Refer to the system bus and PCI bus. Configuration options: [Overclock 5%] [Overclock 10%] [Overclock 15%] [Overclock 20%] [Test... Mode] DRAM Frequency [Auto] Allows you to set the AI Overclocking item to the default setting. 2-10 Chapter 2: BIOS information FSB 1333 1066 800 Auto v v v 667MHz v v v 800MHz v v v DRAM Frequency 960MHz 1000MHz v 1067MHz v 1100MHz v Selecting a very high...
...Overclock Profile]. You can also type the desired CPU frequency using the numeric keypad. CPU Frequency [xxx] Displays the frequency sent by the BIOS. Refer to the system bus and PCI bus. Configuration options: [Overclock 5%] [Overclock 10%] [Overclock 15%] [Overclock 20%] [Test... Mode] DRAM Frequency [Auto] Allows you to set the AI Overclocking item to the default setting. 2-10 Chapter 2: BIOS information FSB 1333 1066 800 Auto v v v 667MHz v v v 800MHz v v v DRAM Frequency 960MHz 1000MHz v 1067MHz v 1100MHz v Selecting a very high...
User Manual
Page 47
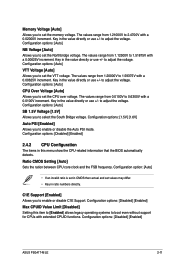
... adjust the voltage. Configuration options: [Disabled] [Enabled] Max CPUID Value Limit [Disabled] Setting this menu show the CPU-related information that the BIOS automatically detects. Configuration options: [Disabled] [Enabled] ASUS P5G41T-M LE 2-11 Ratio CMOS Setting [Auto] Sets the ration between CPU core clock and the FSB frequency. to adjust the voltage. Configuration options...
... adjust the voltage. Configuration options: [Disabled] [Enabled] Max CPUID Value Limit [Disabled] Setting this menu show the CPU-related information that the BIOS automatically detects. Configuration options: [Disabled] [Enabled] ASUS P5G41T-M LE 2-11 Ratio CMOS Setting [Auto] Sets the ration between CPU core clock and the FSB frequency. to adjust the voltage. Configuration options...
User Manual
Page 48
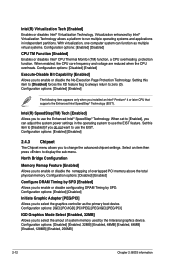
...(R) Virtualization Tech [Enabled] Enables or disables Intel® Virtualization Technology. Configuration options: [Disabled] [Enabled, 32MB] [Enabled, 48MB] [Enabled, 64MB] [Enabled, 128MB] [Enabled, 256MB] 2-12 Chapter 2: BIOS information
...(R) Virtualization Tech [Enabled] Enables or disables Intel® Virtualization Technology. Configuration options: [Disabled] [Enabled, 32MB] [Enabled, 48MB] [Enabled, 64MB] [Enabled, 128MB] [Enabled, 256MB] 2-12 Chapter 2: BIOS information


