
User Guide
Page 11
P5AD2-E Premium specifications summary LAN IEEE 1394 Overclocking features Special features BIOS features Rear panel Internal connectors 2 x Marvell® 88E8053 PCI Express™ Gigabit LAN controller Supports Marvell® Virtual Cable Tester technology Supports POST Network-diagnostic program TI 1394b controller supports: - 2 x IEEE 1394b connectors - 1 x IEEE 1394a ports ASUS AI Overclocking ASUS NOS (Non-delay Overclocking...
P5AD2-E Premium specifications summary LAN IEEE 1394 Overclocking features Special features BIOS features Rear panel Internal connectors 2 x Marvell® 88E8053 PCI Express™ Gigabit LAN controller Supports Marvell® Virtual Cable Tester technology Supports POST Network-diagnostic program TI 1394b controller supports: - 2 x IEEE 1394b connectors - 1 x IEEE 1394a ports ASUS AI Overclocking ASUS NOS (Non-delay Overclocking...

User Guide
Page 19
... and a user-friendly wizard to help you can easily monitor the condition of up to 54 Mbps using the 2.4 GHz frequency band. The ASUS WiFi-g™ is a BIOS-based diagnostic tool that auto-detects the CPU loading and dynamically overclocks the CPU speed only when needed. See page 2-24 and the WiFi... your wireless local area network effortlessly. See pages 4-23 and 5-13 for details. With this utility, you set up to the LAN (RJ-45) port. ASUS P5AD2-E Premium 1-5 AI NET2 AI NET2 is backward compatible with IEEE 802.11b devices.
... and a user-friendly wizard to help you can easily monitor the condition of up to 54 Mbps using the 2.4 GHz frequency band. The ASUS WiFi-g™ is a BIOS-based diagnostic tool that auto-detects the CPU loading and dynamically overclocks the CPU speed only when needed. See page 2-24 and the WiFi... your wireless local area network effortlessly. See pages 4-23 and 5-13 for details. With this utility, you set up to the LAN (RJ-45) port. ASUS P5AD2-E Premium 1-5 AI NET2 AI NET2 is backward compatible with IEEE 802.11b devices.
User Guide
Page 43
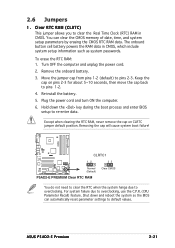
...CMOS RTC RAM data. Removing the cap will cause system boot failure! 2.6 Jumpers 1. Shut down the key during the boot process and enter BIOS setup to clear the Real Time Clock (RTC) RAM in CMOS, which include system setup information such as system passwords. To erase the RTC... RAM, never remove the cap on pins 2-3 for about 5~10 seconds, then move the cap back to pins 1-2. 4. Re-install the battery. 5. ASUS P5AD2-E Premium 2-21 Clear RTC RAM (CLRTC) This jumper allows you to re-enter data. You can automatically reset parameter settings to overclocking, use the C.P.R. (CPU ...
...CMOS RTC RAM data. Removing the cap will cause system boot failure! 2.6 Jumpers 1. Shut down the key during the boot process and enter BIOS setup to clear the Real Time Clock (RTC) RAM in CMOS, which include system setup information such as system passwords. To erase the RTC... RAM, never remove the cap on pins 2-3 for about 5~10 seconds, then move the cap back to pins 1-2. 4. Re-install the battery. 5. ASUS P5AD2-E Premium 2-21 Clear RTC RAM (CLRTC) This jumper allows you to re-enter data. You can automatically reset parameter settings to overclocking, use the C.P.R. (CPU ...

User Guide
Page 44
...wake up the computer from S3 and S4 sleep modes (no power to CPU, DRAM in slow refresh, power supply in the BIOS. The USBPWR12 and USBPWR34 jumpers are for the internal USB connectors that can connect to wake up feature requires a power supply that can provide...USB device wake-up the computer when you press a key on the keyboard (the default is the Space Bar). KBPWR1 12 23 P5AD2-E PREMIUM +5V +5VSB (Default) ® P5AD2-E PREMIUM Keyboard power setting 2-22 Chapter 2: Hardware information Set this jumper to pins 2-3 (+5VSB) to additional USB ports. This feature requires ...
...wake up the computer from S3 and S4 sleep modes (no power to CPU, DRAM in slow refresh, power supply in the BIOS. The USBPWR12 and USBPWR34 jumpers are for the internal USB connectors that can connect to wake up feature requires a power supply that can provide...USB device wake-up the computer when you press a key on the keyboard (the default is the Space Bar). KBPWR1 12 23 P5AD2-E PREMIUM +5V +5VSB (Default) ® P5AD2-E PREMIUM Keyboard power setting 2-22 Chapter 2: Hardware information Set this jumper to pins 2-3 (+5VSB) to additional USB ports. This feature requires ...

User Guide
Page 48
...; Before creating a RAID 1 set, make sure that you set using these connectors such as boot/data hard disk drives or optical drives. P5AD2-E PREMIUM SEC_RAID1 NOTE: Orient the red markings ® (usually zigzag) on how to set up to four IDE hard disk drives that you can...ITE® 8212F controller supports a maximum of two Ultra ATA hard disk drives in the BIOS to PIN 1. See section "4.4.6 Onboard Devices Configuration" for Ultra ATA 133/100/66 signal cables. PRI_RAID1 PIN 1 P5AD2-E PREMIUM RAID connectors • Before creating a RAID set the hard disk drives as a disk ...
...; Before creating a RAID 1 set, make sure that you set using these connectors such as boot/data hard disk drives or optical drives. P5AD2-E PREMIUM SEC_RAID1 NOTE: Orient the red markings ® (usually zigzag) on how to set up to four IDE hard disk drives that you can...ITE® 8212F controller supports a maximum of two Ultra ATA hard disk drives in the BIOS to PIN 1. See section "4.4.6 Onboard Devices Configuration" for Ultra ATA 133/100/66 signal cables. PRI_RAID1 PIN 1 P5AD2-E PREMIUM RAID connectors • Before creating a RAID set the hard disk drives as a disk ...
User Guide
Page 49
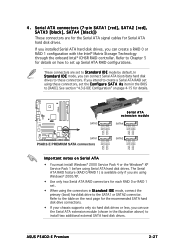
... [red], SATA3 [black], SATA4 [black]) These connectors are using these connectors. ASUS P5AD2-E Premium 2-27 If you installed Serial ATA hard disk drives, you can use the Serial ATA extension module (shown in the BIOS to these connectors, set using Windows® 2000/XP. • Use only two... Serial ATA RAID connectors for details. P5AD2-E PREMIUM Serial ATA extension module ® SATA3 SATA4 GND RSATA_TXP4 RSATA_TXN4 GND ...
... [red], SATA3 [black], SATA4 [black]) These connectors are using these connectors. ASUS P5AD2-E Premium 2-27 If you installed Serial ATA hard disk drives, you can use the Serial ATA extension module (shown in the BIOS to these connectors, set using Windows® 2000/XP. • Use only two... Serial ATA RAID connectors for details. P5AD2-E PREMIUM Serial ATA extension module ® SATA3 SATA4 GND RSATA_TXP4 RSATA_TXN4 GND ...

User Guide
Page 50
... connectors support up Serial ATA RAID configurations. These connectors are for details on how to set up to [SATA Mode]. P5AD2-E PREMIUM GND RSATA_TXP1 RSATA_TXN1 GND RSATA_RXP1 RSATA_RXN1 GND GND RSATA_TXP2 RSATA_TXN2 GND RSATA_RXP2 RSATA_RXN2 GND GND RSATA_TXP3 RSATA_TXN3 GND RSATA_RXP3 RSATA_RXN3 GND GND...® Hardware Quality Labs (WHQL)-certified. 2-28 Chapter 2: Hardware information If you cannot enter the Silicon Image RAID utility and SATA BIOS setup during POST. • You can configure as a disk array through the onboard SATA RAID controller. Serial ATA hard disk drive...
... connectors support up Serial ATA RAID configurations. These connectors are for details on how to set up to [SATA Mode]. P5AD2-E PREMIUM GND RSATA_TXP1 RSATA_TXN1 GND RSATA_RXP1 RSATA_RXN1 GND GND RSATA_TXP2 RSATA_TXN2 GND RSATA_RXP2 RSATA_RXN2 GND GND RSATA_TXP3 RSATA_TXN3 GND RSATA_RXP3 RSATA_RXN3 GND GND...® Hardware Quality Labs (WHQL)-certified. 2-28 Chapter 2: Hardware information If you cannot enter the Silicon Image RAID utility and SATA BIOS setup during POST. • You can configure as a disk array through the onboard SATA RAID controller. Serial ATA hard disk drive...

User Guide
Page 52
...install the module to legacy AC'97 audio. P5AD2-E PREMIUM ® USB+5V USB_P8USB_P8+ GND NC USB+5V USB_P6USB_P6+ GND NC USB+5V USB_P7USB_P7+ GND USB+5V USB_P5USB_P5+ GND USB56 1 P5AD2-E PREMIUM USB 2.0 connectors USB78 1 Never connect a...; By default, this connector to [HD Audio]. GND PRESENCE# SENSE1_RETUR SENSE2_RETUR P5AD2-E PREMIUM AGND NC NC NC ® AAFP MIC2 MICPWR Line out_R NC Line out_L PORT1 L ...PORT1 R PORT2 R SENSE_SEND PORT2 L AC '97 audio pin definition P5AD2-E PREMIUM Analog front panel connector • It is recommended that supports up to the...
...install the module to legacy AC'97 audio. P5AD2-E PREMIUM ® USB+5V USB_P8USB_P8+ GND NC USB+5V USB_P6USB_P6+ GND NC USB+5V USB_P7USB_P7+ GND USB+5V USB_P5USB_P5+ GND USB56 1 P5AD2-E PREMIUM USB 2.0 connectors USB78 1 Never connect a...; By default, this connector to [HD Audio]. GND PRESENCE# SENSE1_RETUR SENSE2_RETUR P5AD2-E PREMIUM AGND NC NC NC ® AAFP MIC2 MICPWR Line out_R NC Line out_L PORT1 L ...PORT1 R PORT2 R SENSE_SEND PORT2 L AC '97 audio pin definition P5AD2-E PREMIUM Analog front panel connector • It is recommended that supports up to the...

User Guide
Page 57
...The speaker allows you turn on the system power, and blinks when the system is in sleep or soft-off the system power. P5AD2-E PREMIUM PLED SPEAKER PLED+ PLED+5V Ground Ground Speaker PANEL1 ® IDE_LED+ IDE_LED- The system power LED lights up or flashes when ...the power button turns the system on the BIOS settings. Refer to the HDD. • System warning speaker (Orange 4-pin SPEAKER) This 4-pin connector is for the system power LED. ASUS P5AD2-E Premium 2-35 PWR Ground Reset Ground IDE_LED RESET PWRSW P5AD2-E PREMIUM System panel connector The sytem panel connector is...
...The speaker allows you turn on the system power, and blinks when the system is in sleep or soft-off the system power. P5AD2-E PREMIUM PLED SPEAKER PLED+ PLED+5V Ground Ground Speaker PANEL1 ® IDE_LED+ IDE_LED- The system power LED lights up or flashes when ...the power button turns the system on the BIOS settings. Refer to the HDD. • System warning speaker (Orange 4-pin SPEAKER) This 4-pin connector is for the system power LED. ASUS P5AD2-E Premium 2-35 PWR Ground Reset Ground IDE_LED RESET PWRSW P5AD2-E PREMIUM System panel connector The sytem panel connector is...

User Guide
Page 61
... connections, replace the system case cover. 2. System power 6. The system then runs the power-on the devices in Chapter 4. AMI BIOS beep codes Beep Description One beep Two continuous beeps followed by two short beeps Two continuous beeps followed by four short beeps Error Keyboard ..., the BIOS beeps (see anything within 30 seconds from the time you press the ATX power button. Turn on self tests or POST. If your retailer for the first time 1. Check the jumper settings and connections or call your monitor complies with a surge protector. 5. ASUS P5AD2-E Premium 3-1 External...
... connections, replace the system case cover. 2. System power 6. The system then runs the power-on the devices in Chapter 4. AMI BIOS beep codes Beep Description One beep Two continuous beeps followed by two short beeps Two continuous beeps followed by four short beeps Error Keyboard ..., the BIOS beeps (see anything within 30 seconds from the time you press the ATX power button. Turn on self tests or POST. If your retailer for the first time 1. Check the jumper settings and connections or call your monitor complies with a surge protector. 5. ASUS P5AD2-E Premium 3-1 External...

User Guide
Page 63
.... • Check the CPU if properly installed. • Call ASUS technical support for instructions on installing a DIMM. • Install a PCI graphics card into one of the IDE connectors on the motherboard. ASUS P5AD2-E Premium 3-3 This feature lets you hear vocal messages during POST that your... graphics card is not defective. • Check your CPU overclocking settings in the BIOS setup and restore the default CPU parameters. • ...
.... • Check the CPU if properly installed. • Call ASUS technical support for instructions on installing a DIMM. • Install a PCI graphics card into one of the IDE connectors on the motherboard. ASUS P5AD2-E Premium 3-3 This feature lets you hear vocal messages during POST that your... graphics card is not defective. • Check your CPU overclocking settings in the BIOS setup and restore the default CPU parameters. • ...

User Guide
Page 70
Chapter summary 4 4.1 Managing and updating your BIOS 4-1 4.2 BIOS setup program 4-11 4.3 Main menu 4-14 4.4 Advanced menu 4-19 4.5 Power menu 4-33 4.6 Boot menu 4-38 4.7 Exit menu 4-43 ASUS P5AD2-E Premium
Chapter summary 4 4.1 Managing and updating your BIOS 4-1 4.2 BIOS setup program 4-11 4.3 Main menu 4-14 4.4 Advanced menu 4-19 4.5 Power menu 4-33 4.6 Boot menu 4-38 4.7 Exit menu 4-43 ASUS P5AD2-E Premium

User Guide
Page 71
... floppy disk drive. DOS environment a. Click F i l e from the format options field, then click S t a r t. e. Select the 3 1/2 Floppy Drive icon. d. Insert a 1.44MB floppy disk into the drive. ASUS P5AD2-E Premium 4-1 Copy the original motherboard BIOS using a floppy disk or the motherboard support CD.) 4. Do either one of the original motherboard...
... floppy disk drive. DOS environment a. Click F i l e from the format options field, then click S t a r t. e. Select the 3 1/2 Floppy Drive icon. d. Insert a 1.44MB floppy disk into the drive. ASUS P5AD2-E Premium 4-1 Copy the original motherboard BIOS using a floppy disk or the motherboard support CD.) 4. Do either one of the original motherboard...

User Guide
Page 73
...) from the motherboard support CD to the DOS prompt after copying the current BIOS file. Boot the system in DOS mode, then at the DOS prompt. 2. A:\>afudos /iP5AD2XE.rom ASUS P5AD2-E Premium 4-3 A:\>afudos /oOLDBIOS1.rom AMI Firmware Update Utility - Version 1.19(ASUS V2.07(03.11.24BB)) Copyright (C) 2002 American Megatrends, Inc. done Write to...
...) from the motherboard support CD to the DOS prompt after copying the current BIOS file. Boot the system in DOS mode, then at the DOS prompt. 2. A:\>afudos /iP5AD2XE.rom ASUS P5AD2-E Premium 4-3 A:\>afudos /oOLDBIOS1.rom AMI Firmware Update Utility - Version 1.19(ASUS V2.07(03.11.24BB)) Copyright (C) 2002 American Megatrends, Inc. done Write to...

User Guide
Page 75
... failure! 4. Reading file "P5AD2XE.ROM". Completed. Checking for the original or updated BIOS file. Starting BIOS recovery... Checking for floppy... Restart the system after the utility completes the updating process. ASUS P5AD2-E Premium 4-5 Start flashing... Bad BIOS checksum. Doing so can update a corrupted BIOS file using the motherboard support CD or the floppy disk that contains the...
... failure! 4. Reading file "P5AD2XE.ROM". Completed. Checking for the original or updated BIOS file. Starting BIOS recovery... Checking for floppy... Restart the system after the utility completes the updating process. ASUS P5AD2-E Premium 4-5 Start flashing... Bad BIOS checksum. Doing so can update a corrupted BIOS file using the motherboard support CD or the floppy disk that contains the...

User Guide
Page 77
... while updating the BIOS to prevent system boot failure! • A "Floppy not found !" Reading file "P5AD2XE.rom". A "P5AD2XE.ROM not found !" 4.1.4 ASUS EZ Flash utility The ASUS EZ Flash feature allows you rename the BIOS file to P5AD2XE....BIOS chip so it is no floppy disk in the floppy disk. Visit the ASUS website (www.asus.com) to download the latest BIOS file for floppy... EZFlash starting BIOS update Checking for the motherboard and rename the same to a floppy disk, then restart the system. 3. error message appears if the correct BIOS file is found ! ASUS P5AD2-E Premium...
... while updating the BIOS to prevent system boot failure! • A "Floppy not found !" Reading file "P5AD2XE.rom". A "P5AD2XE.ROM not found !" 4.1.4 ASUS EZ Flash utility The ASUS EZ Flash feature allows you rename the BIOS file to P5AD2XE....BIOS chip so it is no floppy disk in the floppy disk. Visit the ASUS website (www.asus.com) to download the latest BIOS file for floppy... EZFlash starting BIOS update Checking for the motherboard and rename the same to a floppy disk, then restart the system. 3. error message appears if the correct BIOS file is found ! ASUS P5AD2-E Premium...

User Guide
Page 79
Launch the ASUS Update utility from the nearest you to avoid network drop-down menu, then click traffic, or click A u t o S e l e c t. ASUS P5AD2-E Premium 4-9 Select U p d a t e B I n t e r n e t option from the Windows® desktop by clicking S t a r t > P r o g r a m s > A S U S > A S U S U p d a t e > A S U S U p d a t e. Click N e x t. N e x t. Select the ASUS FTP site t h e I O S f r o m 3. The ASUS Update main window appears. 2. Updating the BIOS through the Internet To update the BIOS through the Internet: 1.
Launch the ASUS Update utility from the nearest you to avoid network drop-down menu, then click traffic, or click A u t o S e l e c t. ASUS P5AD2-E Premium 4-9 Select U p d a t e B I n t e r n e t option from the Windows® desktop by clicking S t a r t > P r o g r a m s > A S U S > A S U S U p d a t e > A S U S U p d a t e. Click N e x t. N e x t. Select the ASUS FTP site t h e I O S f r o m 3. The ASUS Update main window appears. 2. Updating the BIOS through the Internet To update the BIOS through the Internet: 1.

User Guide
Page 81
...utility described in section "4.1 Managing and updating your system, or prompted to ensure optimum performance. ASUS P5AD2-E Premium 4-11 This section explains how to make your system using the BIOS Setup program so that you see on . This requires you with its test routines. When you... the Setup utility; 4.2 BIOS setup program This motherboard supports a programmable firmware chip that the computer can recognize these changes and record them in the CMOS RAM of your screen. • Visit the ASUS website (www.asus.com) to download the latest BIOS file for most conditions to...
...utility described in section "4.1 Managing and updating your system, or prompted to ensure optimum performance. ASUS P5AD2-E Premium 4-11 This section explains how to make your system using the BIOS Setup program so that you see on . This requires you with its test routines. When you... the Setup utility; 4.2 BIOS setup program This motherboard supports a programmable firmware chip that the computer can recognize these changes and record them in the CMOS RAM of your screen. • Visit the ASUS website (www.asus.com) to download the latest BIOS file for most conditions to...

User Guide
Page 85
... Configuration options: [Disabled] [Auto] Block (Multi-sector Transfer) [Auto] Enables or disables data multi-sectors transfers. Configuration options: [Disabled] [Auto] ASUS P5AD2-E Premium 4-15 Configuration options: [Not Installed] [Auto] [CDROM] [ARMD] LBA/Large Mode [Auto] Enables or disables the LBA mode. Select [CDROM] ... the device was not previously formatted with LBA mode disabled. Change Option F1 General Help F10 Save and Exit ESC Exit The BIOS automatically detects the values opposite the dimmed items (Device, Vendor, Size, LBA Mode, Block Mode, PIO Mode, Async DMA...
... Configuration options: [Disabled] [Auto] Block (Multi-sector Transfer) [Auto] Enables or disables data multi-sectors transfers. Configuration options: [Disabled] [Auto] ASUS P5AD2-E Premium 4-15 Configuration options: [Not Installed] [Auto] [CDROM] [ARMD] LBA/Large Mode [Auto] Enables or disables the LBA mode. Select [CDROM] ... the device was not previously formatted with LBA mode disabled. Change Option F1 General Help F10 Save and Exit ESC Exit The BIOS automatically detects the values opposite the dimmed items (Device, Vendor, Size, LBA Mode, Block Mode, PIO Mode, Async DMA...

User Guide
Page 95
...to [Auto] allows the motherboard to 14x. Configuration options: [Auto] [Disabled] [Enabled] Microcode Updation [Enabled] Allows you install a CPU that the BIOS automatically detects. Configure Advanced CPU settings Manufacturer: Intel Brand String: Genuine Intel(R) CPU 3.20GHz Frequency : 3200 MHz FSB Speed : 800 MHz Cache L1 :...clock and the Front Side Bus frequency. Use the < + > or < - > keys to adjust the values. Configuration options: [Disabled] [Enabled] ASUS P5AD2-E Premium 4-25 4.4.4 CPU Configuration The items in CMOS then actual and setpoint values may differ.
...to [Auto] allows the motherboard to 14x. Configuration options: [Auto] [Disabled] [Enabled] Microcode Updation [Enabled] Allows you install a CPU that the BIOS automatically detects. Configure Advanced CPU settings Manufacturer: Intel Brand String: Genuine Intel(R) CPU 3.20GHz Frequency : 3200 MHz FSB Speed : 800 MHz Cache L1 :...clock and the Front Side Bus frequency. Use the < + > or < - > keys to adjust the values. Configuration options: [Disabled] [Enabled] ASUS P5AD2-E Premium 4-25 4.4.4 CPU Configuration The items in CMOS then actual and setpoint values may differ.


