
User Guide
Page 4
... setup 4.1 Managing and updating your BIOS 4-1 4.1.1 Creating a bootable floppy disk 4-1 4.1.2 AFUDOS utility 4-2 4.1.3 ASUS CrashFree BIOS 2 utility 4-5 4.1.4 ASUS EZ Flash utility 4-7 4.1.5 ASUS Update utility 4-8 4.2 BIOS setup program 4-11 4.2.2 Menu bar 4-12 4.2.3 Navigation keys 4-12 4.2.1 BIOS menu... screen 4-12 4.2.4 Menu items 4-13 4.2.5 Sub-menu items 4-13 4.2.6 Configuration fields 4-13 4.2.7 Pop-up window 4-13 ...
... setup 4.1 Managing and updating your BIOS 4-1 4.1.1 Creating a bootable floppy disk 4-1 4.1.2 AFUDOS utility 4-2 4.1.3 ASUS CrashFree BIOS 2 utility 4-5 4.1.4 ASUS EZ Flash utility 4-7 4.1.5 ASUS Update utility 4-8 4.2 BIOS setup program 4-11 4.2.2 Menu bar 4-12 4.2.3 Navigation keys 4-12 4.2.1 BIOS menu... screen 4-12 4.2.4 Menu items 4-13 4.2.5 Sub-menu items 4-13 4.2.6 Configuration fields 4-13 4.2.7 Pop-up window 4-13 ...

User Guide
Page 10
...) x RAID 0, RAID 1, RAID 0+1, and JBOD configuration WiFi-g™ wireless solution provides: - up to 8 USB 2.0 ports (continued on Windows® XP/2003 Server OS Intel® High Definition Audio (HD Audio) C-Media CMI9880 7.1-channel audio CODEC Dolby® Digital Live™ ...RAID 5 (software patch, no WHQL) configuration ITE 8212F IDE RAID controller supports: - 2 x Ultra DMA 133/100/66 hard disks - P5AD2-E Premium specifications summary CPU Chipset Front Side Bus Memory Expansion slots Storage Wireless LAN (optional) High Definition Audio USB LGA775 socket for IEEE 802.11g/b ...
...) x RAID 0, RAID 1, RAID 0+1, and JBOD configuration WiFi-g™ wireless solution provides: - up to 8 USB 2.0 ports (continued on Windows® XP/2003 Server OS Intel® High Definition Audio (HD Audio) C-Media CMI9880 7.1-channel audio CODEC Dolby® Digital Live™ ...RAID 5 (software patch, no WHQL) configuration ITE 8212F IDE RAID controller supports: - 2 x Ultra DMA 133/100/66 hard disks - P5AD2-E Premium specifications summary CPU Chipset Front Side Bus Memory Expansion slots Storage Wireless LAN (optional) High Definition Audio USB LGA775 socket for IEEE 802.11g/b ...

User Guide
Page 30
... it to remove (B). 2. Lift the load plate with your thumb and forefinger to a 100º angle (A), then push the PnP cap from the load plate window to the left corner of the arrow to the socket pins, do not remove the PnP cap unless you .
... it to remove (B). 2. Lift the load plate with your thumb and forefinger to a 100º angle (A), then push the PnP cap from the load plate window to the left corner of the arrow to the socket pins, do not remove the PnP cap unless you .
User Guide
Page 49
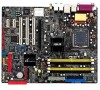
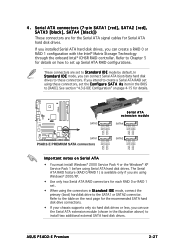
...signal cables for details. Serial ATA connectors (7-pin SATA1 [red], SATA2 [red], SATA3 [black], SATA4 [black]) These connectors are using Windows® 2000/XP. • Use only two Serial ATA RAID connectors for each RAID 0 or RAID 1 set using these connectors. If... onboard Intel® ICH6R RAID controller. If you installed Serial ATA hard disk drives, you intend to install two additional external SATA hard disk drives. ASUS P5AD2-E Premium 2-27 See section "4.3.6 IDE Configuration" on how to set the C o n f i g u r e S A T A A s item in the illustration above) to create a...
...signal cables for details. Serial ATA connectors (7-pin SATA1 [red], SATA2 [red], SATA3 [black], SATA4 [black]) These connectors are using Windows® 2000/XP. • Use only two Serial ATA RAID connectors for each RAID 0 or RAID 1 set using these connectors. If... onboard Intel® ICH6R RAID controller. If you installed Serial ATA hard disk drives, you intend to install two additional external SATA hard disk drives. ASUS P5AD2-E Premium 2-27 See section "4.3.6 IDE Configuration" on how to set the C o n f i g u r e S A T A A s item in the illustration above) to create a...

User Guide
Page 50
... RSATA_TXP2 RSATA_TXN2 GND RSATA_RXP2 RSATA_RXN2 GND GND RSATA_TXP3 RSATA_TXN3 GND RSATA_RXP3 RSATA_RXN3 GND GND RSATA_TXP4 RSATA_TXN4 GND RSATA_RXP4 RSATA_RXN4 GND ® SATA_RAID1 SATA_RAID2 SATA_RAID3 SATA_RAID4 P5AD2-E PREMIUM SATA RAID connectors • Before creating a RAID set the S i l i c o n I D M o d e by default. Refer to [SATA Mode]. See section "4.4.6 Onboard Devices...Use SATA1/SATA2 Red Master Boot disk SATA3/SATA4 Black Slave Data disk 5 . The RAID 5 feature is not Windows® Hardware Quality Labs (WHQL)-certified. 2-28 Chapter 2: Hardware information
... RSATA_TXP2 RSATA_TXN2 GND RSATA_RXP2 RSATA_RXN2 GND GND RSATA_TXP3 RSATA_TXN3 GND RSATA_RXP3 RSATA_RXN3 GND GND RSATA_TXP4 RSATA_TXN4 GND RSATA_RXP4 RSATA_RXN4 GND ® SATA_RAID1 SATA_RAID2 SATA_RAID3 SATA_RAID4 P5AD2-E PREMIUM SATA RAID connectors • Before creating a RAID set the S i l i c o n I D M o d e by default. Refer to [SATA Mode]. See section "4.4.6 Onboard Devices...Use SATA1/SATA2 Red Master Boot disk SATA3/SATA4 Black Slave Data disk 5 . The RAID 5 feature is not Windows® Hardware Quality Labs (WHQL)-certified. 2-28 Chapter 2: Hardware information

User Guide
Page 62
.... 3. Pressing the power switch for more than four seconds puts the system to sleep mode or to shut down the computer. 3. If you are using Windows® 2000: 1. Make sure that the S h u t D o w n option button is ON, pressing the power switch for details. 3-2 Chapter 3: Powering up Click the T u r...system enter the soft-off mode regardless of the BIOS setting. The power supply should turn off after Windows® shuts down . The power supply should turn off after Windows® shuts down . 3.2.2 Using the dual function power switch While the system is selected, then ...
.... 3. Pressing the power switch for more than four seconds puts the system to sleep mode or to shut down the computer. 3. If you are using Windows® 2000: 1. Make sure that the S h u t D o w n option button is ON, pressing the power switch for details. 3-2 Chapter 3: Powering up Click the T u r...system enter the soft-off mode regardless of the BIOS setting. The power supply should turn off after Windows® shuts down . The power supply should turn off after Windows® shuts down . 3.2.2 Using the dual function power switch While the system is selected, then ...

User Guide
Page 65
The Winbond Voice Editor screen appears. ASUS P5AD2-E Premium 3-5 To avoid conflicts, do not run the Winbond Voice Editor while running the ASUS PC Probe application. Launching the Voice Editor You can install this application from the Windows® desktop by clicking S t a r t > All Programs > Winbond Voice Editor > Voice Editor. The default language setting is English. POST...
The Winbond Voice Editor screen appears. ASUS P5AD2-E Premium 3-5 To avoid conflicts, do not run the Winbond Voice Editor while running the ASUS PC Probe application. Launching the Voice Editor You can install this application from the Windows® desktop by clicking S t a r t > All Programs > Winbond Voice Editor > Voice Editor. The default language setting is English. POST...

User Guide
Page 66
... messages for the language you boot your desired language, then click O p e n. Click the W r i t e button from the Voice Editor main window. Click Y e s to update the EEPROM. 4. Changing the default language To change the default language: 1. The next time you selected appear on some ...languages have a corresponding message due to file size constraints. 3. Select your computer, the ASUS Post Reporter announces the messages in the selected language. 3-6 Chapter 3: Powering up Click the L o a d button from the Voice Editor main...
... messages for the language you boot your desired language, then click O p e n. Click the W r i t e button from the Voice Editor main window. Click Y e s to update the EEPROM. 4. Changing the default language To change the default language: 1. The next time you selected appear on some ...languages have a corresponding message due to file size constraints. 3. Select your computer, the ASUS Post Reporter announces the messages in the selected language. 3-6 Chapter 3: Powering up Click the L o a d button from the Voice Editor main...

User Guide
Page 67
...; Create a separate folder for each event. 3. From the Voice Editor screen, click the A d d button to the database, then close the window when done. Launch the Voice Editor application and note the list of POST events on the leftmost column of the screen. 2. For example, use 8-... wish to to replace the pre-installed wave files. Copy the wave files that you recorded to display the A d d W a v e F i l e window. 5. ASUS P5AD2-E Premium 3-7 Customizing your POST messages The Voice Editor application allows you to record your own POST messages if your wave files so you can locate them...
...; Create a separate folder for each event. 3. From the Voice Editor screen, click the A d d button to the database, then close the window when done. Launch the Voice Editor application and note the list of POST events on the leftmost column of the screen. 2. For example, use 8-... wish to to replace the pre-installed wave files. Copy the wave files that you recorded to display the A d d W a v e F i l e window. 5. ASUS P5AD2-E Premium 3-7 Customizing your POST messages The Voice Editor application allows you to record your own POST messages if your wave files so you can locate them...

User Guide
Page 68
... the arrow opposite Voice1. Locate and select your wave file for the other events. 10. The file you select appears on the confirmation window that the files exceed the total allowable size, do any or all of the following: • Shorten your configuration. 11. Click Y... e s on the space next to the Voice Editor main window. 9. A window appears prompting you that appears. f l h extension, then click Save. 12. Click the W r i t e button to save your messages. • Save...
... the arrow opposite Voice1. Locate and select your wave file for the other events. 10. The file you select appears on the confirmation window that the files exceed the total allowable size, do any or all of the following: • Shorten your configuration. 11. Click Y... e s on the space next to the Voice Editor main window. 9. A window appears prompting you that appears. f l h extension, then click Save. 12. Click the W r i t e button to save your messages. • Save...

User Guide
Page 71
... A F o r m a t 3 1 / 2 F l o p p y D i s k window appears. W i n d o w s® X P u s e r s : Select C r e a t e a n M S - b. D O S s t a r t u p d i s k from the menu, then select F o r m a t. Windows® XP environment a. d. A S U S C r a s h F r e e B I O S 2 (Updates the BIOS using the ASUS Update or AFUDOS utilities. 4.1.1 Creating a bootable floppy disk 1. A S U S E Z F l a s... Click F i l e from the format options field, then click S t a r t. ASUS P5AD2-E Premium 4-1 Insert a 1.44MB floppy disk into the drive. b. Save a copy of the following utilities...
... A F o r m a t 3 1 / 2 F l o p p y D i s k window appears. W i n d o w s® X P u s e r s : Select C r e a t e a n M S - b. D O S s t a r t u p d i s k from the menu, then select F o r m a t. Windows® XP environment a. d. A S U S C r a s h F r e e B I O S 2 (Updates the BIOS using the ASUS Update or AFUDOS utilities. 4.1.1 Creating a bootable floppy disk 1. A S U S E Z F l a s... Click F i l e from the format options field, then click S t a r t. ASUS P5AD2-E Premium 4-1 Insert a 1.44MB floppy disk into the drive. b. Save a copy of the following utilities...

User Guide
Page 72
Insert a formatted, high density 1.44 MB floppy disk into the drive. b. e. Insert the Windows® 2000 CD to continue. 2. Click S t a r t, then select R u n. Copying the current BIOS To copy the current BIOS file using a bootable floppy disk with the ... A:\>afudos /oOLDBIOS1.rom Main filename Extension name 4-2 Chapter 4: BIOS setup This utility also allows you to the bootable floppy disk you can use as shown. 1. Windows® 2000 environment To create a set of boot disks for reference only. Press , then follow screen instructions to the optical drive. Boot the system in...
Insert a formatted, high density 1.44 MB floppy disk into the drive. b. e. Insert the Windows® 2000 CD to continue. 2. Click S t a r t, then select R u n. Copying the current BIOS To copy the current BIOS file using a bootable floppy disk with the ... A:\>afudos /oOLDBIOS1.rom Main filename Extension name 4-2 Chapter 4: BIOS setup This utility also allows you to the bootable floppy disk you can use as shown. 1. Windows® 2000 environment To create a set of boot disks for reference only. Press , then follow screen instructions to the optical drive. Boot the system in...

User Guide
Page 78
... package. Installing ASUS Update To install ASUS Update: 1. The D r i v e r s menu appears. 2. See page 5-4 for the U t i l i t i e s screen menu. 3. Quit all Windows® applications before you to manage, save, and update the motherboard BIOS in Windows® environment.... Internet • Update the BIOS from an updated BIOS file • Update the BIOS directly from the Internet, and • View the BIOS version information. ASUS Update requires an Internet connection either through a network or an Internet Service Provider (ISP). Click the U t i l i t i e s tab, then click I n s t...
... package. Installing ASUS Update To install ASUS Update: 1. The D r i v e r s menu appears. 2. See page 5-4 for the U t i l i t i e s screen menu. 3. Quit all Windows® applications before you to manage, save, and update the motherboard BIOS in Windows® environment.... Internet • Update the BIOS from an updated BIOS file • Update the BIOS directly from the Internet, and • View the BIOS version information. ASUS Update requires an Internet connection either through a network or an Internet Service Provider (ISP). Click the U t i l i t i e s tab, then click I n s t...

User Guide
Page 79
Select U p d a t e B I n t e r n e t option from the Windows® desktop by clicking S t a r t > P r o g r a m s > A S U S > A S U S U p d a t e > A S U S U p d a t e. Click N e x t. Select the ASUS FTP site t h e I O S f r o m 3. N e x t. The ASUS Update main window appears. 2. ASUS P5AD2-E Premium 4-9 Updating the BIOS through the Internet To update the BIOS through the Internet: 1. Launch the ASUS Update utility from the nearest you to avoid network drop-down menu, then click traffic, or click A u t o S e l e c t.
Select U p d a t e B I n t e r n e t option from the Windows® desktop by clicking S t a r t > P r o g r a m s > A S U S > A S U S U p d a t e > A S U S U p d a t e. Click N e x t. Select the ASUS FTP site t h e I O S f r o m 3. N e x t. The ASUS Update main window appears. 2. ASUS P5AD2-E Premium 4-9 Updating the BIOS through the Internet To update the BIOS through the Internet: 1. Launch the ASUS Update utility from the nearest you to avoid network drop-down menu, then click traffic, or click A u t o S e l e c t.

User Guide
Page 80
... update the utility to download. Select U p d a t e B I O S f r o m a f i l e option from the Windows® desktop by clicking S t a r t > P r o g r a m s > A S U S > A S U S U p d a t e > A S U S U p d a t e. 4. Launch the ASUS Update utility from the drop-down menu, then click N e x t. 3. Click N e x t. 5. Updating the BIOS through a BIOS file To ...update the BIOS through the Internet. The ASUS Update utility is capable of updating itself through a BIOS file: 1. From the FTP site, select the BIOS version that ...
... update the utility to download. Select U p d a t e B I O S f r o m a f i l e option from the Windows® desktop by clicking S t a r t > P r o g r a m s > A S U S > A S U S U p d a t e > A S U S U p d a t e. 4. Launch the ASUS Update utility from the drop-down menu, then click N e x t. 3. Click N e x t. 5. Updating the BIOS through a BIOS file To ...update the BIOS through the Internet. The ASUS Update utility is capable of updating itself through a BIOS file: 1. From the FTP site, select the BIOS version that ...

User Guide
Page 83
... 4.2.6 Configuration fields These fields show the values for the menu items. If an item is enclosed in ] [English] :[ST320413A] :[ASUS CD-S340] :[Not Detected] :[Not Detected] :[Not Detected] :[Not Detected] Use [ENTER], [TAB] or [SHIFT-TAB] to...or [-] to display the other items (Advanced, Power, Boot, and Exit) on the screen. Refer to "4.2.7 Pop-up window." 4.2.7 Pop-up window Select a menu item then press to malfunction. For example, selecting M a i n shows the Main menu items. The other... below may cause system to display a pop-up window Scroll bar ASUS P5AD2-E Premium 4-13
... 4.2.6 Configuration fields These fields show the values for the menu items. If an item is enclosed in ] [English] :[ST320413A] :[ASUS CD-S340] :[Not Detected] :[Not Detected] :[Not Detected] :[Not Detected] Use [ENTER], [TAB] or [SHIFT-TAB] to...or [-] to display the other items (Advanced, Power, Boot, and Exit) on the screen. Refer to "4.2.7 Pop-up window." 4.2.7 Pop-up window Select a menu item then press to malfunction. For example, selecting M a i n shows the Main menu items. The other... below may cause system to display a pop-up window Scroll bar ASUS P5AD2-E Premium 4-13

User Guide
Page 87
... Mode] Enhanced Mode Support On [S-ATA] Allows you are for detecting ATA/ATAPI devices. The P-ATA+S-ATA and P-ATA options are using native OS including Windows® 2000/XP. IDE Detect Time Out [35] Selects the time out value for advanced users only. Onboard IDE Operate Mode [Enhanced Mode] Allows selection... set to [RAID]. This item appears only when the Configure SATA As item is set as RAID. Configuration options: [0] [5] [10] [15] [20] [25] [30] [35] ASUS P5AD2-E Premium 4-17
... Mode] Enhanced Mode Support On [S-ATA] Allows you are for detecting ATA/ATAPI devices. The P-ATA+S-ATA and P-ATA options are using native OS including Windows® 2000/XP. IDE Detect Time Out [35] Selects the time out value for advanced users only. Onboard IDE Operate Mode [Enhanced Mode] Allows selection... set to [RAID]. This item appears only when the Configure SATA As item is set as RAID. Configuration options: [0] [5] [10] [15] [20] [25] [30] [35] ASUS P5AD2-E Premium 4-17

User Guide
Page 99
...Option ROM [Disabled] This item allows you to enable or disable the option ROM in the onboard LAN controller. Configuration options: [Disabled] [Enabled] ASUS P5AD2-E Premium 4-29 Configuration options: [Disabled] [Enabled] OnBoard PCIEX GbE LAN [Enabled] Allows you to enable or disable the onboard PCI Express Gigabit LAN .... Configuration options: [Disabled] [Enabled] The Gigabit LAN controller does not support S5 Wake-On-LAN function under DOS mode or Windows® ME. OnBoard 2nd PCIEX GbE LAN [Enabled] Allows you to set to enable or disable the second onboard PCI Express Gigabit...
...Option ROM [Disabled] This item allows you to enable or disable the option ROM in the onboard LAN controller. Configuration options: [Disabled] [Enabled] ASUS P5AD2-E Premium 4-29 Configuration options: [Disabled] [Enabled] OnBoard PCIEX GbE LAN [Enabled] Allows you to enable or disable the onboard PCI Express Gigabit LAN .... Configuration options: [Disabled] [Enabled] The Gigabit LAN controller does not support S5 Wake-On-LAN function under DOS mode or Windows® ME. OnBoard 2nd PCIEX GbE LAN [Enabled] Allows you to set to enable or disable the second onboard PCI Express Gigabit...

User Guide
Page 113
...When you select this option, a confirmation appears. Select Y e s to save the changes while exiting. After selecting this option, a confirmation window appears. Select one of the options from this option only if you do not want to save your selections, choose this operation. Exit & ... System Time, and Password, the BIOS asks for the BIOS items, and save the changes that you made and restore the previously saved values. ASUS P5AD2-E Premium 4-43 An onboard backup battery sustains the CMOS RAM so it stays on even when the computer is turned off. 4.7 Exit menu The Exit ...
...When you select this option, a confirmation appears. Select Y e s to save the changes while exiting. After selecting this option, a confirmation window appears. Select one of the options from this option only if you do not want to save your selections, choose this operation. Exit & ... System Time, and Password, the BIOS asks for the BIOS items, and save the changes that you made and restore the previously saved values. ASUS P5AD2-E Premium 4-43 An onboard backup battery sustains the CMOS RAM so it stays on even when the computer is turned off. 4.7 Exit menu The Exit ...

User Guide
Page 114
When you select this option or if you to load the default values for each of the parameters on the Setup menus. Select E x i t & S a v e C h a n g e s or make other changes before saving the values to load default values. Select Y e s to the non-volatile RAM. 4-44 Chapter 4: BIOS setup Load Setup Defaults Allows you press , a confirmation window appears.
When you select this option or if you to load the default values for each of the parameters on the Setup menus. Select E x i t & S a v e C h a n g e s or make other changes before saving the values to load default values. Select Y e s to the non-volatile RAM. 4-44 Chapter 4: BIOS setup Load Setup Defaults Allows you press , a confirmation window appears.


