
User Manual
Page 4
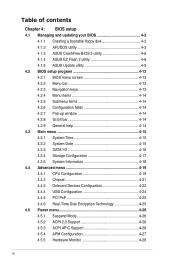
... your BIOS 4-2 4.1.1 Creating a bootable floppy disk 4-2 4.1.2 AFUDOS utility 4-3 4.1.3 ASUS CrashFree BIOS 3 utility 4-6 4.1.4 ASUS EZ Flash 2 utility 4-8 4.1.5 ASUS Update utility 4-9 4.2 BIOS setup program 4-12 4.2.1 BIOS menu screen 4-13 4.2.2 Menu bar 4-13 4.2.3 Navigation keys 4-13 4.2.4 Menu items 4-14 4.2.5 Submenu items 4-14 4.2.6 Configuration fields 4-14 4.2.7 Pop-up window 4-14 4.2.8 Scroll bar 4-14 4.2.9 General help 4-14 4.3 Main menu...
... your BIOS 4-2 4.1.1 Creating a bootable floppy disk 4-2 4.1.2 AFUDOS utility 4-3 4.1.3 ASUS CrashFree BIOS 3 utility 4-6 4.1.4 ASUS EZ Flash 2 utility 4-8 4.1.5 ASUS Update utility 4-9 4.2 BIOS setup program 4-12 4.2.1 BIOS menu screen 4-13 4.2.2 Menu bar 4-13 4.2.3 Navigation keys 4-13 4.2.4 Menu items 4-14 4.2.5 Submenu items 4-14 4.2.6 Configuration fields 4-14 4.2.7 Pop-up window 4-14 4.2.8 Scroll bar 4-14 4.2.9 General help 4-14 4.3 Main menu...
User Manual
Page 18
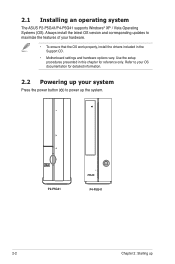
2.1 Installing an operating system The ASUS P2-P5G41/P4-P5G41 supports Windows® XP / Vista Operating Systems (OS). Always install the latest OS version and corresponding updates to maximize the features of your system Press the power ... drivers included in this chapter for reference only. Use the setup procedures presented in the Support CD. • Motherboard settings and hardware options vary. P2-P5G41 P4-P5G41 2-2 Chapter 2: Starting up the system. Refer to power up
2.1 Installing an operating system The ASUS P2-P5G41/P4-P5G41 supports Windows® XP / Vista Operating Systems (OS). Always install the latest OS version and corresponding updates to maximize the features of your system Press the power ... drivers included in this chapter for reference only. Use the setup procedures presented in the Support CD. • Motherboard settings and hardware options vary. P2-P5G41 P4-P5G41 2-2 Chapter 2: Starting up the system. Refer to power up
User Manual
Page 21
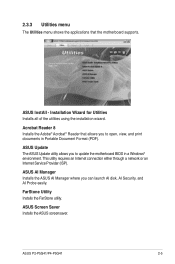
... utility allows you to open, view, and print documents in a Windows® environment. FarStone Utility Installs the FarStone utility. ASUS InstAll - ASUS Screen Saver Installs the ASUS screensaver. ASUS P2-P5G41/P4-P5G41 2-5 ASUS AI Manager Installs the ASUS AI Manager where you can launch AI disk, AI Security, and AI Probe easily. Installation Wizard for Utilities Installs all of...
... utility allows you to open, view, and print documents in a Windows® environment. FarStone Utility Installs the FarStone utility. ASUS InstAll - ASUS Screen Saver Installs the ASUS screensaver. ASUS P2-P5G41/P4-P5G41 2-5 ASUS AI Manager Installs the ASUS AI Manager where you can launch AI disk, AI Security, and AI Probe easily. Installation Wizard for Utilities Installs all of...

User Manual
Page 25
... Quick Bar appears. Close Maximize/Resume Minimize Main Support My Favorites Information ASUS P2-P5G41/P4-P5G41 2-9 Place the Support CD into the optical drive. To launch AI Manager from the Windows® desktop. 2.4 ASUS AI Manager ASUS AI Manager allows you to run the CD. 2. Right-click this ... You can launch AI Manager right after installation or anytime from the Windows® desktop, click Start > All Programs > ASUS > AI Manager > AI Manager v1.xx.xx. Click the Utilities tab, then click ASUS AI Manager. 3. The CD automatically displays the Drivers menu if Autorun...
... Quick Bar appears. Close Maximize/Resume Minimize Main Support My Favorites Information ASUS P2-P5G41/P4-P5G41 2-9 Place the Support CD into the optical drive. To launch AI Manager from the Windows® desktop. 2.4 ASUS AI Manager ASUS AI Manager allows you to run the CD. 2. Right-click this ... You can launch AI Manager right after installation or anytime from the Windows® desktop, click Start > All Programs > ASUS > AI Manager > AI Manager v1.xx.xx. Click the Utilities tab, then click ASUS AI Manager. 3. The CD automatically displays the Drivers menu if Autorun...

User Manual
Page 26
Select the item that you to clear, then click Apply. 2-10 Chapter 2: Starting up Click the small triangle to open /close the Main menu AI Disk AI Disk allows you want to easily clear the temporary IE files, IE URLs, IE cookies, IE history list, Recycle Bin, and recently opened files list. Click to open or close AI Manager. 2.4.4 Main Launch AI Disk, AI Security, or AI Probe from the Main menu. Click to close the Main menu. Click to keep AI Manager in the taskbar. Click to switch between a full-screen AI Manager window and the Quick bar.
Select the item that you to clear, then click Apply. 2-10 Chapter 2: Starting up Click the small triangle to open /close the Main menu AI Disk AI Disk allows you want to easily clear the temporary IE files, IE URLs, IE cookies, IE history list, Recycle Bin, and recently opened files list. Click to open or close AI Manager. 2.4.4 Main Launch AI Disk, AI Security, or AI Probe from the Main menu. Click to close the Main menu. Click to keep AI Manager in the taskbar. Click to switch between a full-screen AI Manager window and the Quick bar.

User Manual
Page 35
P5Q8L P5Q8L COM Connector COM1 PIN 1 ASUS P2-P5G41/P4-P5G41 3-5 Connect the serial port module cable to this connector, then install the module to the SATA1 connector. 3.4 Connectors 1. P5Q8L SATA1 GND RSATA_RXN1 RSATA_RXP1 GND RSATA_TXN1 ... RSATA_RXP2 GND RSATA_TXN2 RSATA_TXP2 GND P5Q8L SATA Connectors (ICH7®) 2. COM port connector (10-1pin COM1) This connector is for Serial ATA drives. • Install Windows® XP Service Pack 1 before using Serial ATA drives. • When using the connectors in IDE mode, connect the primary (boot) hard disk drive to...
P5Q8L P5Q8L COM Connector COM1 PIN 1 ASUS P2-P5G41/P4-P5G41 3-5 Connect the serial port module cable to this connector, then install the module to the SATA1 connector. 3.4 Connectors 1. P5Q8L SATA1 GND RSATA_RXN1 RSATA_RXP1 GND RSATA_TXN1 ... RSATA_RXP2 GND RSATA_TXN2 RSATA_TXP2 GND P5Q8L SATA Connectors (ICH7®) 2. COM port connector (10-1pin COM1) This connector is for Serial ATA drives. • Install Windows® XP Service Pack 1 before using Serial ATA drives. • When using the connectors in IDE mode, connect the primary (boot) hard disk drive to...
User Manual
Page 42
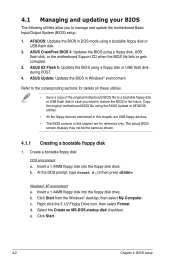
...floppy disk drive. At the DOS prompt, type format A:/S then press . Click Start from the Windows® desktop, then select My Computer. Select the Create an MS-DOS startup disk checkbox. ASUS EZ Flash 2: Updates the BIOS using a bootable floppy disk or USB flash disk. 2. Refer ...or USB flash disk during POST. 4. Insert a 1.44MB floppy disk into the floppy disk drive. b. e. ASUS Update: Updates the BIOS in case you to a bootable floppy disk or USB flash disk in Windows® environment. b. d. The actual BIOS screen displays may not be the same as shown. 4.1.1 Creating ...
...floppy disk drive. At the DOS prompt, type format A:/S then press . Click Start from the Windows® desktop, then select My Computer. Select the Create an MS-DOS startup disk checkbox. ASUS EZ Flash 2: Updates the BIOS using a bootable floppy disk or USB flash disk. 2. Refer ...or USB flash disk during POST. 4. Insert a 1.44MB floppy disk into the floppy disk drive. b. e. ASUS Update: Updates the BIOS in case you to a bootable floppy disk or USB flash disk in Windows® environment. b. d. The actual BIOS screen displays may not be the same as shown. 4.1.1 Creating ...

User Manual
Page 43
... not write-protected and has at least 1024KB free space to save the file. ASUS P2-P5G41/P4-P5G41 4-3 The actual BIOS screens may not be the same as backup when the BIOS fails or gets corrupted during the updating process. Windows® Vista environment a. Copy the original or the latest motherboard BIOS file to...
... not write-protected and has at least 1024KB free space to save the file. ASUS P2-P5G41/P4-P5G41 4-3 The actual BIOS screens may not be the same as backup when the BIOS fails or gets corrupted during the updating process. Windows® Vista environment a. Copy the original or the latest motherboard BIOS file to...
User Manual
Page 49
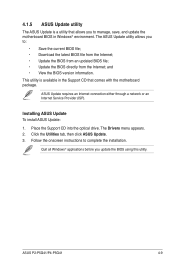
...: 1. Place the Support CD into the optical drive. The Drivers menu appears. 2. Quit all Windows® applications before you to complete the installation. ASUS P2-P5G41/P4-P5G41 4-9 Follow the onscreen instructions to : • Save the current BIOS file; • Download the latest BIOS file from the Internet; • Update the BIOS from ...
...: 1. Place the Support CD into the optical drive. The Drivers menu appears. 2. Quit all Windows® applications before you to complete the installation. ASUS P2-P5G41/P4-P5G41 4-9 Follow the onscreen instructions to : • Save the current BIOS file; • Download the latest BIOS file from the Internet; • Update the BIOS from ...

User Manual
Page 50
The ASUS Update main window appears. 2. click Auto Select. Click Next. 4-10 Chapter 4: BIOS setup Select Update BIOS from the dropdown you to avoid network traffic, or menu, then click Next. Select the ASUS FTP site nearest Internet option from the 3. Launch the ASUS Update utility from the Windows® desktop by clicking Start > Programs > ASUS > ASUSUpdate > ASUSUpdate. Updating the BIOS through the Internet To update the BIOS through the Internet: 1.
The ASUS Update main window appears. 2. click Auto Select. Click Next. 4-10 Chapter 4: BIOS setup Select Update BIOS from the dropdown you to avoid network traffic, or menu, then click Next. Select the ASUS FTP site nearest Internet option from the 3. Launch the ASUS Update utility from the Windows® desktop by clicking Start > Programs > ASUS > ASUSUpdate > ASUSUpdate. Updating the BIOS through the Internet To update the BIOS through the Internet: 1.

User Manual
Page 51
... features. Always update the utility to download. The ASUS Update main window appears. 2. Follow the onscreen instructions to complete the updating process. Select Update BIOS from a file option from the Open window, then click Open. 4. Updating the BIOS through ... ASUS Update utility is capable of updating itself through a BIOS file: 1. Locate the BIOS file from the dropdown menu, then click Next. 3. 4. Launch the ASUS Update utility from the Windows® desktop by clicking Start > Programs > ASUS > ASUSUpdate > ASUSUpdate. P5Q8L.ROM P5Q8L ASUS P2-P5G41/P4-P5G41...
... features. Always update the utility to download. The ASUS Update main window appears. 2. Follow the onscreen instructions to complete the updating process. Select Update BIOS from a file option from the Open window, then click Open. 4. Updating the BIOS through ... ASUS Update utility is capable of updating itself through a BIOS file: 1. Locate the BIOS file from the dropdown menu, then click Next. 3. 4. Launch the ASUS Update utility from the Windows® desktop by clicking Start > Programs > ASUS > ASUSUpdate > ASUSUpdate. P5Q8L.ROM P5Q8L ASUS P2-P5G41/P4-P5G41...

User Manual
Page 54
... Option F1 General Help F10 Save and Exit ESC Exit v02.61 (C)Copyright 1985-2009, American Megatrends, Inc. 4.2.8 Scroll bar Pop-up window Scroll bar A scroll bar appears on the menu bar have their respective menu items. Main Advanced BIOS SETUP UTILITY Power Boot Tools Exit System... the screen. 4.2.9 General help At the top right corner of the menu screen is not user-configurable. Refer to 4.2.7 Pop-up window. 4.2.7 Pop-up window with the configuration options for the menu items. If an item is highlighted when selected. A configurable field is enclosed in brackets, and...
... Option F1 General Help F10 Save and Exit ESC Exit v02.61 (C)Copyright 1985-2009, American Megatrends, Inc. 4.2.8 Scroll bar Pop-up window Scroll bar A scroll bar appears on the menu bar have their respective menu items. Main Advanced BIOS SETUP UTILITY Power Boot Tools Exit System... the screen. 4.2.9 General help At the top right corner of the menu screen is not user-configurable. Refer to 4.2.7 Pop-up window. 4.2.7 Pop-up window with the configuration options for the menu items. If an item is highlighted when selected. A configurable field is enclosed in brackets, and...
User Manual
Page 60
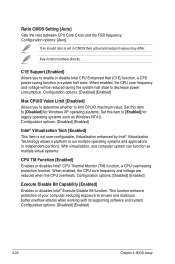
...: [Disabled] [Enabled] Intel® Virtualization Tech [Enabled] This item is set in system halt state. Set this item to [Disabled] for Windows XP operating systems. Set this item to enable or disable Intel CPU Enhanced Halt (C1E) function, a CPU power-saving function in CMOS then actual... to viruses and malicious buffer overflow attacks when working with its supporting software and system. With virtualization, one computer system can function as Windows NT4.0. Configuration options: [Auto]. Ratio CMOS Setting [Auto] Sets the ratio between CPU Core Clock and the FSB frequency. If an...
...: [Disabled] [Enabled] Intel® Virtualization Tech [Enabled] This item is set in system halt state. Set this item to [Disabled] for Windows XP operating systems. Set this item to enable or disable Intel CPU Enhanced Halt (C1E) function, a CPU power-saving function in CMOS then actual... to viruses and malicious buffer overflow attacks when working with its supporting software and system. With virtualization, one computer system can function as Windows NT4.0. Configuration options: [Auto]. Ratio CMOS Setting [Auto] Sets the ratio between CPU Core Clock and the FSB frequency. If an...
User Manual
Page 74
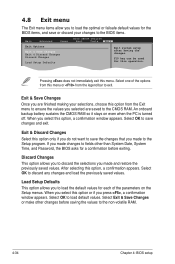
... your selections, choose this menu or from the Exit menu to ensure the values you press , a confirmation window appears. If you to load the optimal or failsafe default values for this option, a confirmation window appears. Discard Changes This option allows you to discard the selections you select this operation. Enter F1 Go...
... your selections, choose this menu or from the Exit menu to ensure the values you press , a confirmation window appears. If you to load the optimal or failsafe default values for this option, a confirmation window appears. Discard Changes This option allows you to discard the selections you select this operation. Enter F1 Go...