

User Guide
Page 4
... to comply with Part 15 of no guarantee that this equipment does cause harmful interference to radio or television reception, which the receiver is no signal input after 10 seconds, the product automatically goes to provide reasonable protection against harmful interference in a particular installation. As an Energy Star® Partner, our...
... to comply with Part 15 of no guarantee that this equipment does cause harmful interference to radio or television reception, which the receiver is no signal input after 10 seconds, the product automatically goes to provide reasonable protection against harmful interference in a particular installation. As an Energy Star® Partner, our...

User Guide
Page 10
Status White Amber OFF Description ON Standby mode OFF ASUS LCD Monitor MX279 1-3 Power Button/Power Indicator: • Press this button to display HDMI signals after you connect HDMI cable with the monitor. 7. Press (Input Select button) to turn the monitor on/off. • The color definition of the power indicator is as the table below.
Status White Amber OFF Description ON Standby mode OFF ASUS LCD Monitor MX279 1-3 Power Button/Power Indicator: • Press this button to display HDMI signals after you connect HDMI cable with the monitor. 7. Press (Input Select button) to turn the monitor on/off. • The color definition of the power indicator is as the table below.

User Guide
Page 14
Use your fingers to the monitor. • Hold the base while removing the screw. Disconnect power and signal cables. Or, you may directly use a screwdriver to remove the screw that secures the base to the stand, and detach the base from the stand. 3. 2.1.2 Detaching the base 1. Carefully put the front of the base, and remove the base from the stand. • We recommend that you cover the table surface with soft cloth to prevent damage to loosen the screw located at the bottom of the monitor face down on a clean table. 2. ASUS LCD Monitor MX279 2-2
Use your fingers to the monitor. • Hold the base while removing the screw. Disconnect power and signal cables. Or, you may directly use a screwdriver to remove the screw that secures the base to the stand, and detach the base from the stand. 3. 2.1.2 Detaching the base 1. Carefully put the front of the base, and remove the base from the stand. • We recommend that you cover the table surface with soft cloth to prevent damage to loosen the screw located at the bottom of the monitor face down on a clean table. 2. ASUS LCD Monitor MX279 2-2

User Guide
Page 16
b. The power indicator is connected, connect the end with plug type to your computer's VGA/HDMI port. b. When multiple video cable signals are connected, you can choose the desired input by pressing the Input Select key or select from the Input Select item in -line is connected... . • To connect the power cord: a. Connect the other end to the monitor's earphone jack. Tighten the two screws to show that the monitor ASUS LCD Monitor MX279 2-4 See page 1-2 for the location of the VGA/HDMI cable to the monitor's DC input. Connect the adapter to the monitor's VGA...
b. The power indicator is connected, connect the end with plug type to your computer's VGA/HDMI port. b. When multiple video cable signals are connected, you can choose the desired input by pressing the Input Select key or select from the Input Select item in -line is connected... . • To connect the power cord: a. Connect the other end to the monitor's earphone jack. Tighten the two screws to show that the monitor ASUS LCD Monitor MX279 2-4 See page 1-2 for the location of the VGA/HDMI cable to the monitor's DC input. Connect the adapter to the monitor's VGA...
User Guide
Page 19
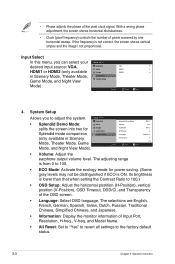
... scanned by one horizontal sweep. With a wrong phase adjustment, the screen shows horizontal distrubances. • Clock (pixel frequency) controls the number of the pixel clock signal. Input Select In this menu, you to adjust the system. • Splendid Demo Mode: splits the screen into two for power saving. (Some gray levels...
... scanned by one horizontal sweep. With a wrong phase adjustment, the screen shows horizontal distrubances. • Clock (pixel frequency) controls the number of the pixel clock signal. Input Select In this menu, you to adjust the system. • Splendid Demo Mode: splits the screen into two for power saving. (Some gray levels...

User Guide
Page 22
... is properly connected to the monitor and the power outlet. Screen image has color defects (white does not look white) • Inspect the signal cable and make sure none of the pins are bent. • Connect the computer with another available monitor to check if the computer is present ... if the adapter and power cable are bent. • Perform Reset via OSD. • Adjust the R/G/B color settings or select the Color Temperature via OSD. ASUS LCD Monitor MX279 3-6 Screen image is properly installed and activated.
... is properly connected to the monitor and the power outlet. Screen image has color defects (white does not look white) • Inspect the signal cable and make sure none of the pins are bent. • Connect the computer with another available monitor to check if the computer is present ... if the adapter and power cable are bent. • Perform Reset via OSD. • Adjust the R/G/B color settings or select the Color Temperature via OSD. ASUS LCD Monitor MX279 3-6 Screen image is properly installed and activated.


