User Manual
Page 128
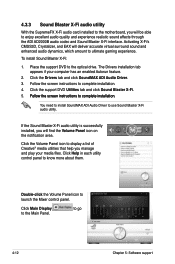
...appears if your media files. You need to install SoundMAX ADI Audio Driver to the optical drive. to complete installation. 4. Click the Volume Panel icon to display a list of Creative® media utilities that help you will be able to enjoy excellent audio quality and ...the screen instructions to go 4-12 Chapter 5: Software support 4.3.3 Sound Blaster X-Fi audio utility With the SupremeFX X-Fi audio card installed to the motherboard, you manage and play your computer has an enabled Autorun feature. 2. To install Sound Blaster X-Fi: 1. Click the Drivers tab and click ...
...appears if your media files. You need to install SoundMAX ADI Audio Driver to the optical drive. to complete installation. 4. Click the Volume Panel icon to display a list of Creative® media utilities that help you will be able to enjoy excellent audio quality and ...the screen instructions to go 4-12 Chapter 5: Software support 4.3.3 Sound Blaster X-Fi audio utility With the SupremeFX X-Fi audio card installed to the motherboard, you manage and play your computer has an enabled Autorun feature. 2. To install Sound Blaster X-Fi: 1. Click the Drivers tab and click ...

User Manual
Page 129
... each icon to configure further settings Minimize Exit Help Drag to adjust volume Click to mute volume Click to restore default settings Speakers and Headphone Panel This panel allows you to test speaker noise in turn ASUS Maximus II Formula 4-13 Main Panel The Main Panel displays all the features and functions your SupremeFX X-Fi audio...
... each icon to configure further settings Minimize Exit Help Drag to adjust volume Click to mute volume Click to restore default settings Speakers and Headphone Panel This panel allows you to test speaker noise in turn ASUS Maximus II Formula 4-13 Main Panel The Main Panel displays all the features and functions your SupremeFX X-Fi audio...

User Manual
Page 131
Drag to adjust volume Click to select a recording device ASUS Maximus II Formula Click to adjust volume Click to select a recording device and adjust recording/playback devices volume. Click to enable EQ Drag to customize effects Click to select an EQ preset Click to save settings Mixer Panel This panel allows you to avoid large volume fluctuations. Smart Volume Management Panel Enable Smart Volume Management (SVM) to customize equalizer settings or select an EQ presets. Click to switch on/off SVM Graphic Equalizer Panel This panel allows you to mute volume 4-15
Drag to adjust volume Click to select a recording device ASUS Maximus II Formula Click to adjust volume Click to select a recording device and adjust recording/playback devices volume. Click to enable EQ Drag to customize effects Click to select an EQ preset Click to save settings Mixer Panel This panel allows you to avoid large volume fluctuations. Smart Volume Management Panel Enable Smart Volume Management (SVM) to customize equalizer settings or select an EQ presets. Click to switch on/off SVM Graphic Equalizer Panel This panel allows you to mute volume 4-15

User Manual
Page 153
To partition volumes: 1. Right-click My Computer on the Windows® desktop, and then select Manage from the pop-up window. 2. ASUS Maximus II Formula 4-37 Right-click the unallocated space of the disk, and then select New Partition. Follow the onscreen instructions to initialize the disk first. 3. ...New Partition Wizard screen appears. If the New Partition option is not available, right-click Disk item, and then select Initialize Disk to complete the volume partition. Partitioning volumes You have to partition volumes for the hard disk after Speeding HDD configuration.
To partition volumes: 1. Right-click My Computer on the Windows® desktop, and then select Manage from the pop-up window. 2. ASUS Maximus II Formula 4-37 Right-click the unallocated space of the disk, and then select New Partition. Follow the onscreen instructions to initialize the disk first. 3. ...New Partition Wizard screen appears. If the New Partition option is not available, right-click Disk item, and then select Initialize Disk to complete the volume partition. Partitioning volumes You have to partition volumes for the hard disk after Speeding HDD configuration.

User Manual
Page 158
... and select the menu options. All Rights Reserved. [ MAIN MENU ] 1. Exit RAID Volumes: None defined. Install all the Serial ATA hard disk drives. 2. Delete RAID Volume 4. Turn on your screen. 4-42 Chapter 4: Software support Intel® Matrix Storage Manager...Southbridge. To enter the Intel® Matrix Storage Manager option ROM utility: 1. Create RAID Volume 3. Physical Disks: Port Drive Model 0 XXXXXXXXXXX 1 XXXXXXXXXXX 2 XXXXXXXXXXX 3 XXXXXXXXXXX [ DISK/VOLUME INFORMATION ] Serial # XXXXXXXX XXXXXXXX XXXXXXXX XXXXXXXX Size XX.XXGB XX.XXGB XX.XXGB XX....
... and select the menu options. All Rights Reserved. [ MAIN MENU ] 1. Exit RAID Volumes: None defined. Install all the Serial ATA hard disk drives. 2. Delete RAID Volume 4. Turn on your screen. 4-42 Chapter 4: Software support Intel® Matrix Storage Manager...Southbridge. To enter the Intel® Matrix Storage Manager option ROM utility: 1. Create RAID Volume 3. Physical Disks: Port Drive Model 0 XXXXXXXXXXX 1 XXXXXXXXXXX 2 XXXXXXXXXXX 3 XXXXXXXXXXX [ DISK/VOLUME INFORMATION ] Serial # XXXXXXXX XXXXXXXX XXXXXXXX XXXXXXXX Size XX.XXGB XX.XXGB XX.XXGB XX....

User Manual
Page 159
A small triangle marks the selected drive. Create RAID Volume and press . When the RAID Level item is highlighted, press the up /down arrow key to configure as RAID. ASUS Maximus II Formula 4-43 Enter a name for the RAID 0 set : 1. When the Disks item is 16 characters or ... create a RAID 0 set and press . 3. All Rights Reserved. [ CREATE VOLUME MENU ] Name: RAID Level: Disks: Strip Size: Capacity: Volume0 RAID0(Stripe) Select Disks 128KB XXX GB Create Volume [ HELP ] Enter a unique volume name that has no special characters and is highlighted, press to select the hard ...
A small triangle marks the selected drive. Create RAID Volume and press . When the RAID Level item is highlighted, press the up /down arrow key to configure as RAID. ASUS Maximus II Formula 4-43 Enter a name for the RAID 0 set : 1. When the Disks item is 16 characters or ... create a RAID 0 set and press . 3. All Rights Reserved. [ CREATE VOLUME MENU ] Name: RAID Level: Disks: Strip Size: Capacity: Volume0 RAID0(Stripe) Select Disks 128KB XXX GB Create Volume [ HELP ] Enter a unique volume name that has no special characters and is highlighted, press to select the hard ...

User Manual
Page 160
... systems, and a higher stripe size for multimedia computer systems used mainly for the RAID 0 array, and then press . Press when the Create Volume item is 128 KB. The default stripe size is highlighted. The following warning message appears. WARNING: ALL DATA ON SELECTED DISKS WILL BE LOST.... Use the up/down arrow key to 128 KB. Enter the RAID volume capacity that you want and press . Are you sure you want to the Create Volume menu. 4-44 Chapter 4: Software support The default value indicates the maximum capacity allowed. 8. Press to...
... systems, and a higher stripe size for multimedia computer systems used mainly for the RAID 0 array, and then press . Press when the Create Volume item is 128 KB. The default stripe size is highlighted. The following warning message appears. WARNING: ALL DATA ON SELECTED DISKS WILL BE LOST.... Use the up/down arrow key to 128 KB. Enter the RAID volume capacity that you want and press . Are you sure you want to the Create Volume menu. 4-44 Chapter 4: Software support The default value indicates the maximum capacity allowed. 8. Press to...

User Manual
Page 161
... the RAID 1 set : 1. The following screen appears. When the Capacity item is highlighted. Press when the Create Volume item is highlighted, enter the RAID volume capacity that has no special characters and is highlighted, press the up/down arrow key to select RAID 1(Mirror), then...to go back to create this volume? (Y/N): 6. Creating a RAID 1 set (mirrored) To create a RAID 1 set and press . 3. When the RAID Level item is 16 characters or less. [↑↓]-Change [TAB]-Next [ESC]-Previous Menu [Enter]-Select 2. ASUS Maximus II Formula 4-45 From the utility main menu...
... the RAID 1 set : 1. The following screen appears. When the Capacity item is highlighted. Press when the Create Volume item is highlighted, enter the RAID volume capacity that has no special characters and is highlighted, press the up/down arrow key to select RAID 1(Mirror), then...to go back to create this volume? (Y/N): 6. Creating a RAID 1 set (mirrored) To create a RAID 1 set and press . 3. When the RAID Level item is 16 characters or less. [↑↓]-Change [TAB]-Next [ESC]-Previous Menu [Enter]-Select 2. ASUS Maximus II Formula 4-45 From the utility main menu...

User Manual
Page 162
...RAID Level item is highlighted, press the up /down arrow key to select the stripe size for audio and video editing. 5. Enter the RAID volume capacity that has no special characters and is 64 KB. The default stripe size is 16 characters or less. [↑↓]-Change [TAB]-Next... stripe size for server systems, and a higher stripe size for multimedia computer systems used mainly for the RAID 10 array, and then press . Create RAID Volume and press . The available stripe size values range from 4 KB to select RAID 10 (RAID 0+1), and then press . 4. Enter a name for the...
...RAID Level item is highlighted, press the up /down arrow key to select the stripe size for audio and video editing. 5. Enter the RAID volume capacity that has no special characters and is 64 KB. The default stripe size is 16 characters or less. [↑↓]-Change [TAB]-Next... stripe size for server systems, and a higher stripe size for multimedia computer systems used mainly for the RAID 10 array, and then press . Create RAID Volume and press . The available stripe size values range from 4 KB to select RAID 10 (RAID 0+1), and then press . 4. Enter a name for the...

User Manual
Page 163
... up/down arrow key to select RAID 5(Parity), and then press . Press to create the RAID volume and return to the main menu or to go back to create this volume? (Y/N): 7. From the utility main menu, select 1. The following warning message appears. Enter a name...]-Previous Menu [Enter]-Select 2. Creating a RAID 5 set (parity) To create a RAID 5 set and press . 3. Create RAID Volume and press . ASUS Maximus II Formula 4-47 Intel(R) Matrix Storage Manager option ROM v8.0.0.1027 ICH10R wRAID5 Copyright(C) 2003-08 Intel Corporation. 6. The following screen appears.
... up/down arrow key to select RAID 5(Parity), and then press . Press to create the RAID volume and return to the main menu or to go back to create this volume? (Y/N): 7. From the utility main menu, select 1. The following warning message appears. Enter a name...]-Previous Menu [Enter]-Select 2. Creating a RAID 5 set (parity) To create a RAID 5 set and press . 3. Create RAID Volume and press . ASUS Maximus II Formula 4-47 Intel(R) Matrix Storage Manager option ROM v8.0.0.1027 ICH10R wRAID5 Copyright(C) 2003-08 Intel Corporation. 6. The following screen appears.

User Manual
Page 164
.... Are you sure you want to set, and then press to configure as RAID. Press to create the RAID volume and return to the main menu or to go back to create this volume? (Y/N): 9. Port Drive Model 0 XXXXXXXXXXXX 1 XXXXXXXXXXXX 2 XXXXXXXXXXXX 3 XXXXXXXXXXXX [ SELECT DISKS ] Serial # XXXXXXXX XXXXXXXX ...RAID Disk XX.XGB Non-RAID Disk XX.XGB Non-RAID Disk XX.XGB Non-RAID Disk Select 3 to 6 disks to use in creating the volume. [↑↓]-Previous/Next [SPACE]-SelectsDisk [ENTER]-Done 5. A small triangle marks the selected drive. 4. The default stripe size is highlighted. ...
.... Are you sure you want to set, and then press to configure as RAID. Press to create the RAID volume and return to the main menu or to go back to create this volume? (Y/N): 9. Port Drive Model 0 XXXXXXXXXXXX 1 XXXXXXXXXXXX 2 XXXXXXXXXXXX 3 XXXXXXXXXXXX [ SELECT DISKS ] Serial # XXXXXXXX XXXXXXXX ...RAID Disk XX.XGB Non-RAID Disk XX.XGB Non-RAID Disk XX.XGB Non-RAID Disk Select 3 to 6 disks to use in creating the volume. [↑↓]-Previous/Next [SPACE]-SelectsDisk [ENTER]-Done 5. A small triangle marks the selected drive. 4. The default stripe size is highlighted. ...