User Manual
Page 22
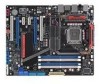
AI Booster The ASUS AI Booster allows you to overclock the CPU speed in an ever... device failure and translates the errors on a hardware level. External LCD Poster The new LCD Poster now posts critical POST information in Windows® environment without having to experience realistic dynamic sound effects with games. �S�e�...open the system chassis to effortlessly fine-tune the performance without the hassle of SupremeFX card on the LCD during POST. Due to find out what is required before using C.P.R. C.P.R. (CPU Parameter Recall) When the system hangs due...
AI Booster The ASUS AI Booster allows you to overclock the CPU speed in an ever... device failure and translates the errors on a hardware level. External LCD Poster The new LCD Poster now posts critical POST information in Windows® environment without having to experience realistic dynamic sound effects with games. �S�e�...open the system chassis to effortlessly fine-tune the performance without the hassle of SupremeFX card on the LCD during POST. Due to find out what is required before using C.P.R. C.P.R. (CPU Parameter Recall) When the system hangs due...
User Manual
Page 65
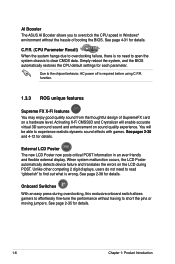
...the screen. While the tests are off. 3. If you do not see BIOS beep codes table below) or additional messages appear on the chain) c. ASUS Maximus II Formula 2-39 Monitor b. For systems with "green" standards or if it has a "power standby" feature, the monitor LED may have failed a power-on... self tests or POST. Follow the instructions in the following order: a. Connect the power cord to enter the BIOS Setup. 2.9 Starting up . System power 6. If your ...
...the screen. While the tests are off. 3. If you do not see BIOS beep codes table below) or additional messages appear on the chain) c. ASUS Maximus II Formula 2-39 Monitor b. For systems with "green" standards or if it has a "power standby" feature, the monitor LED may have failed a power-on... self tests or POST. Follow the instructions in the following order: a. Connect the power cord to enter the BIOS Setup. 2.9 Starting up . System power 6. If your ...

User Manual
Page 72
... to the Tools menu to select EZ Flash2 and press to display the following. When the correct BIOS file is accessible by pressing + during POST to enable it is found . You can launch the EZ Flash 2 by pressing before the correct file is found , EZ Flash 2 performs...2 1. Visit the ASUS website (www.asus.com) to a floppy disk or a USB flash disk, then restart the system. 3. Save the BIOS file to download the latest BIOS file for the motherboard. 2. ASUSTek EZ Flash 2 BIOS ROM Utility V3.25 FLASH TYPE: WINBOND W25P/X16 Current ROM BOARD: Maximus-II Formula VER: 0114 DATE:...
... to the Tools menu to select EZ Flash2 and press to display the following. When the correct BIOS file is accessible by pressing + during POST to enable it is found . You can launch the EZ Flash 2 by pressing before the correct file is found , EZ Flash 2 performs...2 1. Visit the ASUS website (www.asus.com) to a floppy disk or a USB flash disk, then restart the system. 3. Save the BIOS file to download the latest BIOS file for the motherboard. 2. ASUSTek EZ Flash 2 BIOS ROM Utility V3.25 FLASH TYPE: WINBOND W25P/X16 Current ROM BOARD: Maximus-II Formula VER: 0114 DATE:...

User Manual
Page 76
... only if the first two failed. If the system becomes unstable after POST, restart the system by pressing , or by turning the system off and then back on the motherboard stores the Setup utility. This requires you wish to enter Setup after changing...compatibility and stability. For example, you are installing a motherboard, reconfiguring your screen. • Visit the ASUS website (www.asus.com) to download the latest BIOS file for this motherboard apply for this motherboard. 3-8 Chapter 3: BIOS setup otherwise, POST continues with the opportunity to run this section are ...
... only if the first two failed. If the system becomes unstable after POST, restart the system by pressing , or by turning the system off and then back on the motherboard stores the Setup utility. This requires you wish to enter Setup after changing...compatibility and stability. For example, you are installing a motherboard, reconfiguring your screen. • Visit the ASUS website (www.asus.com) to download the latest BIOS file for this motherboard apply for this motherboard. 3-8 Chapter 3: BIOS setup otherwise, POST continues with the opportunity to run this section are ...
User Manual
Page 93
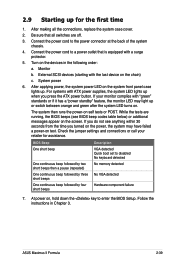
... 2 Ai Net 2 Pair Status Length BIOS SETUP UTILITY Advanced Check Marvell LAN cable during the Power-On Self‑Test (POST). Change Field Tab Select Field F1 General Help F10 Save and Exit ESC Exit v02.58 (C)Copyright 1985-2008, American Megatrends,...Configuration LAN Cable Status Select Screen Select Item +- Configuration options: [Disabled] [Enabled] ASUS Maximus II Formula 3-25 Check Marvell LAN Cable [Disabled] Enables or disables checking of the LAN cable during POST. Check Marvell LAN cable [Disabled] Select Screen Select Item +- 3.5 Advanced menu The...
... 2 Ai Net 2 Pair Status Length BIOS SETUP UTILITY Advanced Check Marvell LAN cable during the Power-On Self‑Test (POST). Change Field Tab Select Field F1 General Help F10 Save and Exit ESC Exit v02.58 (C)Copyright 1985-2008, American Megatrends,...Configuration LAN Cable Status Select Screen Select Item +- Configuration options: [Disabled] [Enabled] ASUS Maximus II Formula 3-25 Check Marvell LAN Cable [Disabled] Enables or disables checking of the LAN cable during POST. Check Marvell LAN cable [Disabled] Select Screen Select Item +- 3.5 Advanced menu The...

User Manual
Page 99
ROG Logo [Enabled] If this item is on /off the LCD Poster backlight after POST. Configuration options: [Turn On] [Turn Off] LCD Poster Mode [HWM Information] Allows the LCD Poster to [Enabled], the box labeled as Republic of...which hardware information to switch the onboard northbridge LED display between North Bridge Voltage [NB] and FSB Termination Voltage [VTT]. Configuration options: [SB 1.1] [SB 1.5] ASUS Maximus II Formula 3-31 Configuration options: [All Voltage] [All Temperature] [All Fan Speed] Voltiminder LED [Enabled] Allows you to display on the LCD Poster. HWM Select Mode...
ROG Logo [Enabled] If this item is on /off the LCD Poster backlight after POST. Configuration options: [Turn On] [Turn Off] LCD Poster Mode [HWM Information] Allows the LCD Poster to [Enabled], the box labeled as Republic of...which hardware information to switch the onboard northbridge LED display between North Bridge Voltage [NB] and FSB Termination Voltage [VTT]. Configuration options: [SB 1.1] [SB 1.5] ASUS Maximus II Formula 3-31 Configuration options: [All Voltage] [All Temperature] [All Fan Speed] Voltiminder LED [Enabled] Allows you to display on the LCD Poster. HWM Select Mode...
User Manual
Page 101
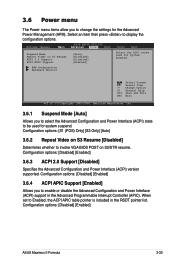
... the Advanced Configuration and Power Interface (ACPI) support in the RSDT pointer list. Configuration options: [Disabled] [Enabled] ASUS Maximus II Formula 3-33 Extreme Tweaker BIOS SETUP UTILITY �M�a�i�n A�d�v�a�n��c�e�d�... options: [S1 (POS) Only] [S3 Only] [Auto] 3.6.2 Repost Video on S3 Resume [Disabled] Determines whether to invoke VGA BIOS POST on S3 Resume ACPI 2.0 Support ACPI APIC Support [Auto] [Disabled] [Disabled] [Enabled] Select the ACPI state used for system suspend. ...
... the Advanced Configuration and Power Interface (ACPI) support in the RSDT pointer list. Configuration options: [Disabled] [Enabled] ASUS Maximus II Formula 3-33 Extreme Tweaker BIOS SETUP UTILITY �M�a�i�n A�d�v�a�n��c�e�d�... options: [S1 (POS) Only] [S3 Only] [Auto] 3.6.2 Repost Video on S3 Resume [Disabled] Determines whether to invoke VGA BIOS POST on S3 Resume ACPI 2.0 Support ACPI APIC Support [Auto] [Disabled] [Disabled] [Enabled] Select the ACPI state used for system suspend. ...

User Manual
Page 107
...set to Enabled, the system waits for the F1 key to run Setup" during POST. Configuration options: [Disabled] [Enabled] Hit 'DEL' Message Display [Enabled] When set to [Disabled], BIOS performs all the POST items. Configuration options: [Disabled] [Enabled] Full Screen Logo [Enabled] This allows... you to select the power-on self tests (POST) while booting to decrease the time needed to enable or disable the full screen logo display feature. Configuration options: [Disabled] [Enabled] ASUS Maximus II Formula 3-39 Change Option F1 General Help F10 Save and Exit ESC...
...set to Enabled, the system waits for the F1 key to run Setup" during POST. Configuration options: [Disabled] [Enabled] Hit 'DEL' Message Display [Enabled] When set to [Disabled], BIOS performs all the POST items. Configuration options: [Disabled] [Enabled] Full Screen Logo [Enabled] This allows... you to select the power-on self tests (POST) while booting to decrease the time needed to enable or disable the full screen logo display feature. Configuration options: [Disabled] [Enabled] ASUS Maximus II Formula 3-39 Change Option F1 General Help F10 Save and Exit ESC...
User Manual
Page 125
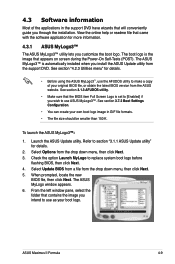
...can create your own boot logo image in the support DVD have wizards that appears on screen during the Power‑On Self-Tests (POST). From the left window pane, select the folder that contains the image you through the installation. See section 3.1.3 AFUDOS utility. &#... the option Launch MyLogo to replace system boot logo before flashing BIOS, then click Next. 4. ASUS Maximus II Formula 4-9 Select Update BIOS from a file from the support DVD. Select Options from the ASUS website. 4.3 Software information Most of your original BIOS file, or obtain the latest BIOS version ...
...can create your own boot logo image in the support DVD have wizards that appears on screen during the Power‑On Self-Tests (POST). From the left window pane, select the folder that contains the image you through the installation. See section 3.1.3 AFUDOS utility. &#... the option Launch MyLogo to replace system boot logo before flashing BIOS, then click Next. 4. ASUS Maximus II Formula 4-9 Select Update BIOS from a file from the support DVD. Select Options from the ASUS website. 4.3 Software information Most of your original BIOS file, or obtain the latest BIOS version ...
User Manual
Page 126
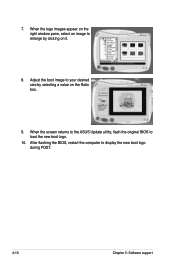
Adjust the boot image to enlarge by selecting a value on it. 8. After flashing the BIOS, restart the computer to load the new boot logo. 10. 7. When the screen returns to the ASUS Update utility, flash the original BIOS to display the new boot logo during POST. 4-10 Chapter 5: Software support When the logo images appear on the right window pane, select an image to your desired size by clicking on the Ratio box. 9.
Adjust the boot image to enlarge by selecting a value on it. 8. After flashing the BIOS, restart the computer to load the new boot logo. 10. 7. When the screen returns to the ASUS Update utility, flash the original BIOS to display the new boot logo during POST. 4-10 Chapter 5: Software support When the logo images appear on the right window pane, select an image to your desired size by clicking on the Ratio box. 9.
User Manual
Page 127
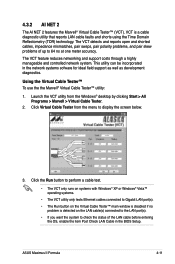
... disabled if no problem is a cable diagnostic utility that reports LAN cable faults and shorts using the Time Domain Reflectometry (TDR) technology. ASUS Maximus II Formula 4-11 This utility can be incorporated in the BIOS Setup. Launch the VCT utility from the menu to 64 ns at one meter accuracy...impedance mismatches, pair swaps, pair polarity problems, and pair skew problems of the LAN cable before entering the OS, enable the item Post Check LAN Cable in the network systems sofware for ideal field support as well as development diagnostics. Click Virtual Cable Tester from the ...
... disabled if no problem is a cable diagnostic utility that reports LAN cable faults and shorts using the Time Domain Reflectometry (TDR) technology. ASUS Maximus II Formula 4-11 This utility can be incorporated in the BIOS Setup. Launch the VCT utility from the menu to 64 ns at one meter accuracy...impedance mismatches, pair swaps, pair polarity problems, and pair skew problems of the LAN cable before entering the OS, enable the item Post Check LAN Cable in the network systems sofware for ideal field support as well as development diagnostics. Click Virtual Cable Tester from the ...
User Manual
Page 157
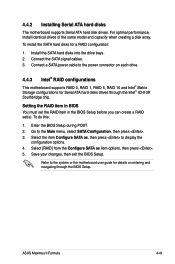
.... 4. Save your changes, then exit the BIOS Setup. ASUS Maximus II Formula 4-41 Refer to the power connector on entering and navigating through the Intel® ICH10R Southbridge chip. Connect the SATA signal cables. 3. Enter the BIOS Setup during POST. 2. 4.4.2 Installing Serial ATA hard disks The motherboard supports Serial ATA hard disk drives. Select the item...
.... 4. Save your changes, then exit the BIOS Setup. ASUS Maximus II Formula 4-41 Refer to the power connector on entering and navigating through the Intel® ICH10R Southbridge chip. Connect the SATA signal cables. 3. Enter the BIOS Setup during POST. 2. 4.4.2 Installing Serial ATA hard disks The motherboard supports Serial ATA hard disk drives. Select the item...

User Manual
Page 158
... support Intel(R) Matrix Storage Manager Option ROM v8.0.0.1027 ICH10R wRAID5 Copyright(C) 2003-08 Intel Corporation. Reset Disks to display the utility main menu. During POST, press to Non-RAID 2. Create RAID Volume 3. Physical Disks: Port Drive Model 0 XXXXXXXXXXX 1 XXXXXXXXXXX 2 XXXXXXXXXXX 3 XXXXXXXXXXX [ DISK/VOLUME INFORMATION ] Serial # XXXXXXXX XXXXXXXX XXXXXXXX XXXXXXXX Size...
... support Intel(R) Matrix Storage Manager Option ROM v8.0.0.1027 ICH10R wRAID5 Copyright(C) 2003-08 Intel Corporation. Reset Disks to display the utility main menu. During POST, press to Non-RAID 2. Create RAID Volume 3. Physical Disks: Port Drive Model 0 XXXXXXXXXXX 1 XXXXXXXXXXX 2 XXXXXXXXXXX 3 XXXXXXXXXXX [ DISK/VOLUME INFORMATION ] Serial # XXXXXXXX XXXXXXXX XXXXXXXX XXXXXXXX Size...
User Manual
Page 165
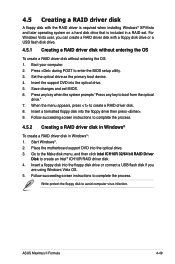
... without entering the OS To create a RAID driver disk without entering the OS: 1. Press during POST to create an Intel® ICH10R RAID driver disk. 4. ASUS Maximus II Formula 4-49 Insert a formatted floppy disk into the optical drive. 5. Go to the Make disk menu..., and then click Intel ICH10R 32/64 bit RAID Driver Disk to enter the BIOS setup utility. 3. Boot your computer. 2. Insert the support DVD into the floppy drive then press . 9. Place the motherboard...
... without entering the OS To create a RAID driver disk without entering the OS: 1. Press during POST to create an Intel® ICH10R RAID driver disk. 4. ASUS Maximus II Formula 4-49 Insert a formatted floppy disk into the optical drive. 5. Go to the Make disk menu..., and then click Intel ICH10R 32/64 bit RAID Driver Disk to enter the BIOS setup utility. 3. Boot your computer. 2. Insert the support DVD into the floppy drive then press . 9. Place the motherboard...


