User Manual
Page 1
Motherboard Maximus II Formula
Motherboard Maximus II Formula
User Manual
Page 3
... Contents...iii Notices...viii Safety information ix About this guide x Maximus II Formula specifications summary xii Chapter 1: Product introduction 1.1 Welcome 1-1 1.2 Package contents 1-1 1.3 Special features 1-2 1.3.1 Product highlights 1-2 1.3.2 ROG Intelligent Performance & Overclocking features... 1-4 1.3.3 ROG unique features 1-6 1.3.4 ASUS special features 1-7 Chapter 2: Hardware information 2.1 Before you proceed 2-1 2.2 Motherboard overview 2-4 2.2.1 Motherboard layout 2-4 2.2.2 SupremeFX-Fi audio card layout 2-4 2.2.3 Layout contents 2-5 2.2.4 Placement direction...
... Contents...iii Notices...viii Safety information ix About this guide x Maximus II Formula specifications summary xii Chapter 1: Product introduction 1.1 Welcome 1-1 1.2 Package contents 1-1 1.3 Special features 1-2 1.3.1 Product highlights 1-2 1.3.2 ROG Intelligent Performance & Overclocking features... 1-4 1.3.3 ROG unique features 1-6 1.3.4 ASUS special features 1-7 Chapter 2: Hardware information 2.1 Before you proceed 2-1 2.2 Motherboard overview 2-4 2.2.1 Motherboard layout 2-4 2.2.2 SupremeFX-Fi audio card layout 2-4 2.2.3 Layout contents 2-5 2.2.4 Placement direction...
User Manual
Page 17
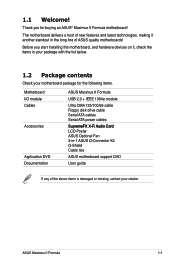
... DVD Documentation User guide If any of the above items is damaged or missing, contact your motherboard package for buying an ASUS® Maximus II Formula motherboard! The motherboard delivers a host of ASUS quality motherboards! ASUS Maximus II Formula 1-1 Before you for the following items. Motherboard ASUS Maximus II Formula I/O module USB 2.0 + IEEE 1394a module Cables Ultra DMA 133/100/66 cable Floppy disk drive cable Serial ATA...
... DVD Documentation User guide If any of the above items is damaged or missing, contact your motherboard package for buying an ASUS® Maximus II Formula motherboard! The motherboard delivers a host of ASUS quality motherboards! ASUS Maximus II Formula 1-1 Before you for the following items. Motherboard ASUS Maximus II Formula I/O module USB 2.0 + IEEE 1394a module Cables Ultra DMA 133/100/66 cable Floppy disk drive cable Serial ATA...

User Manual
Page 19
... for audio/video appliances such as a network gateway for details. Serial ATA 3.0 Gb/s technology and SATA-On-The-Go This motherboard supports the next-generation hard drives based on your PC! Easily backup photos, videos and other PC portable devices. You can now... advanced 3D settings, and check the effects with rendering speed, eliminating the need to scale down screen resolution to external devices. ASUS Maximus II Formula 1-3 Adjust your partners on the headphones while playing multi-channel network games. This capability ensures rapid transfer of data from WAN...
... for audio/video appliances such as a network gateway for details. Serial ATA 3.0 Gb/s technology and SATA-On-The-Go This motherboard supports the next-generation hard drives based on your PC! Easily backup photos, videos and other PC portable devices. You can now... advanced 3D settings, and check the effects with rendering speed, eliminating the need to scale down screen resolution to external devices. ASUS Maximus II Formula 1-3 Adjust your partners on the headphones while playing multi-channel network games. This capability ensures rapid transfer of data from WAN...
User Manual
Page 21
... of extreme performance, overvoltage adjustment is critical during overclocking for frequency adjustment, over-voltage options, or memory timing settings, they are present on the motherboard. Extreme Tweaker Extreme Tweaker is a special IC which enables several ROG highlighted functions that give you are unhappy with more freedom and less constraint for...of a tachometer, the Voltiminder LED displays the voltage status for details. The Voltiminder LED allows quick voltage monitoring for details. See pages 2-1 and 2-2 for overclockers. ASUS Maximus II Formula 1-5
... of extreme performance, overvoltage adjustment is critical during overclocking for frequency adjustment, over-voltage options, or memory timing settings, they are present on the motherboard. Extreme Tweaker Extreme Tweaker is a special IC which enables several ROG highlighted functions that give you are unhappy with more freedom and less constraint for...of a tachometer, the Voltiminder LED displays the voltage status for details. The Voltiminder LED allows quick voltage monitoring for details. See pages 2-1 and 2-2 for overclockers. ASUS Maximus II Formula 1-5

User Manual
Page 23
...moderating power in different geographic regions and system loading. The motherboard uses a special design on the printed circuit board (PCB) to the OS environment, simply click the mouse or press a key. Fan Xpert ASUS Fan Xpert intelligently allows users to adjust both the CPU ... usage via intelligent acceleration and overclocking, helping save power and money. ASUS EPU-6 Engine The new ASUS EPU, the world's first power saving engine, has been upgraded to achieve a quiet and cool environment. ASUS Maximus II Formula 1-7 AI Nap With AI Nap, the system can continue running at...
...moderating power in different geographic regions and system loading. The motherboard uses a special design on the printed circuit board (PCB) to the OS environment, simply click the mouse or press a key. Fan Xpert ASUS Fan Xpert intelligently allows users to adjust both the CPU ... usage via intelligent acceleration and overclocking, helping save power and money. ASUS EPU-6 Engine The new ASUS EPU, the world's first power saving engine, has been upgraded to achieve a quiet and cool environment. ASUS Maximus II Formula 1-7 AI Nap With AI Nap, the system can continue running at...
User Manual
Page 26
Chapter summary 2 2.1 Before you proceed 2-1 2.2 Motherboard overview 2-4 2.3 Central Processing Unit (CPU 2-7 2.4 System memory 2-13 2.5 Expansion slots 2-16 2.6 Jumpers 2-19 2.7....C.o.n.n.e.c.to.r.s 2-21 2.8 Installing accessories 2-36 2.9 Starting up for the first time 2-39 2.10 Turning off the computer 2-40 ASUS Maximus II Formula
Chapter summary 2 2.1 Before you proceed 2-1 2.2 Motherboard overview 2-4 2.3 Central Processing Unit (CPU 2-7 2.4 System memory 2-13 2.5 Expansion slots 2-16 2.6 Jumpers 2-19 2.7....C.o.n.n.e.c.to.r.s 2-21 2.8 Installing accessories 2-36 2.9 Starting up for the first time 2-39 2.10 Turning off the computer 2-40 ASUS Maximus II Formula
User Manual
Page 27
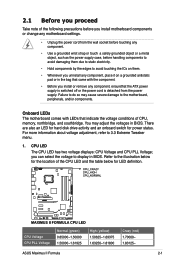
... pad or in the bag that came with LEDs that indicate the voltage conditions of CPU, memory, northbridge, and southbridge. ASUS Maximus II Formula 2-1 You may cause severe damage to the motherboard, peripherals, and/or components. 2.1 Before you proceed Take note of the following precautions before you install... voltages in BIOS. There are also an LED for hard disk drive activity and an onboard switch for LED definition. Onboard LEDs The motherboard comes with the component. • Before you install or remove any component, place it on them due to static electricity. •...
... pad or in the bag that came with LEDs that indicate the voltage conditions of CPU, memory, northbridge, and southbridge. ASUS Maximus II Formula 2-1 You may cause severe damage to the motherboard, peripherals, and/or components. 2.1 Before you proceed Take note of the following precautions before you install... voltages in BIOS. There are also an LED for hard disk drive activity and an onboard switch for LED definition. Onboard LEDs The motherboard comes with the component. • Before you install or remove any component, place it on them due to static electricity. •...

User Manual
Page 29
4. The LED does not light up to boot. ASUS Maximus II Formula 2-3 Wait till the flash stops before removing or plugging in soft‑off mode.... the onboard power-on switch. It blinks when data is designed to the motherboard or when the hard disk drive does not function. 5. Power LED The motherboard comes with a power-on the ATX power supply, the Power LED flashes ...three times to indicate that the system is ON, in sleep mode, or in any motherboard component. Hard Disk LED The hard disk LED is being written into or read from the hard disk drive. When...
4. The LED does not light up to boot. ASUS Maximus II Formula 2-3 Wait till the flash stops before removing or plugging in soft‑off mode.... the onboard power-on switch. It blinks when data is designed to the motherboard or when the hard disk drive does not function. 5. Power LED The motherboard comes with a power-on the ATX power supply, the Power LED flashes ...three times to indicate that the system is ON, in sleep mode, or in any motherboard component. Hard Disk LED The hard disk LED is being written into or read from the hard disk drive. When...
User Manual
Page 33
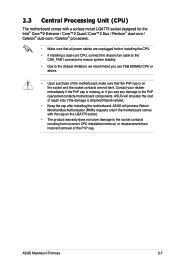
ASUS Maximus II Formula 2-7 ASUS will shoulder the cost of the PnP cap. 2.3 Central Processing Unit (CPU) The motherboard comes with the cap on the socket and the socket contacts are unplugged before installing the CPU. • If installing a dual-core ... is on the LGA775 socket. • The product warranty does not cover damage to the PnP cap/socket contacts/motherboard components. ASUS will process Return Merchandise Authorization (RMA) requests only if the motherboard comes with a surface mount LGA775 socket designed for the Intel® Core™2 Extreme / Core™2 Quad ...
ASUS Maximus II Formula 2-7 ASUS will shoulder the cost of the PnP cap. 2.3 Central Processing Unit (CPU) The motherboard comes with the cap on the socket and the socket contacts are unplugged before installing the CPU. • If installing a dual-core ... is on the LGA775 socket. • The product warranty does not cover damage to the PnP cap/socket contacts/motherboard components. ASUS will process Return Merchandise Authorization (RMA) requests only if the motherboard comes with a surface mount LGA775 socket designed for the Intel® Core™2 Extreme / Core™2 Quad ...
User Manual
Page 37
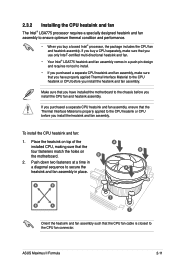
Make sure that you have installed the motherboard to the chassis before you install the heatsink and fan assembly. B 2. ASUS Maximus II Formula 2-11 Place the heatsink on top of the installed CPU, making sure that the Thermal Interface Material is closest to the CPU heatsink or CPU ... install the heatsink and fan assembly. If you purchased a separate CPU heatsink and fan assembly, ensure that the four fasteners match the holes on the motherboard.
Make sure that you have installed the motherboard to the chassis before you install the heatsink and fan assembly. B 2. ASUS Maximus II Formula 2-11 Place the heatsink on top of the installed CPU, making sure that the Thermal Interface Material is closest to the CPU heatsink or CPU ... install the heatsink and fan assembly. If you purchased a separate CPU heatsink and fan assembly, ensure that the four fasteners match the holes on the motherboard.
User Manual
Page 39
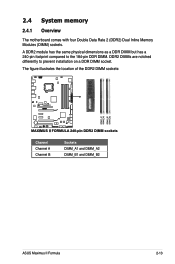
2.4 System memory 2.4.1 Overview The motherboard comes with four Double Data Rate 2 (DDR2) Dual Inline Memory Modules (DIMM) sockets. DDR2 DIMMs are notched differently to the 184-pin DDR DIMM. The figure illustrates the location of the DDR2 DIMM sockets: Channel Channel A Channel B Sockets DIMM_A1 and DIMM_A2 DIMM_B1 and DIMM_B2 ASUS Maximus II Formula 2-13 A DDR2 module has the same physical dimensions as a DDR DIMM but has a 240-pin footprint compared to prevent installation on a DDR DIMM socket.
2.4 System memory 2.4.1 Overview The motherboard comes with four Double Data Rate 2 (DDR2) Dual Inline Memory Modules (DIMM) sockets. DDR2 DIMMs are notched differently to the 184-pin DDR DIMM. The figure illustrates the location of the DDR2 DIMM sockets: Channel Channel A Channel B Sockets DIMM_A1 and DIMM_A2 DIMM_B1 and DIMM_B2 ASUS Maximus II Formula 2-13 A DDR2 module has the same physical dimensions as a DDR DIMM but has a 240-pin footprint compared to prevent installation on a DDR DIMM socket.
User Manual
Page 41
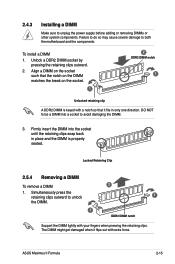
...a DIMM into the socket until the retaining clips snap back in only one direction. 2.4.3 Installing a DIMM Make sure to both the motherboard and the components. The DIMM might get damaged when it fits in place and the DIMM is keyed with a notch so that it... that the notch on the DIMM matches the break on the socket. 1 2 DDR2 DIMM notch 1 Unlocked retaining clip A DDR2 DIMM is properly seated. ASUS Maximus II Formula 2-15 Unlock a DDR2 DIMM socket by pressing the retaining clips outward. 2. Locked Retaining Clip 2.5.4 Removing a DIMM To remove a DIMM 2 1. Simultaneously...
...a DIMM into the socket until the retaining clips snap back in only one direction. 2.4.3 Installing a DIMM Make sure to both the motherboard and the components. The DIMM might get damaged when it fits in place and the DIMM is keyed with a notch so that it... that the notch on the DIMM matches the break on the socket. 1 2 DDR2 DIMM notch 1 Unlocked retaining clip A DDR2 DIMM is properly seated. ASUS Maximus II Formula 2-15 Unlock a DDR2 DIMM socket by pressing the retaining clips outward. 2. Locked Retaining Clip 2.5.4 Removing a DIMM To remove a DIMM 2 1. Simultaneously...
User Manual
Page 43
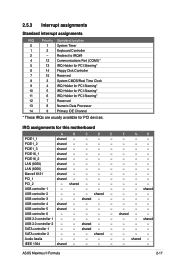
...* 12 7 Reserved 13 8 Numeric Data Processor 14 9 Primary IDE Channel * These IRQs are usually available for this motherboard A B C D E F G H PCIE1_1 shared - - - - - - - PCIE16_2 shared - - - - - - - PCI_1 shared - - - - - - - PCI_2 - USB controller 3 - - ASUS Maximus II Formula 2-17 PCIE1_2 shared - - - - - - - PCIE1_3 shared - - - - - - - shared - - - - - - USB controller 1 - - - - - - - shared USB controller 2 - - - shared - - - - USB controller 6 - - - - - shared - - USB 2.0 controller...
...* 12 7 Reserved 13 8 Numeric Data Processor 14 9 Primary IDE Channel * These IRQs are usually available for this motherboard A B C D E F G H PCIE1_1 shared - - - - - - - PCIE16_2 shared - - - - - - - PCI_1 shared - - - - - - - PCI_2 - USB controller 3 - - ASUS Maximus II Formula 2-17 PCIE1_2 shared - - - - - - - PCIE1_3 shared - - - - - - - shared - - - - - - USB controller 1 - - - - - - - shared USB controller 2 - - - shared - - - - USB controller 6 - - - - - shared - - USB 2.0 controller...
User Manual
Page 51
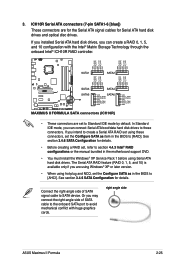
...intend to SATA device. See section 3.4.6 SATA Configuration for details. • Before creating a RAID set the Configure SATA as item in the motherboard support DVD. • You must install the Windows® XP Service Pack 1 before using Serial ATA hard disk drives. If you installed ... (RAID 0, 1, 5, and 10) is available only if you are for the Serial ATA signal cables for details. right angle side ASUS Maximus II Formula 2-25 ICH10R Serial ATA connectors (7-pin SATA1-6 [blue]) These connectors are using Windows® XP or later version. • When using these connectors...
...intend to SATA device. See section 3.4.6 SATA Configuration for details. • Before creating a RAID set the Configure SATA as item in the motherboard support DVD. • You must install the Windows® XP Service Pack 1 before using Serial ATA hard disk drives. If you installed ... (RAID 0, 1, 5, and 10) is available only if you are for the Serial ATA signal cables for details. right angle side ASUS Maximus II Formula 2-25 ICH10R Serial ATA connectors (7-pin SATA1-6 [blue]) These connectors are using Windows® XP or later version. • When using these connectors...

User Manual
Page 53
... 910; Never connect a USB cable to the USB connectors. Doing so will damage the motherboard! USB connectors (10-1 pin USB 78; USB1112) These connectors are for a IEEE 1394a port. Never connect a 1394 cable to the IEEE 1394a connector. ASUS Maximus II Formula 2-27 5. Connect the USB module cable to any of these connectors, then install...
... 910; Never connect a USB cable to the USB connectors. Doing so will damage the motherboard! USB connectors (10-1 pin USB 78; USB1112) These connectors are for a IEEE 1394a port. Never connect a 1394 cable to the IEEE 1394a connector. ASUS Maximus II Formula 2-27 5. Connect the USB module cable to any of these connectors, then install...

User Manual
Page 63
Take out the audio card from the package. 2. Locate the audio slot on the motherboard. The photo below shows the audio card installed on the motherboard. 3. Align the card connector with the slot and press firmly until the card sits on the slot completely. 4. ASUS Maximus II Formula 2-37 2.8.2 Installing the audio card 1.
Take out the audio card from the package. 2. Locate the audio slot on the motherboard. The photo below shows the audio card installed on the motherboard. 3. Align the card connector with the slot and press firmly until the card sits on the slot completely. 4. ASUS Maximus II Formula 2-37 2.8.2 Installing the audio card 1.
User Manual
Page 69
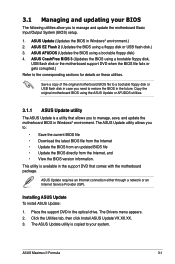
... 3 (Updates the BIOS using the ASUS Update or AFUDOS utilities. 3.1.1 ASUS Update utility The ASUS Update is a utility that comes with the motherboard package. ASUS Update requires an Internet connection either through a network or an Internet Service Provider (ISP). Click the Utilities tab, then click Install ASUS Update VX.XX.XX. 3. ASUS Maximus II Formula 3-1 ASUS AFUDOS (Updates the BIOS using...
... 3 (Updates the BIOS using the ASUS Update or AFUDOS utilities. 3.1.1 ASUS Update utility The ASUS Update is a utility that comes with the motherboard package. ASUS Update requires an Internet connection either through a network or an Internet Service Provider (ISP). Click the Utilities tab, then click Install ASUS Update VX.XX.XX. 3. ASUS Maximus II Formula 3-1 ASUS AFUDOS (Updates the BIOS using...

User Manual
Page 72
...Flash 2 BIOS ROM Utility V3.25 FLASH TYPE: WINBOND W25P/X16 Current ROM BOARD: Maximus-II Formula VER: 0114 DATE: 05/09/2008 Update ROM BOARD: Unknown VER: Unknown DATE:...Enter BIOS setup program. Then press . 4. Visit the ASUS website (www.asus.com) to a floppy disk or a USB flash disk, then restart the system. 3. 3.1.2 ASUS EZ Flash 2 utility The ASUS EZ Flash 2 feature allows you to update the BIOS ... press to display the following. Save the BIOS file to download the latest BIOS file for the motherboard. 2. You can launch the EZ Flash 2 by pressing before the correct file is found ,...
...Flash 2 BIOS ROM Utility V3.25 FLASH TYPE: WINBOND W25P/X16 Current ROM BOARD: Maximus-II Formula VER: 0114 DATE: 05/09/2008 Update ROM BOARD: Unknown VER: Unknown DATE:...Enter BIOS setup program. Then press . 4. Visit the ASUS website (www.asus.com) to a floppy disk or a USB flash disk, then restart the system. 3. 3.1.2 ASUS EZ Flash 2 utility The ASUS EZ Flash 2 feature allows you to update the BIOS ... press to display the following. Save the BIOS file to download the latest BIOS file for the motherboard. 2. You can launch the EZ Flash 2 by pressing before the correct file is found ,...
User Manual
Page 73
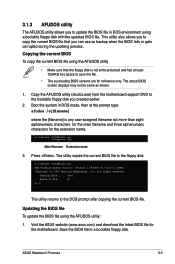
... filename Extension name 3. 3.1.3 AFUDOS utility The AFUDOS utility allows you created earlier. 2. Copy the AFUDOS utility (afudos.exe) from the motherboard support DVD to the bootable floppy disk you to update the BIOS file in DOS mode, then at least 1024KB free space to a ... file for the extension name. Copying the current BIOS To copy the current BIOS file using the AFUDOS utility: 1. All rights reserved. ASUS Maximus II Formula 3-5 Boot the system in DOS environment using a bootable floppy disk with the updated BIOS file. Save the BIOS file to save the file...
... filename Extension name 3. 3.1.3 AFUDOS utility The AFUDOS utility allows you created earlier. 2. Copy the AFUDOS utility (afudos.exe) from the motherboard support DVD to the bootable floppy disk you to update the BIOS file in DOS mode, then at least 1024KB free space to a ... file for the extension name. Copying the current BIOS To copy the current BIOS file using the AFUDOS utility: 1. All rights reserved. ASUS Maximus II Formula 3-5 Boot the system in DOS environment using a bootable floppy disk with the updated BIOS file. Save the BIOS file to save the file...


