
User Manual
Page 3
... guide...viii M5A99X EVO specifications summary x Chapter 1: Product introduction 1.1 Welcome!...1-1 1.2 Package contents 1-1 1.3 Special features 1-2 1.3.1 Product highlights 1-2 1.3.2 Dual Intelligent Processors 2 with DIGI+ VRM 1-3 1.3.3 ASUS Exclusive Features 1-3 1.3.4 ASUS Quiet Thermal Solution 1-4 1.3.5 ASUS EZ DIY...components to build a PC system 2-30 2.3.2 CPU installation 2-31 2.3.3 CPU heatsink and fan assembly installation 2-32 2.3.4 DIMM installation 2-35 2.3.5 Motherboard installation 2-36 2.3.6 ATX Power connection 2-38 2.3.7 SATA device connection ...
... guide...viii M5A99X EVO specifications summary x Chapter 1: Product introduction 1.1 Welcome!...1-1 1.2 Package contents 1-1 1.3 Special features 1-2 1.3.1 Product highlights 1-2 1.3.2 Dual Intelligent Processors 2 with DIGI+ VRM 1-3 1.3.3 ASUS Exclusive Features 1-3 1.3.4 ASUS Quiet Thermal Solution 1-4 1.3.5 ASUS EZ DIY...components to build a PC system 2-30 2.3.2 CPU installation 2-31 2.3.3 CPU heatsink and fan assembly installation 2-32 2.3.4 DIMM installation 2-35 2.3.5 Motherboard installation 2-36 2.3.6 ATX Power connection 2-38 2.3.7 SATA device connection ...
User Manual
Page 4
... 3.6 Monitor menu 3-22 3.7 Boot menu 3-24 3.8 Tools menu 3-26 3.8.1 ASUS EZ Flash 2 3-26 3.8.2 ASUS SPD Information 3-27 3.8.3 ASUS O.C. Profile 3-28 3.9 Exit menu 3-29 3.10 Updating BIOS 3-30 3.10.1 ASUS Update utility 3-30 3.10.2 ASUS EZ Flash 2 utility 3-33 3.10.3 ASUS BIOS Updater 3-35 Chapter 4: Software support 4.1 Installing an operating system 4-1 4.2 Support DVD information 4-1 4.2.1 Running the support DVD...
... 3.6 Monitor menu 3-22 3.7 Boot menu 3-24 3.8 Tools menu 3-26 3.8.1 ASUS EZ Flash 2 3-26 3.8.2 ASUS SPD Information 3-27 3.8.3 ASUS O.C. Profile 3-28 3.9 Exit menu 3-29 3.10 Updating BIOS 3-30 3.10.1 ASUS Update utility 3-30 3.10.2 ASUS EZ Flash 2 utility 3-33 3.10.3 ASUS BIOS Updater 3-35 Chapter 4: Software support 4.1 Installing an operating system 4-1 4.2 Support DVD information 4-1 4.2.1 Running the support DVD...
User Manual
Page 5
... 4-4 4.3.3 TurboV EVO 4-5 4.3.4 EPU 4-9 4.3.5 FAN Xpert 4-10 4.3.6 Probe II 4-11 4.3.7 Sensor Recorder 4-12 4.3.8 Ai Charger 4-13 4.3.9 Monitor 4-14 4.3.10 System Information 4-15 4.3.11 Audio configurations 4-16 4.4 RAID configurations 4-17 4.4.1 RAID definitions 4-17 4.4.2 Installing Serial ATA hard ...a RAID driver disk without entering the OS 4-22 4.5.2 Creating a RAID driver disk in Windows 4-22 4.5.3 Installing the RAID driver during Windows® OS installation....... 4-23 4.5.4 Using a USB floppy disk drive 4-24 Chapter 5: Multiple GPU technology support 5.1 ATI® ...
... 4-4 4.3.3 TurboV EVO 4-5 4.3.4 EPU 4-9 4.3.5 FAN Xpert 4-10 4.3.6 Probe II 4-11 4.3.7 Sensor Recorder 4-12 4.3.8 Ai Charger 4-13 4.3.9 Monitor 4-14 4.3.10 System Information 4-15 4.3.11 Audio configurations 4-16 4.4 RAID configurations 4-17 4.4.1 RAID definitions 4-17 4.4.2 Installing Serial ATA hard ...a RAID driver disk without entering the OS 4-22 4.5.2 Creating a RAID driver disk in Windows 4-22 4.5.3 Installing the RAID driver during Windows® OS installation....... 4-23 4.5.4 Using a USB floppy disk drive 4-24 Chapter 5: Multiple GPU technology support 5.1 ATI® ...
User Manual
Page 6
...cables for a Class B digital device, pursuant to which can radiate radio frequency energy and, if not installed and used in our products at ASUS REACH website at http://green.asus.com/english/REACH.htm. This class B digital apparatus complies with the REACH (Registration, Evaluation, Authorisation,... of the crossed out wheeled bin indicates that the product (electrical and electronic equipment) should not be placed in a particular installation. REACH Complying with Canadian ICES-003. However, there is encouraged to try to this equipment. Changes or modifications to correct ...
...cables for a Class B digital device, pursuant to which can radiate radio frequency energy and, if not installed and used in our products at ASUS REACH website at http://green.asus.com/english/REACH.htm. This class B digital apparatus complies with the REACH (Registration, Evaluation, Authorisation,... of the crossed out wheeled bin indicates that the product (electrical and electronic equipment) should not be placed in a particular installation. REACH Complying with Canadian ICES-003. However, there is encouraged to try to this equipment. Changes or modifications to correct ...

User Manual
Page 7
... signal cables are not damaged. If you encounter technical problems with the package. • Before using an adapter or extension cord. Operation safety • Before installing the motherboard and adding devices on a stable surface. • If you detect any area where it may become wet. • Place the product on it...
... signal cables are not damaged. If you encounter technical problems with the package. • Before using an adapter or extension cord. Operation safety • Before installing the motherboard and adding devices on a stable surface. • If you detect any area where it may become wet. • Place the product on it...
User Manual
Page 8
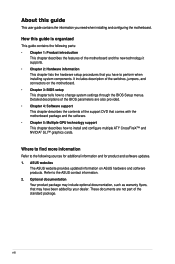
...may have to change system settings through the BIOS Setup menus. ASUS websites The ASUS website provides updated information on the motherboard. • Chapter 3: BIOS setup This chapter tells how to perform when installing system components. viii How this guide This user guide contains ... it supports. • Chapter 2: Hardware information This chapter lists the hardware setup procedures that you need when installing and configuring the motherboard. Refer to install and configure multiple ATI® CrossFireX™ and NVIDIA® SLI™ graphics cards. About this guide ...
...may have to change system settings through the BIOS Setup menus. ASUS websites The ASUS website provides updated information on the motherboard. • Chapter 3: BIOS setup This chapter tells how to perform when installing system components. viii How this guide This user guide contains ... it supports. • Chapter 2: Hardware information This chapter lists the hardware setup procedures that you need when installing and configuring the motherboard. Refer to install and configure multiple ATI® CrossFireX™ and NVIDIA® SLI™ graphics cards. About this guide ...
User Manual
Page 10
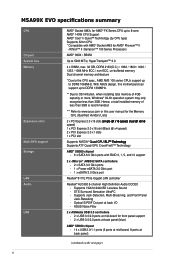
... - DTS Surround Sensation UltraPC - Supports Jack-Detection, Multi-Streaming, and Front Panel Jack-Retasking - ASUS Noise Filter 2 x ASMedia USB 3.0 controllers - 2 x USB 3.0/2.0 ports at mid-board for ...Processors� AMD® 990X / SB950 Up to DDR3 1066MHz. M5A99X EVO specifications summary CPU Chipset System bus Memory Expansion slots Multi-GPU support Storage...PCIe Gigabit LAN controller Realtek® ALC892 8-channel High Definition Audio CODEC - Hence, a total installed memory of 4GB capacity or more, Windows® 32-bit operation system may only recognize less than...
... - DTS Surround Sensation UltraPC - Supports Jack-Detection, Multi-Streaming, and Front Panel Jack-Retasking - ASUS Noise Filter 2 x ASMedia USB 3.0 controllers - 2 x USB 3.0/2.0 ports at mid-board for ...Processors� AMD® 990X / SB950 Up to DDR3 1066MHz. M5A99X EVO specifications summary CPU Chipset System bus Memory Expansion slots Multi-GPU support Storage...PCIe Gigabit LAN controller Realtek® ALC892 8-channel High Definition Audio CODEC - Hence, a total installed memory of 4GB capacity or more, Windows® 32-bit operation system may only recognize less than...
User Manual
Page 13
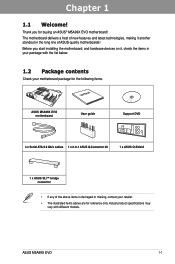
...Welcome! Before you for reference only. Thank you start installing the motherboard, and hardware devices on it another standout in -1 ASUS Q-Connector kit 1 x ASUS Q-Shield 1 x ASUS SLI™ bridge connector • If any of ASUS quality motherboards! Actual product specifications may vary with the ... package for the following items. User Manual ASUS M5A99X EVO motherboard User guide Support DVD 4 x Serial ATA 6.0 Gb/s cables 1 x 2-in the long line of the above are for buying an ASUS® M5A99X EVO motherboard! ASUS M5A99X EVO 1-1 The motherboard delivers a host of new...
...Welcome! Before you for reference only. Thank you start installing the motherboard, and hardware devices on it another standout in -1 ASUS Q-Connector kit 1 x ASUS Q-Shield 1 x ASUS SLI™ bridge connector • If any of ASUS quality motherboards! Actual product specifications may vary with the ... package for the following items. User Manual ASUS M5A99X EVO motherboard User guide Support DVD 4 x Serial ATA 6.0 Gb/s cables 1 x 2-in the long line of the above are for buying an ASUS® M5A99X EVO motherboard! ASUS M5A99X EVO 1-1 The motherboard delivers a host of new...
User Manual
Page 16
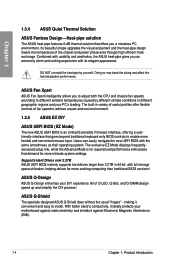
... fan speed to achieve a quiet and cool environment. 1.3.5 ASUS EZ DIY ASUS UEFI BIOS (EZ Mode) The new ASUS UEFI BIOS is for experienced performance enthusiasts that goes beyond traditional keyboard-only BIOS controls to install. Users can easily navigate the new UEFI BIOS with its ...elegant appearance. Supports Hard Drives over 2.2TB ASUS UEFI BIOS natively supports hard drives larger than 2.2TB in variety of ...
... fan speed to achieve a quiet and cool environment. 1.3.5 ASUS EZ DIY ASUS UEFI BIOS (EZ Mode) The new ASUS UEFI BIOS is for experienced performance enthusiasts that goes beyond traditional keyboard-only BIOS controls to install. Users can easily navigate the new UEFI BIOS with its ...elegant appearance. Supports Hard Drives over 2.2TB ASUS UEFI BIOS natively supports hard drives larger than 2.2TB in variety of ...
User Manual
Page 19
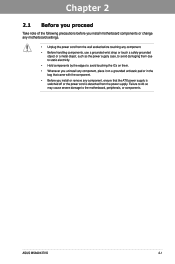
... uninstall any component, place it on a grounded antistatic pad or in the bag that came with the component. • Before you install motherboard components or change any motherboard settings. • Unplug the power cord from the wall socket before touching any component. • ...• Hold components by the edges to the motherboard, peripherals, or components. ASUS M5A99X EVO 2-1 Chapter 2: Chapter 2 Hardware information 2.1 Before you proceed Take note of the following precautions before you install or remove any component, ensure that the ATX power supply is switched off or ...
... uninstall any component, place it on a grounded antistatic pad or in the bag that came with the component. • Before you install motherboard components or change any motherboard settings. • Unplug the power cord from the wall socket before touching any component. • ...• Hold components by the edges to the motherboard, peripherals, or components. ASUS M5A99X EVO 2-1 Chapter 2: Chapter 2 Hardware information 2.1 Before you proceed Take note of the following precautions before you install or remove any component, ensure that the ATX power supply is switched off or ...
User Manual
Page 22
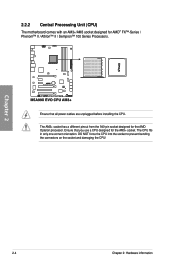
... for AMD® FX™-Series / Phenom™ II / Athlon™ II / Sempron™ 100 Series Processors. Ensure that all power cables are unplugged before installing the CPU.
... for AMD® FX™-Series / Phenom™ II / Athlon™ II / Sempron™ 100 Series Processors. Ensure that all power cables are unplugged before installing the CPU.
User Manual
Page 23
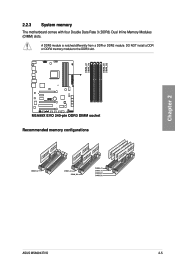
DO NOT install a DDR or DDR2 memory module to the DDR3 slot. Recommended memory configurations Chapter 2 ASUS M5A99X EVO 2-5 A DDR3 module is notched differently from a DDR or DDR2 module. 2.2.3 System memory The motherboard comes with four Double Data Rate 3 (DDR3) Dual Inline Memory Modules (DIMM) slots.
DO NOT install a DDR or DDR2 memory module to the DDR3 slot. Recommended memory configurations Chapter 2 ASUS M5A99X EVO 2-5 A DDR3 module is notched differently from a DDR or DDR2 module. 2.2.3 System memory The motherboard comes with four Double Data Rate 3 (DDR3) Dual Inline Memory Modules (DIMM) slots.

User Manual
Page 24
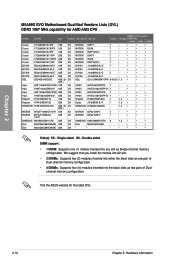
...OS when you obtain memory modules from the higher-sized channel is the standard way of memory, we recommend that you install 4GB or more details, refer to DDR3 1066MHz. M5A99X EVO Motherboard Qualified Vendors Lists (QVL) DDR3 2000 MHz capability for the dual-channel configuration. Chapter 2 Memory configurations You ...8226; Silicon Power SP002GBLYU200S02(XMP) 2GB DS - - - - • • • Team TXD32048M2000C9-L(XMP) 2GB DS Team T3D1288RT-20 9-9-9-24 1.6 • 2-6 Chapter 2: Hardware information With ASUS design, this motherboard can be about 3GB or less.
...OS when you obtain memory modules from the higher-sized channel is the standard way of memory, we recommend that you install 4GB or more details, refer to DDR3 1066MHz. M5A99X EVO Motherboard Qualified Vendors Lists (QVL) DDR3 2000 MHz capability for the dual-channel configuration. Chapter 2 Memory configurations You ...8226; Silicon Power SP002GBLYU200S02(XMP) 2GB DS - - - - • • • Team TXD32048M2000C9-L(XMP) 2GB DS Team T3D1288RT-20 9-9-9-24 1.6 • 2-6 Chapter 2: Hardware information With ASUS design, this motherboard can be about 3GB or less.
User Manual
Page 30
Double-sided DIMM support: • 1 DIMM: Supports one pair of Dualchannel memory configuration. We suggest that you install the module into A2 slot. • 2 DIMMs: Supports two (2) modules inserted into either the black slots as one (1) module ...4 DIMMs: Supports four (4) modules inserted into any slot as Single-channel memory configuration. Single-sided DS - Visit the ASUS website for AMD AM3 CPU Vendor Part No. Chapter 2 M5A99X EVO Motherboard Qualified Vendors Lists (QVL) DDR3 1067 MHz capability for the latest QVL. 2-12 Chapter 2: Hardware information Timing DIMM ...
Double-sided DIMM support: • 1 DIMM: Supports one pair of Dualchannel memory configuration. We suggest that you install the module into A2 slot. • 2 DIMMs: Supports two (2) modules inserted into either the black slots as one (1) module ...4 DIMMs: Supports four (4) modules inserted into any slot as Single-channel memory configuration. Single-sided DS - Visit the ASUS website for AMD AM3 CPU Vendor Part No. Chapter 2 M5A99X EVO Motherboard Qualified Vendors Lists (QVL) DDR3 1067 MHz capability for the latest QVL. 2-12 Chapter 2: Hardware information Timing DIMM ...
User Manual
Page 34
...with the motherboard may cause system boot failure, and the DRAM_LED near the MemOK! switch Installing DIMMs that you download and update to the latest BIOS version from the ASUS website at www.asus.com. • If you to fine-tune performance when working on the computer. ..., indicating different test processes. • Due to memory tuning requirement, the system automatically reboots when each timing set is not properly installed. switch to boot after the whole tuning process, the DRAM_LED lights continuously. switch until the DRAM_LED starts blinking to begin automatic memory ...
...with the motherboard may cause system boot failure, and the DRAM_LED near the MemOK! switch Installing DIMMs that you download and update to the latest BIOS version from the ASUS website at www.asus.com. • If you to fine-tune performance when working on the computer. ..., indicating different test processes. • Due to memory tuning requirement, the system automatically reboots when each timing set is not properly installed. switch to boot after the whole tuning process, the DRAM_LED lights continuously. switch until the DRAM_LED starts blinking to begin automatic memory ...
User Manual
Page 39
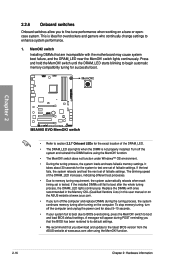
If you installed Serial ATA hard disk drives, you intend to create a Serial ATA RAID set using NCQ, set to [RAID Mode]. If you can create a RAID 0, RAID 1, ..., set the SATA Mode item in the BIOS to section 3.5.3 SATA Configuration for details. • You must install Windows® XP Service Pack 3 or later versions before using Windows® XP SP3 or later versions. ASUS M5A99X EVO 2-21 Refer to [AHCI Mode]. Chapter 2 • These connectors are for the Serial ATA 6.0 Gb/s signal...
If you installed Serial ATA hard disk drives, you intend to create a Serial ATA RAID set using NCQ, set to [RAID Mode]. If you can create a RAID 0, RAID 1, ..., set the SATA Mode item in the BIOS to section 3.5.3 SATA Configuration for details. • You must install Windows® XP Service Pack 3 or later versions before using Windows® XP SP3 or later versions. ASUS M5A99X EVO 2-21 Refer to [AHCI Mode]. Chapter 2 • These connectors are for the Serial ATA 6.0 Gb/s signal...

User Manual
Page 40
... using Windows® XP SP3 or later versions. If you are set to [AHCI Mode]. Refer to section 3.5.3 SATA Configuration for details. • You must install Windows® XP Service Pack 3 or later versions before using NCQ, set the SATA Mode item in the BIOS to [AHCI Mode] by default. The...
... using Windows® XP SP3 or later versions. If you are set to [AHCI Mode]. Refer to section 3.5.3 SATA Configuration for details. • You must install Windows® XP Service Pack 3 or later versions before using NCQ, set the SATA Mode item in the BIOS to [AHCI Mode] by default. The...
User Manual
Page 42
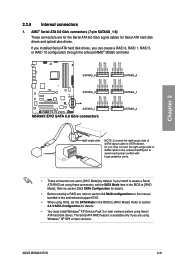
USB1112; You can connect the front panel USB cable to the ASUS Q-Connector (USB, blue) first, and then install the Q-Connector (USB) to a slot opening at the back of the system chassis. Connect the USB module cable to any of these connectors, then install the module to the USB connector onboard if your chassis...
USB1112; You can connect the front panel USB cable to the ASUS Q-Connector (USB, blue) first, and then install the Q-Connector (USB) to a slot opening at the back of the system chassis. Connect the USB module cable to any of these connectors, then install the module to the USB connector onboard if your chassis...
User Manual
Page 43
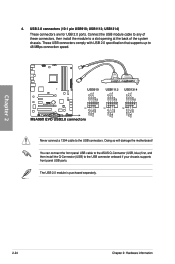
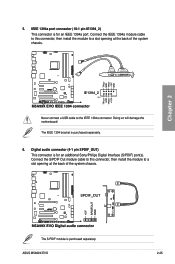
Doing so will damage the motherboard! Connect the IEEE 1394a module cable to this connector, then install the module to a slot opening at the back of the system chassis. The IEEE 1394 bracket is for an IEEE 1394a port. Chapter 2 Never connect a ... purchased separately. The S/PDIF module is for an additional Sony/Philips Digital Interface (S/PDIF) port(s). Connect the S/PDIF Out module cable to this connector, then install the module to the IEEE 1394a connector. 5. ASUS M5A99X EVO 2-25
Doing so will damage the motherboard! Connect the IEEE 1394a module cable to this connector, then install the module to a slot opening at the back of the system chassis. The IEEE 1394 bracket is for an IEEE 1394a port. Chapter 2 Never connect a ... purchased separately. The S/PDIF module is for an additional Sony/Philips Digital Interface (S/PDIF) port(s). Connect the S/PDIF Out module cable to this connector, then install the module to the IEEE 1394a connector. 5. ASUS M5A99X EVO 2-25

User Manual
Page 44
Do not place jumper caps on the motherboard, ensuring that you install two VGA cards, we recommend that the black wire of each cable matches the ground pin of the connector. CPU, chassis, and power fan connectors (4-...! • The CPU_FAN connector supports the CPU fan of maximum 1A (12 W) fan power. • Only the CPU_FAN, CHA_FAN1, CHA_FAN2 and CHA_FAN3 connectors support the ASUS FAN Xpert feature. • If you plug the rear chassis fan cable to the fan connectors. Insufficient air flow inside the system may damage the...
Do not place jumper caps on the motherboard, ensuring that you install two VGA cards, we recommend that the black wire of each cable matches the ground pin of the connector. CPU, chassis, and power fan connectors (4-...! • The CPU_FAN connector supports the CPU fan of maximum 1A (12 W) fan power. • Only the CPU_FAN, CHA_FAN1, CHA_FAN2 and CHA_FAN3 connectors support the ASUS FAN Xpert feature. • If you plug the rear chassis fan cable to the fan connectors. Insufficient air flow inside the system may damage the...


