

User Manual
Page 8
..., screws, and staples away from the motherboard, ensure that the battery should not be placed in our products at ASUS REACH website at http://crs.asus.com/english/REACH.htm. This product has been designed to enable proper reuse of the electrical outlet you detect any area... the devices are unplugged before relocating the system. • When adding or removing devices to the correct voltage in your local power company. • If the power supply is set to or from the existing system before using , contact your area. Operation safety • Before installing the motherboard...
..., screws, and staples away from the motherboard, ensure that the battery should not be placed in our products at ASUS REACH website at http://crs.asus.com/english/REACH.htm. This product has been designed to enable proper reuse of the electrical outlet you detect any area... the devices are unplugged before relocating the system. • When adding or removing devices to the correct voltage in your local power company. • If the power supply is set to or from the existing system before using , contact your area. Operation safety • Before installing the motherboard...

User Manual
Page 18
... according to different ambient temperatures caused by power surges from switching power supply unit (PSU). ErP ready The motherboard is in variety of useful profiles offer flexible controls of fan speed to update the BIOS without using a bootable floppy disk or an OS-based utility. Fan Xpert ASUS Fan Xpert intelligently allows you to...
... according to different ambient temperatures caused by power surges from switching power supply unit (PSU). ErP ready The motherboard is in variety of useful profiles offer flexible controls of fan speed to update the BIOS without using a bootable floppy disk or an OS-based utility. Fan Xpert ASUS Fan Xpert intelligently allows you to...
User Manual
Page 19
Chapter 2 ASUS M5A88-V EVO 2-1 Chapter 2: Chapter 2 Hardware information 2.1 Before you proceed Take note of the following precautions before you install motherboard components or change any motherboard settings. • Unplug the power cord from the wall socket before touching any component. • Before handling components..., use a grounded wrist strap or touch a safely grounded object or a metal object, such as the power supply case, to avoid damaging them due to static electricity. • Hold components by the edges to the motherboard, peripherals, ...
Chapter 2 ASUS M5A88-V EVO 2-1 Chapter 2: Chapter 2 Hardware information 2.1 Before you proceed Take note of the following precautions before you install motherboard components or change any motherboard settings. • Unplug the power cord from the wall socket before touching any component. • Before handling components..., use a grounded wrist strap or touch a safely grounded object or a metal object, such as the power supply case, to avoid damaging them due to static electricity. • Hold components by the edges to the motherboard, peripherals, ...

User Manual
Page 30
... a socket in the wrong direction to both ends of the DIMM simultaneously until the 3 retaining clip snaps back into the socket VERTICALLY to unplug the power supply before adding or removing DIMMs or other system components. Align a DIMM on the socket. Apply force to both the motherboard and the components. 1. Hold the...
... a socket in the wrong direction to both ends of the DIMM simultaneously until the 3 retaining clip snaps back into the socket VERTICALLY to unplug the power supply before adding or removing DIMMs or other system components. Align a DIMM on the socket. Apply force to both the motherboard and the components. 1. Hold the...
User Manual
Page 50
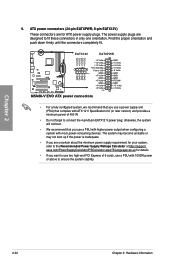
...asus.com/PowerSupplyCalculator/PSCalculator.aspx?SLanguage=en-us for details. • If you want to use two high-end PCI Express x16 cards, use a PSU with higher power output when configuring a system with more power-consuming devices. EATX12V EATXPWR +12V DC +12V DC +12V DC +12V DC M5A88-V EVO...+5V Standby Power OK PIN 1 GND +5 Volts GND +5 Volts GND +3 Volts +3 Volts PIN 1 M5A88-V EVO ATX power connectors GND +5 Volts +5 Volts +5 Volts -5 Volts GND GND GND PSON# GND -12 Volts +3 Volts • For a fully configured system, we recommend that you use a power supply unit (PSU)...
...asus.com/PowerSupplyCalculator/PSCalculator.aspx?SLanguage=en-us for details. • If you want to use two high-end PCI Express x16 cards, use a PSU with higher power output when configuring a system with more power-consuming devices. EATX12V EATXPWR +12V DC +12V DC +12V DC +12V DC M5A88-V EVO...+5V Standby Power OK PIN 1 GND +5 Volts GND +5 Volts GND +3 Volts +3 Volts PIN 1 M5A88-V EVO ATX power connectors GND +5 Volts +5 Volts +5 Volts -5 Volts GND GND GND PSON# GND -12 Volts +3 Volts • For a fully configured system, we recommend that you use a power supply unit (PSU)...

User Manual
Page 51
...lights up when you to this connector. Chapter 2 10. PWR Ground Reset Ground PANEL PIN 1 M5A88-V EVO IDE_LED PWRSW RESET * Requires an ATX power supply M5A88-V EVO System panel connector • System power LED (2-pin PLED) This 2-pin connector is for system reboot without turning off the system...; System warning speaker (4-pin SPEAKER) This 4-pin connector is for the HDD Activity LED. ASUS M5A88-V EVO 2-33 System panel connector (20-8 pin PANEL) This connector supports several chassis-mounted functions. The system power LED lights up or flashes when data is for the system...
...lights up when you to this connector. Chapter 2 10. PWR Ground Reset Ground PANEL PIN 1 M5A88-V EVO IDE_LED PWRSW RESET * Requires an ATX power supply M5A88-V EVO System panel connector • System power LED (2-pin PLED) This 2-pin connector is for system reboot without turning off the system...; System warning speaker (4-pin SPEAKER) This 4-pin connector is for the HDD Activity LED. ASUS M5A88-V EVO 2-33 System panel connector (20-8 pin PANEL) This connector supports several chassis-mounted functions. The system power LED lights up or flashes when data is for the system...

User Manual
Page 55
... by four short beeps Description VGA detected Quick boot set to enter the BIOS Setup. External SCSI devices (starting with ATX power supplies, the system LED lights up or change from the time you turned on . While the tests are off the computer While...power switch for the first time 1. Connect the power cord to section 3.7 Power menu in Chapter 3 for assistance. Turn on , hold down the key to disabled No keyboard detected No memory detected No VGA detected Hardware component failure 7. At power on the devices in Chapter 3. 2.11 Turning off . 3. ASUS M5A88-V EVO ...
... by four short beeps Description VGA detected Quick boot set to enter the BIOS Setup. External SCSI devices (starting with ATX power supplies, the system LED lights up or change from the time you turned on . While the tests are off the computer While...power switch for the first time 1. Connect the power cord to section 3.7 Power menu in Chapter 3 for assistance. Turn on , hold down the key to disabled No keyboard detected No memory detected No VGA detected Hardware component failure 7. At power on the devices in Chapter 3. 2.11 Turning off . 3. ASUS M5A88-V EVO ...

User Manual
Page 86
... setup This feature requires an ATX power supply that provides at least 1A on the first try. 3.7.4 APM Configuration M5A88-V EVO BIOS Setup Power APM Configuration Restore on AC Power Loss [Power Off] Power On From S5 By PME# [Disabled] Power On From S5 By Ring [Disabled] Power On By PS/2 Keyboard [Disabled] Power On From S5 By RTC Alarm [Disabled...
... setup This feature requires an ATX power supply that provides at least 1A on the first try. 3.7.4 APM Configuration M5A88-V EVO BIOS Setup Power APM Configuration Restore on AC Power Loss [Power Off] Power On From S5 By PME# [Disabled] Power On From S5 By Ring [Disabled] Power On By PS/2 Keyboard [Disabled] Power On From S5 By RTC Alarm [Disabled...
User Manual
Page 117
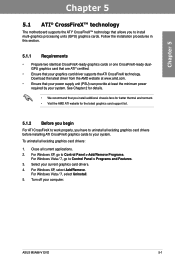
Download the latest driver from the AMD website at www.amd.com. • Ensure that your power supply unit (PSU) can provide at least the minimum power required by your computer. Close all existing graphics card drivers: 1. Turn off your system. See Chapter 2... 2. For Windows XP, go to Control Panel > Add/Remove Programs. For Windows Vista / 7, go to Control Panel > Programs and Features. 3. ASUS M5A88-V EVO 5-1 Chapter 5 Chapter 5: Chapter 5 ATI® CrossFireX™ technology support 5.1 ATI® CrossFireX™ technology The motherboard supports the ATI® CrossFireX...
Download the latest driver from the AMD website at www.amd.com. • Ensure that your power supply unit (PSU) can provide at least the minimum power required by your computer. Close all existing graphics card drivers: 1. Turn off your system. See Chapter 2... 2. For Windows XP, go to Control Panel > Add/Remove Programs. For Windows Vista / 7, go to Control Panel > Programs and Features. 3. ASUS M5A88-V EVO 5-1 Chapter 5 Chapter 5: Chapter 5 ATI® CrossFireX™ technology support 5.1 ATI® CrossFireX™ technology The motherboard supports the ATI® CrossFireX...

User Manual
Page 118
... cards separately. 6. Chapter 5 5.1.3 Installing two CrossFireX™ graphics cards The following pictures are properly seated on each graphics card. Connect two independent auxiliary power sources from the power supply to the graphics card. Ensure that the connector is firmly in this user manual for the locations of the PCIEX16 slots recommended for reference...
... cards separately. 6. Chapter 5 5.1.3 Installing two CrossFireX™ graphics cards The following pictures are properly seated on each graphics card. Connect two independent auxiliary power sources from the power supply to the graphics card. Ensure that the connector is firmly in this user manual for the locations of the PCIEX16 slots recommended for reference...


