
User Guide
Page 3
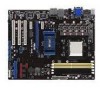
Contents Contents...iii Notices...v Safety information vi About this guide vi M4N78 PRO specifications summary viii Chapter 1 Product introduction 1.1 Welcome 1-1 1.2 Package contents 1-1 1.3 Special features 1-1 1.4 Before you proceed 1-3 1.5 Motherboard overview 1-4 1.5.1 Placement direction 1-4 1.5.2 Screw holes 1-4 1.5.3 Motherboard layout 1-5 1.5.4 Layout contents 1-5 1.6 Central Processing Unit (CPU 1-6 1.6.1 Installing... 1-26 1.11.2 Support DVD information 1-26 Chapter 2 BIOS setup 2.1 Managing and updating your BIOS 2-1 2.2 BIOS setup program 2-6 iii
Contents Contents...iii Notices...v Safety information vi About this guide vi M4N78 PRO specifications summary viii Chapter 1 Product introduction 1.1 Welcome 1-1 1.2 Package contents 1-1 1.3 Special features 1-1 1.4 Before you proceed 1-3 1.5 Motherboard overview 1-4 1.5.1 Placement direction 1-4 1.5.2 Screw holes 1-4 1.5.3 Motherboard layout 1-5 1.5.4 Layout contents 1-5 1.6 Central Processing Unit (CPU 1-6 1.6.1 Installing... 1-26 1.11.2 Support DVD information 1-26 Chapter 2 BIOS setup 2.1 Managing and updating your BIOS 2-1 2.2 BIOS setup program 2-6 iii

User Guide
Page 6
... problems with the package. • Before using an adapter or extension cord. If you need when installing and configuring the motherboard. Detailed descriptions of the motherboard and the new technology it may become wet. • Place the product on it by yourself. Operation safety • ...About this guide is organized This guide contains the following parts: • Chapter 1: Product introduction This chapter describes the features of the BIOS parameters are using, contact your local power company. • If the power supply is set to the correct voltage in any damage, ...
... problems with the package. • Before using an adapter or extension cord. If you need when installing and configuring the motherboard. Detailed descriptions of the motherboard and the new technology it may become wet. • Place the product on it by yourself. Operation safety • ...About this guide is organized This guide contains the following parts: • Chapter 1: Product introduction This chapter describes the features of the BIOS parameters are using, contact your local power company. • If the power supply is set to the correct voltage in any damage, ...
User Guide
Page 9
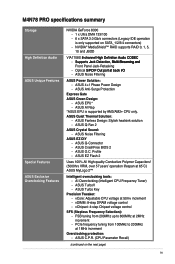
M4N78 PRO specifications summary Storage High Definition Audio ASUS Unique Features Special Features ASUS Exclusive Overclocking Features NVIDIA GeForce 8300 - 1 x Ultra DMA 133/100 - 6 x SATA 3.0 Gb/s ...to 200MHz at 2MHz increment - ASUS Q-Connector - ASUS 4+1 Phase Power Design - ASUS CrashFree BIOS 2 - ASUS EPU* - AI Overclocking (Intelligent CPU Frequency Tuner) - ASUS TurboV - vDIMM: 8-step DRAM voltage control - ASUS C.P.R. (CPU Parameter Recall) (continued on SATA_1/2/3/4 connectors) - ASUS Q-Fan 2 ASUS Crystal Sound: - ASUS EZ Flash 2 Uses 100% All...
M4N78 PRO specifications summary Storage High Definition Audio ASUS Unique Features Special Features ASUS Exclusive Overclocking Features NVIDIA GeForce 8300 - 1 x Ultra DMA 133/100 - 6 x SATA 3.0 Gb/s ...to 200MHz at 2MHz increment - ASUS Q-Connector - ASUS 4+1 Phase Power Design - ASUS CrashFree BIOS 2 - ASUS EPU* - AI Overclocking (Intelligent CPU Frequency Tuner) - ASUS TurboV - vDIMM: 8-step DRAM voltage control - ASUS C.P.R. (CPU Parameter Recall) (continued on SATA_1/2/3/4 connectors) - ASUS Q-Fan 2 ASUS Crystal Sound: - ASUS EZ Flash 2 Uses 100% All...
User Guide
Page 10
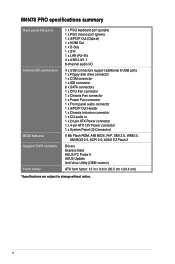
M4N78 PRO specifications summary Rear panel I/O ports Internal I/O connectors BIOS features Support DVD contents Form factor 1 x PS/2 keyboard port (purple) 1 x PS/2 mouse port (green) 1 x S/PDIF Out (Optical) 1 x HDMI Out 1 x D-Sub 1 x DVI 1 x LAN (RJ... Intrusion connector 1 x CD audio in 1 x 24-pin ATX Power connector 1 x 4-pin ATX 12V Power connector 1 x System Panel (Q-Connector) 8 Mb Flash ROM, AMI BIOS, PnP, DMI 2.0, WfM2.0, SM BIOS 2.5, ACPI 2.0, ASUS EZ Flash 2 Drivers Express Gate ASUS PC Probe II ASUS Update Anti-Virus Utility (OEM version) ATX form factor: 12 in x 9.6 in (30.5 cm x...
M4N78 PRO specifications summary Rear panel I/O ports Internal I/O connectors BIOS features Support DVD contents Form factor 1 x PS/2 keyboard port (purple) 1 x PS/2 mouse port (green) 1 x S/PDIF Out (Optical) 1 x HDMI Out 1 x D-Sub 1 x DVI 1 x LAN (RJ... Intrusion connector 1 x CD audio in 1 x 24-pin ATX Power connector 1 x 4-pin ATX 12V Power connector 1 x System Panel (Q-Connector) 8 Mb Flash ROM, AMI BIOS, PnP, DMI 2.0, WfM2.0, SM BIOS 2.5, ACPI 2.0, ASUS EZ Flash 2 Drivers Express Gate ASUS PC Probe II ASUS Update Anti-Virus Utility (OEM version) ATX form factor: 12 in x 9.6 in (30.5 cm x...
User Guide
Page 20
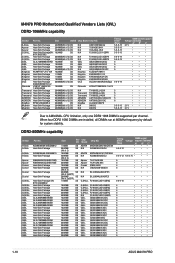
...Bios) A* B* C* • •• 4-4-4-12 • •• • 4-4-4-12 1.9~2.1V • 5 • 5 • 4 • 5 • • 4 • 5-5-5-15 • 4 • 5 • 4 • 5 • 5 • 5 • 5 • 4 • 5 • 4 • 5 • 4 • 5 • 5 • 5 • 4 • 5 • 4 • 5 • 4 • 5 • 1-10 ASUS M4N78 PRO... system stability. M4N78 PRO Motherboard Qualified Vendors Lists (QVL) DDR2-1066MHz capability Vendor A-Data Part No.
...Bios) A* B* C* • •• 4-4-4-12 • •• • 4-4-4-12 1.9~2.1V • 5 • 5 • 4 • 5 • • 4 • 5-5-5-15 • 4 • 5 • 4 • 5 • 5 • 5 • 5 • 4 • 5 • 4 • 5 • 4 • 5 • 5 • 5 • 4 • 5 • 4 • 5 • 4 • 5 • 1-10 ASUS M4N78 PRO... system stability. M4N78 PRO Motherboard Qualified Vendors Lists (QVL) DDR2-1066MHz capability Vendor A-Data Part No.

User Guide
Page 21
... SLZ2128M8-JGE 28V0H8 M2Y1G64TU88D5B-AC 0828.GS M2Y1G64TU8HB0B-25C M2Y2G64TU8HD5B-AC 0826.SG MDT 512MB TMS51B264C081-805EP D48001GP3-63BJU D48002GP0-73BCU M2GVD6G3H3160Q1E52 Timing Dimm Voltage (Bios) 5 5 DIMM socket support (Optional) A* B* C ••• ••• 6 ••• ••• ••• •• 5 ••• 4 •...
... SLZ2128M8-JGE 28V0H8 M2Y1G64TU88D5B-AC 0828.GS M2Y1G64TU8HB0B-25C M2Y2G64TU8HD5B-AC 0826.SG MDT 512MB TMS51B264C081-805EP D48001GP3-63BJU D48002GP0-73BCU M2GVD6G3H3160Q1E52 Timing Dimm Voltage (Bios) 5 5 DIMM socket support (Optional) A* B* C ••• ••• 6 ••• ••• ••• •• 5 ••• 4 •...

User Guide
Page 22
DS ADATA M2OAD5G314170Q1C58 Timing Dimm (Bios) DIMM socket Voltage support (Optional) A• * B• * C• * DS ADATA M2OAD5H3J4170I1C53 ••• SS Apacer AU 512E667C5KBGC 5 • SS Apacer...; ••• ••• • • 1.7-1.9 • • ••• Side(s): SS - Visit the ASUS website for the latest QVL. 1-12 ASUS M4N78 PRO Double-sided DIMM support: • A*: Supports one module inserted into either slot as Single-channel memory configuration. • B*: Supports two modules inserted...
DS ADATA M2OAD5G314170Q1C58 Timing Dimm (Bios) DIMM socket Voltage support (Optional) A• * B• * C• * DS ADATA M2OAD5H3J4170I1C53 ••• SS Apacer AU 512E667C5KBGC 5 • SS Apacer...; ••• ••• • • 1.7-1.9 • • ••• Side(s): SS - Visit the ASUS website for the latest QVL. 1-12 ASUS M4N78 PRO Double-sided DIMM support: • A*: Supports one module inserted into either slot as Single-channel memory configuration. • B*: Supports two modules inserted...
User Guide
Page 24
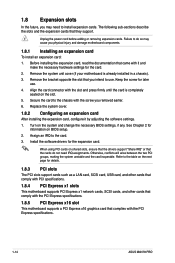
... an IRQ to install expansion cards. Refer to use . 4. Remove the system unit cover (if your motherboard is completely seated on the system and change the necessary BIOS settings, if any. Replace the system cover. 1.8.2 Configuring an expansion card After installing the expansion card, ... cord before adding or removing expansion cards. Turn on the slot. 5. Align the card connector with the PCI Express specifications. 1-14 ASUS M4N78 PRO Otherwise, conflicts will arise between the two PCI groups, making the system unstable and the card inoperable. Failure to do not need to...
... an IRQ to install expansion cards. Refer to use . 4. Remove the system unit cover (if your motherboard is completely seated on the system and change the necessary BIOS settings, if any. Replace the system cover. 1.8.2 Configuring an expansion card After installing the expansion card, ... cord before adding or removing expansion cards. Turn on the slot. 5. Align the card connector with the PCI Express specifications. 1-14 ASUS M4N78 PRO Otherwise, conflicts will arise between the two PCI groups, making the system unstable and the card inoperable. Failure to do not need to...
User Guide
Page 25
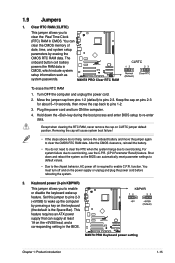
...4. 1.9 Jumpers 1. Keyboard power (3-pin KBPWR) This jumper allows you to re-enter data. The onboard button cell battery powers the RAM data in the BIOS. Turn OFF the computer and unplug the power cord. 2. Clear RTC RAM (CLRTC) This jumper allows you to enable C.P.R. You can automatically reset parameter... behavior, AC power off and on pins 2-3 for about 5~10 seconds, then move the jumper again to overclocking. This feature requires an ATX power supply that can supply at least 1A on CLRTC jumper default position. Except when clearing the RTC RAM, never remove the cap on ...
...4. 1.9 Jumpers 1. Keyboard power (3-pin KBPWR) This jumper allows you to re-enter data. The onboard button cell battery powers the RAM data in the BIOS. Turn OFF the computer and unplug the power cord. 2. Clear RTC RAM (CLRTC) This jumper allows you to enable C.P.R. You can automatically reset parameter... behavior, AC power off and on pins 2-3 for about 5~10 seconds, then move the jumper again to overclocking. This feature requires an ATX power supply that can supply at least 1A on CLRTC jumper default position. Except when clearing the RTC RAM, never remove the cap on ...

User Guide
Page 28
... onboard HDMI out port and the HDMI cable, you can resize the desktop appearing on your display device. CPU DIMM BIOS setup Playback software Suggested list AMD® Athlon 64 x2 5000+ DDR2 800MHz 2GB Frame Buffer Size--256MB or higher ...monitor. Troubleshooting on HDTV overscaling or underscaling: If your HDTV desktop: 1. Click OK to receive stereo audio input from the motherboard support DVD. 2. • Playback of HD DVD and Blu-Ray Discs For better playback quality, we suggest that you ...an HDTV compliance resolution such as a CD-ROM, TV tuner, or MPEG card. 1-18 ASUS M4N78 PRO
... onboard HDMI out port and the HDMI cable, you can resize the desktop appearing on your display device. CPU DIMM BIOS setup Playback software Suggested list AMD® Athlon 64 x2 5000+ DDR2 800MHz 2GB Frame Buffer Size--256MB or higher ...monitor. Troubleshooting on HDTV overscaling or underscaling: If your HDTV desktop: 1. Click OK to receive stereo audio input from the motherboard support DVD. 2. • Playback of HD DVD and Blu-Ray Discs For better playback quality, we suggest that you ...an HDTV compliance resolution such as a CD-ROM, TV tuner, or MPEG card. 1-18 ASUS M4N78 PRO
User Guide
Page 32
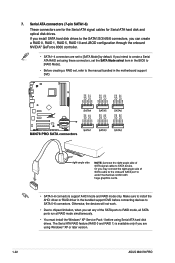
... (7-pin SATA1-6) These connectors are using Windows® XP or later version. 1-22 ASUS M4N78 PRO If you set to SATA 5-6 connectors. Otherwise, the devices will not work. •...-4 connectors are set any of the SATA ports to install the AHCI driver or RAID driver in the motherboard support DVD. • SATA 5-6 connectors support AHCI mode and RAID mode only. Make sure to RAID...the Windows® XP Service Pack 1 before using these connectors, set the SATA Mode select item in the BIOS to [RAID Mode]. • Before creating a RAID set, refer to the manual bundled in the bundled ...
... (7-pin SATA1-6) These connectors are using Windows® XP or later version. 1-22 ASUS M4N78 PRO If you set to SATA 5-6 connectors. Otherwise, the devices will not work. •...-4 connectors are set any of the SATA ports to install the AHCI driver or RAID driver in the motherboard support DVD. • SATA 5-6 connectors support AHCI mode and RAID mode only. Make sure to RAID...the Windows® XP Service Pack 1 before using these connectors, set the SATA Mode select item in the BIOS to [RAID Mode]. • Before creating a RAID set, refer to the manual bundled in the bundled ...
User Guide
Page 33
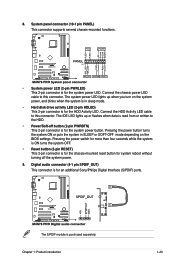
... LED lights up when you turn on the system power, and blinks when the system is in SLEEP or SOFT-OFF mode depending on the BIOS settings. Pressing the power switch for more than four seconds while the system is ON turns the system OFF. • Reset button (2-pin RESET) This...
... LED lights up when you turn on the system power, and blinks when the system is in SLEEP or SOFT-OFF mode depending on the BIOS settings. Pressing the power switch for more than four seconds while the system is ON turns the system OFF. • Reset button (2-pin RESET) This...
User Guide
Page 35
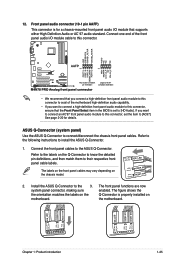
... ASUS Q-Connector to install the ASUS Q-Connector. 1. Refer to the following instructions to connect/disconnect the chassis front panel cables. Connect the front panel cables to their respective front panel cable labels. The labels on the front panel cables may vary depending on motherboard. the motherboard.... /O module that the Front Panel Select item in the BIOS is set the item to [AC97]. The figure shows the the orientation matches the labels on the Q-Connector is for details. IDE_LED+ IDE_LED- Install the ASUS Q-Connector to [HD Audio]. Front panel audio connector (...
... ASUS Q-Connector to install the ASUS Q-Connector. 1. Refer to the following instructions to connect/disconnect the chassis front panel cables. Connect the front panel cables to their respective front panel cable labels. The labels on the front panel cables may vary depending on motherboard. the motherboard.... /O module that the Front Panel Select item in the BIOS is set the item to [AC97]. The figure shows the the orientation matches the labels on the Q-Connector is for details. IDE_LED+ IDE_LED- Install the ASUS Q-Connector to [HD Audio]. Front panel audio connector (...

User Guide
Page 37
Copy the original motherboard BIOS using the ASUS Update or AFUDOS utilities. DOS environment a. Windows® XP environment a. c. From the Windows® desktop, click > Computer. Click Start. 2. Insert a formatted, high density 1.44MB ...floppy disk to display the Format 3 1/2 Floppy dialog box. A Format 3 1/2 Floppy window appears. d. Windows® Vista environment a. b. Follow the instructions based on your BIOS Save a copy of the original motherboard BIOS file to a bootable floppy disk or a USB flash disk in case you need to the bootable floppy disk. b. Chapter...
Copy the original motherboard BIOS using the ASUS Update or AFUDOS utilities. DOS environment a. Windows® XP environment a. c. From the Windows® desktop, click > Computer. Click Start. 2. Insert a formatted, high density 1.44MB ...floppy disk to display the Format 3 1/2 Floppy dialog box. A Format 3 1/2 Floppy window appears. d. Windows® Vista environment a. b. Follow the instructions based on your BIOS Save a copy of the original motherboard BIOS file to a bootable floppy disk or a USB flash disk in case you need to the bootable floppy disk. b. Chapter...
User Guide
Page 38
...: 1. Follow the onscreen instructions to complete the updating process. 2-2 ASUS M4N78 PRO The ASUS Update utility is available in the optical drive. Select Update BIOS from the Open window, and then click Open. 3. Locate the BIOS file from a file, and then click Next. Follow the onscreen ...with the motherboard package. Updating the BIOS To update the BIOS: 1. c. Updating from the Internet, and then click Next. 2.1.2 ASUS Update utility The ASUS Update is a utility that allows you to manage, save, and update the motherboard BIOS in Windows® environment. • ASUS Update ...
...: 1. Follow the onscreen instructions to complete the updating process. 2-2 ASUS M4N78 PRO The ASUS Update utility is available in the optical drive. Select Update BIOS from the Open window, and then click Open. 3. Locate the BIOS file from a file, and then click Next. Follow the onscreen ...with the motherboard package. Updating the BIOS To update the BIOS: 1. c. Updating from the Internet, and then click Next. 2.1.2 ASUS Update utility The ASUS Update is a utility that allows you to manage, save, and update the motherboard BIOS in Windows® environment. • ASUS Update ...

User Guide
Page 39
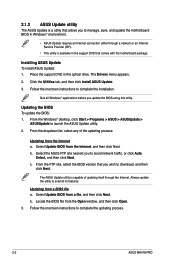
... ways. a. To update the BIOS using EZ Flash 2: 1. Download the latest BIOS file from the ASUS website at www.asus.com. Go to the Tools menu to select EZ Flash 2 and press to display the following: ASUSTek EZ Flash 2 BIOS ROM Utility V3.34 FLASH TYPE: MXIC 25L8005 Current ROM BOARD: M4N78 PRO VER: 0203 DATE: 12...
... ways. a. To update the BIOS using EZ Flash 2: 1. Download the latest BIOS file from the ASUS website at www.asus.com. Go to the Tools menu to select EZ Flash 2 and press to display the following: ASUSTek EZ Flash 2 BIOS ROM Utility V3.34 FLASH TYPE: MXIC 25L8005 Current ROM BOARD: M4N78 PRO VER: 0203 DATE: 12...

User Guide
Page 40
... and insert the floppy disk that contains the AFUDOS utility and the latest BIOS file. • Obtain the AFUDOS utility (afudos.exe) from the bundled support DVD and the latest BIOS file from the hard disk drive. 2-4 ASUS M4N78 PRO At the DOS prompt, key in the floppy disk. The utility returns ...to prevent system boot failure! 4. You will need to copy the current BIOS file that you can use as shown. Do not ...
... and insert the floppy disk that contains the AFUDOS utility and the latest BIOS file. • Obtain the AFUDOS utility (afudos.exe) from the bundled support DVD and the latest BIOS file from the hard disk drive. 2-4 ASUS M4N78 PRO At the DOS prompt, key in the floppy disk. The utility returns ...to prevent system boot failure! 4. You will need to copy the current BIOS file that you can use as shown. Do not ...

User Guide
Page 41
...drive, or the floppy disk containing the BIOS file to the floppy disk drive. 3. Turn off the system after the utility completes the updating process and power on the ASUS official website. Doing so can restore a corrupted BIOS file using the motherboard support DVD or a floppy disk that ...contains the BIOS file. The utility automatically checks the devices for the BIOS file. DO NOT shut down or reset the system...
...drive, or the floppy disk containing the BIOS file to the floppy disk drive. 3. Turn off the system after the utility completes the updating process and power on the ASUS official website. Doing so can restore a corrupted BIOS file using the motherboard support DVD or a floppy disk that ...contains the BIOS file. The utility automatically checks the devices for the BIOS file. DO NOT shut down or reset the system...
User Guide
Page 42
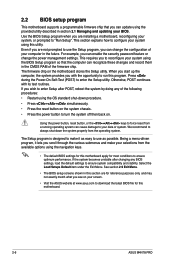
... system. This section explains how to configure your system using this motherboard. 2-6 ASUS M4N78 PRO This requires you can update using the provided utility described in section 2.1 Managing and updating your BIOS. Use the BIOS Setup program when you are for this utility. 2.2 BIOS setup program This motherboard supports a programmable firmware chip that you to reconfigure your system...
... system. This section explains how to configure your system using this motherboard. 2-6 ASUS M4N78 PRO This requires you can update using the provided utility described in section 2.1 Managing and updating your BIOS. Use the BIOS Setup program when you are for this utility. 2.2 BIOS setup program This motherboard supports a programmable firmware chip that you to reconfigure your system...

User Guide
Page 43
... select an item on the menu bar, press the right or left arrow key on the keyboard until the desired item is highlighted. • The BIOS setup screens shown in .] [English] :[Not Detected] :[Not Detected] :[Not Detected] :[Not Detected] :[Not Detected] :[Not Detected] Use [ENTER], [TAB] or [SHIFT-TAB] to select.../12/2008] [1.44M, 3.5 in this chapter are for reference purposes only, and may not exactly match what you see on your screen. • Visit the ASUS website at www.asus.com to configure system Time. ←→ Select Screen ↑↓ Select Item +-
... select an item on the menu bar, press the right or left arrow key on the keyboard until the desired item is highlighted. • The BIOS setup screens shown in .] [English] :[Not Detected] :[Not Detected] :[Not Detected] :[Not Detected] :[Not Detected] :[Not Detected] Use [ENTER], [TAB] or [SHIFT-TAB] to select.../12/2008] [1.44M, 3.5 in this chapter are for reference purposes only, and may not exactly match what you see on your screen. • Visit the ASUS website at www.asus.com to configure system Time. ←→ Select Screen ↑↓ Select Item +-


