

User Manual
Page 1
M4A88T-M LE Motherboard
M4A88T-M LE Motherboard

User Manual
Page 3
Contents Notices...vi Safety information vii About this guide vii M4A88T-M LE specifications summary ix Chapter 1: Product introduction 1.1 Welcome 1-1 1.2 Package contents 1-1 1.3 Special features 1-1 1.3.1 Product highlights 1-1 1.3.2 Innovative ASUS features 1-3 1.4 Before you proceed 1-5 1.5 Motherboard overview 1-6 1.5.1 Placement direction 1-6 1.5.2 Screw holes 1-6 1.5.3 Motherboard layout 1-7 1.5.4 Layout contents 1-7 1.6 Central Processing Unit (CPU 1-8 1.6.1 Installing the CPU 1-8 1.6.2 Installing the heatsink and fan 1-10 1.7 System memory...
Contents Notices...vi Safety information vii About this guide vii M4A88T-M LE specifications summary ix Chapter 1: Product introduction 1.1 Welcome 1-1 1.2 Package contents 1-1 1.3 Special features 1-1 1.3.1 Product highlights 1-1 1.3.2 Innovative ASUS features 1-3 1.4 Before you proceed 1-5 1.5 Motherboard overview 1-6 1.5.1 Placement direction 1-6 1.5.2 Screw holes 1-6 1.5.3 Motherboard layout 1-7 1.5.4 Layout contents 1-7 1.6 Central Processing Unit (CPU 1-8 1.6.1 Installing the CPU 1-8 1.6.2 Installing the heatsink and fan 1-10 1.7 System memory...

User Manual
Page 6
... for connection of the crossed out wheeled bin indicates that the battery should not be placed in our products at ASUS REACH website at http://csr.asus.com/english/REACH.htm. If this equipment. Check local regulations for a Class B digital device, pursuant to radio...are designed to enable proper reuse of Communications. REACH Complying with manufacturer's instructions, may cause undesired operation. DO NOT throw the motherboard in municipal waste. vi Changes or modifications to this unit not expressly approved by turning the equipment off and on a circuit ...
... for connection of the crossed out wheeled bin indicates that the battery should not be placed in our products at ASUS REACH website at http://csr.asus.com/english/REACH.htm. If this equipment. Check local regulations for a Class B digital device, pursuant to radio...are designed to enable proper reuse of Communications. REACH Complying with manufacturer's instructions, may cause undesired operation. DO NOT throw the motherboard in municipal waste. vi Changes or modifications to this unit not expressly approved by turning the equipment off and on a circuit ...
User Manual
Page 7
...staples away from connectors, slots, sockets and circuitry. • Avoid dust, humidity, and temperature extremes. Operation safety • Before installing the motherboard and adding devices on a stable surface. • If you encounter technical problems with the package. • Before using the product, ensure ... power cables are not damaged. How this guide This user guide contains the information you need when installing and configuring the motherboard. vii These devices could interrupt the grounding circuit. • Ensure that the power cables for the devices are unplugged before...
...staples away from connectors, slots, sockets and circuitry. • Avoid dust, humidity, and temperature extremes. Operation safety • Before installing the motherboard and adding devices on a stable surface. • If you encounter technical problems with the package. • Before using the product, ensure ... power cables are not damaged. How this guide This user guide contains the information you need when installing and configuring the motherboard. vii These devices could interrupt the grounding circuit. • Ensure that the power cables for the devices are unplugged before...
User Manual
Page 13
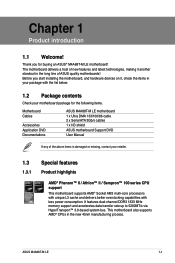
... the list below. 1.2 Package contents Check your motherboard package for buying an ASUS® M4A88T-M LE motherboard! ASUS M4A88T-M LE 1-1 Before you for the following items. Motherboard Cables Accessories Application DVD Documentations ASUS M4A88T-M LE motherboard 1 x Ultra DMA 133/100/66 cable 2 x Serial ATA 3Gb/s cables 1 x I/O shield ASUS motherboard Support DVD User Manual If any of ASUS quality motherboards! This motherboard also supports AMD® CPUs in the...
... the list below. 1.2 Package contents Check your motherboard package for buying an ASUS® M4A88T-M LE motherboard! ASUS M4A88T-M LE 1-1 Before you for the following items. Motherboard Cables Accessories Application DVD Documentations ASUS M4A88T-M LE motherboard 1 x Ultra DMA 133/100/66 cable 2 x Serial ATA 3Gb/s cables 1 x I/O shield ASUS motherboard Support DVD User Manual If any of ASUS quality motherboards! This motherboard also supports AMD® CPUs in the...
User Manual
Page 14
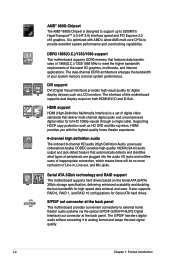
...(Digital Visual Interface) provides high visual quality for Serial ATA hard drives. S/PDIF out connector at the back panel This motherboard provides convenient connectivity to analog format and keeps the best signal quality. 1-2 Chapter 1: Product introduction Supporting HDCP copy protection ...such as LCD monitors. DDR3 1866(O.C.)/1333/1066 support This motherboard supports DDR3 memory that features data transfer rates of 1866(O.C.)/1333/1066 MHz to provide excellent system performance and overclocking ...
...(Digital Visual Interface) provides high visual quality for Serial ATA hard drives. S/PDIF out connector at the back panel This motherboard provides convenient connectivity to analog format and keeps the best signal quality. 1-2 Chapter 1: Product introduction Supporting HDCP copy protection ...such as LCD monitors. DDR3 1866(O.C.)/1333/1066 support This motherboard supports DDR3 memory that features data transfer rates of 1866(O.C.)/1333/1066 MHz to provide excellent system performance and overclocking ...
User Manual
Page 15
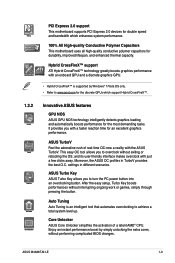
...Auto Tuning Auto Tuning is supported by simply unlocking the extra cores, without performing complicated BIOS changes. ASUS M4A88T-M LE 1-3 This easy OC tool allows you to overclock without interrupting ongoing work or games, simply through pressing the button. Core...the discrete GPUs which enhances system performance. 100% All High-quality Conductive Polymer Capacitors This motherboard uses all high-quality conductive polymer capacitors for an excellent graphics performance. ASUS TurboV Feel the adrenaline rush of a latent AMD® CPU. Hybrid CrossFireX™ support...
...Auto Tuning Auto Tuning is supported by simply unlocking the extra cores, without performing complicated BIOS changes. ASUS M4A88T-M LE 1-3 This easy OC tool allows you to overclock without interrupting ongoing work or games, simply through pressing the button. Core...the discrete GPUs which enhances system performance. 100% All High-quality Conductive Polymer Capacitors This motherboard uses all high-quality conductive polymer capacitors for an excellent graphics performance. ASUS TurboV Feel the adrenaline rush of a latent AMD® CPU. Hybrid CrossFireX™ support...
User Manual
Page 16
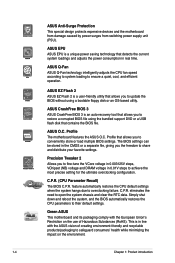
...BIOS automatically restores the CPU parameters to open the system chassis and clear the RTC data. ASUS Anti-Surge Protection This special design protects expensive devices and the motherboard from damage caused by power surges from switching power supply unit (PSU). This is a...store or load multiple BIOS settings. ASUS CrashFree BIOS 3 ASUS CrashFree BIOS 3 is a unique power saving technology that contains the BIOS file. ASUS O.C. Green ASUS This motherboard and its packaging comply with the ASUS vision of Hazardous Substances (RoHS). ASUS EPU ASUS EPU is an auto-recovery tool ...
...BIOS automatically restores the CPU parameters to open the system chassis and clear the RTC data. ASUS Anti-Surge Protection This special design protects expensive devices and the motherboard from damage caused by power surges from switching power supply unit (PSU). This is a...store or load multiple BIOS settings. ASUS CrashFree BIOS 3 ASUS CrashFree BIOS 3 is a unique power saving technology that contains the BIOS file. ASUS O.C. Green ASUS This motherboard and its packaging comply with the ASUS vision of Hazardous Substances (RoHS). ASUS EPU ASUS EPU is an auto-recovery tool ...
User Manual
Page 17
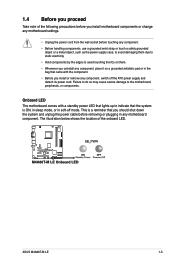
ASUS M4A88T-M LE 1-5 Onboard LED The motherboard comes with the component. • Before you install or remove any component, switch off mode. The illustration below shows the location of the following precautions before you install motherboard components or change any motherboard settings. • Unplug the power cord from the wall socket before removing or plugging ... or touch a safely grounded object or a metal object, such as the power supply case, to avoid damaging them . • Whenever you uninstall any motherboard component. Failure to do so may cause severe damage to the...
ASUS M4A88T-M LE 1-5 Onboard LED The motherboard comes with the component. • Before you install or remove any component, switch off mode. The illustration below shows the location of the following precautions before you install motherboard components or change any motherboard settings. • Unplug the power cord from the wall socket before removing or plugging ... or touch a safely grounded object or a metal object, such as the power supply case, to avoid damaging them . • Whenever you uninstall any motherboard component. Failure to do so may cause severe damage to the...
User Manual
Page 18
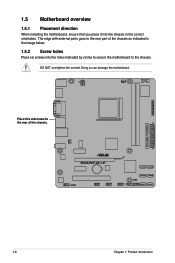
The edge with external ports goes to the chassis. Place this side towards the rear of the chassis as indicated in the correct orientation. DO NOT overtighten the screws! Doing so can damage the motherboard. 1.5 Motherboard overview 1.5.1 Placement direction When installing the motherboard, ensure that you place it into the chassis in the image below. 1.5.2 Screw holes Place six screws into the holes indicated by circles to secure the motherboard to the rear part of the chassis. 1-6 Chapter 1: Product introduction
The edge with external ports goes to the chassis. Place this side towards the rear of the chassis as indicated in the correct orientation. DO NOT overtighten the screws! Doing so can damage the motherboard. 1.5 Motherboard overview 1.5.1 Placement direction When installing the motherboard, ensure that you place it into the chassis in the image below. 1.5.2 Screw holes Place six screws into the holes indicated by circles to secure the motherboard to the rear part of the chassis. 1-6 Chapter 1: Product introduction
User Manual
Page 19
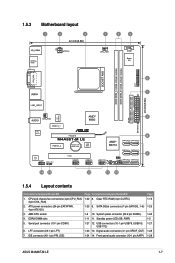
... 1-28 ASUS M4A88T-M LE 1-7 CPU and chassis fan connectors (4-pin CPU_FAN, 3-pin CHA_FAN) 2. SATA 3Gb/s connectors (7-pin SATA3G_1~6) 1-8 10. DDR3 DIMM slots 5. Clear RTC RAM (3-pin CLRTC) 1-23 9. AM3 CPU socket 4. Serial port connector (10-1 pin COM1) 6. USB connectors (10-1 pin USB78, USB910, USB1112) 1-23 13. Standby power LED (SB_PWR) 1-27 12. 1.5.3 Motherboard layout...
... 1-28 ASUS M4A88T-M LE 1-7 CPU and chassis fan connectors (4-pin CPU_FAN, 3-pin CHA_FAN) 2. SATA 3Gb/s connectors (7-pin SATA3G_1~6) 1-8 10. DDR3 DIMM slots 5. Clear RTC RAM (3-pin CLRTC) 1-23 9. AM3 CPU socket 4. Serial port connector (10-1 pin COM1) 6. USB connectors (10-1 pin USB78, USB910, USB1112) 1-23 13. Standby power LED (SB_PWR) 1-27 12. 1.5.3 Motherboard layout...

User Manual
Page 20
... use a CPU designed for Phenom™ II / Athlon™ II / Sempron™ 100 series processors. 1.6 Central Processing Unit (CPU) This motherboard comes with a small triangle. 4. DO NOT force the CPU into the socket to prevent bending the pins and damaging the CPU! otherwise, the CPU... CPU corner with the gold triangle matches the socket corner with an AM3 socket designed for the AM3 socket. Locate the CPU socket on the motherboard. 2. Press the lever sideways to prevent bending the pins and damaging the CPU! 1.6.1 Installing the CPU To install a CPU: 1. Small triangle ...
... use a CPU designed for Phenom™ II / Athlon™ II / Sempron™ 100 series processors. 1.6 Central Processing Unit (CPU) This motherboard comes with a small triangle. 4. DO NOT force the CPU into the socket to prevent bending the pins and damaging the CPU! otherwise, the CPU... CPU corner with the gold triangle matches the socket corner with an AM3 socket designed for the AM3 socket. Locate the CPU socket on the motherboard. 2. Press the lever sideways to prevent bending the pins and damaging the CPU! 1.6.1 Installing the CPU To install a CPU: 1. Small triangle ...
User Manual
Page 21
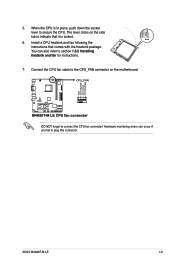
You can occur if you fail to section 1.6.2 Installing heatsink and fan for instructions. 7. Install a CPU heatsink and fan following the instructions that it is locked. 6. Hardware monitoring errors can also refer to plug this connector. Connect the CPU fan cable to connect the CPU fan connector! ASUS M4A88T-M LE 1-9 DO NOT forget to the CPU_FAN connector on the side tab to secure the CPU. 5. The lever clicks on the motherboard. When the CPU is in place, push down the socket lever to indicate that comes with the heatsink package.
You can occur if you fail to section 1.6.2 Installing heatsink and fan for instructions. 7. Install a CPU heatsink and fan following the instructions that it is locked. 6. Hardware monitoring errors can also refer to plug this connector. Connect the CPU fan cable to connect the CPU fan connector! ASUS M4A88T-M LE 1-9 DO NOT forget to the CPU_FAN connector on the side tab to secure the CPU. 5. The lever clicks on the motherboard. When the CPU is in place, push down the socket lever to indicate that comes with the heatsink package.
User Manual
Page 22
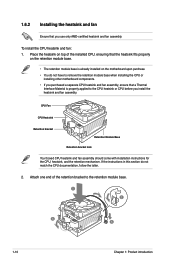
.... • If you purchased a separate CPU heatsink and fan assembly, ensure that a Thermal Interface Material is already installed on the motherboard upon purchase. • You do not match the CPU documentation, follow the latter. 2. Attach one end of the installed CPU, ensuring that the heatsink fits ...
.... • If you purchased a separate CPU heatsink and fan assembly, ensure that a Thermal Interface Material is already installed on the motherboard upon purchase. • You do not match the CPU documentation, follow the latter. 2. Attach one end of the installed CPU, ensuring that the heatsink fits ...
User Manual
Page 23
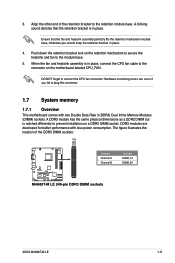
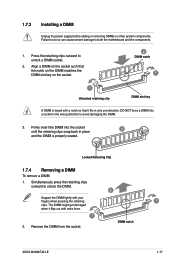
...the location of the retention bracket to plug this connector. 1.7 System memory 1.7.1 Overview This motherboard comes with less power consumption. A clicking sound denotes that the fan and heatsink assembly perfectly...down the retention bracket lock on the retention mechanism to secure the heatsink and fan to prevent installation on the motherboard labeled CPU_FAN. Ensure that the retention bracket is in place. 4. DDR3 modules are developed for better performance with ... end of the DDR3 DIMM sockets: Channel Channel A Channel B Sockets DIMM_A1 DIMM_B1 ASUS M4A88T-M LE 1-11
...the location of the retention bracket to plug this connector. 1.7 System memory 1.7.1 Overview This motherboard comes with less power consumption. A clicking sound denotes that the fan and heatsink assembly perfectly...down the retention bracket lock on the retention mechanism to secure the heatsink and fan to prevent installation on the motherboard labeled CPU_FAN. Ensure that the retention bracket is in place. 4. DDR3 modules are developed for better performance with ... end of the DDR3 DIMM sockets: Channel Channel A Channel B Sockets DIMM_A1 DIMM_B1 ASUS M4A88T-M LE 1-11
User Manual
Page 24
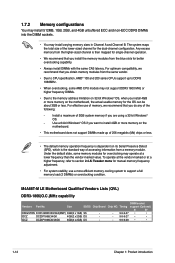
...recommend that you obtain memory modules from the same vendor. • Due to support a full memory load (2 DIMMs) or overclocking condition. M4A88T-M LE Motherboard Qualified Vendors Lists (QVL) DDR3-1866(O.C.)MHz capability DIMM socket Vendors Part No. Timing support (Optional) A* B* KINGSTON KHX14900D3K3/3GX(XMP) ... sockets. • You may operate at a higher frequency, refer to the memory address limitation on the motherboard. • This motherboard does not support DIMMs made up to DDR3 1066MHz. • When overclocking, some memory modules for overclocking...
...recommend that you obtain memory modules from the same vendor. • Due to support a full memory load (2 DIMMs) or overclocking condition. M4A88T-M LE Motherboard Qualified Vendors Lists (QVL) DDR3-1866(O.C.)MHz capability DIMM socket Vendors Part No. Timing support (Optional) A* B* KINGSTON KHX14900D3K3/3GX(XMP) ... sockets. • You may operate at a higher frequency, refer to the memory address limitation on the motherboard. • This motherboard does not support DIMMs made up to DDR3 1066MHz. • When overclocking, some memory modules for overclocking...
User Manual
Page 29
Press the retaining clips outward to both the motherboard and the components. 1. DIMM notch ASUS M4A88T-M LE 1-17 Remove the DIMM from the socket. Failure to do so can cause severe damage to unlock a DIMM socket. 2. Firmly insert the DIMM into a socket ...
Press the retaining clips outward to both the motherboard and the components. 1. DIMM notch ASUS M4A88T-M LE 1-17 Remove the DIMM from the socket. Failure to do so can cause severe damage to unlock a DIMM socket. 2. Firmly insert the DIMM into a socket ...

User Manual
Page 30
...expansion card. Assign an IRQ to the chassis with it by adjusting the software settings. 1. Remove the system unit cover (if your motherboard is completely seated on shared slots, ensure that the drivers support "Share IRQ" or that came with the screw you physical injury and ...damage motherboard components. 1.8.1 Installing an expansion card To install an expansion card: 1. Unplug the power cord before adding or removing expansion cards. Align ...
...expansion card. Assign an IRQ to the chassis with it by adjusting the software settings. 1. Remove the system unit cover (if your motherboard is completely seated on shared slots, ensure that the drivers support "Share IRQ" or that came with the screw you physical injury and ...damage motherboard components. 1.8.1 Installing an expansion card To install an expansion card: 1. Unplug the power cord before adding or removing expansion cards. Align ...
User Manual
Page 33
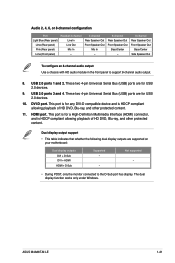
... display function works only under Windows. USB 2.0 ports 1 and 2. USB 2.0 ports 3 and 4. This port is for USB 2.0 devices. 10. ASUS M4A88T-M LE 1-21 These two 4-pin Universal Serial Bus (USB) ports are supported on your motherboard: Dual display outputs DVI + D-Sub DVI + HDMI HDMI + D-Sub Supported • • Not supported • • During POST...
... display function works only under Windows. USB 2.0 ports 1 and 2. USB 2.0 ports 3 and 4. This port is for USB 2.0 devices. 10. ASUS M4A88T-M LE 1-21 These two 4-pin Universal Serial Bus (USB) ports are supported on your motherboard: Dual display outputs DVI + D-Sub DVI + HDMI HDMI + D-Sub Supported • • Not supported • • During POST...

User Manual
Page 34
... 7 1920 x 1080p 1920 x 1080p 12. These two 4-pin Universal Serial Bus (USB) ports are not jumpers! Only the 4-pin CPU fan supports the ASUS Q-Fan feature. 1-22 Chapter 1: Product introduction These are for USB 2.0 devices. 1.10.2 Internal connectors 1. DO NOT forget to connect the fan cables to the... fan connectors on the fan connectors. DO NOT place jumper caps on the motherboard, ensuring that the black wire of each cable matches the ground pin of Blu-ray discs • For better playback quality, we recommend ...
... 7 1920 x 1080p 1920 x 1080p 12. These two 4-pin Universal Serial Bus (USB) ports are not jumpers! Only the 4-pin CPU fan supports the ASUS Q-Fan feature. 1-22 Chapter 1: Product introduction These are for USB 2.0 devices. 1.10.2 Internal connectors 1. DO NOT forget to connect the fan cables to the... fan connectors on the fan connectors. DO NOT place jumper caps on the motherboard, ensuring that the black wire of each cable matches the ground pin of Blu-ray discs • For better playback quality, we recommend ...


