User Manual
Page 8
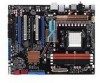
...and circuitry. • Avoid dust, humidity, and temperature extremes. Contact a qualified service technician or your retailer. DO NOT throw the motherboard in municipal waste. This product has been designed to the correct voltage in municipal waste. This symbol of parts and recycling. If you... cell battery in municipal waste. This symbol of the electrical outlet you detect any area where it , carefully read all the manuals that the product (electrical and electronic equipment) should not be placed in municipal waste. These devices could interrupt the grounding circuit....
...and circuitry. • Avoid dust, humidity, and temperature extremes. Contact a qualified service technician or your retailer. DO NOT throw the motherboard in municipal waste. This product has been designed to the correct voltage in municipal waste. This symbol of parts and recycling. If you... cell battery in municipal waste. This symbol of the electrical outlet you detect any area where it , carefully read all the manuals that the product (electrical and electronic equipment) should not be placed in municipal waste. These devices could interrupt the grounding circuit....
User Manual
Page 15
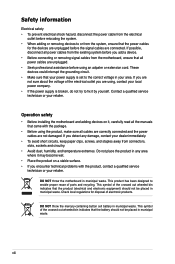
... with the list below. 1.2 Package contents Check your motherboard package for the following items. Chapter 1 ASUS M4A79T Deluxe Motherboard 1 x Multi-functional module (2-port USB 2.0 and 1-port IEEE 1394a) 2 x ASUS CrossFire™ bridge cables 5 x Serial ATA signal cables 1 x Ultra DMA 133/100/66 cable 1 x ASUS Q-Connector Kit 1 x ASUS Q-Shield (I/O shield) User Manual User Guide Support DVD • If any of...
... with the list below. 1.2 Package contents Check your motherboard package for the following items. Chapter 1 ASUS M4A79T Deluxe Motherboard 1 x Multi-functional module (2-port USB 2.0 and 1-port IEEE 1394a) 2 x ASUS CrossFire™ bridge cables 5 x Serial ATA signal cables 1 x Ultra DMA 133/100/66 cable 1 x ASUS Q-Connector Kit 1 x ASUS Q-Shield (I/O shield) User Manual User Guide Support DVD • If any of...
User Manual
Page 31
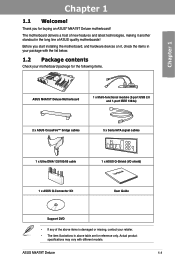
... recommended that you install 4GB or more memory installed on the motherboard. • This motherboard does not support DIMMs made up of the lower-sized channel for the OS can be about 3GB or less. Chapter 2 ASUS M4A79T Deluxe 2-11 Any excess memory from the orange slots for overclocking may...ECC and non‑ECC DDR3 DIMMs into the DIMM sockets. • You may operate at a higher frequency, see section 3.6 Advanced menu for manual memory frequency adjustment. • For system stability, use of memory, we recommend that you obtain memory modules from the same vendor. • ...
... recommended that you install 4GB or more memory installed on the motherboard. • This motherboard does not support DIMMs made up of the lower-sized channel for the OS can be about 3GB or less. Chapter 2 ASUS M4A79T Deluxe 2-11 Any excess memory from the orange slots for overclocking may...ECC and non‑ECC DDR3 DIMMs into the DIMM sockets. • You may operate at a higher frequency, see section 3.6 Advanced menu for manual memory frequency adjustment. • For system stability, use of memory, we recommend that you obtain memory modules from the same vendor. • ...
User Manual
Page 59
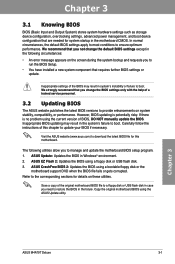
... utilities allow you need to manage and update the motherboard BIOS setup program. 1. Save a copy of BIOS, DO NOT manually update the BIOS. Copy the original motherboard BIOS using a bootable floppy disk or the motherboard support DVD when the BIOS file fails or gets ...error message appears on these utilities. ASUS EZ Flash 2: Updates the BIOS using the current version of the original motherboard BIOS file to a floppy disk or USB flash disk in case you to restore the BIOS in Windows® environment. 2. Chapter 3 ASUS M4A79T Deluxe 3-1 If there is potentially risky....
... utilities allow you need to manage and update the motherboard BIOS setup program. 1. Save a copy of BIOS, DO NOT manually update the BIOS. Copy the original motherboard BIOS using a bootable floppy disk or the motherboard support DVD when the BIOS file fails or gets ...error message appears on these utilities. ASUS EZ Flash 2: Updates the BIOS using the current version of the original motherboard BIOS file to a floppy disk or USB flash disk in case you to restore the BIOS in Windows® environment. 2. Chapter 3 ASUS M4A79T Deluxe 3-1 If there is potentially risky....

User Manual
Page 70
...menu The Ai (Extreme) Tweaker menu items allow you to individually set overclocking parameters. Select any of these preset overclocking configuration options: Manual Auto Allows you to configure overclocking-related items. Be cautious when changing the settings of the general system specifications. Chapter 3 3-12...] HT Link Speed [Auto] ******* Please key in this chapter vary depending on the CPU and DIMM model you installed on the motherboard. Change Option F1 General Help F10 Save and Exit ESC Exit v02.61 (C)Copyright 1985-2008, American Megatrends, Inc. 3.5.1 AI ...
...menu The Ai (Extreme) Tweaker menu items allow you to individually set overclocking parameters. Select any of these preset overclocking configuration options: Manual Auto Allows you to configure overclocking-related items. Be cautious when changing the settings of the general system specifications. Chapter 3 3-12...] HT Link Speed [Auto] ******* Please key in this chapter vary depending on the CPU and DIMM model you installed on the motherboard. Change Option F1 General Help F10 Save and Exit ESC Exit v02.61 (C)Copyright 1985-2008, American Megatrends, Inc. 3.5.1 AI ...

User Manual
Page 71
...MHz] [800 MHz] [1 GHz] [1.2 GHz] [1.4 GHz] [1.6 GHz] [1.8 GHz] [2.0 GHz] [2.2 GHz] [2.4 GHz] [2.6 GHz] Chapter 3 ASUS M4A79T Deluxe 3-13 The following sub-item vary depending on the DIMMs you install on the motherboard. 3.5.2 CPU Ratio [Auto] Allows you to select the HyperTransport link speed. If this happens, revert to the default.... The values range from 100 to 150. 3.5.5 DRAM Frequency [800MHz] Allows you to set the AI Overclocking Tuner item to [Manual]. 3.5.3 FSB Frequency [XXX] Displays the frequency sent by the clock generator to the system bus and PCI bus. The valid value...
...MHz] [800 MHz] [1 GHz] [1.2 GHz] [1.4 GHz] [1.6 GHz] [1.8 GHz] [2.0 GHz] [2.2 GHz] [2.4 GHz] [2.6 GHz] Chapter 3 ASUS M4A79T Deluxe 3-13 The following sub-item vary depending on the DIMMs you install on the motherboard. 3.5.2 CPU Ratio [Auto] Allows you to select the HyperTransport link speed. If this happens, revert to the default.... The values range from 100 to 150. 3.5.5 DRAM Frequency [800MHz] Allows you to set the AI Overclocking Tuner item to [Manual]. 3.5.3 FSB Frequency [XXX] Displays the frequency sent by the clock generator to the system bus and PCI bus. The valid value...

User Manual
Page 95
... and other software that you want to avail all motherboard features. ASUS M4A79T Deluxe 4-1 The DVD automatically displays the Drivers menu if Autorun is NOT enabled in your computer, browse the contents of the user manual. The Manual menu contains the list of your OS documentation for ... installing the drivers for reference only. Install the necessary drivers to maximize the features of supplementary user manuals. Click an icon to display DVD/ motherboard information Click an item to locate the file ASSETUP.EXE from the BIN folder. Always install the ...
... and other software that you want to avail all motherboard features. ASUS M4A79T Deluxe 4-1 The DVD automatically displays the Drivers menu if Autorun is NOT enabled in your computer, browse the contents of the user manual. The Manual menu contains the list of your OS documentation for ... installing the drivers for reference only. Install the necessary drivers to maximize the features of supplementary user manuals. Click an icon to display DVD/ motherboard information Click an item to locate the file ASSETUP.EXE from the BIN folder. Always install the ...
User Manual
Page 97
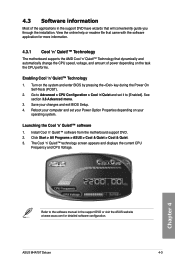
...ASUS website at www.asus.com for more information. 4.3.1 Cool 'n' Quiet!™ Technology The motherboard supports the AMD Cool 'n' Quiet!™ Technology that will conveniently guide you through the installation. Turn on the task the CPU performs. Enabling Cool 'n' Quiet!™ Technology 1. ASUS M4A79T Deluxe... 4-3 View the online help or readme file that came with the software application for detailed software configuration. Save your computer and set it to the software manual in the support DVD have wizards ...
...ASUS website at www.asus.com for more information. 4.3.1 Cool 'n' Quiet!™ Technology The motherboard supports the AMD Cool 'n' Quiet!™ Technology that will conveniently guide you through the installation. Turn on the task the CPU performs. Enabling Cool 'n' Quiet!™ Technology 1. ASUS M4A79T Deluxe... 4-3 View the online help or readme file that came with the software application for detailed software configuration. Save your computer and set it to the software manual in the support DVD have wizards ...

User Manual
Page 98
... to the software manual in the support DVD or visit the ASUS website at www.asus.com for Windows XP Configuration options Control settings window Information button Exit button Minimize button Chapter 4 Information button Refer to install the Realtek® Audio Driver from the support CD/DVD that came with the motherboard package. Realtek...
... to the software manual in the support DVD or visit the ASUS website at www.asus.com for Windows XP Configuration options Control settings window Information button Exit button Minimize button Chapter 4 Information button Refer to install the Realtek® Audio Driver from the support CD/DVD that came with the motherboard package. Realtek...
User Manual
Page 99
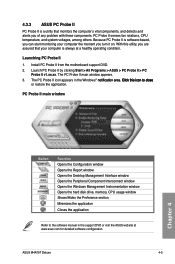
...PC Probe II 1. Install PC Probe II from the motherboard support DVD. 2. The PC Probe II icon appears in the support DVD or visit the ASUS website at a healthy operating condition. PC Probe II ...window Shows/Hides the Preference section Minimizes the application Closes the application Refer to the software manual in the Windows® n��o�t�i�fi�c�a�t�i�...The PC Probe II main window appears. 3. ASUS M4A79T Deluxe 4-5 Launch PC Probe II by clicking Start > All Programs > ASUS > PC Probe II > PC Probe II v1.xx.xx.
...PC Probe II 1. Install PC Probe II from the motherboard support DVD. 2. The PC Probe II icon appears in the support DVD or visit the ASUS website at a healthy operating condition. PC Probe II ...window Shows/Hides the Preference section Minimizes the application Closes the application Refer to the software manual in the Windows® n��o�t�i�fi�c�a�t�i�...The PC Probe II main window appears. 3. ASUS M4A79T Deluxe 4-5 Launch PC Probe II by clicking Start > All Programs > ASUS > PC Probe II > PC Probe II v1.xx.xx.
User Manual
Page 100
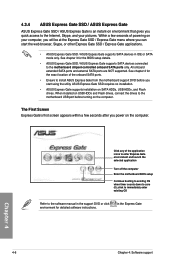
...ASUS Express Gate from the motherboard support DVD before turning on SATA HDDs, USB HDDs, and Flash drives. ASUS Express Gate SSD requires no installation. • ASUS...motherboard chipset-controlled onboard SATA ports only. The First Screen Express Gate's first screen appears within a few seconds of powering on your pictures. See chapter 3 for detailed software instructions. 4.3.4 ASUS Express Gate SSD / ASUS Express Gate ASUS Express Gate SSD / ASUS... details. • ASUS Express Gate SSD / ASUS Express Gate supports SATA devices connected to the motherboard USB port before you...
...ASUS Express Gate from the motherboard support DVD before turning on SATA HDDs, USB HDDs, and Flash drives. ASUS Express Gate SSD requires no installation. • ASUS...motherboard chipset-controlled onboard SATA ports only. The First Screen Express Gate's first screen appears within a few seconds of powering on your pictures. See chapter 3 for detailed software instructions. 4.3.4 ASUS Express Gate SSD / ASUS Express Gate ASUS Express Gate SSD / ASUS... details. • ASUS Express Gate SSD / ASUS Express Gate supports SATA devices connected to the motherboard USB port before you...
User Manual
Page 101
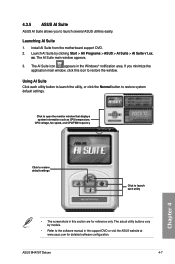
...ASUS M4A79T Deluxe 4-7 4.3.5 ASUS AI Suite ASUS AI Suite allows you minimize the application main window, click this section are for detailed software configuration. Launch AI Suite by models. • Refer to launch several ASUS utilities easily. If you to the software manual in the support DVD or visit the ASUS website at www.asus....com for reference only. Launching AI Suite 1. Install AI Suite from the motherboard support DVD. 2. The actual ...
...ASUS M4A79T Deluxe 4-7 4.3.5 ASUS AI Suite ASUS AI Suite allows you minimize the application main window, click this section are for detailed software configuration. Launch AI Suite by models. • Refer to launch several ASUS utilities easily. If you to the software manual in the support DVD or visit the ASUS website at www.asus....com for reference only. Launching AI Suite 1. Install AI Suite from the motherboard support DVD. 2. The actual ...
User Manual
Page 102
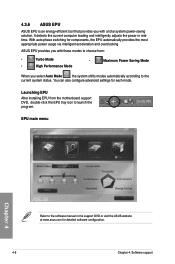
4.3.6 ASUS EPU ASUS EPU is an energy-efficient tool that provides you with these modes to choose from the motherboard support DVD, double-click the EPU tray icon to the software manual in realtime. You can also configure advanced settings for detailed software configuration. 4-8 Chapter 4: Software support ...-saving solution. It detects the current computer loading and intelligently adjusts the power in the support DVD or visit the ASUS website at www.asus.com for each mode. EPU main menu Chapter 4 Refer to launch the program. With auto phase switching for components...
4.3.6 ASUS EPU ASUS EPU is an energy-efficient tool that provides you with these modes to choose from the motherboard support DVD, double-click the EPU tray icon to the software manual in realtime. You can also configure advanced settings for detailed software configuration. 4-8 Chapter 4: Software support ...-saving solution. It detects the current computer loading and intelligently adjusts the power in the support DVD or visit the ASUS website at www.asus.com for each mode. EPU main menu Chapter 4 Refer to launch the program. With auto phase switching for components...
User Manual
Page 105
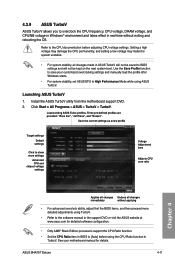
... and will not be kept on the next system boot. Launching ASUS TurboV 1. ASUS M4A79T Deluxe 4-11 Use the Save Profile function to [Auto] before adjusting CPU voltage settings. Install the ASUS TurboV utility from the motherboard support DVD. 2. See your customized overclocking settings and manually load the profile after Windows starts. • For system stability, set...
... and will not be kept on the next system boot. Launching ASUS TurboV 1. ASUS M4A79T Deluxe 4-11 Use the Save Profile function to [Auto] before adjusting CPU voltage settings. Install the ASUS TurboV utility from the motherboard support DVD. 2. See your customized overclocking settings and manually load the profile after Windows starts. • For system stability, set...
User Manual
Page 106
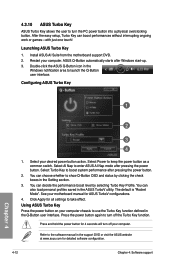
...motherboard manual for all settings to take effect. The default is "Rocket Mode". Double-click the ASUS Q-Button icon in the Windows notification area to keep the power button as a common switch. Configuring ASUS Turbo Key 1 2 3 4 1. See your desired power button action. Using ASUS Turbo Key Press the power button on your computer. Install ASUS... AI Suite from the motherboard support DVD. 2. ...
...motherboard manual for all settings to take effect. The default is "Rocket Mode". Double-click the ASUS Q-Button icon in the Windows notification area to keep the power button as a common switch. Configuring ASUS Turbo Key 1 2 3 4 1. See your desired power button action. Using ASUS Turbo Key Press the power button on your computer. Install ASUS... AI Suite from the motherboard support DVD. 2. ...

User Manual
Page 116
... CrossFireX installation 1. Ensure that the connector is for reference purpose only and may not exactly match your motherboard has more than two PCIEX16 slots, refer to the goldfingers on the slots. 4. Chapter 5 5.2 Installing CrossFireX™ graphics cards • ...on each graphics card. Insert the two graphics card into the PCIEX16 slots. Align and firmly insert the CrossFireX bridge connector to its user manual for the locations of this chapter is firmly in place. CrossFireX bridge CrossFireX goldfingers 5-2 Chapter 5: ATI® CrossFireX™ technology support ...
... CrossFireX installation 1. Ensure that the connector is for reference purpose only and may not exactly match your motherboard has more than two PCIEX16 slots, refer to the goldfingers on the slots. 4. Chapter 5 5.2 Installing CrossFireX™ graphics cards • ...on each graphics card. Insert the two graphics card into the PCIEX16 slots. Align and firmly insert the CrossFireX bridge connector to its user manual for the locations of this chapter is firmly in place. CrossFireX bridge CrossFireX goldfingers 5-2 Chapter 5: ATI® CrossFireX™ technology support ...

User Manual
Page 117
Prepare three CrossFireX-ready graphics cards. 2. If your motherboard has more than three PCIEX16 slots, refer to the three graphics cards separately. 6. Connect three independent auxiliary power sources from the power... installation 1. Insert the three graphics card into the PCIEX16 slots. Connect two independent auxiliary power sources from the power supply to its user manual for the locations of the PCIEX16 slots recommended for multi-graphics card installation. 3. ASUS M4A79T Deluxe 5-3 Connect a VGA or a DVI cable to the two graphics cards separately. 6. Chapter 5 5.
Prepare three CrossFireX-ready graphics cards. 2. If your motherboard has more than three PCIEX16 slots, refer to the three graphics cards separately. 6. Connect three independent auxiliary power sources from the power... installation 1. Insert the three graphics card into the PCIEX16 slots. Connect two independent auxiliary power sources from the power supply to its user manual for the locations of the PCIEX16 slots recommended for multi-graphics card installation. 3. ASUS M4A79T Deluxe 5-3 Connect a VGA or a DVI cable to the two graphics cards separately. 6. Chapter 5 5.


