User Manual
Page 19
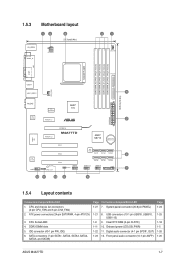
... connector (20-8 pin PANEL) 1-21 8. USB connectors (10-1 pin USB78, USB910, USB1112) 1-8 9. Clear RTC RAM (3-pin CLRTC) 1-11 10. Digital audio connector (4-1 pin SPDIF_OUT) 1-23 12. ATX power connectors (24-pin EATXPWR, 4-pin ATX12V) 3. IDE connector (40-1 pin PRI_IDE) 6. DDR3 DIMM slots 5. ...and 3-pin CHA_FAN) 2. CPU Socket AM3 4. Front panel audio connector (10-1 pin AAFP) Page 1-24 1-25 1-18 1-5 1-26 1-26 ASUS M4A77TD 1-7 1.5.3 Motherboard layout 12 3 21.3cm(8.4in) KB_USB56 SPDIF_O ATX12V 4 1 CHA_FAN DDR3 DIMM_A2 (64bit, 240-pin module) DDR3 DIMM_B2 (64bit, 240-pin ...
... connector (20-8 pin PANEL) 1-21 8. USB connectors (10-1 pin USB78, USB910, USB1112) 1-8 9. Clear RTC RAM (3-pin CLRTC) 1-11 10. Digital audio connector (4-1 pin SPDIF_OUT) 1-23 12. ATX power connectors (24-pin EATXPWR, 4-pin ATX12V) 3. IDE connector (40-1 pin PRI_IDE) 6. DDR3 DIMM slots 5. ...and 3-pin CHA_FAN) 2. CPU Socket AM3 4. Front panel audio connector (10-1 pin AAFP) Page 1-24 1-25 1-18 1-5 1-26 1-26 ASUS M4A77TD 1-7 1.5.3 Motherboard layout 12 3 21.3cm(8.4in) KB_USB56 SPDIF_O ATX12V 4 1 CHA_FAN DDR3 DIMM_A2 (64bit, 240-pin module) DDR3 DIMM_B2 (64bit, 240-pin ...

User Manual
Page 30
...pins 1-2. 3. For system failure due to pins 2-3. Keep the cap on CLRTC jumper default position. 1.9 Jumpers 1. M4A77TD CLRTC 12 23 Normal (Default) M4A77TD Clear RTC RAM Clear RTC To erase the RTC RAM: 1. Turn OFF the computer and unplug the power cord. 2. Plug the power cord and turn ON the computer....CMOS, reinstall the battery. • You do not help, remove the onboard battery and move the cap back to clear the CMOS RTC RAM data. Shut down the key during the boot process and enter BIOS setup to default values. 1-18 Chapter 1: Product introduction You can ...
...pins 1-2. 3. For system failure due to pins 2-3. Keep the cap on CLRTC jumper default position. 1.9 Jumpers 1. M4A77TD CLRTC 12 23 Normal (Default) M4A77TD Clear RTC RAM Clear RTC To erase the RTC RAM: 1. Turn OFF the computer and unplug the power cord. 2. Plug the power cord and turn ON the computer....CMOS, reinstall the battery. • You do not help, remove the onboard battery and move the cap back to clear the CMOS RTC RAM data. Shut down the key during the boot process and enter BIOS setup to default values. 1-18 Chapter 1: Product introduction You can ...

User Manual
Page 61
... password. If you forget your password. After you have set your BIOS password, you can clear it by erasing the CMOS Real Time Clock (RTC) RAM. ASUS M4A77TD 2-21 Select an item then press to the Setup utility. User Access Level [Full Access] This item allows you to select the access restriction to...
... password. If you forget your password. After you have set your BIOS password, you can clear it by erasing the CMOS Real Time Clock (RTC) RAM. ASUS M4A77TD 2-21 Select an item then press to the Setup utility. User Access Level [Full Access] This item allows you to select the access restriction to...
User Manual
Page 64
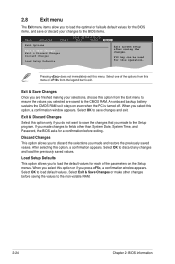
... Enter Go to Sub-screen F1 General Help F10 Save and Exit Exit & Save Changes ESC Exit Once you are saved to the CMOS RAM. Discard Changes This option allows you to discard the selections you made changes to fields other changes before exiting. When you select this menu.... Defaults Exit system setup after saving the changes. After selecting this option only if you select this operation. An onboard backup battery sustains the CMOS RAM so it stays on the Setup menus. Exit & Discard Changes Select this option, a confirmation appears. Select OK to save the changes that you ...
... Enter Go to Sub-screen F1 General Help F10 Save and Exit Exit & Save Changes ESC Exit Once you are saved to the CMOS RAM. Discard Changes This option allows you to discard the selections you made changes to fields other changes before exiting. When you select this menu.... Defaults Exit system setup after saving the changes. After selecting this option only if you select this operation. An onboard backup battery sustains the CMOS RAM so it stays on the Setup menus. Exit & Discard Changes Select this option, a confirmation appears. Select OK to save the changes that you ...


