
User Manual
Page 67
This chapter describes the power up sequence, the vocal POST messages, ChaPpotwerer3in: 3g up and ways of shutting down the system.
This chapter describes the power up sequence, the vocal POST messages, ChaPpotwerer3in: 3g up and ways of shutting down the system.
User Manual
Page 69
... the back of the system chassis. 4. After applying power, the system power LED on the chain) c. ASUS M3N72-D 3-1 While the tests are off. 3. Turn on the screen. System power 6. For systems with the...for assistance. If you do not see anything within 30 seconds from the time you press the ATX power button. Be sure that is equipped with "green" standards or if it has a "power... standby" feature, the monitor LED may have failed a power-on self tests or POST. Connect the power cord to enter the BIOS Setup. Monitor b. Follow the instructions in the following order...
... the back of the system chassis. 4. After applying power, the system power LED on the chain) c. ASUS M3N72-D 3-1 While the tests are off. 3. Turn on the screen. System power 6. For systems with the...for assistance. If you do not see anything within 30 seconds from the time you press the ATX power button. Be sure that is equipped with "green" standards or if it has a "power... standby" feature, the monitor LED may have failed a power-on self tests or POST. Connect the power cord to enter the BIOS Setup. Monitor b. Follow the instructions in the following order...
User Manual
Page 77
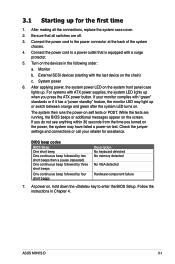
...contains the BIOS file to the floppy disk drive or the USB port. Save the BIOS file to prevent system boot failure! Then press . 4. ASUS M3N72-D 4-5 You can launch the EZ Flash 2 by pressing before the correct file is found , EZ Flash 2 performs the BIOS update process and ...is built-in the BIOS chip so it . When the correct BIOS file is accessible by pressing + during POST to download the latest BIOS file for the motherboard. 2. 4.1.3 ASUS EZ Flash 2 utility The ASUS EZ Flash 2 feature allows you to update the BIOS without having to enable it is found . To update...
...contains the BIOS file to the floppy disk drive or the USB port. Save the BIOS file to prevent system boot failure! Then press . 4. ASUS M3N72-D 4-5 You can launch the EZ Flash 2 by pressing before the correct file is found , EZ Flash 2 performs the BIOS update process and ...is built-in the BIOS chip so it . When the correct BIOS file is accessible by pressing + during POST to download the latest BIOS file for the motherboard. 2. 4.1.3 ASUS EZ Flash 2 utility The ASUS EZ Flash 2 feature allows you to update the BIOS without having to enable it is found . To update...
User Manual
Page 81
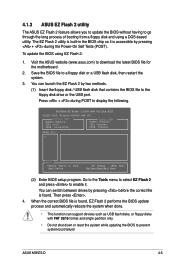
...options using this last option only if the first two failed. Being a menu-driven program, it as possible. ASUS M3N72-D 4-9 Press during the Power-On Self-Test (POST) to run this section are for reference purposes only, and may not exactly match what you see on your ...the power management settings. Use the BIOS Setup program when you are installing a motherboard, reconfiguring your system using the navigation keys. • The default BIOS settings for this motherboard apply for this motherboard. Even if you are not prompted to use as easy to ensure optimum ...
...options using this last option only if the first two failed. Being a menu-driven program, it as possible. ASUS M3N72-D 4-9 Press during the Power-On Self-Test (POST) to run this section are for reference purposes only, and may not exactly match what you see on your ...the power management settings. Use the BIOS Setup program when you are installing a motherboard, reconfiguring your system using the navigation keys. • The default BIOS settings for this motherboard apply for this motherboard. Even if you are not prompted to use as easy to ensure optimum ...

User Manual
Page 92
... Specific Help DRAM timing and control DRAM Configuration This sub-menu allows you to enable or disable LAN cable check during POST. Phoenix-Award BIOS CMOS Setup Utility Advanced DRAM Configuration Select Menu Timing Mode x Memory clock Frequency Memory Hole Remapping [Auto... value Manual, use Memory Clock value 4-20 Chapter 4: BIOS setup Advanced Phoenix-Award BIOS CMOS Setup Utility AI NET 2 Select Menu POST Check LAN Cable [Disabled] Pair LAN1(1-2) LAN1(3-6) LAN1(4-5) LAN1(7-8) Status Open Open Open Open Length N/A N/A N/A N/A Item Specific Help...
... Specific Help DRAM timing and control DRAM Configuration This sub-menu allows you to enable or disable LAN cable check during POST. Phoenix-Award BIOS CMOS Setup Utility Advanced DRAM Configuration Select Menu Timing Mode x Memory clock Frequency Memory Hole Remapping [Auto... value Manual, use Memory Clock value 4-20 Chapter 4: BIOS setup Advanced Phoenix-Award BIOS CMOS Setup Utility AI NET 2 Select Menu POST Check LAN Cable [Disabled] Pair LAN1(1-2) LAN1(3-6) LAN1(4-5) LAN1(7-8) Status Open Open Open Open Length N/A N/A N/A N/A Item Specific Help...

User Manual
Page 104
... rate at which a character repeats when you to select the power-on state for the NumLock. Enable this item to run floppy drives test during POST to boot the system Case Open Warning [Enabled] Enables or disables the chassis open status feature. Configuration options: [Disabled] [Enabled] Bootup Num-Lock [On] Allows...
... rate at which a character repeats when you to select the power-on state for the NumLock. Enable this item to run floppy drives test during POST to boot the system Case Open Warning [Enabled] Enables or disables the chassis open status feature. Configuration options: [Disabled] [Enabled] Bootup Num-Lock [On] Allows...

User Manual
Page 121
... folder that appears on screen during the Power‑On Self-Tests (POST). See section 5.2.3 Utilities menu for more information. 5.3.1 ASUS MyLogo2™ The ASUS MyLogo2™ utility lets you wish to use the AFUDOS utility to ...ASUS Update utility. 5.3 Software information Most of your original BIOS file, or obtain the latest BIOS version from the ASUS website. The ASUS MyLogo window appears. 6. See section 4.6.2 Boot Settings Configuration. • You can create your boot logo. Refer to replace system boot logo before flashing BIOS, then click Next. 4. ASUS M3N72...
... folder that appears on screen during the Power‑On Self-Tests (POST). See section 5.2.3 Utilities menu for more information. 5.3.1 ASUS MyLogo2™ The ASUS MyLogo2™ utility lets you wish to use the AFUDOS utility to ...ASUS Update utility. 5.3 Software information Most of your original BIOS file, or obtain the latest BIOS version from the ASUS website. The ASUS MyLogo window appears. 6. See section 4.6.2 Boot Settings Configuration. • You can create your boot logo. Refer to replace system boot logo before flashing BIOS, then click Next. 4. ASUS M3N72...

User Manual
Page 122
Adjust the boot image to enlarge by selecting a value on it. 8. After flashing the BIOS, restart the computer to load the new boot logo. 10. When the logo images appear on the right window pane, select an image to your desired size by clicking on the Ratio box. 9. When the screen returns to the ASUS Update utility, flash the original BIOS to display the new boot logo during POST. 5-10 Chapter 5: Software support 7.
Adjust the boot image to enlarge by selecting a value on it. 8. After flashing the BIOS, restart the computer to load the new boot logo. 10. When the logo images appear on the right window pane, select an image to your desired size by clicking on the Ratio box. 9. When the screen returns to the ASUS Update utility, flash the original BIOS to display the new boot logo during POST. 5-10 Chapter 5: Software support 7.
User Manual
Page 123
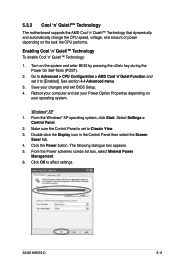
... Quiet!™ Technology The motherboard supports the AMD Cool 'n' Quiet!™ Technology that dynamically and automatically change the CPU speed, voltage, and amount of power depending on the system and enter BIOS by pressing the key during the Power On Self-Tests (POST). 2. Save your operating system.... From the Windows® XP operating system, click Start. Double-click the Display icon in the Control Panel then select the Screen Saver tab. 4. ASUS M3N72-D 5-11 See section 4.4 Advanced menu. 3. ...
... Quiet!™ Technology The motherboard supports the AMD Cool 'n' Quiet!™ Technology that dynamically and automatically change the CPU speed, voltage, and amount of power depending on the system and enter BIOS by pressing the key during the Power On Self-Tests (POST). 2. Save your operating system.... From the Windows® XP operating system, click Start. Double-click the Display icon in the Control Panel then select the Screen Saver tab. 4. ASUS M3N72-D 5-11 See section 4.4 Advanced menu. 3. ...
User Manual
Page 155
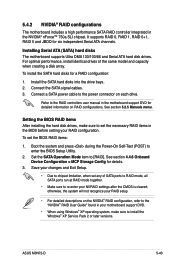
...SATA power cable to re-enter your RAID configuration. Boot the system and press during the Power-On Self-Test (POST) to [RAID]. Setting the BIOS RAID items After installing the hard disk drives, make sure to the RAID controllers ...the BIOS before setting your NVRAID settings after the CMOS is cleared; Installing Serial ATA (SATA) hard disks The motherboard supports Ultra DMA 133/100/66 and Serial ATA hard disk drives. Refer to install the Windows® XP ..." found in the NVIDIA® nForce™ 750a SLI chipset. See section 5.2.5 Manuals menu. ASUS M3N72-D 5-43
...SATA power cable to re-enter your RAID configuration. Boot the system and press during the Power-On Self-Test (POST) to [RAID]. Setting the BIOS RAID items After installing the hard disk drives, make sure to the RAID controllers ...the BIOS before setting your NVRAID settings after the CMOS is cleared; Installing Serial ATA (SATA) hard disks The motherboard supports Ultra DMA 133/100/66 and Serial ATA hard disk drives. Refer to install the Windows® XP ..." found in the NVIDIA® nForce™ 750a SLI chipset. See section 5.2.5 Manuals menu. ASUS M3N72-D 5-43

User Manual
Page 156
... BIOS setup screens shown in this section are the navigation keys. Entering the NVIDIA® RAID utility To enter the NVIDIA® RAID utility: 1. During POST, press to move through and select menu options. 5-44 Chapter 5: Software support Boot up your screen.
... BIOS setup screens shown in this section are the navigation keys. Entering the NVIDIA® RAID utility To enter the NVIDIA® RAID utility: 1. During POST, press to move through and select menu options. 5-44 Chapter 5: Software support Boot up your screen.
User Manual
Page 162
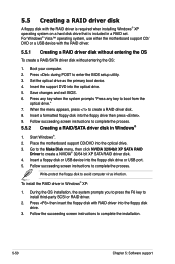
... disk drive that is included in a RAID set. Insert a formatted floppy disk into the optical drive. 3. Start Windows®. 2. Place the motherboard support CD/DVD into the floppy drive then press . 9. Insert a floppy disk or USB device into the optical drive. 5. Press any key ... Boot your computer. 2. Save changes and exit BIOS. 6. Follow the succeeding screen instructions to enter the BIOS setup utility. 3. Press during POST to complete the installation. 5-50 Chapter 5: Software support To install the RAID driver in Windows® 1. Set the optical drive as the primary...
... disk drive that is included in a RAID set. Insert a formatted floppy disk into the optical drive. 3. Start Windows®. 2. Place the motherboard support CD/DVD into the floppy drive then press . 9. Insert a floppy disk or USB device into the optical drive. 5. Press any key ... Boot your computer. 2. Save changes and exit BIOS. 6. Follow the succeeding screen instructions to enter the BIOS setup utility. 3. Press during POST to complete the installation. 5-50 Chapter 5: Software support To install the RAID driver in Windows® 1. Set the optical drive as the primary...
User Manual
Page 172
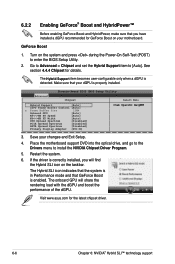
... only when a dGPU is properly installed. Place the motherboard support DVD into the optical drive, and go to the Drivers menu to enter the BIOS Setup Utility. 2. Turn on the system and press during the Power-On Self-Test (POST) to install the NVIDIA Chipset Driver Program. 5. Make... sure that your dGPU is detected. If the driver is enabled. Visit www.asus.com for details. 6.2.2 Enabling GeForce® Boost and HybridPower™ Before enabling ...
... only when a dGPU is properly installed. Place the motherboard support DVD into the optical drive, and go to the Drivers menu to enter the BIOS Setup Utility. 2. Turn on the system and press during the Power-On Self-Test (POST) to install the NVIDIA Chipset Driver Program. 5. Make... sure that your dGPU is detected. If the driver is enabled. Visit www.asus.com for details. 6.2.2 Enabling GeForce® Boost and HybridPower™ Before enabling ...


