User Manual
Page 6
... 'n' Quiet!™ Technology 5-11 5.3.3 Audio configurations 5-14 5.3.4 ASUS PC Probe II 5-22 5.3.5 ASUS AI Suite 5-28 5.3.6 ASUS AI Gear 2 5-30 5.3.7 ASUS AI Nap 5-31 5.3.8 ASUS Q-Fan 2 5-32 5.3.9 ASUS AI Booster 5-33 5.3.10 ASUS Express Gate 5-34 5.4 RAID configurations 5-42 5.4.1 RAID definitions 5-42 5.4.2 NVIDIA® RAID configurations 5-43 5.5 Creating a RAID driver disk 5-50 5.5.1 Creating a RAID driver disk without entering the OS.... 5-50 5.5.2 Creating...
... 'n' Quiet!™ Technology 5-11 5.3.3 Audio configurations 5-14 5.3.4 ASUS PC Probe II 5-22 5.3.5 ASUS AI Suite 5-28 5.3.6 ASUS AI Gear 2 5-30 5.3.7 ASUS AI Nap 5-31 5.3.8 ASUS Q-Fan 2 5-32 5.3.9 ASUS AI Booster 5-33 5.3.10 ASUS Express Gate 5-34 5.4 RAID configurations 5-42 5.4.1 RAID definitions 5-42 5.4.2 NVIDIA® RAID configurations 5-43 5.5 Creating a RAID driver disk 5-50 5.5.1 Creating a RAID driver disk without entering the OS.... 5-50 5.5.2 Creating...
User Manual
Page 11
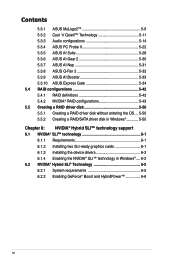
... support: HDMI/DVI & D-Sub - Integrated NVIDIA® GeForce® 8 Series GPU - resolution up to www.asus.com or this user manual for IDE mode) NVIDIA® MediaShield™ RAID supports RAID 0, 1, 0+1, 5, and JBOD NVIDIA Gigabit MAC Realtek® 8211CL Gigabit PHY featuring AI NET2 Realtek® ALC1200... up to 16 GB system memory *DDR2 1066 is recommended. resolution up to 1920 x 1200 - Supports DVI Technology with max. M3N72-D specifications summary CPU Chipset System bus Memory VGA Expansion slots Storage LAN High Definition audio AMD® Socket AM2/AM2+ for AM2 CPU...
... support: HDMI/DVI & D-Sub - Integrated NVIDIA® GeForce® 8 Series GPU - resolution up to www.asus.com or this user manual for IDE mode) NVIDIA® MediaShield™ RAID supports RAID 0, 1, 0+1, 5, and JBOD NVIDIA Gigabit MAC Realtek® 8211CL Gigabit PHY featuring AI NET2 Realtek® ALC1200... up to 16 GB system memory *DDR2 1066 is recommended. resolution up to 1920 x 1200 - Supports DVI Technology with max. M3N72-D specifications summary CPU Chipset System bus Memory VGA Expansion slots Storage LAN High Definition audio AMD® Socket AM2/AM2+ for AM2 CPU...
User Manual
Page 19
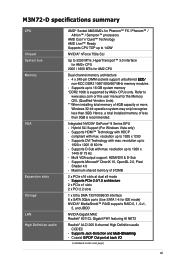
... portable devices. See page 2-23 for details. ASUS M3N72-D 1-3 NVIDIA® Hybrid SLI Technology Hybrid SLI™ Technology is bundled with M3N series motherboard GPUs. See page 2-24 and 6-5 for details. PCIe 2.0 support This motherboard supports the latest PCIe 2.0 devices for details....Visit www.nvidia.com/hybridsli for two SATA connectors. It allows RAID 0, 1, 0+1 and 5 configurations for more information. See page 2-27 for everyday computing needs. Serial ATA 3.0 Gb/s technology This motherboard supports the next-generation hard disk drives based on select GeForce...
... portable devices. See page 2-23 for details. ASUS M3N72-D 1-3 NVIDIA® Hybrid SLI Technology Hybrid SLI™ Technology is bundled with M3N series motherboard GPUs. See page 2-24 and 6-5 for details. PCIe 2.0 support This motherboard supports the latest PCIe 2.0 devices for details....Visit www.nvidia.com/hybridsli for two SATA connectors. It allows RAID 0, 1, 0+1 and 5 configurations for more information. See page 2-27 for everyday computing needs. Serial ATA 3.0 Gb/s technology This motherboard supports the next-generation hard disk drives based on select GeForce...
User Manual
Page 55
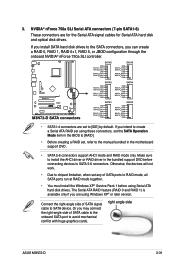
... disk drives. 3. The Serial ATA RAID feature (RAID 0 and RAID 1) is available only if you may connect the right-angle side of SATA signal cable to the manual bundled in the motherboard support DVD. • SATA 5-6 connectors support AHCI mode and RAID mode only. Connect the right-angle ...any of SATA ports to avoid mechanical conflict with huge graphics cards. right angle side ASUS M3N72-D 2-31 Make sure to install the AHCI driver or RAID driver in the BIOS to [RAID]. • Before creating a RAID set to SATA 5-6 connectors. If you install SATA hard disk drives to the ...
... disk drives. 3. The Serial ATA RAID feature (RAID 0 and RAID 1) is available only if you may connect the right-angle side of SATA signal cable to the manual bundled in the motherboard support DVD. • SATA 5-6 connectors support AHCI mode and RAID mode only. Connect the right-angle ...any of SATA ports to avoid mechanical conflict with huge graphics cards. right angle side ASUS M3N72-D 2-31 Make sure to install the AHCI driver or RAID driver in the BIOS to [RAID]. • Before creating a RAID set to SATA 5-6 connectors. If you install SATA hard disk drives to the ...
User Manual
Page 97
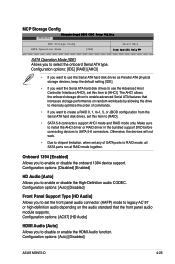
...SATA 5-6 connectors. Configuration options: [Auto] [Disabled] ASUS M3N72-D 4-25 Make sure to install the AHCI driver or RAID driver in the bundled support DVD before connecting devices to enable or disable the High-Definition audio CODEC. Configuration options: [IDE] [RAID] [AHCI] • If you want to use... the Serial ATA hard disk drives as Parallel ATA physical storage devices, keep the default setting [IDE]. • If you want to create a RAID 0, 1, 0+1, 5, or JBOD configuration from the Serial ATA hard disk drives, set the front panel audio connector (AAFP) mode to [AHCI]. ...
...SATA 5-6 connectors. Configuration options: [Auto] [Disabled] ASUS M3N72-D 4-25 Make sure to install the AHCI driver or RAID driver in the bundled support DVD before connecting devices to enable or disable the High-Definition audio CODEC. Configuration options: [IDE] [RAID] [AHCI] • If you want to use... the Serial ATA hard disk drives as Parallel ATA physical storage devices, keep the default setting [IDE]. • If you want to create a RAID 0, 1, 0+1, 5, or JBOD configuration from the Serial ATA hard disk drives, set the front panel audio connector (AAFP) mode to [AHCI]. ...
User Manual
Page 112
Chapter summary 5 5.1 Installing an operating system 5-1 5.2 Support DVD information 5-1 5.3 Software information 5-9 5.4 RAID configurations 5-42 5.5 Creating a RAID driver disk 5-50 ASUS M3N72-D
Chapter summary 5 5.1 Installing an operating system 5-1 5.2 Support DVD information 5-1 5.3 Software information 5-9 5.4 RAID configurations 5-42 5.5 Creating a RAID driver disk 5-50 ASUS M3N72-D
User Manual
Page 117
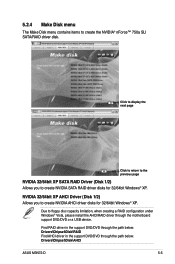
...(Disk 1/2) Allows you to floppy disc capacity limitation, when creating a RAID configuration under Windows® Vista, please install the AHCI/RAID driver through the path below : Drivers\Chipset\Disk\RAID Find AHCI driver in the support DVD/DVD through the motherboard support DVD/DVD or a USB device. 5.2.4 Make Disk menu The ... Windows® XP. NVIDIA 32/64bit XP AHCI Driver (Disk 1/2) Allows you to create the NVIDIA® nForce™ 750a SLI SATA/RAID driver disk. Find RAID driver in the support DVD/DVD through the path below : Drivers\Chipset\Disk\AHCI ASUS M3N72-D 5-5
...(Disk 1/2) Allows you to floppy disc capacity limitation, when creating a RAID configuration under Windows® Vista, please install the AHCI/RAID driver through the path below : Drivers\Chipset\Disk\RAID Find AHCI driver in the support DVD/DVD through the motherboard support DVD/DVD or a USB device. 5.2.4 Make Disk menu The ... Windows® XP. NVIDIA 32/64bit XP AHCI Driver (Disk 1/2) Allows you to create the NVIDIA® nForce™ 750a SLI SATA/RAID driver disk. Find RAID driver in the support DVD/DVD through the path below : Drivers\Chipset\Disk\AHCI ASUS M3N72-D 5-5
User Manual
Page 154
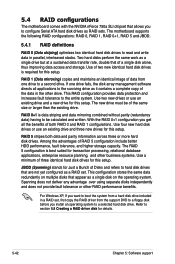
... be of both data and parity information across three or more hard disk drives. The motherboard supports the following RAID configurations: RAID 0, RAID 1, RAID 0+1, RAID 5 and JBOD. 5.4.1 RAID definitions RAID 0 (Data striping) optimizes two identical hard disk drives to a second drive. 5.4 RAID configurations The motherboard comes with the NVIDIA nForce 750a SLI chipset that appear as a single disk on multiple...
... be of both data and parity information across three or more hard disk drives. The motherboard supports the following RAID configurations: RAID 0, RAID 1, RAID 0+1, RAID 5 and JBOD. 5.4.1 RAID definitions RAID 0 (Data striping) optimizes two identical hard disk drives to a second drive. 5.4 RAID configurations The motherboard comes with the NVIDIA nForce 750a SLI chipset that appear as a single disk on multiple...
User Manual
Page 155
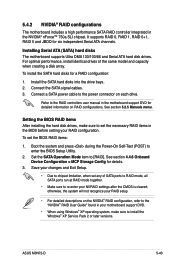
... section 4.4.6 Onboard Device Configuration > MCP Storage Config for a RAID configuration: 1. Setting the BIOS RAID items After installing the hard disk drives, make sure to install the Windows® XP Service Pack 2 or later versions. ASUS M3N72-D 5-43 To install the SATA hard disks for details. ...3. Install the SATA hard disks into the drive bays. 2. See section 5.2.5 Manuals menu. To set the necessary RAID items in the motherboard support DVD for six independent Serial ATA ...
... section 4.4.6 Onboard Device Configuration > MCP Storage Config for a RAID configuration: 1. Setting the BIOS RAID items After installing the hard disk drives, make sure to install the Windows® XP Service Pack 2 or later versions. ASUS M3N72-D 5-43 To install the SATA hard disks for details. ...3. Install the SATA hard disks into the drive bays. 2. See section 5.2.5 Manuals menu. To set the necessary RAID items in the motherboard support DVD for six independent Serial ATA ...

User Manual
Page 156
... keys allow you to display the main menu of the screen are for reference only, and may not exactly match the items on your computer. 2. RAID Mode: Striping Striping Block: Optimal Free Disks Loc Disk Model Name 1.0.M XXXXXXXXXXXXXXXXXX 1.1.M XXXXXXXXXXXXXXXXXX 2.0.M XXXXXXXXXXXXXXXXXX 2.1.M XXXXXXXXXXXXXXXXXX Array Disks Loc Disk Model Name [→] ... Del [F6] Back [F7] Finish [TAB] Navigate [↑↓] Select [ENTER] Popup At the bottom of the utility. Boot up your screen. The RAID BIOS setup screens shown in this section are the navigation keys. Entering the NVIDIA®...
... keys allow you to display the main menu of the screen are for reference only, and may not exactly match the items on your computer. 2. RAID Mode: Striping Striping Block: Optimal Free Disks Loc Disk Model Name 1.0.M XXXXXXXXXXXXXXXXXX 1.1.M XXXXXXXXXXXXXXXXXX 2.0.M XXXXXXXXXXXXXXXXXX 2.1.M XXXXXXXXXXXXXXXXXX Array Disks Loc Disk Model Name [→] ... Del [F6] Back [F7] Finish [TAB] Navigate [↑↓] Select [ENTER] Popup At the bottom of the utility. Boot up your screen. The RAID BIOS setup screens shown in this section are the navigation keys. Entering the NVIDIA®...

User Manual
Page 157
... a higher array block size for your RAID 0 array then press .The available values range from 8 KB to select a RAID mode then press . Press to clear the selected disks or to create RAID set. The following message box appears. ASUS M3N72-D 5-45 For multimedia computer systems used mainly...array block size. Mirroring Striping Stripe Mirroring Spanning 2. The default selection is 128 KB. From the NVIDIA® RAID utility Define a New Array menu, select RAID Mode then press . Use the up or down arrow keys to 128 KB. Press to proceed without clearing the ...
... a higher array block size for your RAID 0 array then press .The available values range from 8 KB to select a RAID mode then press . Press to clear the selected disks or to create RAID set. The following message box appears. ASUS M3N72-D 5-45 For multimedia computer systems used mainly...array block size. Mirroring Striping Stripe Mirroring Spanning 2. The default selection is 128 KB. From the NVIDIA® RAID utility Define a New Array menu, select RAID Mode then press . Use the up or down arrow keys to 128 KB. Press to proceed without clearing the ...

User Manual
Page 158
...: 1. Array 1 : NVIDIA MIRROR XXX.XXG - Array Detail - Array List - Press to select a RAID array then press . RAID Mode: Mirroring Striping Width: 1 Striping Block: 64K Adapt Channel M/S 2 1 1 0 Master Master Index Disk Model Name 0 XXXXXXXXXXXXXXXXX 1 XXXXXXXXXXXXXXXXX Capacity XXX.XXGB XXX...[ENTER] Return Chapter 5: Software support From the Array List menu, use the up or down arrow keys to save settings and exit. NVIDIA RAID Utility Oct 5 2004 - Boot No Id Status 4 Healthy Vendor NVIDIA Array Model Name MIRROR XXX.XXG [Ctrl-X]Exit [↑↓]Select [B]...
...: 1. Array 1 : NVIDIA MIRROR XXX.XXG - Array Detail - Array List - Press to select a RAID array then press . RAID Mode: Mirroring Striping Width: 1 Striping Block: 64K Adapt Channel M/S 2 1 1 0 Master Master Index Disk Model Name 0 XXXXXXXXXXXXXXXXX 1 XXXXXXXXXXXXXXXXX Capacity XXX.XXGB XXX...[ENTER] Return Chapter 5: Software support From the Array List menu, use the up or down arrow keys to save settings and exit. NVIDIA RAID Utility Oct 5 2004 - Boot No Id Status 4 Healthy Vendor NVIDIA Array Model Name MIRROR XXX.XXG [Ctrl-X]Exit [↑↓]Select [B]...

User Manual
Page 159
... rebuild process, the Array list menu appears. Press to start rebuilding array or press to rebuild a RAID array. ASUS M3N72-D 5-47 A new set of navigation keys is displayed on the bottom of the screen. 2. Select Disk Inside Array - RAID Mode: Mirroring Striping Width: 1 Striping Block: 64K Adapt Channel M/S 2 1 1 0 Master Master Index Disk Model ... the NVIDIA utility in order to rebuild, then press . Rebuild array? [ENTER] OK [ESC] Cancel 4. Use the up or down arrow keys to select a RAID array to complete the rebuilt process. The following screen appears.
... rebuild process, the Array list menu appears. Press to start rebuilding array or press to rebuild a RAID array. ASUS M3N72-D 5-47 A new set of navigation keys is displayed on the bottom of the screen. 2. Select Disk Inside Array - RAID Mode: Mirroring Striping Width: 1 Striping Block: 64K Adapt Channel M/S 2 1 1 0 Master Master Index Disk Model ... the NVIDIA utility in order to rebuild, then press . Rebuild array? [ENTER] OK [ESC] Cancel 4. Use the up or down arrow keys to select a RAID array to complete the rebuilt process. The following screen appears.

User Manual
Page 160
... [ENTER] Return A new set of the screen. 2. All data on the bottom of navigation keys is displayed on the RAID drives will be lost! 4. Press to delete array or press to select a RAID array then press . If you selected Yes, the Define a New Array menu appears. 5-48 Chapter 5: Software support From the... or down arrow keys to cancel. Array 1 : NVIDIA MIRROR XXX.XXG - Take caution in using this array? [Y] YES [N] No 3. The following confirmation message appears. Deleting a RAID array To delete a RAID array: 1. Delete this option. Press to delete...
... [ENTER] Return A new set of the screen. 2. All data on the bottom of navigation keys is displayed on the RAID drives will be lost! 4. Press to delete array or press to select a RAID array then press . If you selected Yes, the Define a New Array menu appears. 5-48 Chapter 5: Software support From the... or down arrow keys to cancel. Array 1 : NVIDIA MIRROR XXX.XXG - Take caution in using this array? [Y] YES [N] No 3. The following confirmation message appears. Deleting a RAID array To delete a RAID array: 1. Delete this option. Press to delete...

User Manual
Page 161
ASUS M3N72-D 5-49 Array Detail - The following confirmation message appears. All data on the bottom of the screen. 2. Clear disk data? [Y] YES [N] 3. Array 1 : NVIDIA MIRROR XXX.XXG - Press to select a RAID array then press . RAID Mode: Mirroring Striping Width: 1 Striping Block: 64K Adapt Channel M/S 2 1 1 0 ...XXGB [R] Rebuild [D] Delete [C] Clear Disk [ENTER] Return A new set of navigation keys is displayed on the RAID drives will be lost! The RAID Array details appear. From the Array List menu, use the up or down arrow keys to clear disk. Press...
ASUS M3N72-D 5-49 Array Detail - The following confirmation message appears. All data on the bottom of the screen. 2. Clear disk data? [Y] YES [N] 3. Array 1 : NVIDIA MIRROR XXX.XXG - Press to select a RAID array then press . RAID Mode: Mirroring Striping Width: 1 Striping Block: 64K Adapt Channel M/S 2 1 1 0 ...XXGB [R] Rebuild [D] Delete [C] Clear Disk [ENTER] Return A new set of navigation keys is displayed on the RAID drives will be lost! The RAID Array details appear. From the Array List menu, use the up or down arrow keys to clear disk. Press...
User Manual
Page 162
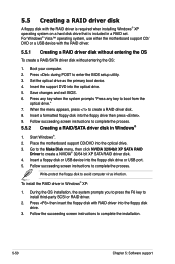
Press during POST to create a RAID driver disk. 8. Save changes and exit BIOS. 6. When the menu appears, press to enter the BIOS setup utility. 3. Place the motherboard support CD/DVD into the floppy disk drive or USB port. 5. Insert a floppy disk or USB device into the optical drive. 3.... hard disk drive that is included in Windows® 1. For Windows® Vista™ operating system, use either the motherboard support CD/ DVD or a USB device with RAID driver into the floppy disk drive. 3. Set the optical drive as the primary boot device. 4. Follow succeeding screen instructions ...
Press during POST to create a RAID driver disk. 8. Save changes and exit BIOS. 6. When the menu appears, press to enter the BIOS setup utility. 3. Place the motherboard support CD/DVD into the floppy disk drive or USB port. 5. Insert a floppy disk or USB device into the optical drive. 3.... hard disk drive that is included in Windows® 1. For Windows® Vista™ operating system, use either the motherboard support CD/ DVD or a USB device with RAID driver into the floppy disk drive. 3. Set the optical drive as the primary boot device. 4. Follow succeeding screen instructions ...
User Manual
Page 163
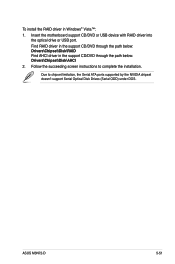
Due to complete the installation. To install the RAID driver in the support CD/DVD through the path below: Drivers\Chipset\Disk\RAID Find AHCI driver in Windows® Vista™: 1. Follow the succeeding screen instructions to chipset limitation, the Serial ATA ports supported ... the NVIDIA chipset doesn't support Serial Optical Disk Drives (Serial ODD) under DOS. Find RAID driver in the support CD/DVD through the path below: Drivers\Chipset\Disk\AHCI 2. ASUS M3N72-D 5-51 Insert the motherboard support CD/DVD or USB device with RAID driver into the optical drive or USB port.
Due to complete the installation. To install the RAID driver in the support CD/DVD through the path below: Drivers\Chipset\Disk\RAID Find AHCI driver in Windows® Vista™: 1. Follow the succeeding screen instructions to chipset limitation, the Serial ATA ports supported ... the NVIDIA chipset doesn't support Serial Optical Disk Drives (Serial ODD) under DOS. Find RAID driver in the support CD/DVD through the path below: Drivers\Chipset\Disk\AHCI 2. ASUS M3N72-D 5-51 Insert the motherboard support CD/DVD or USB device with RAID driver into the optical drive or USB port.


