User Manual
Page 97
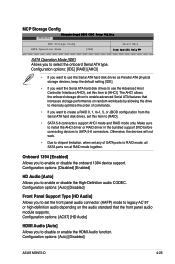
...Serial ATA hard disk drives to use the Advanced Host Controller Interface (AHCI), set this item to RAID mode, all SATA ports run at RAID mode together. Configuration options: [Auto] [Disabled] ASUS M3N72-D 4-25 Onboard 1394 [Enabled] Allows you to SATA 5-6 connectors. The AHCI allows the onboard ...[Enabled] HD Audio [Auto] Allows you to select the onboard Serial ATA type. MCP Storage Config Advanced Phoenix-Award BIOS CMOS Setup Utility MCP Storage Config SATA Operation Mode [IDE] Select Menu Item Specific Help SATA Operation Mode [IDE] Allows you to enable or disable the...
...Serial ATA hard disk drives to use the Advanced Host Controller Interface (AHCI), set this item to RAID mode, all SATA ports run at RAID mode together. Configuration options: [Auto] [Disabled] ASUS M3N72-D 4-25 Onboard 1394 [Enabled] Allows you to SATA 5-6 connectors. The AHCI allows the onboard ...[Enabled] HD Audio [Auto] Allows you to select the onboard Serial ATA type. MCP Storage Config Advanced Phoenix-Award BIOS CMOS Setup Utility MCP Storage Config SATA Operation Mode [IDE] Select Menu Item Specific Help SATA Operation Mode [IDE] Allows you to enable or disable the...
User Manual
Page 155
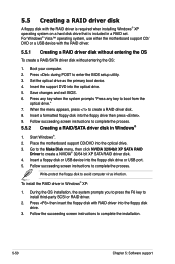
... SLI chipset. otherwise, the system will not recognize your motherboard support DVD. • When using Windows® XP operating system, make sure to the "NVIDIA® RAID User Guide" found in the motherboard support DVD for six independent Serial ATA channels. ASUS M3N72-D 5-43 Set the SATA Operation Mode item to enter the BIOS Setup Utility. 2.
... SLI chipset. otherwise, the system will not recognize your motherboard support DVD. • When using Windows® XP operating system, make sure to the "NVIDIA® RAID User Guide" found in the motherboard support DVD for six independent Serial ATA channels. ASUS M3N72-D 5-43 Set the SATA Operation Mode item to enter the BIOS Setup Utility. 2.

User Manual
Page 156
... [ENTER] Popup At the bottom of the utility. These keys allow you to display the main menu of the screen are for reference only, and may not exactly match the items on your computer. 2. Entering the NVIDIA® RAID utility To enter the NVIDIA® RAID utility: 1. NVIDIA RAID Utility Oct 5 2004 - Boot up your screen. Define...
... [ENTER] Popup At the bottom of the utility. These keys allow you to display the main menu of the screen are for reference only, and may not exactly match the items on your computer. 2. Entering the NVIDIA® RAID utility To enter the NVIDIA® RAID utility: 1. NVIDIA RAID Utility Oct 5 2004 - Boot up your screen. Define...

User Manual
Page 157
.... Clear disk data? [Y] YES [N] NO 5. ASUS M3N72-D 5-45 Take caution in using a lower array block size. For multimedia computer systems used mainly for optimum performance. 3.` Press to create RAID set. The following message box appears. The following submenu appears. Creating a RAID Volume To create a RAID volume: 1. From the NVIDIA® RAID utility Define a New Array menu, select...
.... Clear disk data? [Y] YES [N] NO 5. ASUS M3N72-D 5-45 Take caution in using a lower array block size. For multimedia computer systems used mainly for optimum performance. 3.` Press to create RAID set. The following message box appears. The following submenu appears. Creating a RAID Volume To create a RAID volume: 1. From the NVIDIA® RAID utility Define a New Array menu, select...

User Manual
Page 158
...New Array [ENTER]Detail A new set of navigation keys is displayed on the bottom of the screen. 6. Press to select a RAID array then press . RAID Mode: Mirroring Striping Width: 1 Striping Block: 64K Adapt Channel M/S 2 1 1 0 Master Master Index Disk Model Name 0 ...Clear Disk [ENTER] Return Chapter 5: Software support Rebuilding a RAID array To rebuild a RAID array: 1. The RAID Array details appear. From the Array List menu, use the up or down arrow keys to save settings and exit. Array Detail - NVIDIA RAID Utility Oct 5 2004 - Array List - Array 1 : ...
...New Array [ENTER]Detail A new set of navigation keys is displayed on the bottom of the screen. 6. Press to select a RAID array then press . RAID Mode: Mirroring Striping Width: 1 Striping Block: 64K Adapt Channel M/S 2 1 1 0 Master Master Index Disk Model Name 0 ...Clear Disk [ENTER] Return Chapter 5: Software support Rebuilding a RAID array To rebuild a RAID array: 1. The RAID Array details appear. From the Array List menu, use the up or down arrow keys to save settings and exit. Array Detail - NVIDIA RAID Utility Oct 5 2004 - Array List - Array 1 : ...

User Manual
Page 159
... array or press to complete the rebuilt process. ASUS M3N72-D 5-47 The following confirmation message appears. You will need to enter Window® XP and run the NVIDIA utility in order to cancel. 5. Use the up or down arrow keys to select a RAID array to rebuild a RAID array. RAID Mode: Mirroring Striping Width: 1 Striping Block: 64K...
... array or press to complete the rebuilt process. ASUS M3N72-D 5-47 The following confirmation message appears. You will need to enter Window® XP and run the NVIDIA utility in order to cancel. 5. Use the up or down arrow keys to select a RAID array to rebuild a RAID array. RAID Mode: Mirroring Striping Width: 1 Striping Block: 64K...
User Manual
Page 162
..., then click NVIDIA 32/64bit XP SATA RAID Driver to create a RAID driver disk. 8. To install the RAID driver in Windows® 1. For Windows® Vista™ operating system, use either the motherboard support CD/ DVD or a USB device with the RAID driver is required when installing Windows®.... 5.5.2 Creating a RAID/SATA driver disk in Windows® XP: 1. Insert the support DVD into the floppy disk drive or USB port. 5. Insert a floppy disk or USB device into the optical drive. 5. Press during POST to enter the BIOS setup utility. 3. Place the motherboard support CD/DVD into...
..., then click NVIDIA 32/64bit XP SATA RAID Driver to create a RAID driver disk. 8. To install the RAID driver in Windows® 1. For Windows® Vista™ operating system, use either the motherboard support CD/ DVD or a USB device with the RAID driver is required when installing Windows®.... 5.5.2 Creating a RAID/SATA driver disk in Windows® XP: 1. Insert the support DVD into the floppy disk drive or USB port. 5. Insert a floppy disk or USB device into the optical drive. 5. Press during POST to enter the BIOS setup utility. 3. Place the motherboard support CD/DVD into...


