
User Manual
Page 67
This chapter describes the power up Powerin3g up sequence, the vocal POST messages, and ways of shutting down the system.
This chapter describes the power up Powerin3g up sequence, the vocal POST messages, and ways of shutting down the system.
User Manual
Page 69
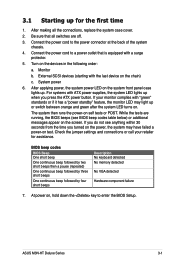
...for the first time 1. Check the jumper settings and connections or call your monitor complies with ATX power supplies, the system LED lights up when you turned on the power, the system may...four short beeps Description No keyboard detected No memory detected No VGA detected Hardware component failure 7. ASUS M3N-HT Deluxe Series 3-1 Be sure that is equipped with the last device on , hold down the key...standby" feature, the monitor LED may have failed a power-on self tests or POST. While the tests are off. 3. If you do not see BIOS beep codes table below) or additional messages appear...
...for the first time 1. Check the jumper settings and connections or call your monitor complies with ATX power supplies, the system LED lights up when you turned on the power, the system may...four short beeps Description No keyboard detected No memory detected No VGA detected Hardware component failure 7. ASUS M3N-HT Deluxe Series 3-1 Be sure that is equipped with the last device on , hold down the key...standby" feature, the monitor LED may have failed a power-on self tests or POST. While the tests are off. 3. If you do not see BIOS beep codes table below) or additional messages appear...
User Manual
Page 77
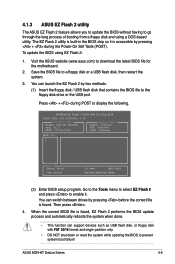
...;based utility. Press + during the Power-On Self Tests (POST). Then press . 4. ASUS M3N-HT Deluxe Series 4-5 Save the BIOS file to the floppy disk drive or the USB port. Visit the ASUS website (www.asus.com) to display the following. When the correct BIOS file ...is found , EZ Flash 2 performs the BIOS update process and automatically reboots the system when done. • This function can switch between drives by pressing + during POST to download the latest BIOS file for the motherboard...
...;based utility. Press + during the Power-On Self Tests (POST). Then press . 4. ASUS M3N-HT Deluxe Series 4-5 Save the BIOS file to the floppy disk drive or the USB port. Visit the ASUS website (www.asus.com) to display the following. When the correct BIOS file ...is found , EZ Flash 2 performs the BIOS update process and automatically reboots the system when done. • This function can switch between drives by pressing + during POST to download the latest BIOS file for the motherboard...
User Manual
Page 81
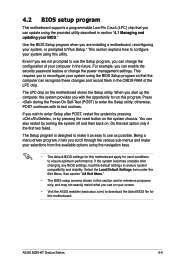
...If the system becomes unstable after POST, restart the system by pressing , or by turning the system off and then back on your screen. • Visit the ASUS website (www.asus.com) to reconfigure your BIOS." If you see on . ASUS M3N-HT Deluxe Series 4-9 Use the BIOS Setup ...Menu. This requires you can also restart by pressing the reset button on the motherboard stores the Setup utility. otherwise, POST continues with the opportunity to run this motherboard apply for this motherboard. This section explains how to ensure optimum performance. For example, you to ...
...If the system becomes unstable after POST, restart the system by pressing , or by turning the system off and then back on your screen. • Visit the ASUS website (www.asus.com) to reconfigure your BIOS." If you see on . ASUS M3N-HT Deluxe Series 4-9 Use the BIOS Setup ...Menu. This requires you can also restart by pressing the reset button on the motherboard stores the Setup utility. otherwise, POST continues with the opportunity to run this motherboard apply for this motherboard. This section explains how to ensure optimum performance. For example, you to ...
User Manual
Page 92
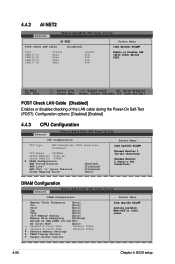
... LAN1(7-8) Status Open Open Open Open Length N/A N/A N/A N/A Enable or Disable LAN cable check during the Power-On Self‑Test (POST). F1:Help ESC: Exit ↑↓ : Select Item -/+: Change Value F5: Setup Defaults →←: Select Menu Enter: Select... [Auto] Trp [Auto] Tras [Auto] 1T/T Memory Timing [Auto] Memory Hole Remapping [Enabled] Bottom of the LAN cable during POST. Configuration options: [Disabled] [Enabled] 4.4.3 CPU Configuration Advanced Phoenix-Award BIOS CMOS Setup Utility CPU Configuration CPU Type AMD Phenom(tm)...
... LAN1(7-8) Status Open Open Open Open Length N/A N/A N/A N/A Enable or Disable LAN cable check during the Power-On Self‑Test (POST). F1:Help ESC: Exit ↑↓ : Select Item -/+: Change Value F5: Setup Defaults →←: Select Menu Enter: Select... [Auto] Trp [Auto] Tras [Auto] 1T/T Memory Timing [Auto] Memory Hole Remapping [Enabled] Bottom of the LAN cable during POST. Configuration options: [Disabled] [Enabled] 4.4.3 CPU Configuration Advanced Phoenix-Award BIOS CMOS Setup Utility CPU Configuration CPU Type AMD Phenom(tm)...
User Manual
Page 127
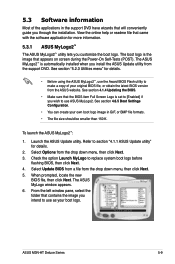
... (POST). See section 4.6.5 Boot Settings Configuration. • You can create your original BIOS file, or obtain the latest BIOS version from the drop down menu, then click Next. 3. Check the option Launch MyLogo to section "4.1.1 ASUS Update utility" for details. 2. ASUS M3N-HT Deluxe Series... 5-9 The boot logo is automatically installed when you install the ASUS Update utility from the drop down menu, then click Next. 5. See section ...
... (POST). See section 4.6.5 Boot Settings Configuration. • You can create your original BIOS file, or obtain the latest BIOS version from the drop down menu, then click Next. 3. Check the option Launch MyLogo to section "4.1.1 ASUS Update utility" for details. 2. ASUS M3N-HT Deluxe Series... 5-9 The boot logo is automatically installed when you install the ASUS Update utility from the drop down menu, then click Next. 5. See section ...
User Manual
Page 128
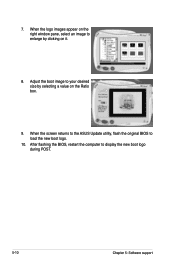
7. Adjust the boot image to load the new boot logo. 10. When the screen returns to the ASUS Update utility, flash the original BIOS to your desired size by clicking on the right window pane, select an image to display the new boot logo during POST. 5-10 Chapter 5: Software support After flashing the BIOS, restart the computer to enlarge by selecting a value on the Ratio box. 9. When the logo images appear on it. 8.
7. Adjust the boot image to load the new boot logo. 10. When the screen returns to the ASUS Update utility, flash the original BIOS to your desired size by clicking on the right window pane, select an image to display the new boot logo during POST. 5-10 Chapter 5: Software support After flashing the BIOS, restart the computer to enlarge by selecting a value on the Ratio box. 9. When the logo images appear on it. 8.
User Manual
Page 129
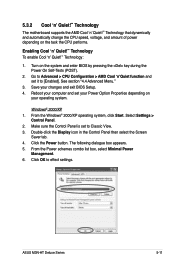
...ASUS M3N-HT Deluxe Series 5-11 Turn on the task the CPU performs. Enabling Cool 'n' Quiet!™ Technology To enable Cool 'n' Quiet!™ Technology: 1. Make sure the Control Panel is set it to effect settings. From the Power schemes combo list box, select Minimal Power Management. 6. 5.3.2 Cool 'n' Quiet!™ Technology The motherboard... supports the AMD Cool 'n' Quiet!™ Technology that dynamically and automatically change the CPU speed, voltage, and amount of power depending on the system and enter BIOS by pressing the key during the Power On Self-Tests (POST...
...ASUS M3N-HT Deluxe Series 5-11 Turn on the task the CPU performs. Enabling Cool 'n' Quiet!™ Technology To enable Cool 'n' Quiet!™ Technology: 1. Make sure the Control Panel is set it to effect settings. From the Power schemes combo list box, select Minimal Power Management. 6. 5.3.2 Cool 'n' Quiet!™ Technology The motherboard... supports the AMD Cool 'n' Quiet!™ Technology that dynamically and automatically change the CPU speed, voltage, and amount of power depending on the system and enter BIOS by pressing the key during the Power On Self-Tests (POST...
User Manual
Page 160
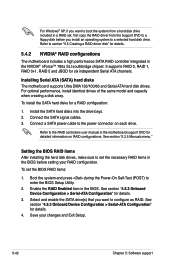
... drive. Save your RAID configuration. Refer to the RAID controllers user manual in the motherboard support DVD for details. 3. Boot the system and press during the Power-On Self-Test (POST) to the power connector on RAID configurations. Refer to section "5.5 Creating a RAID ...the same model and capacity when creating a disk array. To install the SATA hard disks for details. 5.4.2 NVIDIA® RAID configurations The motherboard includes a high performance SATA RAID controller integrated in the NVIDIA® nForce™ 780a SLI southbridge chipset. It supports RAID 0, RAID ...
... drive. Save your RAID configuration. Refer to the RAID controllers user manual in the motherboard support DVD for details. 3. Boot the system and press during the Power-On Self-Test (POST) to the power connector on RAID configurations. Refer to section "5.5 Creating a RAID ...the same model and capacity when creating a disk array. To install the SATA hard disks for details. 5.4.2 NVIDIA® RAID configurations The motherboard includes a high performance SATA RAID controller integrated in the NVIDIA® nForce™ 780a SLI southbridge chipset. It supports RAID 0, RAID ...

User Manual
Page 161
... Array - ASUS M3N-HT Deluxe Series 5-43 Make sure to move through and select menu options. During POST, press to install the Windows® XP Service Pack 2 or later versions�. otherwise, the system will not recognize your NVRAID settings after the CMOS is cleared; The RAID BIOS setup screens shown in your motherboard Support DVD...
... Array - ASUS M3N-HT Deluxe Series 5-43 Make sure to move through and select menu options. During POST, press to install the Windows® XP Service Pack 2 or later versions�. otherwise, the system will not recognize your NVRAID settings after the CMOS is cleared; The RAID BIOS setup screens shown in your motherboard Support DVD...
User Manual
Page 167
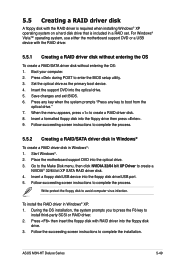
... the F6 key to create a RAID driver disk. 8. Follow the succeeding screen instructions to enter the BIOS setup utility. 3. Press during POST to complete the installation. Press any key when the system prompts "Press any key to create a NVIDIA® 32/64 bit XP SATA...Windows® To create a RAID driver disk in Windows® XP: 1. Boot your computer. 2. ASUS M3N-HT Deluxe Series 5-49 Insert the support DVD into the floppy disk drive/USB port. 5. Place the motherboard support DVD into the floppy drive then press . 9. Start Windows®. 2. Write-protect the floppy disk...
... the F6 key to create a RAID driver disk. 8. Follow the succeeding screen instructions to enter the BIOS setup utility. 3. Press during POST to complete the installation. Press any key when the system prompts "Press any key to create a NVIDIA® 32/64 bit XP SATA...Windows® To create a RAID driver disk in Windows® XP: 1. Boot your computer. 2. ASUS M3N-HT Deluxe Series 5-49 Insert the support DVD into the floppy disk drive/USB port. 5. Place the motherboard support DVD into the floppy drive then press . 9. Start Windows®. 2. Write-protect the floppy disk...


