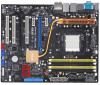
Motherboard Installation Guide
Page 2
Lift up the socket lever to secure the CPU. When the CPU is locked. ASUS M2N-SLI Deluxe FLOPPY EATXPWR 30.5cm (12.0in) Super I/O 1. DO NOT force the CPU into the socket until it is in place, push down the socket ... (128 bit,240-pin module) PWR_FAN LPT CHA_FAN1 CHA_FAN2 Marvell 88E1116 Marvell 88E1116 ADI 1988B AAFP USB910 PCIEX1_1 JMicron JMB363 SATA_RAID1 PCIEX16_1 M2N-SLI DELUXE PCIEX1_2 R PCI1 nVIDIA NF570-SLI PRI_IDE SATA5 SATA6 SATA1 SATA2 SATA3 SATA4 PCIEX16_2 SB_PWR SPDIF_OUT CD ADFP1 PCI2 PCI3 TSB43AB22A CR2032 3V Lithium Cell CMOS Power 4Mb BIOS...
Motherboard Installation Guide
Page 3
...us Under General Search, make the selections as shown, then click Search. Populated - Populated Populated - Populated - Visit the ASUS FAQ site for the latest Qualified Vendor List. You also may check the URLs below for system devices. Click the article ...memory configurations in DIMM_A2 and DIMM_B2 (black sockets) Important notice on this issue: http://dlsvr01.asus.com/pub/ASUS/mb/4GB_Rev1.pdf http://www.intel.com/support/motherboards/server/sb/cs-016594.htm ASUS M2N-SLI Deluxe Populated Populated DIMM_B2 - - - Populated - - The excess memory installation will not ...
Motherboard Installation Guide
Page 4
...latest BIOS file. To enter Setup at start up: Press during POST to display the menus. ASUS M2N-SLI Deluxe If you changed settings, load the Setup Defaults. Insert a floppy disk or flash disk that came with ASUS EZ Flash 2: Boot the system and press + during the Power-On Self Test (POST). Software ... welcome screen and the installation menus if Autorun is complete. 4. You can maximize the features of the user guide for updates. Visit the ASUS website (www. To begin using the BIOS Setup utility. BIOS information The Flash ROM on the motherboard contains the BIOS.
M2N-SLI Deluxe English Edition User's Manual
Page 17
... standout in your package with the list below. 1.2 Package contents Check your motherboard package for the following items. Motherboard I/O modules Cables Accessories Application CD Documentation ASUS M2N-SLI Deluxe IEEE 1394a module 1 x 2-port USB 2.0 module 6 x Serial ATA cables 3 x Serial ATA power cables for six devices 1 x Ultra DMA 133/100/66 cable 1 x Floppy disk drive...
M2N-SLI Deluxe English Edition User's Manual
Page 19
...asynchronous (real-time) data interfacing between computers, peripherals, and consumer electronic devices such as camcorders, VCRs, printers, TVs, and digital cameras. ASUS M2N-SLI Deluxe 1- See pages 2-21 and 2-27 for details. Serial ATA I/II technology and SATA-On-The-Go The motherboard fully supports the Serial ATA... II 3.0 Gb/s technology through the Serial ATA interfaces and the NVIDIA® nForce® 570 SLI™ chipset. See pages 2-22 and 2-27 for details. Serial ATA allows for your wired or wireless Internet, LAN, and ...
M2N-SLI Deluxe English Edition User's Manual
Page 21
...clock. PEG Link Mode This feature enhances your BIOS easily without entering the OS. Four additional settings are available for details. ASUS Q-Connector ASUS Q-Connector allows you a personal wake-up to launch the utility and update the BIOS without preparing a bootable diskette or ... disk containing the BIOS file. See pages 4-42 and 5-17 for details. ASUS EZ Flash 2 EZ Flash 2 is off. The heat pipe, heatsink, and strategic board layout were tailor-made to the correct frequency based on the system configuration. See page 4-5 for details. ASUS M2N-SLI Deluxe 1-
M2N-SLI Deluxe English Edition User's Manual
Page 24
Chapter summary 2 2.1 Before you proceed 2-1 2.2 Motherboard overview 2-2 2.3 Central Processing Unit (CPU 2-6 2.4 System memory 2-11 2.5 Expansion slots 2-16 2.6 Jumper 2-20 2.7 Connectors 2-21 ASUS M2N-SLI Deluxe
M2N-SLI Deluxe English Edition User's Manual
Page 25
... grounded object or to a metal object, such as the power supply case, before removing or plugging in any motherboard component. M2N-SLI DELUXE R SB_PWR ON Standby Power M2N-SLI DELUXE Onboard LED OFF Powered Off ASUS M2N-SLI Deluxe 2- The illustration below shows the location of the following precautions before you install motherboard components or change any motherboard settings. •...
M2N-SLI Deluxe English Edition User's Manual
Page 27
... 88E1116 USB910 PCIEX1_1 JMicron JMB363 SATA_RAID1 PCIEX16_1 PRI_IDE M2N -SLI DELUX E PCIEX1_2 R nVIDIA NF570-SLI SATA5 SATA6 Marvell 88E1116 PCI1 SATA4 SATA3 SATA2 SATA1 PCIEX16_2 ADI 1988B AAFP SB_PWR CD ADH PCI2 PCI3 TSB43AB22A IE1394_2 USB78 CR2032 3V Lithium Cell CMOS Power 4Mb BIOS CLRTC CHASSIS USB56 PANEL CHA_FAN3 CHA_FAN4 30.5cm (12.0in) ASUS M2N-SLI Deluxe 2-
M2N-SLI Deluxe English Edition User's Manual
Page 31
When the CPU is locked. 6. Carefully insert the CPU into the socket until it fits in place, push down the socket lever to indicate that it is in place. Gold triangle Small triangle 5. ASUS M2N-SLI Deluxe 2- 3. Position the CPU above the socket such that came with a small triangle. 4. Install a CPU heatsink and fan following the instructions that the CPU corner with the gold triangle matches the socket corner with the heatsink package. The lever clicks on the side tab to secure the CPU.
M2N-SLI Deluxe English Edition User's Manual
Page 33
Align the other end of the retention bracket to the retention module base. 3. A clicking sound denotes that the fan and heatsink assembly perfectly fits the retention mechanism module base, otherwise you cannot snap the retention bracket in place. ASUS M2N-SLI Deluxe 2- Push down the retention bracket lock on the retention mechanism to secure the heatsink and fan to the retention module base. Make sure that the retention bracket is in place. 4. Attach one end of the retention bracket (near the retention bracket lock) to the module base. 2.
M2N-SLI Deluxe English Edition User's Manual
Page 35
Populated Populated - Populated Populated ASUS M2N-SLI Deluxe 2-11 The figure illustrates the location of the DDR2 DIMM sockets: DIMM_B1 DIMM_B2 DIMM_A1 DIMM_A2 128 Pins M2N-SLI DELUXE R 112 Pins M2N-SLI DELUXE 240-pin DDR2 DIMM Sockets Channel Channel A Channel B Sockets DIMM_A1 and DIMM_A2 DIMM_B1 and DIMM_B2 2.4.2 Memory configurations You may install 256 MB, 512 MB, 1 GB, ...
M2N-SLI Deluxe English Edition User's Manual
Page 39
... not force a DIMM into the socket until the retaining clips snap back in only one direction. Remove the DIMM from the socket. 2 1 DDR2 DIMM notch ASUS M2N-SLI Deluxe 2-15 To install a DIMM: 1. Firmly insert the DIMM into a socket to avoid damaging the DIMM. • The DDR2 DIMM sockets do so can cause severe...
M2N-SLI Deluxe English Edition User's Manual
Page 41
We recommend that comply with PCI specifications. ASUS M2N-SLI Deluxe 2-17 Refer to IRQ#9 4 12 Communications Port (COM1)* 5 13 IRQ Holder for PCI Steering* 6 14 Floppy Disk Controller 7 15 Printer Port (LPT1)* 8 3 System CMOS/Real ...
M2N-SLI Deluxe English Edition User's Manual
Page 43
Recommended PCI Express x16 configurations Mode Non-SLI mode Dual graphics card in SLI Mode PCIEX16_1 (Blue) slot PCIE16_2 (Black) slot Card type Speed Card type Speed PCIe x16 graphics card x16 NA PCIe x16 graphics card x16 PCIe x16 graphics card x8 PCIe x16 graphics card x16 Other PCIe devices x8, x4, x1 Two identical NVIDIA® SLI™ Edition graphics cards at x8, x8 speed ASUS M2N-SLI Deluxe 2-19
M2N-SLI Deluxe English Edition User's Manual
Page 45
... for pointing devices and other audio sources. Serial port. This 6-pin IEEE 1394a port provides high-speed connectivity for a PS/2 mouse. 2. Center/Subwoofer port (orange). ASUS M2N-SLI Deluxe 2-21 LAN 2 (RJ-45) port. Supported by the Marvell® 88E1116 Gigabit LAN controller, this port allows Gigabit connection to a Local Area Network (LAN) through...
M2N-SLI Deluxe English Edition User's Manual
Page 47
... a different connector to this connector, set the JMicron JMB363 controller item in the BIOS to prevent data loss or damage. 14. Coaxial S/PDIF Out port. ASUS M2N-SLI Deluxe 2-23 PS/2 keyboard port (purple).
M2N-SLI Deluxe English Edition User's Manual
Page 49
...], SATA4 [red], SATA5 [red], SATA6 [red]) These connectors are for the Serial ATA signal cables for details. M2N-SLI DELUXE R PRI_IDE M2N-SLI DELUXE IDE Connector 3. The RAID function of these connectors, enable the RAID Enabled item in the SATA Configuration sub-menu in...RSATA_RXN2 RSATA_RXP2 GND RSATA_TXN2 RSATA_TXP2 GND GND RSATA_RXN3 RSATA_RXP3 GND RSATA_TXN3 RSATA_TXP3 GND GND RSATA_RXN4 RSATA_RXP4 GND RSATA_TXN4 RSATA_TXP4 GND M2N-SLI DELUXE SATA Connectors ASUS M2N-SLI Deluxe 2-25 If you can create a RAID 0, RAID 1, RAID 0+1, RAID 5, or JBOD configuration through the onboard...
M2N-SLI Deluxe English Edition User's Manual
Page 51
...M2N-SLI DELUXE R IE1394_2 TPA2+ GND TPB2+ +12V M2N-SLI DELUXE IEEE 1394a Connector Never connect a USB cable to 480 Mbps connection speed. ASUS M2N-SLI Deluxe 2-27 Connect one end of the system chassis. Doing so will damage the motherboard! USB+5V USB_P10USB_P10+ GND NC USB+5V USB_P6 USB_P6+ GND NC USB910 1 M2N-SLI DELUXE R USB78 1 M2N-SLI DELUXE...these connectors, then install the module to a slot opening at the back of the USB cable to the ASUS Q-Connector first before connecting to the USB connectors. 5. USB connectors (10-1 pin USB56, USB78, USB910) These connectors are...
M2N-SLI Deluxe English Edition User's Manual
Page 53
...or switch sends a high-level signal to use the chassis intrusion detection feature. +5VSB_MB Chassis Signal GND M2N-SLI DELUXE R CHASSIS (Default) M2N-SLI DELUXE Chassis Intrusion Connector 9. Remove the jumper caps only when you intend to this connector. Find the proper...DC GND +12V DC M2N-SLI DELUXE R M2N-SLI DELUXE ATX Power Connector +3 Volts -12 Volts Ground PSON# Ground Ground Ground -5 Volts +5 Volts +5 Volts +5 Volts Ground +3 Volts +3 Volts Ground +5 Volts Ground +5 Volts Ground Power OK +5V Standby +12 Volts +12 Volts +3 Volts ASUS M2N-SLI Deluxe 2-29 By default, the...