K8V SE Deluxe User's Manual
Page 37
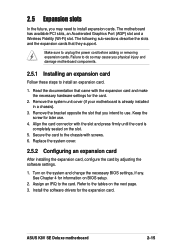
...use . Assign an IRQ to unplug the power cord before adding or removing expansion cards. Refer to the tables on BIOS setup. 2. ASUS K8V SE Deluxe motherboard 2-15 Keep the screw for information on the next page. 3. Secure the card to the chassis with the slot and press firmly ... to do so may need to install expansion cards. Install the software drivers for the card. 2. Read the documentation that they support. Make sure to the card. Remove the system unit cover (if your motherboard is completely seated on the system and change the necessary BIOS settings, ...
...use . Assign an IRQ to unplug the power cord before adding or removing expansion cards. Refer to the tables on BIOS setup. 2. ASUS K8V SE Deluxe motherboard 2-15 Keep the screw for information on the next page. 3. Secure the card to the chassis with the slot and press firmly ... to do so may need to install expansion cards. Install the software drivers for the card. 2. Read the documentation that they support. Make sure to the card. Remove the system unit cover (if your motherboard is completely seated on the system and change the necessary BIOS settings, ...

K8V SE Deluxe User's Manual
Page 38
...7 PS/2 Compatible Mouse Port 13 8 Numeric Data Processor 14* 9 Primary IDE Channel 15* 10 Secondary IDE Channel * These IRQs are usually available for this motherboard PCI slot 1 PCI slot 2 PCI slot 3 PCI slot 4 PCI slot 5 Gigabit LAN Onboard RAID Onboard 1394 Serial ATA AGP slot INT A shared - ...- - INT C - - When using PCI cards on shared slots, ensure that the drivers support "Share IRQ" or that the cards do not need IRQ assignments. shared INT B - shared - - - - shared - Otherwise, conflicts will arise ...
...7 PS/2 Compatible Mouse Port 13 8 Numeric Data Processor 14* 9 Primary IDE Channel 15* 10 Secondary IDE Channel * These IRQs are usually available for this motherboard PCI slot 1 PCI slot 2 PCI slot 3 PCI slot 4 PCI slot 5 Gigabit LAN Onboard RAID Onboard 1394 Serial ATA AGP slot INT A shared - ...- - INT C - - When using PCI cards on shared slots, ensure that the drivers support "Share IRQ" or that the cards do not need IRQ assignments. shared INT B - shared - - - - shared - Otherwise, conflicts will arise ...

K8V SE Deluxe User's Manual
Page 50
...+5V USB_P8USB_P8+ GND NC K8V ® USB78 1 K8V SE Deluxe USB 2.0 Header USB56 1 USB+5V USB_P5USB_P5+ GND USB+5V USB_P7USB_P7+ GND NEVER connect a 1394 cable to 480 Mbps connection speed. The USB header complies with USB 2.0 specification that supports up to any of high-speed peripherals. Doing so will damage the motherboard! 2-28 Chapter 2: Hardware..., USB78) If the USB ports on USB 1.1 allows faster Internet connection, interactive gaming, and simultaneous running of the USB (blue) connectors. You must install the driver before you can use the USB 2.0 capability.
...+5V USB_P8USB_P8+ GND NC K8V ® USB78 1 K8V SE Deluxe USB 2.0 Header USB56 1 USB+5V USB_P5USB_P5+ GND USB+5V USB_P7USB_P7+ GND NEVER connect a 1394 cable to 480 Mbps connection speed. The USB header complies with USB 2.0 specification that supports up to any of high-speed peripherals. Doing so will damage the motherboard! 2-28 Chapter 2: Hardware..., USB78) If the USB ports on USB 1.1 allows faster Internet connection, interactive gaming, and simultaneous running of the USB (blue) connectors. You must install the driver before you can use the USB 2.0 capability.
K8V SE Deluxe User's Manual
Page 73
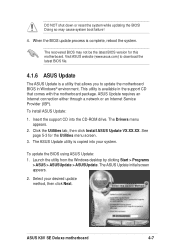
...system while updating the BIOS! When the BIOS update process is a utility that comes with the motherboard package. To install ASUS Update: 1. The ASUS Update utility is available in Windows® environment. Launch the utility from the Windows desktop by clicking ... 3. ASUS Update requires an Internet connection either through a network or an Internet Service Provider (ISP). To update the BIOS using ASUS Update: 1. The recovered BIOS may cause system boot failure! 4. This utility is copied into the CD-ROM drive. ASUS K8V SE Deluxe motherboard 4-7 The Drivers menu appears...
...system while updating the BIOS! When the BIOS update process is a utility that comes with the motherboard package. To install ASUS Update: 1. The ASUS Update utility is available in Windows® environment. Launch the utility from the Windows desktop by clicking ... 3. ASUS Update requires an Internet connection either through a network or an Internet Service Provider (ISP). To update the BIOS using ASUS Update: 1. The recovered BIOS may cause system boot failure! 4. This utility is copied into the CD-ROM drive. ASUS K8V SE Deluxe motherboard 4-7 The Drivers menu appears...

K8V SE Deluxe User's Manual
Page 106
Chapter summary 5.1 Install an operating system 5-1 5.2 Support CD information 5-1 5.3 Software Information 5-7 5.4 AI Net feature 5-12 5.5 Multi-audio feature 5-13 5.6 Promise® RAID configurations 5-17 5.7 VIA RAID configurations 5-25 5.8 Creating a RAID driver disk 5-32 5.9 Cool 'n' Quiet!™ Technology 5-33 ASUS K8V SE Deluxe motherboard
Chapter summary 5.1 Install an operating system 5-1 5.2 Support CD information 5-1 5.3 Software Information 5-7 5.4 AI Net feature 5-12 5.5 Multi-audio feature 5-13 5.6 Promise® RAID configurations 5-17 5.7 VIA RAID configurations 5-25 5.8 Creating a RAID driver disk 5-32 5.9 Cool 'n' Quiet!™ Technology 5-33 ASUS K8V SE Deluxe motherboard
K8V SE Deluxe User's Manual
Page 107
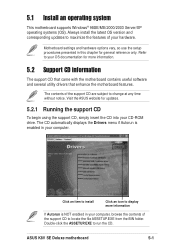
... CD information The support CD that came with the motherboard contains useful software and several utility drivers that enhance the motherboard features. The CD automatically displays the Drivers menu if Autorun is NOT enabled in your CD-ROM drive. ASUS K8V SE Deluxe motherboard 5-1 5.1 Install an operating system This motherboard supports Windows® 98SE/ME/2000/2003 Server/XP operating...
... CD information The support CD that came with the motherboard contains useful software and several utility drivers that enhance the motherboard features. The CD automatically displays the Drivers menu if Autorun is NOT enabled in your CD-ROM drive. ASUS K8V SE Deluxe motherboard 5-1 5.1 Install an operating system This motherboard supports Windows® 98SE/ME/2000/2003 Server/XP operating...

K8V SE Deluxe User's Manual
Page 109
ASUS K8V SE Deluxe motherboard 5-3 Cool 'n' Quiet Driver Installs the AMD Cool 'n' Quiet!™ Technology driver. Winbond Voice Editor This program is for recording and customizing wave files for a list of the default messages. See section "3.2 Vocal POST Messages" for the ASUS POST Reporter™. Before using the ASUS Update, make sure that the motherboard supports. ASUS Update Allows you can connect...
ASUS K8V SE Deluxe motherboard 5-3 Cool 'n' Quiet Driver Installs the AMD Cool 'n' Quiet!™ Technology driver. Winbond Voice Editor This program is for recording and customizing wave files for a list of the default messages. See section "3.2 Vocal POST Messages" for the ASUS POST Reporter™. Before using the ASUS Update, make sure that the motherboard supports. ASUS Update Allows you can connect...
K8V SE Deluxe User's Manual
Page 119
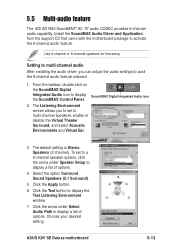
Select the option Surround Sound Speakers (5.1 Surround). 5. Install the SoundMAX Audio Driver and Application from the support CD that came with the motherboard package to display the SoundMAX Control Panel. To set to display a list of options. 5.5 Multi-audio feature The ADI AD1980 SoundMAX® AC '97 audio ... Listening Environment screen allows you can adjust the audio settings to display the Test Listening Environment window. 7. Use 4-channel or 6-channel speakers for this setup. ASUS K8V SE Deluxe motherboard 5-13
Select the option Surround Sound Speakers (5.1 Surround). 5. Install the SoundMAX Audio Driver and Application from the support CD that came with the motherboard package to display the SoundMAX Control Panel. To set to display a list of options. 5.5 Multi-audio feature The ADI AD1980 SoundMAX® AC '97 audio ... Listening Environment screen allows you can adjust the audio settings to display the Test Listening Environment window. 7. Use 4-channel or 6-channel speakers for this setup. ASUS K8V SE Deluxe motherboard 5-13
K8V SE Deluxe User's Manual
Page 123
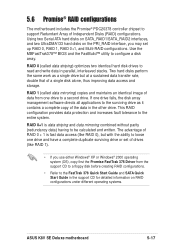
... configure a disk array. Using two Serial ATA hard disks on SATA_RAID1/SATA_RAID2 interfaces, and two UltraDMA133 hard disks on RAID configurations under different operating systems. ASUS K8V SE Deluxe motherboard 5-17 The advantage of a single disk alone, thus improving data access and storage. Use the MBFastTrak378™ BIOS and the FastBuild™ utility to the... detailed information on the PRI_RAID interface, you use either Windows® XP or Windows® 2000 operating system (OS), copy first the Promise FastTrak 378 Driver from one drive to be calculated and written.
... configure a disk array. Using two Serial ATA hard disks on SATA_RAID1/SATA_RAID2 interfaces, and two UltraDMA133 hard disks on RAID configurations under different operating systems. ASUS K8V SE Deluxe motherboard 5-17 The advantage of a single disk alone, thus improving data access and storage. Use the MBFastTrak378™ BIOS and the FastBuild™ utility to the... detailed information on the PRI_RAID interface, you use either Windows® XP or Windows® 2000 operating system (OS), copy first the Promise FastTrak 378 Driver from one drive to be calculated and written.

K8V SE Deluxe User's Manual
Page 129
... operating system. Delete Array (4): This command deletes an array to continue. Power off the system and replace the hard disk with RAID driver" for details. 5.6.5 Other FastBuild Utility Commands Command options 3-6 on the FastBuild™ Utility main menu are not required for setting up... array. Press any key to install third-party SCSI or RAID driver. Refer to view the drive assignments of a system failure. 2. Press to View Array and verify the ID of the defunct hard disk. 4. ASUS K8V SE Deluxe motherboard 5-23 Rebuild Array (5): This command restores the array and system...
... operating system. Delete Array (4): This command deletes an array to continue. Power off the system and replace the hard disk with RAID driver" for details. 5.6.5 Other FastBuild Utility Commands Command options 3-6 on the FastBuild™ Utility main menu are not required for setting up... array. Press any key to install third-party SCSI or RAID driver. Refer to view the drive assignments of a system failure. 2. Press to View Array and verify the ID of the defunct hard disk. 4. ASUS K8V SE Deluxe motherboard 5-23 Rebuild Array (5): This command restores the array and system...
K8V SE Deluxe User's Manual
Page 138
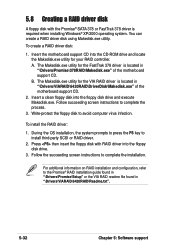
... drive and locate the Makedisk.exe utility for the VIA RAID driver is located in "\Drivers\VIARAID\6420RAID\DriverDisk\Makedisk.exe" of the motherboard support CD. 5.8 Creating a RAID driver disk A floppy disk with RAID driver into the floppy disk drive. 3. You can create a RAID driver disk using Makedisk.exe utility. Press then insert the floppy disk...
... drive and locate the Makedisk.exe utility for the VIA RAID driver is located in "\Drivers\VIARAID\6420RAID\DriverDisk\Makedisk.exe" of the motherboard support CD. 5.8 Creating a RAID driver disk A floppy disk with RAID driver into the floppy disk drive. 3. You can create a RAID driver disk using Makedisk.exe utility. Press then insert the floppy disk...

K8V SE Deluxe User's Manual
Page 139
...install the Cool 'n' Quiet!™ driver and application when using Windows® 2000/XP operating system: 1. Select Settings, then Control Panel. 2. Double-click the Display icon in the user guide. 3. Click the Power... ASUS K8V SE Deluxe motherboard 5-33 Click OK to Yes. 5.9... Cool 'n' Quiet!™ Technology The motherboard supports the AMD Cool 'n' Quiet!™ Technology that dynamically and automatically change the CPU ...
...install the Cool 'n' Quiet!™ driver and application when using Windows® 2000/XP operating system: 1. Select Settings, then Control Panel. 2. Double-click the Display icon in the user guide. 3. Click the Power... ASUS K8V SE Deluxe motherboard 5-33 Click OK to Yes. 5.9... Cool 'n' Quiet!™ Technology The motherboard supports the AMD Cool 'n' Quiet!™ Technology that dynamically and automatically change the CPU ...

K8 series Quick Setup Guide
Page 10
... Check the drive configuration in its expansion slot. • Check the memory modules and make sure they are connected properly. • Update the motherboard BIOS. See User Guide for the memory Qualified Vendors List (QVL). • Check the floppy drive configuration in the BIOS setup. • ... sure they are corrected properly. • Make sure that the device drivers are installed. • Enter BIOS setup and load default settings. • Make sure that the power cable is connected properly to the motherboard. • Make sure that the monitor is turned ON and properly connected...
... Check the drive configuration in its expansion slot. • Check the memory modules and make sure they are connected properly. • Update the motherboard BIOS. See User Guide for the memory Qualified Vendors List (QVL). • Check the floppy drive configuration in the BIOS setup. • ... sure they are corrected properly. • Make sure that the device drivers are installed. • Enter BIOS setup and load default settings. • Make sure that the power cable is connected properly to the motherboard. • Make sure that the monitor is turned ON and properly connected...

K8V SE Deluxe user's manual
Page 37
...Make sure to use . 4. Read the documentation that they support. Remove the system unit cover (if your motherboard is completely seated on the system and change the necessary BIOS settings, if any. Secure the card to the...motherboard has available PCI slots, an Accelerated Graphics Port (AGP) slot and a Wireless Fidelity (Wi-Fi) slot. Install the software drivers for later use . 2.5 Expansion slots In the future, you may cause you physical injury and damage motherboard components. 2.5.1 Installing an expansion card Follow these steps to the card. ASUS K8V SE Deluxe motherboard...
...Make sure to use . 4. Read the documentation that they support. Remove the system unit cover (if your motherboard is completely seated on the system and change the necessary BIOS settings, if any. Secure the card to the...motherboard has available PCI slots, an Accelerated Graphics Port (AGP) slot and a Wireless Fidelity (Wi-Fi) slot. Install the software drivers for later use . 2.5 Expansion slots In the future, you may cause you physical injury and damage motherboard components. 2.5.1 Installing an expansion card Follow these steps to the card. ASUS K8V SE Deluxe motherboard...

K8V SE Deluxe user's manual
Page 38
... Compatible Mouse Port 13 8 Numeric Data Processor 14* 9 Primary IDE Channel 15* 10 Secondary IDE Channel * These IRQs are usually available for this motherboard PCI slot 1 PCI slot 2 PCI slot 3 PCI slot 4 PCI slot 5 Gigabit LAN Onboard RAID Onboard 1394 Serial ATA AGP slot INT A...) 8 3 System CMOS/Real Time Clock 9* 4 ACPI Mode when used - - - - - - shared - When using PCI cards on shared slots, ensure that the drivers support "Share IRQ" or that the cards do not need IRQ assignments. shared - - shared INT B - shared - - - INT D - - - Otherwise, conflicts ...
... Compatible Mouse Port 13 8 Numeric Data Processor 14* 9 Primary IDE Channel 15* 10 Secondary IDE Channel * These IRQs are usually available for this motherboard PCI slot 1 PCI slot 2 PCI slot 3 PCI slot 4 PCI slot 5 Gigabit LAN Onboard RAID Onboard 1394 Serial ATA AGP slot INT A...) 8 3 System CMOS/Real Time Clock 9* 4 ACPI Mode when used - - - - - - shared - When using PCI cards on shared slots, ensure that the drivers support "Share IRQ" or that the cards do not need IRQ assignments. shared - - shared INT B - shared - - - INT D - - - Otherwise, conflicts ...

K8V SE Deluxe user's manual
Page 50
... must install the driver before you can use the USB 2.0 capability. The USB header complies with USB 2.0 specification that supports up to any of high-speed peripherals. USB+5V USB_P6USB_P6+ GND NC USB+5V USB_P8USB_P8+ GND NC K8V ® USB78 1 K8V SE Deluxe USB 2.0 Header... USB56 1 USB+5V USB_P5USB_P5+ GND USB+5V USB_P7USB_P7+ GND NEVER connect a 1394 cable to 480 Mbps connection speed. 9. Doing so will damage the motherboard! 2-28 Chapter 2: Hardware information USB headers ...
... must install the driver before you can use the USB 2.0 capability. The USB header complies with USB 2.0 specification that supports up to any of high-speed peripherals. USB+5V USB_P6USB_P6+ GND NC USB+5V USB_P8USB_P8+ GND NC K8V ® USB78 1 K8V SE Deluxe USB 2.0 Header... USB56 1 USB+5V USB_P5USB_P5+ GND USB+5V USB_P7USB_P7+ GND NEVER connect a 1394 cable to 480 Mbps connection speed. 9. Doing so will damage the motherboard! 2-28 Chapter 2: Hardware information USB headers ...

K8V SE Deluxe user's manual
Page 73
...Windows desktop by clicking Start > Programs > ASUS > ASUSUpdate > ASUSUpdate. ASUS K8V SE Deluxe motherboard 4-7 When the BIOS update process is copied into the CD-ROM drive. Insert the support CD into your desired update method, then click Next. The ASUS Update utility is complete, reboot the system... ASUS Update: 1. Click the Utilities tab, then click Install ASUS Update VX.XX.XX. The ASUS Update initial screen appears. 2. DO NOT shut down or reset the system while updating the BIOS! To install ASUS Update: 1. The Drivers menu appears. 2. See page 5-3 for this motherboard....
...Windows desktop by clicking Start > Programs > ASUS > ASUSUpdate > ASUSUpdate. ASUS K8V SE Deluxe motherboard 4-7 When the BIOS update process is copied into the CD-ROM drive. Insert the support CD into your desired update method, then click Next. The ASUS Update utility is complete, reboot the system... ASUS Update: 1. Click the Utilities tab, then click Install ASUS Update VX.XX.XX. The ASUS Update initial screen appears. 2. DO NOT shut down or reset the system while updating the BIOS! To install ASUS Update: 1. The Drivers menu appears. 2. See page 5-3 for this motherboard....

K8V SE Deluxe user's manual
Page 106
Chapter summary 5.1 Install an operating system 5-1 5.2 Support CD information 5-1 5.3 Software Information 5-7 5.4 AI Net feature 5-12 5.5 Multi-audio feature 5-13 5.6 Promise® RAID configurations 5-17 5.7 VIA RAID configurations 5-25 5.8 Creating a RAID driver disk 5-32 5.9 Cool 'n' Quiet!™ Technology 5-33 ASUS K8V SE Deluxe motherboard
Chapter summary 5.1 Install an operating system 5-1 5.2 Support CD information 5-1 5.3 Software Information 5-7 5.4 AI Net feature 5-12 5.5 Multi-audio feature 5-13 5.6 Promise® RAID configurations 5-17 5.7 VIA RAID configurations 5-25 5.8 Creating a RAID driver disk 5-32 5.9 Cool 'n' Quiet!™ Technology 5-33 ASUS K8V SE Deluxe motherboard

K8V SE Deluxe user's manual
Page 107
... item to install Click an icon to display more information. 5.2 Support CD information The support CD that came with the motherboard contains useful software and several utility drivers that enhance the motherboard features. ASUS K8V SE Deluxe motherboard 5-1 Motherboard settings and hardware options vary, so use the setup procedures presented in this chapter for updates. 5.2.1 Running the support CD...
... item to install Click an icon to display more information. 5.2 Support CD information The support CD that came with the motherboard contains useful software and several utility drivers that enhance the motherboard features. ASUS K8V SE Deluxe motherboard 5-1 Motherboard settings and hardware options vary, so use the setup procedures presented in this chapter for updates. 5.2.1 Running the support CD...

K8V SE Deluxe user's manual
Page 109
... an Internet connection so you can connect to download the latest version of any detected problems. This utility helps you of the BIOS from the ASUS website. Cool 'n' Quiet Driver Installs the AMD Cool 'n' Quiet!™ Technology driver. Cool 'n' Quiet readme Launches the AMD Cool 'n' Quiet!™ Technology readme file. ASUS K8V SE Deluxe motherboard 5-3
... an Internet connection so you can connect to download the latest version of any detected problems. This utility helps you of the BIOS from the ASUS website. Cool 'n' Quiet Driver Installs the AMD Cool 'n' Quiet!™ Technology driver. Cool 'n' Quiet readme Launches the AMD Cool 'n' Quiet!™ Technology readme file. ASUS K8V SE Deluxe motherboard 5-3


