
User Manual
Page 3
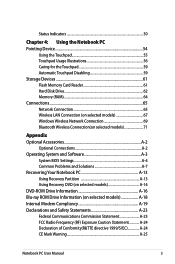
... Card Reader 61 Hard Disk Drive 62 Memory (RAM 64 Connections...65 Network Connection 65 Wireless LAN Connection (on selected models 67 Windows Wireless Network Connection 69 Bluetooth Wireless Connection(on selected models 71 Appendix Optional Accessories A-2 Optional Connections A-2 Operating System and Software A-3 System BIOS Settings A-4 Common Problems and Solutions A-7 Recovering Your Notebook PC A-13 Using Recovery Partition A-13 Using Recovery DVD (on selected models A-14 DVD-ROM Drive Information A-16 Blu-ray ROM Drive Information (on selected models A-18 Internal...
... Card Reader 61 Hard Disk Drive 62 Memory (RAM 64 Connections...65 Network Connection 65 Wireless LAN Connection (on selected models 67 Windows Wireless Network Connection 69 Bluetooth Wireless Connection(on selected models 71 Appendix Optional Accessories A-2 Optional Connections A-2 Operating System and Software A-3 System BIOS Settings A-4 Common Problems and Solutions A-7 Recovering Your Notebook PC A-13 Using Recovery Partition A-13 Using Recovery DVD (on selected models A-14 DVD-ROM Drive Information A-16 Blu-ray ROM Drive Information (on selected models A-18 Internal...
User Manual
Page 6
... differences between your Notebook PC as follows: WARNING! The following are used throughout this guide, allowing you information on the Notebook PC's components. 3. Getting Started Gives you to complete certain tasks safely and effectively.These notes have different degrees of this User's Manual: 1. NOTE: Information for completing tasks. Knowing the Parts Gives you information on using the Notebook PC's components. 5. Appendix...
... differences between your Notebook PC as follows: WARNING! The following are used throughout this guide, allowing you information on the Notebook PC's components. 3. Getting Started Gives you to complete certain tasks safely and effectively.These notes have different degrees of this User's Manual: 1. NOTE: Information for completing tasks. Knowing the Parts Gives you information on using the Notebook PC's components. 5. Appendix...
User Manual
Page 7
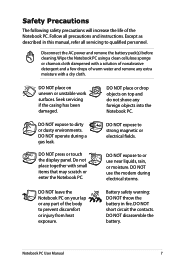
.... Disconnect the AC power and remove the battery pack(s) before cleaning. Battery safety warning: DO NOT throw the battery in this manual, refer all precautions and instructions. DO NOT press or touch the display panel. DO NOT disassemble the battery. Wipe the Notebook PC using a clean cellulose sponge or chamois cloth dampened with small items that may scratch or enter the Notebook PC. DO NOT expose...
.... Disconnect the AC power and remove the battery pack(s) before cleaning. Battery safety warning: DO NOT throw the battery in this manual, refer all precautions and instructions. DO NOT press or touch the display panel. DO NOT disassemble the battery. Wipe the Notebook PC using a clean cellulose sponge or chamois cloth dampened with small items that may scratch or enter the Notebook PC. DO NOT expose...
User Manual
Page 20
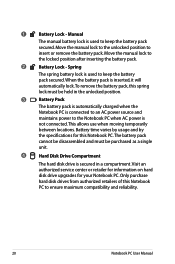
.... 2 Battery Lock - When the battery pack is inserted, it will automatically lock.To remove the battery pack, this Notebook PC.The battery pack cannot be disassembled and must be purchased as a single unit. 4 Hard Disk Drive Compartment The hard disk drive is secured in the unlocked position. 3 Battery Pack The battery pack is automatically charged when the Notebook PC is not connected. Battery time varies by usage and by the specifications for your Notebook...
.... 2 Battery Lock - When the battery pack is inserted, it will automatically lock.To remove the battery pack, this Notebook PC.The battery pack cannot be disassembled and must be purchased as a single unit. 4 Hard Disk Drive Compartment The hard disk drive is secured in the unlocked position. 3 Battery Pack The battery pack is automatically charged when the Notebook PC is not connected. Battery time varies by usage and by the specifications for your Notebook...
User Manual
Page 22
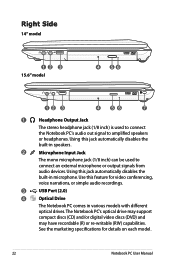
See the marketing specifications for video conferencing, voice narrations, or simple audio recordings. 3 USB Port (2.0) 4 Optical Drive The Notebook PC comes in speakers. 2 Microphone Input Jack The mono microphone jack (1/8 inch) can be used to connect the Notebook PC's audio out signal to connect an external microphone or output signals from audio devices. Use this feature for details on each model. 22 Notebook PC User Manual Using this jack automatically disables the built-in microphone. Using this jack automatically disables the built-in...
See the marketing specifications for video conferencing, voice narrations, or simple audio recordings. 3 USB Port (2.0) 4 Optical Drive The Notebook PC comes in speakers. 2 Microphone Input Jack The mono microphone jack (1/8 inch) can be used to connect the Notebook PC's audio out signal to connect an external microphone or output signals from audio devices. Use this feature for details on each model. 22 Notebook PC User Manual Using this jack automatically disables the built-in microphone. Using this jack automatically disables the built-in...
User Manual
Page 25
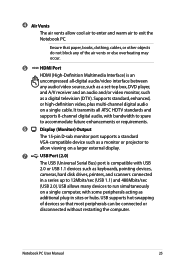
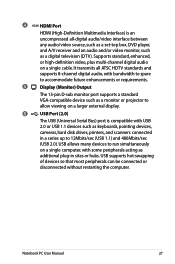
... video, plus multi-channel digital audio on a larger external display. 7 USB Port (2.0) The USB (Universal Serial Bus) port is an uncompressed all ATSC HDTV standards and supports 8-channel digital audio, with bandwidth to spare to accommodate future enhancements or requirements. 6 Display (Monitor) Output The 15-pin D-sub monitor port supports a standard VGA-compatible device such as keyboards, pointing devices, cameras, hard disk drives, printers, and scanners connected in sites or hubs. Ensure that paper, books...
... video, plus multi-channel digital audio on a larger external display. 7 USB Port (2.0) The USB (Universal Serial Bus) port is an uncompressed all ATSC HDTV standards and supports 8-channel digital audio, with bandwidth to spare to accommodate future enhancements or requirements. 6 Display (Monitor) Output The 15-pin D-sub monitor port supports a standard VGA-compatible device such as keyboards, pointing devices, cameras, hard disk drives, printers, and scanners connected in sites or hubs. Ensure that paper, books...
User Manual
Page 27
... a set-top box, DVD player, and A/V receiver and an audio and/or video monitor, such as additional plug-in a series up to run simultaneously on a single cable. USB allows many devices to 12Mbits/sec (USB 1.1) and 480Mbits/sec (USB 2.0). Notebook PC User Manual 27 Supports standard, enhanced, or high-definition video, plus multi-channel digital audio on a single computer, with USB 2.0 or USB 1.1 devices such as keyboards, pointing devices, cameras, hard disk drives, printers, and scanners connected...
... a set-top box, DVD player, and A/V receiver and an audio and/or video monitor, such as additional plug-in a series up to run simultaneously on a single cable. USB allows many devices to 12Mbits/sec (USB 1.1) and 480Mbits/sec (USB 2.0). Notebook PC User Manual 27 Supports standard, enhanced, or high-definition video, plus multi-channel digital audio on a single computer, with USB 2.0 or USB 1.1 devices such as keyboards, pointing devices, cameras, hard disk drives, printers, and scanners connected...
User Manual
Page 36
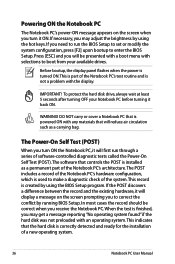
... cover a Notebook PC that is created by using the BIOS Setup program. This record is powered ON with selections to boot from your Notebook PC before turning it ON. When the test is not a problem with an operating system. Before bootup, the display panel flashes when the power is turned ON.This is part of the Notebook PC's test routine and is finished, you may adjust the brightness by using the hot keys. The Power...
... cover a Notebook PC that is created by using the BIOS Setup program. This record is powered ON with selections to boot from your Notebook PC before turning it ON. When the test is not a problem with an operating system. Before bootup, the display panel flashes when the power is turned ON.This is part of the Notebook PC's test routine and is finished, you may adjust the brightness by using the hot keys. The Power...
User Manual
Page 42
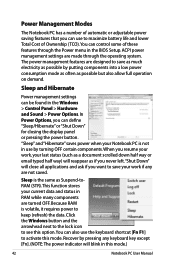
... blink in this mode.) 42 Notebook PC User Manual "Sleep" and "Hibernate" saves power when your work if any keyboard key except [Fn]. (NOTE: The power indicator will close all applications and ask if you want to maximize battery life and lower Total Cost of Ownership (TCO).You can control some of automatic or adjustable power saving features that you can be found in the BIOS Setup. Because RAM...
... blink in this mode.) 42 Notebook PC User Manual "Sleep" and "Hibernate" saves power when your work if any keyboard key except [Fn]. (NOTE: The power indicator will close all applications and ask if you want to maximize battery life and lower Total Cost of Ownership (TCO).You can control some of automatic or adjustable power saving features that you can be found in the BIOS Setup. Because RAM...

User Manual
Page 44
...in power management setup). stretches the screen area to -Disk depending on sleep button setting in Display Property Settings.) NOTE: Must connect an external monitor "before" booting up. 44 Notebook PC User Manual The Hot Key locations on the function keys may vary depending on the Notebook PC's keyboard. Special Keyboard Functions Colored Hot Keys The following defines the colored hot keys on model but the functions should remain the same. When enabled, the corresponding wireless indicator will light. Radio Tower (F2): Wireless Models Only:Toggles the internal wireless LAN or...
...in power management setup). stretches the screen area to -Disk depending on sleep button setting in Display Property Settings.) NOTE: Must connect an external monitor "before" booting up. 44 Notebook PC User Manual The Hot Key locations on the function keys may vary depending on the Notebook PC's keyboard. Special Keyboard Functions Colored Hot Keys The following defines the colored hot keys on model but the functions should remain the same. When enabled, the corresponding wireless indicator will light. Radio Tower (F2): Wireless Models Only:Toggles the internal wireless LAN or...

User Manual
Page 45
... on-screen display (OSD). The power saving modes control many aspects of the Notebook PC to improve contrast, brightness, skin tone, and color saturation for red, green, and blue independently. Locking the touchpad will light when the touchpad is UNLOCKED (enabled) and not light when the touchpad is best used with an external pointing device such as a mouse. Applying or removing the power adapter will automatically switch the system between various power saving modes. Fn...
... on-screen display (OSD). The power saving modes control many aspects of the Notebook PC to improve contrast, brightness, skin tone, and color saturation for red, green, and blue independently. Locking the touchpad will light when the touchpad is UNLOCKED (enabled) and not light when the touchpad is best used with an external pointing device such as a mouse. Applying or removing the power adapter will automatically switch the system between various power saving modes. Fn...
User Manual
Page 61
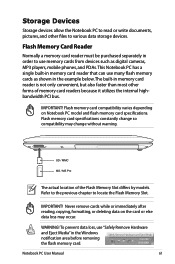
Never remove cards while or immediately after reading, copying, formatting, or deleting data on Notebook PC model and flash memory card specifications. This Notebook PC has a single built-in memory card reader that can use many flash memory cards as digital cameras, MP3 players, mobile phones, and PDAs. Notebook PC User Manual 61 SD / MMC MS / MS Pro The actual location of memory card readers because it utilizes the internal highbandwidth PCI bus. Storage Devices Storage devices allow the Notebook PC to...
Never remove cards while or immediately after reading, copying, formatting, or deleting data on Notebook PC model and flash memory card specifications. This Notebook PC has a single built-in memory card reader that can use many flash memory cards as digital cameras, MP3 players, mobile phones, and PDAs. Notebook PC User Manual 61 SD / MMC MS / MS Pro The actual location of memory card readers because it utilizes the internal highbandwidth PCI bus. Storage Devices Storage devices allow the Notebook PC to...
User Manual
Page 64
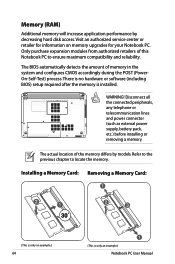
... amount of the memory differs by decreasing hard disk access. Disconnect all the connected peripherals, any telephone or telecommunication lines and power connector (such as external power supply, battery pack, etc.) before installing or removing a memory. Installing a Memory Card: Removing a Memory Card: 33 (This is only an example.) 64 (This is installed. WARNING! There is no hardware or software (including BIOS) setup required after the memory is only an example.) Notebook PC User Manual Refer to the...
... amount of the memory differs by decreasing hard disk access. Disconnect all the connected peripherals, any telephone or telecommunication lines and power connector (such as external power supply, battery pack, etc.) before installing or removing a memory. Installing a Memory Card: Removing a Memory Card: 33 (This is only an example.) 64 (This is installed. WARNING! There is no hardware or software (including BIOS) setup required after the memory is only an example.) Notebook PC User Manual Refer to the...
User Manual
Page 77
... operating system installed on the hard drive at the factory.The recovery disc provides a comprehensive recovery solution that quickly restores the Notebook PC's operating system to its customers the choice of the support disc is necessary even if your Notebook PC came pre-configured in good working order. Notebook PC User Manual A-3 The choices and languages will depend on the installed operating system. The support disc contains all drivers, utilities and software for web sites to enable hardware features, extend functionality...
... operating system installed on the hard drive at the factory.The recovery disc provides a comprehensive recovery solution that quickly restores the Notebook PC's operating system to its customers the choice of the support disc is necessary even if your Notebook PC came pre-configured in good working order. Notebook PC User Manual A-3 The choices and languages will depend on the installed operating system. The support disc contains all drivers, utilities and software for web sites to enable hardware features, extend functionality...
User Manual
Page 79
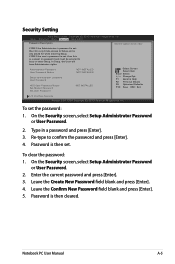
...On the Security screen, select Setup Administrator Password or User Password. 2. Type in a password and press [Enter]. 3. Re-type to boot or enter Setup. Enter the current password and press [Enter]. 3. Leave the Create New Password field blank and press [Enter]. 4. In Setup, the User will have Administrator rights. Administrator Password User Password Status NOT INSTALLED NOT INSTALLED Setup administrator password User Password HDD User Password Status : Set Master Password Set User Password NOT INSTALLED : Select Screen : Select Item Enter: Select +/-: Change Opt. Copyright...
...On the Security screen, select Setup Administrator Password or User Password. 2. Type in a password and press [Enter]. 3. Re-type to boot or enter Setup. Enter the current password and press [Enter]. 3. Leave the Create New Password field blank and press [Enter]. 4. In Setup, the User will have Administrator rights. Administrator Password User Password Status NOT INSTALLED NOT INSTALLED Setup administrator password User Password HDD User Password Status : Set Master Password Set User Password NOT INSTALLED : Select Screen : Select Item Enter: Select +/-: Change Opt. Copyright...
User Manual
Page 81
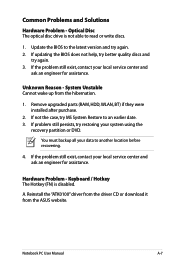
... assistance. If problem still persists, try again. 3. Hardware Problem - If the problem still exist, contact your system using the recovery partition or DVD. If the problem still exist, contact your data to read or write discs. 1. Update the BIOS to an earlier date. 3. System Unstable Cannot wake up from the ASUS website. A. Remove upgraded parts (RAM, HDD, WLAN, BT) if they were installed after purchase. 2. You must backup all your...
... assistance. If problem still persists, try again. 3. Hardware Problem - If the problem still exist, contact your system using the recovery partition or DVD. If the problem still exist, contact your data to read or write discs. 1. Update the BIOS to an earlier date. 3. System Unstable Cannot wake up from the ASUS website. A. Remove upgraded parts (RAM, HDD, WLAN, BT) if they were installed after purchase. 2. You must backup all your...

User Manual
Page 83
... location before recovering. D. Make sure that the FAN works when the CPU temperature is high and check whether there is equipped with a wireless card? The problem may also be in the MB, HDD, or NB; You must backup all your data to another location before recovering. Notebook PC User Manual A-9 Enter Control Panel -> Device Manager. If you have many applications running (see whether the Notebook PC has a WLAN card under the "Network Adapter" item. IMPORTANT! B. C. Battery problem...
... location before recovering. D. Make sure that the FAN works when the CPU temperature is high and check whether there is equipped with a wireless card? The problem may also be in the MB, HDD, or NB; You must backup all your data to another location before recovering. Notebook PC User Manual A-9 Enter Control Panel -> Device Manager. If you have many applications running (see whether the Notebook PC has a WLAN card under the "Network Adapter" item. IMPORTANT! B. C. Battery problem...
User Manual
Page 86
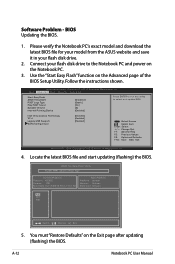
... your flash disk drive to select and update BIOS. Follow the instructions shown. Main Advanced Boot Security Save & Exit Start Easy Flash ASUS FancyStart POST Logo Type Play POST Sound Speaker Volume Internal Pointing Device [Disabled] [Static] [No] [4] [Enabled] Press ENTER to run the utility to the Notebook PC and power on the Exit page after updating (flashing) the BIOS. Copyright (C) 2010 American Megatrends, Inc. 4. Software Problem - Connect your flash disk drive. 2. Use the "Start Easy Flash" function on the Advanced page of the BIOS Setup Utility...
... your flash disk drive to select and update BIOS. Follow the instructions shown. Main Advanced Boot Security Save & Exit Start Easy Flash ASUS FancyStart POST Logo Type Play POST Sound Speaker Volume Internal Pointing Device [Disabled] [Static] [No] [4] [Enabled] Press ENTER to run the utility to the Notebook PC and power on the Exit page after updating (flashing) the BIOS. Copyright (C) 2010 American Megatrends, Inc. 4. Software Problem - Connect your flash disk drive. 2. Use the "Start Easy Flash" function on the Advanced page of the BIOS Setup Utility...
User Manual
Page 88
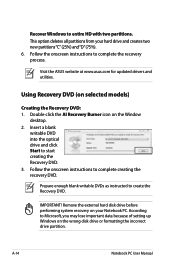
... two partitions. A-14 Notebook PC User Manual This option deletes all partitions from your Notebook PC. Follow the onscreen instructions to Microsoft, you may lose important data because of setting up Windows on your hard drive and creates two new partitions"C"(25%) and"D"(75%). 6. According to complete the recovery process. Prepare enough blank writable DVDs as instructed to start creating the Recovery DVD. 3. Visit the ASUS website at www.asus.com for updated drivers and utilities. Remove the external hard disk drive...
... two partitions. A-14 Notebook PC User Manual This option deletes all partitions from your Notebook PC. Follow the onscreen instructions to Microsoft, you may lose important data because of setting up Windows on your hard drive and creates two new partitions"C"(25%) and"D"(75%). 6. According to complete the recovery process. Prepare enough blank writable DVDs as instructed to start creating the Recovery DVD. 3. Visit the ASUS website at www.asus.com for updated drivers and utilities. Remove the external hard disk drive...
User Manual
Page 89
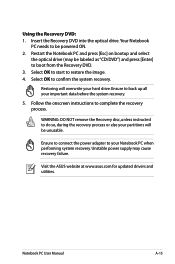
... select the optical drive (may cause recovery failure. Select OK to start to boot from the Recovery DVD. 3. Ensure to connect the power adapter to confirm the system recovery. Visit the ASUS website at www.asus.com for updated drivers and utilities. Select OK to your Notebook PC when performing system recovery. Notebook PC User Manual A-15 WARNING: DO NOT remove the Recovery disc, unless instructed to back up all your hard drive. Ensure to do...
... select the optical drive (may cause recovery failure. Select OK to start to boot from the Recovery DVD. 3. Ensure to connect the power adapter to confirm the system recovery. Visit the ASUS website at www.asus.com for updated drivers and utilities. Select OK to your Notebook PC when performing system recovery. Notebook PC User Manual A-15 WARNING: DO NOT remove the Recovery disc, unless instructed to back up all your hard drive. Ensure to do...


