User Manual
Page 1
E6459 Notebook PC User Manual February 2011
E6459 Notebook PC User Manual February 2011

User Manual
Page 2
Table of Contents Chapter 1: Introducing the Notebook PC About This User's Manual 6 Notes for This Manual 6 Safety Precautions 7 Preparing your Notebook PC 11 Chapter 2: Knowing the parts Top Side...14 Bottom Side...18 Right Side...22 Left Side...24 Rear Side...28 Front Side...29 Chapter 3: Getting Started Power System...32 Using AC Power 32 Using Battery Power 34 Battery Care...35 Powering ON the Notebook PC 36 The Power-On Self Test (POST 36 Checking Battery Power 38 Charging the Battery Pack 39 Power Options 40 Power Management Modes 42 Sleep and Hibernate 42 Thermal Power ...
Table of Contents Chapter 1: Introducing the Notebook PC About This User's Manual 6 Notes for This Manual 6 Safety Precautions 7 Preparing your Notebook PC 11 Chapter 2: Knowing the parts Top Side...14 Bottom Side...18 Right Side...22 Left Side...24 Rear Side...28 Front Side...29 Chapter 3: Getting Started Power System...32 Using AC Power 32 Using Battery Power 34 Battery Care...35 Powering ON the Notebook PC 36 The Power-On Self Test (POST 36 Checking Battery Power 38 Charging the Battery Pack 39 Power Options 40 Power Management Modes 42 Sleep and Hibernate 42 Thermal Power ...
User Manual
Page 3
Status Indicators 50 Chapter 4: Using the Notebook PC Pointing Device 54 Using the Touchpad 55 Touchpad Usage Illustrations 56 Caring for the Touchpad 59 Automatic Touchpad Disabling 59 Storage Devices 61 Flash Memory Card Reader 61 Hard Disk Drive 62 Memory (RAM 64 Connections...65 Network Connection 65 Wireless LAN Connection (on selected models 67 Windows Wireless Network Connection 69 Bluetooth Wireless Connection(on selected models 71 Appendix Optional Accessories A-2 Optional Connections A-2 Operating System and Software A-3 System BIOS Settings A-4 Common Problems and ...
Status Indicators 50 Chapter 4: Using the Notebook PC Pointing Device 54 Using the Touchpad 55 Touchpad Usage Illustrations 56 Caring for the Touchpad 59 Automatic Touchpad Disabling 59 Storage Devices 61 Flash Memory Card Reader 61 Hard Disk Drive 62 Memory (RAM 64 Connections...65 Network Connection 65 Wireless LAN Connection (on selected models 67 Windows Wireless Network Connection 69 Bluetooth Wireless Connection(on selected models 71 Appendix Optional Accessories A-2 Optional Connections A-2 Operating System and Software A-3 System BIOS Settings A-4 Common Problems and ...
User Manual
Page 4
IC Radiation Exposure Statement for Canada A-25 Wireless Operation Channel for Different Domains A-26 France Restricted Wireless Frequency Bands A-26 UL Safety Notices A-28 Power Safety Requirement A-29 TV Tuner Notices A-29 REACH A-29 Nordic Lithium Cautions (for lithium-ion batteries A-30 Optical Drive Safety Information A-31 Laser Safety Information A-31 Service warning label A-31 CDRH Regulations A-31 Macrovision Corporation Product Notice A-32 CTR 21 Approval(for Notebook PC with built-in Modem A-33 European Union Eco-label A-35 ENERGY STAR complied product A-35 Global ...
IC Radiation Exposure Statement for Canada A-25 Wireless Operation Channel for Different Domains A-26 France Restricted Wireless Frequency Bands A-26 UL Safety Notices A-28 Power Safety Requirement A-29 TV Tuner Notices A-29 REACH A-29 Nordic Lithium Cautions (for lithium-ion batteries A-30 Optical Drive Safety Information A-31 Laser Safety Information A-31 Service warning label A-31 CDRH Regulations A-31 Macrovision Corporation Product Notice A-32 CTR 21 Approval(for Notebook PC with built-in Modem A-33 European Union Eco-label A-35 ENERGY STAR complied product A-35 Global ...

User Manual
Page 5
1 Chapter 1: Introducing the Notebook PC
1 Chapter 1: Introducing the Notebook PC
User Manual
Page 6
About This User's Manual You are reading the Notebook PC User's Manual.This User's Manual provides information regarding the various components in this manual. Using the Notebook PC Gives you to the Notebook PC and this User's Manual. 2. Please accept your Notebook PC and the pictures shown in the Notebook PC and how to optional accessories and gives additional information. Vital information that must be differences between your Notebook PC as follows: WARNING! Introducing the Notebook PC Introduces you information on using the Notebook PC's components. 5. IMPORTANT! ...
About This User's Manual You are reading the Notebook PC User's Manual.This User's Manual provides information regarding the various components in this manual. Using the Notebook PC Gives you to the Notebook PC and this User's Manual. 2. Please accept your Notebook PC and the pictures shown in the Notebook PC and how to optional accessories and gives additional information. Vital information that must be differences between your Notebook PC as follows: WARNING! Introducing the Notebook PC Introduces you information on using the Notebook PC's components. 5. IMPORTANT! ...
User Manual
Page 7
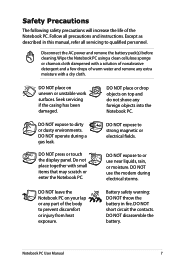
Follow all servicing to qualified personnel. DO NOT place on your lap or any part of the body to or use the modem during a gas leak. DO NOT expose to strong magnetic or electrical fields. DO NOT disassemble the battery. DO NOT press or touch the display panel. Do not place together with a dry cloth. DO NOT expose to prevent discomfort or injury from heat exposure. DO NOT short circuit the contacts. Battery safety warning: DO NOT throw the battery in this manual, refer all precautions and instructions. DO NOT expose to dirty or dusty environments. DO NOT use...
Follow all servicing to qualified personnel. DO NOT place on your lap or any part of the body to or use the modem during a gas leak. DO NOT expose to strong magnetic or electrical fields. DO NOT disassemble the battery. DO NOT press or touch the display panel. Do not place together with a dry cloth. DO NOT expose to prevent discomfort or injury from heat exposure. DO NOT short circuit the contacts. Battery safety warning: DO NOT throw the battery in this manual, refer all precautions and instructions. DO NOT expose to dirty or dusty environments. DO NOT use...

User Manual
Page 8
INPUT RATING: Refer to the rating label on or near the surface. Sound Pressure Warning: Excessive sound pressure from earphones or headphones can cause hearing damage or loss. Check local regulations for disposal of the Notebook PC and be sure that your power adapter complies with any materials that is powered ON with the rating. DO NOT throw the battery in municipal waste.The symbol of the crossed out wheeled bin indicates that the product (electrical, electronic equipment and mercury-containing button cell battery) should not be placed in municipal waste. Please adjustment ...
INPUT RATING: Refer to the rating label on or near the surface. Sound Pressure Warning: Excessive sound pressure from earphones or headphones can cause hearing damage or loss. Check local regulations for disposal of the Notebook PC and be sure that your power adapter complies with any materials that is powered ON with the rating. DO NOT throw the battery in municipal waste.The symbol of the crossed out wheeled bin indicates that the product (electrical, electronic equipment and mercury-containing button cell battery) should not be placed in municipal waste. Please adjustment ...
User Manual
Page 9
DC fan Warning: Please notice the DC fan is latched securely in the closed position to prevent scratching of the base will rise during transport.Therefore, you should not transport the Notebook PC while the power is easily dulled if not properly cared for. Close the display panel and check that it OFF and disconnect all external peripherals to prevent damage to operate with exposed skin can cause discomfort or burn 4. Adapter (1) adapter information: Input voltage: 100-240Vac Input frequency: 50-60Hz Rating output current: 3.42A (65W) Rating output voltage: 19Vdc (2) The ...
DC fan Warning: Please notice the DC fan is latched securely in the closed position to prevent scratching of the base will rise during transport.Therefore, you should not transport the Notebook PC while the power is easily dulled if not properly cared for. Close the display panel and check that it OFF and disconnect all external peripherals to prevent damage to operate with exposed skin can cause discomfort or burn 4. Adapter (1) adapter information: Input voltage: 100-240Vac Input frequency: 50-60Hz Rating output current: 3.42A (65W) Rating output voltage: 19Vdc (2) The ...

User Manual
Page 10
Airplane Precautions Contact your battery pack and any optional battery packs before going on the airplane. Charge Your Batteries If you intend to use only between and not during takeoffs and landings. Most airlines will allow electronic use battery power, be sure to fully charge your airline if you do not send your Notebook PC and diskettes through airport X-ray machines. Be aware that you want to magnetic wands. 10 Notebook PC User Manual CAUTION! There are three main types of airport security devices: X-ray machines (used on items placed on conveyor belts), ...
Airplane Precautions Contact your battery pack and any optional battery packs before going on the airplane. Charge Your Batteries If you intend to use only between and not during takeoffs and landings. Most airlines will allow electronic use battery power, be sure to fully charge your airline if you do not send your Notebook PC and diskettes through airport X-ray machines. Be aware that you want to magnetic wands. 10 Notebook PC User Manual CAUTION! There are three main types of airport security devices: X-ray machines (used on items placed on conveyor belts), ...

User Manual
Page 11
Preparing your Notebook PC These are quick instructions for using your Notebook PC. Installing the Battery Pack 3 1 2 Connecting the Power Adapter 2 1 3 110V-220V Notebook PC User Manual 11
Preparing your Notebook PC These are quick instructions for using your Notebook PC. Installing the Battery Pack 3 1 2 Connecting the Power Adapter 2 1 3 110V-220V Notebook PC User Manual 11

User Manual
Page 12
Turning on the Power 1. Use [Fn]+[F5] or [Fn]+[F6] to a comfortable viewing angle. Slowly tilt the display panel forward or backward to adjust the LCD brightness. 12 Notebook PC User Manual Push and release the power button located beneath the LCD display panel. 2. Carefully lift up the display panel with your thumb. 2. Opening the LCD display panel 1.
Turning on the Power 1. Use [Fn]+[F5] or [Fn]+[F6] to a comfortable viewing angle. Slowly tilt the display panel forward or backward to adjust the LCD brightness. 12 Notebook PC User Manual Push and release the power button located beneath the LCD display panel. 2. Carefully lift up the display panel with your thumb. 2. Opening the LCD display panel 1.

User Manual
Page 13
2 Chapter 2: Knowing the parts
2 Chapter 2: Knowing the parts

User Manual
Page 14
Top Side The keyboard differs for each territory. 14" model 1 2 3 4 esc f1 f2 f3 f4 tab caps lock f5 f6 f7 f8 f9 f10 f11 f12 pause break prt sc sysrq insert num lk delete scr lk backspace home pgup enter pgdn shift shift end ctrl fn alt alt ctrl 5 6 7 8 9 10 14 Notebook PC User Manual
Top Side The keyboard differs for each territory. 14" model 1 2 3 4 esc f1 f2 f3 f4 tab caps lock f5 f6 f7 f8 f9 f10 f11 f12 pause break prt sc sysrq insert num lk delete scr lk backspace home pgup enter pgdn shift shift end ctrl fn alt alt ctrl 5 6 7 8 9 10 14 Notebook PC User Manual
User Manual
Page 15
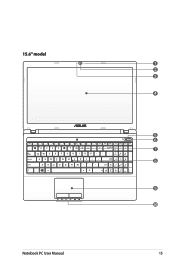
15.6" model 1 2 3 4 esc f1 f2 f3 f4 f5 f6 f7 f8 f9 f10 f11 f12 pause break prt sc sysrq delete insert home pgup pgdn end backspace num lk scr lk tab home pgup caps lock enter shift ctrl fn alt shift end pgdn enter alt ctrl insert delete 5 6 7 8 9 10 Notebook PC User Manual 15
15.6" model 1 2 3 4 esc f1 f2 f3 f4 f5 f6 f7 f8 f9 f10 f11 f12 pause break prt sc sysrq delete insert home pgup pgdn end backspace num lk scr lk tab home pgup caps lock enter shift ctrl fn alt shift end pgdn enter alt ctrl insert delete 5 6 7 8 9 10 Notebook PC User Manual 15
User Manual
Page 16
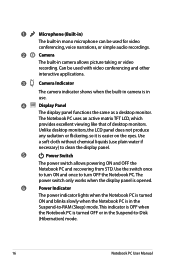
This indicator is OFF when the Notebook PC is easier on the eyes. Use the switch once to turn OFF the Notebook PC. Unlike desktop monitors, the LCD panel does not produce any radiation or flickering, so it is turned OFF or in the Suspend-to -RAM (Sleep) mode. Use a soft cloth without chemical liquids (use . 4 Display Panel The display panel functions the same as a desktop monitor. The power switch only works when the display panel is opened. 6 Power Indicator The power indicator lights when the Notebook PC is turned ON and blinks slowly when the Notebook PC is in the ...
This indicator is OFF when the Notebook PC is easier on the eyes. Use the switch once to turn OFF the Notebook PC. Unlike desktop monitors, the LCD panel does not produce any radiation or flickering, so it is turned OFF or in the Suspend-to -RAM (Sleep) mode. Use a soft cloth without chemical liquids (use . 4 Display Panel The display panel functions the same as a desktop monitor. The power switch only works when the display panel is opened. 6 Power Indicator The power indicator lights when the Notebook PC is turned ON and blinks slowly when the Notebook PC is in the ...

User Manual
Page 17
The multimedia sound system features an integrated digital audio controller that provides the same functions as a desktop mouse. A software-controlled scrolling function is a pointing device that produces rich, vibrant sound (results improved with comfortable travel (depth at which the keys can be depressed) and palm rest for both hands. Audio features are provided to help ease navigation in stereo speaker system allows you to allow easy Windows or web navigation. 10 Status Indicators (front) Status indicators represent various hardware/software conditions. Notebook PC ...
The multimedia sound system features an integrated digital audio controller that provides the same functions as a desktop mouse. A software-controlled scrolling function is a pointing device that produces rich, vibrant sound (results improved with comfortable travel (depth at which the keys can be depressed) and palm rest for both hands. Audio features are provided to help ease navigation in stereo speaker system allows you to allow easy Windows or web navigation. 10 Status Indicators (front) Status indicators represent various hardware/software conditions. Notebook PC ...

User Manual
Page 18
The battery pack size varies depending on model. Bottom Side The bottom side may vary in appearance depending on model. 2 3 1 4 5 18 Notebook PC User Manual
The battery pack size varies depending on model. Bottom Side The bottom side may vary in appearance depending on model. 2 3 1 4 5 18 Notebook PC User Manual

User Manual
Page 19
DO NOT USE ON SOFT SURFACES SUCH AS SOFAS OR BEDS, WHICH MAY BLOCK THE VENTS. DO NOT PUT THE NOTEBOOK PC ON YOUR LAP OR OTHER PARTS OF THE BODY TO AVOID INJURY FROM THE HEAT. The bottom of the Notebook PC can get very hot. High temperatures are normal during charging or operation. 15.6" model 2 3 1 4 5 WARNING! Notebook PC User Manual 19 Be careful when handling the Notebook PC while it is in operation or recently been in operation.
DO NOT USE ON SOFT SURFACES SUCH AS SOFAS OR BEDS, WHICH MAY BLOCK THE VENTS. DO NOT PUT THE NOTEBOOK PC ON YOUR LAP OR OTHER PARTS OF THE BODY TO AVOID INJURY FROM THE HEAT. The bottom of the Notebook PC can get very hot. High temperatures are normal during charging or operation. 15.6" model 2 3 1 4 5 WARNING! Notebook PC User Manual 19 Be careful when handling the Notebook PC while it is in operation or recently been in operation.
User Manual
Page 20
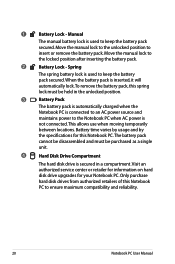
Only purchase hard disk drives from authorized retailers of this spring lock must be held in a compartment. Move the manual lock to the unlocked position to the locked position after inserting the battery pack. 2 Battery Lock - This allows use when moving temporarily between locations. Battery time varies by usage and by the specifications for your Notebook PC. 1 Battery Lock - Move the manual lock to insert or remove the battery pack. Spring The spring battery lock is secured in the unlocked position. 3 Battery Pack The battery pack is automatically charged when ...
Only purchase hard disk drives from authorized retailers of this spring lock must be held in a compartment. Move the manual lock to the unlocked position to the locked position after inserting the battery pack. 2 Battery Lock - This allows use when moving temporarily between locations. Battery time varies by usage and by the specifications for your Notebook PC. 1 Battery Lock - Move the manual lock to insert or remove the battery pack. Spring The spring battery lock is secured in the unlocked position. 3 Battery Pack The battery pack is automatically charged when ...