
H61M-C User's Manual
Page 1
H61M-C Motherboard
H61M-C Motherboard
H61M-C User's Manual
Page 3
Contents Safety information...vi About this guide...vii H61M-C specifications summary ix Package contents...xi Chapter 1: Product introduction 1.1 Special features 1-1 1.1.1 Product highlights 1-1 1.1.2 ASUS Exclusive Features 1-2 1.2 Before you proceed 1-4 1.3 Motherboard overview 1-5 1.3.1 Placement direction 1-5 1.3.2 Screw holes 1-5 1.3.3 Motherboard layout 1-6 1.3.4 Layout contents 1-7 1.4 Central Processing Unit (CPU 1-7 1.4.1 CPU installation 1-8 1.4.2 CPU heatsink and fan assembly installation 1-10 1.5 System memory 1-12 1.5.1 Overview...
Contents Safety information...vi About this guide...vii H61M-C specifications summary ix Package contents...xi Chapter 1: Product introduction 1.1 Special features 1-1 1.1.1 Product highlights 1-1 1.1.2 ASUS Exclusive Features 1-2 1.2 Before you proceed 1-4 1.3 Motherboard overview 1-5 1.3.1 Placement direction 1-5 1.3.2 Screw holes 1-5 1.3.3 Motherboard layout 1-6 1.3.4 Layout contents 1-7 1.4 Central Processing Unit (CPU 1-7 1.4.1 CPU installation 1-8 1.4.2 CPU heatsink and fan assembly installation 1-10 1.5 System memory 1-12 1.5.1 Overview...
H61M-C User's Manual
Page 6
... are not sure about the voltage of the electrical outlet you add a device. • Before connecting or removing signal cables from the motherboard, ensure that came with the product, contact a qualified service technician or your retailer. vi Contact a qualified service technician or your retailer....supply is set to fix it by yourself. If possible, disconnect all power cables are not damaged. Operation safety • Before installing the motherboard and adding devices on it may become wet. • Place the product on a stable surface. • If you detect any area where...
... are not sure about the voltage of the electrical outlet you add a device. • Before connecting or removing signal cables from the motherboard, ensure that came with the product, contact a qualified service technician or your retailer. vi Contact a qualified service technician or your retailer....supply is set to fix it by yourself. If possible, disconnect all power cables are not damaged. Operation safety • Before installing the motherboard and adding devices on it may become wet. • Place the product on a stable surface. • If you detect any area where...
H61M-C User's Manual
Page 7
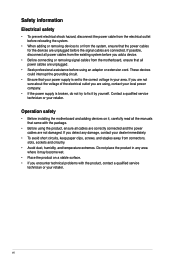
...ASUS websites The ASUS website provides updated information on ASUS hardware and software products. Optional documentation Your product package may include optional documentation, such as warranty flyers, that may have been added by your dealer. How this guide This user guide contains the information you need when installing and configuring the motherboard... describes the features of the standard package. Detailed descriptions of the BIOS parameters are not part of the motherboard and the new technology it supports. • Chapter 2: BIOS information This chapter tells how to change ...
...ASUS websites The ASUS website provides updated information on ASUS hardware and software products. Optional documentation Your product package may include optional documentation, such as warranty flyers, that may have been added by your dealer. How this guide This user guide contains the information you need when installing and configuring the motherboard... describes the features of the standard package. Detailed descriptions of the BIOS parameters are not part of the motherboard and the new technology it supports. • Chapter 2: BIOS information This chapter tells how to change ...
H61M-C User's Manual
Page 11
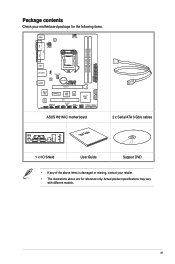
... Super I/O ALC 887 AAFP PCIEX1_1 ASM 64Mb 1083 BIOS PCI1 Intel® H61 USBPW5~10 SPDIF_OUT USB56 SB_PWR USB78 CLRTC USB910 SPEAKER F_PANEL SATA3G_4 SATA3G_3 ASUS H61M-C motherboard User Guide 2 x Serial ATA 3 Gb/s cables 1 x I/O Shield User Guide Support DVD • If any of the above items is damaged or missing, contact your retailer...
... Super I/O ALC 887 AAFP PCIEX1_1 ASM 64Mb 1083 BIOS PCI1 Intel® H61 USBPW5~10 SPDIF_OUT USB56 SB_PWR USB78 CLRTC USB910 SPEAKER F_PANEL SATA3G_4 SATA3G_3 ASUS H61M-C motherboard User Guide 2 x Serial ATA 3 Gb/s cables 1 x I/O Shield User Guide Support DVD • If any of the above items is damaged or missing, contact your retailer...

H61M-C User's Manual
Page 13
...well as have the latest technology available to support onboard graphics out with dedicated chipsets, 2-channel (2 DIMMs) DDR3 memory, and 16 PCI Express 3.0/2.0 lanes. ASUS H61M-C 1-1 Intel® 3rd/2nd generation Core™ i7 / Core™ i5 / Core™ i3, Pentium®, and Celeron® processors are...for Intel® 3rd/2nd Generation Core™ i7 / Core™ i5 / Core™ i3, Pentium®, and Celeron® processors This motherboard supports the Intel® 3rd/2nd generation Core™ i7 / Core™ i5 / Core™ i3, Pentium®, and Celeron® processors...
...well as have the latest technology available to support onboard graphics out with dedicated chipsets, 2-channel (2 DIMMs) DDR3 memory, and 16 PCI Express 3.0/2.0 lanes. ASUS H61M-C 1-1 Intel® 3rd/2nd generation Core™ i7 / Core™ i5 / Core™ i3, Pentium®, and Celeron® processors are...for Intel® 3rd/2nd Generation Core™ i7 / Core™ i5 / Core™ i3, Pentium®, and Celeron® processors This motherboard supports the Intel® 3rd/2nd generation Core™ i7 / Core™ i5 / Core™ i3, Pentium®, and Celeron® processors...

H61M-C User's Manual
Page 14
...only supported when you with dual selectable modes and native support for durability, improved lifespan, and enhanced thermal capacity. 1.1.2 ASUS Exclusive Features ASUS UEFI BIOS ASUS UEFI BIOS, a UEFI compliant architecture, offers the first mouse-controlled intuitive graphical BIOS interface that goes beyond the traditional keyboard... to provide efficient power management for advanced operating systems. 100% All High-quality Conductive Polymer Capacitors This motherboard uses all high-quality conductive polymer capacitors for hard drives larger than the traditional BIOS versions.
...only supported when you with dual selectable modes and native support for durability, improved lifespan, and enhanced thermal capacity. 1.1.2 ASUS Exclusive Features ASUS UEFI BIOS ASUS UEFI BIOS, a UEFI compliant architecture, offers the first mouse-controlled intuitive graphical BIOS interface that goes beyond the traditional keyboard... to provide efficient power management for advanced operating systems. 100% All High-quality Conductive Polymer Capacitors This motherboard uses all high-quality conductive polymer capacitors for hard drives larger than the traditional BIOS versions.
H61M-C User's Manual
Page 15
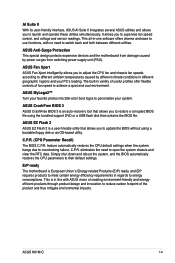
...and reboot the system, and the BIOS automatically restores the CPU parameters to personalize your system. ASUS Anti-Surge Protection This special design protects expensive devices and the motherboard from damage caused by different climate conditions in different geographic regions and your favorite photos into 256-... innovation to reduce carbon footprint of fan speed to restore a corrupted BIOS file using a bootable floppy disk or an OS-based utility. ASUS H61M-C 1-3 It allows you to update the BIOS without using the bundled support DVD or a USB flash disk that allows you to energy ...
...and reboot the system, and the BIOS automatically restores the CPU parameters to personalize your system. ASUS Anti-Surge Protection This special design protects expensive devices and the motherboard from damage caused by different climate conditions in different geographic regions and your favorite photos into 256-... innovation to reduce carbon footprint of fan speed to restore a corrupted BIOS file using a bootable floppy disk or an OS-based utility. ASUS H61M-C 1-3 It allows you to update the BIOS without using the bundled support DVD or a USB flash disk that allows you to energy ...

H61M-C User's Manual
Page 16
... its power cord. This is ON, in sleep mode, or in any motherboard component. Standby Power LED The motherboard comes with the component. • Before you install or remove any component, switch off mode. H61M-C SB_PWR ON OFF Standby Power Powered Off H61M-C Onboard LED 1-4 Chapter 1: Product introduction 1.2 Before you proceed Take note of...
... its power cord. This is ON, in sleep mode, or in any motherboard component. Standby Power LED The motherboard comes with the component. • Before you install or remove any component, switch off mode. H61M-C SB_PWR ON OFF Standby Power Powered Off H61M-C Onboard LED 1-4 Chapter 1: Product introduction 1.2 Before you proceed Take note of...
H61M-C User's Manual
Page 17
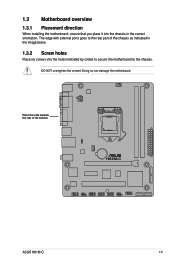
Doing so can damage the motherboard. The edge with external ports goes to the rear part of the chassis H61M-C ASUS H61M-C 1-5 Place this side towards the rear of the chassis as indicated in the image below. 1.3.2 Screw holes Place six screws into the chassis in the correct orientation. 1.3 Motherboard overview 1.3.1 Placement direction When installing the motherboard, ensure that you place it into the holes indicated by circles to secure the motherboard to the chassis. DO NOT overtighten the screws!
Doing so can damage the motherboard. The edge with external ports goes to the rear part of the chassis H61M-C ASUS H61M-C 1-5 Place this side towards the rear of the chassis as indicated in the image below. 1.3.2 Screw holes Place six screws into the chassis in the correct orientation. 1.3 Motherboard overview 1.3.1 Placement direction When installing the motherboard, ensure that you place it into the holes indicated by circles to secure the motherboard to the chassis. DO NOT overtighten the screws!

H61M-C User's Manual
Page 18
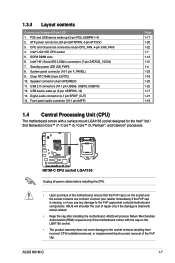
1.3.3 Motherboard layout 12 34 3 5 17.8cm(7.0in) KBMS RT 8876 CPU_FAN COM ATX12V DDR3 DIMM_A1 (64bit, 240-pin module) DDR3 DIMM_B1 (64bit, 240-pin module) LPT VGA LGA1155 USB34 22.9cm(9.0in) PS2_USBPW1~4 LAN_USB12 CHA_FAN EATXPWR RTL 8111F 2 BATTERY AUDIO H61M-C PCIEX16 SATA3G_2 SATA3G_1 Super I/O PCIEX1_1 ASM 64Mb 1083 BIOS 6 Intel® H61 ALC PCI1 887 SB_PWR 7 USBPW5~10 SPDIF_OUT USB56 USB78 CLRTC F_PANEL SATA3G_4 SATA3G_3 USB910 SPEAKER AAFP 14 13 12 11 10 9 8 6 1-6 Chapter 1: Product introduction
1.3.3 Motherboard layout 12 34 3 5 17.8cm(7.0in) KBMS RT 8876 CPU_FAN COM ATX12V DDR3 DIMM_A1 (64bit, 240-pin module) DDR3 DIMM_B1 (64bit, 240-pin module) LPT VGA LGA1155 USB34 22.9cm(9.0in) PS2_USBPW1~4 LAN_USB12 CHA_FAN EATXPWR RTL 8111F 2 BATTERY AUDIO H61M-C PCIEX16 SATA3G_2 SATA3G_1 Super I/O PCIEX1_1 ASM 64Mb 1083 BIOS 6 Intel® H61 ALC PCI1 887 SB_PWR 7 USBPW5~10 SPDIF_OUT USB56 USB78 CLRTC F_PANEL SATA3G_4 SATA3G_3 USB910 SPEAKER AAFP 14 13 12 11 10 9 8 6 1-6 Chapter 1: Product introduction
H61M-C User's Manual
Page 19
... wake-up (3-pin PS2_USBPW1~4) 2. Intel® LGA1155 CPU socket 5. Standby power LED (SB_PWR) 8. ASUS H61M-C 1-7 1.3.4 Layout contents Connectors/Jumpers/Slots/LED 1. ATX power connectors (24-pin EATXPWR, 4-pin ATX12V) 3. ASUS will process Return Merchandise Authorization (RMA) requests only if the motherboard comes with a surface mount LGA1155 socket designed for the Intel® 3rd / 2nd...
... wake-up (3-pin PS2_USBPW1~4) 2. Intel® LGA1155 CPU socket 5. Standby power LED (SB_PWR) 8. ASUS H61M-C 1-7 1.3.4 Layout contents Connectors/Jumpers/Slots/LED 1. ATX power connectors (24-pin EATXPWR, 4-pin ATX12V) 3. ASUS will process Return Merchandise Authorization (RMA) requests only if the motherboard comes with a surface mount LGA1155 socket designed for the Intel® 3rd / 2nd...
H61M-C User's Manual
Page 24
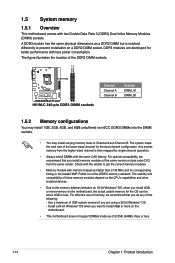
... with less power consumption. Check with the retailer to install 4GB or more memory on the motherboard. • This motherboard does not support DIMMs made up of 3GB system memory if you do any of the lower-sized channel for the OS can...better performance with two Double Data Rate 3 (DDR3) Dual Inline Memory Modules (DIMM) sockets. The stability and compatibility of the DDR3 DIMM sockets: DIMM_A1 DIMM_B1 H61M-C H61M-C 240-pin DDR3 DIMM sockets Channel Channel A Channel B Sockets DIMM_A1 DIMM_B1 1.5.2 Memory configurations You may install 1GB, 2GB, 4GB, and 8GB unbuffered non-...
... with less power consumption. Check with the retailer to install 4GB or more memory on the motherboard. • This motherboard does not support DIMMs made up of 3GB system memory if you do any of the lower-sized channel for the OS can...better performance with two Double Data Rate 3 (DDR3) Dual Inline Memory Modules (DIMM) sockets. The stability and compatibility of the DDR3 DIMM sockets: DIMM_A1 DIMM_B1 H61M-C H61M-C 240-pin DDR3 DIMM sockets Channel Channel A Channel B Sockets DIMM_A1 DIMM_B1 1.5.2 Memory configurations You may install 1GB, 2GB, 4GB, and 8GB unbuffered non-...

H61M-C User's Manual
Page 26
... press firmly until the card is already installed in a chassis). 3. Replace the system cover. 1-14 Chapter 1: Product introduction Remove the system unit cover (if your motherboard is completely seated on the slot. 5. Secure the card to the chassis with it and make the necessary hardware settings for later use . The following... cards. Failure to do so may cause you may need to use . 4. To remove a DIMM B A A 1.6 Expansion slots In the future, you physical injury and damage motherboard components. 1.6.1 Installing an expansion card To install an expansion card: 1.
... press firmly until the card is already installed in a chassis). 3. Replace the system cover. 1-14 Chapter 1: Product introduction Remove the system unit cover (if your motherboard is completely seated on the slot. 5. Secure the card to the chassis with it and make the necessary hardware settings for later use . The following... cards. Failure to do so may cause you may need to use . 4. To remove a DIMM B A A 1.6 Expansion slots In the future, you physical injury and damage motherboard components. 1.6.1 Installing an expansion card To install an expansion card: 1.
H61M-C User's Manual
Page 27
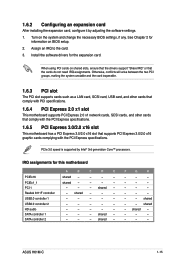
... - - F G H - - - - - - - - - - - - - - shared - PCIe 3.0 speed is supported by adjusting the software settings. 1. Install the software drivers for this motherboard PCIEx16 PCIEx1_1 PCI 1 Realtek 8111F controller USB2.0 controller 1 USB2.0 controller 2 HD audio SATA controller 1 SATA controller 2 A B C D E shared - - - - shared - - - - ASUS H61M-C 1-15 Otherwise, conflicts will arise between the two PCI groups, making the system unstable and the...
... - - F G H - - - - - - - - - - - - - - shared - PCIe 3.0 speed is supported by adjusting the software settings. 1. Install the software drivers for this motherboard PCIEx16 PCIEx1_1 PCI 1 Realtek 8111F controller USB2.0 controller 1 USB2.0 controller 2 HD audio SATA controller 1 SATA controller 2 A B C D E shared - - - - shared - - - - ASUS H61M-C 1-15 Otherwise, conflicts will arise between the two PCI groups, making the system unstable and the...
H61M-C User's Manual
Page 31
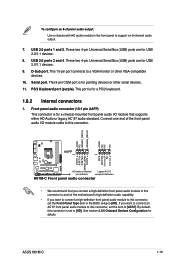
...[HD]. D-Sub port. This 15-pin port connects to a VGA monitor or other serial devices. 11. ASUS H61M-C 1-19 PS/2 Keyboard port (purple). Connect one end of the motherboard's high-definition audio capability. • If you want to connect a high-definition front panel audio module to ...AAFP PIN 1 PIN 1 MIC2 MICPWR Line out_R NC Line out_L PORT1 L PORT1 R PORT2 R SENSE_SEND PORT2 L H61M-C HD-audio-compliant Legacy AC'97 pin definition compliant definition H61M-C Front panel audio connector • We recommend that supports either HD Audio or legacy AC`97 audio standard.
...[HD]. D-Sub port. This 15-pin port connects to a VGA monitor or other serial devices. 11. ASUS H61M-C 1-19 PS/2 Keyboard port (purple). Connect one end of the motherboard's high-definition audio capability. • If you want to connect a high-definition front panel audio module to ...AAFP PIN 1 PIN 1 MIC2 MICPWR Line out_R NC Line out_L PORT1 L PORT1 R PORT2 R SENSE_SEND PORT2 L H61M-C HD-audio-compliant Legacy AC'97 pin definition compliant definition H61M-C Front panel audio connector • We recommend that supports either HD Audio or legacy AC`97 audio standard.

H61M-C User's Manual
Page 34
...• Only the 4-pin CPU fan and 4-pin chassis fan support the ASUS Fan Xpert feature. 6. USB connectors (10-1 pin USB56, USB78, USB910) These connectors are not jumpers! Insufficient air flow inside the system may damage the motherboard components. CPU and chassis fan connectors (4-pin CPU_FAN, 4-pin CHA_FAN) Connect...fan connectors support fans of the connector. CPU_FAN CPU FAN PWM CPU FAN IN CPU FAN PWR GND H61M-C CHA_FAN CHA FAN PWM CHA FAN IN CHA FAN PWR GND H61M-C Fan connectors Do not forget to connect the fan cables to 480 Mbps connection speed. USB56 USB78 USB910...
...• Only the 4-pin CPU fan and 4-pin chassis fan support the ASUS Fan Xpert feature. 6. USB connectors (10-1 pin USB56, USB78, USB910) These connectors are not jumpers! Insufficient air flow inside the system may damage the motherboard components. CPU and chassis fan connectors (4-pin CPU_FAN, 4-pin CHA_FAN) Connect...fan connectors support fans of the connector. CPU_FAN CPU FAN PWM CPU FAN IN CPU FAN PWR GND H61M-C CHA_FAN CHA FAN PWM CHA FAN IN CHA FAN PWR GND H61M-C Fan connectors Do not forget to connect the fan cables to 480 Mbps connection speed. USB56 USB78 USB910...
H61M-C User's Manual
Page 36
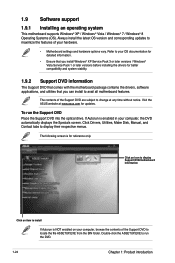
... to install If Autorun is for updates. If Autorun is enabled in your hardware. • Motherboard settings and hardware options vary. Visit the ASUS website at any time without notice. 1.9 Software support 1.9.1 Installing an operating system This motherboard supports Windows® XP / Windows® Vista / Windows® 7 / Windows® 8 Operating Systems (OS). Refer...
... to install If Autorun is for updates. If Autorun is enabled in your hardware. • Motherboard settings and hardware options vary. Visit the ASUS website at any time without notice. 1.9 Software support 1.9.1 Installing an operating system This motherboard supports Windows® XP / Windows® Vista / Windows® 7 / Windows® 8 Operating Systems (OS). Refer...
H61M-C User's Manual
Page 37
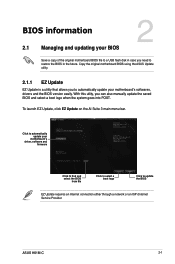
... can also manually update the saved BIOS and select a boot logo when the system goes into POST. ASUS H61M-C 2-1 Click to automatically update your BIOS 2 Save a copy of the original motherboard BIOS file to a USB flash disk in case you need to restore the BIOS in the future.... Update on the AI Suite 3 main menu bar. With this utlity, you to automatically update your motherboard's softwares, drivers and the BIOS version easily. BIOS information 2.1 Managing and updating your motherboard's driver, software and firmware Click to find and select the BIOS from file Click to select a ...
... can also manually update the saved BIOS and select a boot logo when the system goes into POST. ASUS H61M-C 2-1 Click to automatically update your BIOS 2 Save a copy of the original motherboard BIOS file to a USB flash disk in case you need to restore the BIOS in the future.... Update on the AI Suite 3 main menu bar. With this utlity, you to automatically update your motherboard's softwares, drivers and the BIOS version easily. BIOS information 2.1 Managing and updating your motherboard's driver, software and firmware Click to find and select the BIOS from file Click to select a ...

H61M-C User's Manual
Page 38
... ASUS website at www.asus.com. Press the Up/Down arrow keys to find the BIOS file, and then press to perform the BIOS update process. Enter the Advanced Mode of the BIOS setup program. Press to switch to the USB port. 2. You can restore a corrupted BIOS file using the motherboard...and single partition only. • DO NOT shut down or reset the system while updating the BIOS to prevent system boot failure! 2.1.3 ASUS CrashFree BIOS 3 utility The ASUS CrashFree BIOS 3 is an auto recovery tool that contains the latest BIOS, and then press . 5. Before you to restore the BIOS file...
... ASUS website at www.asus.com. Press the Up/Down arrow keys to find the BIOS file, and then press to perform the BIOS update process. Enter the Advanced Mode of the BIOS setup program. Press to switch to the USB port. 2. You can restore a corrupted BIOS file using the motherboard...and single partition only. • DO NOT shut down or reset the system while updating the BIOS to prevent system boot failure! 2.1.3 ASUS CrashFree BIOS 3 utility The ASUS CrashFree BIOS 3 is an auto recovery tool that contains the latest BIOS, and then press . 5. Before you to restore the BIOS file...


