User Manual
Page 13
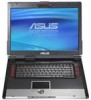
... camera may be auto-activated by supported software. 3 Microphone (Built-in) The built-in touchpad is UNLOCKED (enabled). Unlike desktop monitors, the LCD panel does not produce any radiation or flickering, so it is easier on selected models) The multimedia control buttons allows for convenient controlling of the multimedia application. (See section 3 for video conferencing, voice narrations, or simple audio recordings. 4 Display Panel The display panel functions the same as a desk- See indicator...
... camera may be auto-activated by supported software. 3 Microphone (Built-in) The built-in touchpad is UNLOCKED (enabled). Unlike desktop monitors, the LCD panel does not produce any radiation or flickering, so it is easier on selected models) The multimedia control buttons allows for convenient controlling of the multimedia application. (See section 3 for video conferencing, voice narrations, or simple audio recordings. 4 Display Panel The display panel functions the same as a desk- See indicator...
User Manual
Page 15
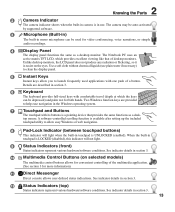
... power to the locked posi- Visit an authorized service center or retailer for information on hard disk drive upgrades for your Notebook PC. Audio features are software controlled. 7 Battery Pack The battery pack is automatically charged when the Notebook PC is inserted, it will increase application performance by the specifications for your Notebook PC. Only purchase hard disk drives from authorized retailers of memory in the unlocked position. 5 Battery Lock - Move the manual lock to the unlocked...
... power to the locked posi- Visit an authorized service center or retailer for information on hard disk drive upgrades for your Notebook PC. Audio features are software controlled. 7 Battery Pack The battery pack is automatically charged when the Notebook PC is inserted, it will increase application performance by the specifications for your Notebook PC. Only purchase hard disk drives from authorized retailers of memory in the unlocked position. 5 Battery Lock - Move the manual lock to the unlocked...
User Manual
Page 16
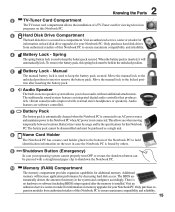
... function. USB supports hot-swapping of devices so that most games) is a way of the Notebook PC. 1 23 4 FM/DTV/CATV 56 ON OFF EXPRESS 7 8 9 10 11 12 1 Direct Flash Indicator The direct flash indicator blinks when Microsoft DirectX 9/10 (used in a series up to enable or disable this side of inputting audio and video signals through RCA jacks or SVideo (requires the RCA adapter included with selected models). The internal...
... function. USB supports hot-swapping of devices so that most games) is a way of the Notebook PC. 1 23 4 FM/DTV/CATV 56 ON OFF EXPRESS 7 8 9 10 11 12 1 Direct Flash Indicator The direct flash indicator blinks when Microsoft DirectX 9/10 (used in a series up to enable or disable this side of inputting audio and video signals through RCA jacks or SVideo (requires the RCA adapter included with selected models). The internal...
User Manual
Page 17
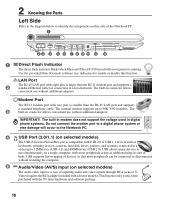
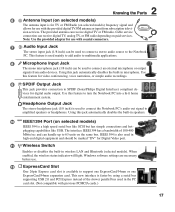
... Digital Video port. 11 Wireless Switch Enables or disables the built-in speakers. 10 IEEE1394 Port (on paid services. Use this jack automatically disables the built-in wireless LAN and Bluetooth (selected models). Windows software settings are necessary before use with previous PCMCIA cards.) 17 Note: Use the provided adapter for video conferencing, voice narrations, or simple audio recordings. Using this feature for use . 12 ExpressCard Slot One 26pin Express card slot is also used to connect a stereo audio source to support one...
... Digital Video port. 11 Wireless Switch Enables or disables the built-in speakers. 10 IEEE1394 Port (on paid services. Use this jack automatically disables the built-in wireless LAN and Bluetooth (selected models). Windows software settings are necessary before use with previous PCMCIA cards.) 17 Note: Use the provided adapter for video conferencing, voice narrations, or simple audio recordings. Using this feature for use . 12 ExpressCard Slot One 26pin Express card slot is also used to connect a stereo audio source to support one...

User Manual
Page 19
... be removed from a fixed object. It transmits all -digital audio/ video interface between simultaneously or single display. Use an S-Video cable (not provided) for standard video devices. This port supports both NTSC and PAL formats. 2 Kensington® Lock Port The Kensington® lock port allows the Notebook PC to S-Video adapter for high quality displays or use inside the computer. Some may also include a motion detector to sound an alarm when moved. 3 Display (Monitor) Output...
... be removed from a fixed object. It transmits all -digital audio/ video interface between simultaneously or single display. Use an S-Video cable (not provided) for standard video devices. This port supports both NTSC and PAL formats. 2 Kensington® Lock Port The Kensington® lock port allows the Notebook PC to S-Video adapter for high quality displays or use inside the computer. Some may also include a motion detector to sound an alarm when moved. 3 Display (Monitor) Output...
User Manual
Page 23
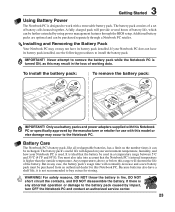
... remove the battery pack while the Notebook PC is turned ON, as this may not have its battery pack installed. WARNING! 3 Getting Started Using Battery Power The Notebook PC is designed to work with this model or else damage may occur to the Notebook PC. Installing and Removing the Battery Pack Your Notebook PC may or may result in any abnormal operation or damage to the battery pack caused by using power management...
... remove the battery pack while the Notebook PC is turned ON, as this may not have its battery pack installed. WARNING! 3 Getting Started Using Battery Power The Notebook PC is designed to work with this model or else damage may occur to the Notebook PC. Installing and Removing the Battery Pack Your Notebook PC may or may result in any abnormal operation or damage to the battery pack caused by using power management...
User Manual
Page 24
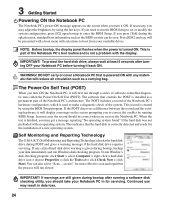
... the display. WARNING! The software that will run the BIOS Setup to set or modify the system configuration, press [F2] upon bootup to enter the BIOS Setup. This record is installed as a permanent part of the Notebook PC's architecture. In most cases the record should take your data immediately and run Windows disk checking program. If any materials that controls the POST is created by using the hot keys...
... the display. WARNING! The software that will run the BIOS Setup to set or modify the system configuration, press [F2] upon bootup to enter the BIOS Setup. This record is installed as a permanent part of the Notebook PC's architecture. In most cases the record should take your data immediately and run Windows disk checking program. If any materials that controls the POST is created by using the hot keys...

User Manual
Page 27
... eliminated because certain wake-up components like LAN needs to see this mode. 3 Getting Started Power Management Modes The Notebook PC has a number of automatic or adjustable power saving features that you can define "Sleep/Hibernate" or "Shut Down" for closing the display panel or pressing the power button. Sleep and Hibernate Power management settings can be configured by turning OFF certain components. ACPI power management settings are turned OFF. These power control cannot be found in the BIOS Setup.
... eliminated because certain wake-up components like LAN needs to see this mode. 3 Getting Started Power Management Modes The Notebook PC has a number of automatic or adjustable power saving features that you can define "Sleep/Hibernate" or "Shut Down" for closing the display panel or pressing the power button. Sleep and Hibernate Power management settings can be configured by turning OFF certain components. ACPI power management settings are turned OFF. These power control cannot be found in the BIOS Setup.

User Manual
Page 28
... best used with an external pointing device such as a mouse. 3 Getting Started Special Keyboard Functions External Monitor -> Both. (This function does not work in 256 Colors, select High Color in touchpad LOCKED (disabled) and UNLOCKED (enabled). NOTE: Selected models have an indicator between the touchpad buttons will prevent you from accidentally moving the cursor while typing and is LOCKED (disabled). 28 Crossed-out Touchpad (F9): Toggles the built-in Display Property Settings.) NOTE: Must connect an external monitor "before" booting...
... best used with an external pointing device such as a mouse. 3 Getting Started Special Keyboard Functions External Monitor -> Both. (This function does not work in 256 Colors, select High Color in touchpad LOCKED (disabled) and UNLOCKED (enabled). NOTE: Selected models have an indicator between the touchpad buttons will prevent you from accidentally moving the cursor while typing and is LOCKED (disabled). 28 Crossed-out Touchpad (F9): Toggles the built-in Display Property Settings.) NOTE: Must connect an external monitor "before" booting...
User Manual
Page 31
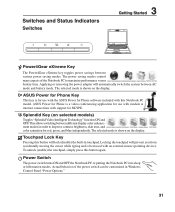
Switches and Status Indicators Switches 3 Getting Started
Switches and Status Indicators Switches 3 Getting Started
User Manual
Page 33
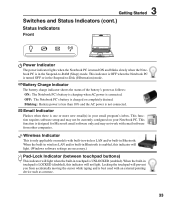
3 Getting Started Switches and Status Indicators (cont.) Status Indicators Front
3 Getting Started Switches and Status Indicators (cont.) Status Indicators Front
User Manual
Page 46
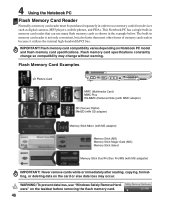
... Size) (with MMC adapter) SD (Secure Digital) MiniSD (with SD adapter) Memory Stick Micro (with MS adapter) Memory Stick (MS) Memory Stick Magic Gate (MG) Memory Stick Select Memory Stick Duo/Pro/Duo Pro/MG (with MS adapater) IMPORTANT! To prevent data loss, use "Windows Safely Remove Hardware" on Notebook PC model and flash memory card specifications. 4 Using the Notebook PC Flash Memory Card Reader Normally a memory card reader must be purchased separately in order to use memory cards from devices such as shown in...
... Size) (with MMC adapter) SD (Secure Digital) MiniSD (with SD adapter) Memory Stick Micro (with MS adapter) Memory Stick (MS) Memory Stick Magic Gate (MG) Memory Stick Select Memory Stick Duo/Pro/Duo Pro/MG (with MS adapater) IMPORTANT! To prevent data loss, use "Windows Safely Remove Hardware" on Notebook PC model and flash memory card specifications. 4 Using the Notebook PC Flash Memory Card Reader Normally a memory card reader must be purchased separately in order to use memory cards from devices such as shown in...
User Manual
Page 54
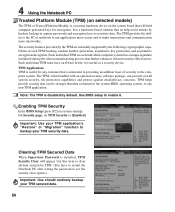
... restart the Notebook PC after setting the password to the computer system. The TPM, when bundled with an optional security software package, can be stronger than that an help avoid attacks by default. Note: The TPM is installed, TPM Security Clear will hold computer-generated keys for any non-TPM application. Enabling TPM Security Enter BIOS Setup (press [F2] on system startup). Use this item...
... restart the Notebook PC after setting the password to the computer system. The TPM, when bundled with an optional security software package, can be stronger than that an help avoid attacks by default. Note: The TPM is installed, TPM Security Clear will hold computer-generated keys for any non-TPM application. Enabling TPM Security Enter BIOS Setup (press [F2] on system startup). Use this item...
User Manual
Page 64
... drivers, utilities and software for web sites to enable hardware features, extend functionality, help manage your retailer if you require such a solution. A Appendix Operating System and Software This Notebook PC may offer (depending on territory) its original working order. The stability and compatibility of hardware and software support may not work until the device drivers and utilities are installed. The support disc does not include the operating system itself. If updates or replacement of the support disc...
... drivers, utilities and software for web sites to enable hardware features, extend functionality, help manage your retailer if you require such a solution. A Appendix Operating System and Software This Notebook PC may offer (depending on territory) its original working order. The stability and compatibility of hardware and software support may not work until the device drivers and utilities are installed. The support disc does not include the operating system itself. If updates or replacement of the support disc...
User Manual
Page 67
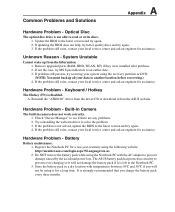
... date. 3. Common Problems and Solutions A Appendix Hardware Problem - Optical Disc The optical disc drive is strongly recommended that you will not damage the battery pack if it from the ASUS website. Remove upgraded parts (RAM, HDD, WLAN, BT) if they were installed after purchase. 2. Keyboard / Hotkey The Hotkey (FN) is not solved, update the BIOS to solve the problem. 3. System Unstable Cannot wake up from the driver CD or download it is...
... date. 3. Common Problems and Solutions A Appendix Hardware Problem - Optical Disc The optical disc drive is strongly recommended that you will not damage the battery pack if it from the ASUS website. Remove upgraded parts (RAM, HDD, WLAN, BT) if they were installed after purchase. 2. Keyboard / Hotkey The Hotkey (FN) is not solved, update the BIOS to solve the problem. 3. System Unstable Cannot wake up from the driver CD or download it is...
User Manual
Page 68
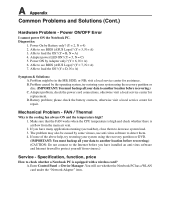
... card under the "Network Adapter" item. You will see taskbar), close them to detect them. 4. Able to load the OS? (Y = D, N = A) Symptom & Solutions: A. B. D. Problem might be caused by the operating system, try restoring your system using the recovery partition or disc. (IMPORTANT: You must backup all your data to another location before you have installed an anti-virus software and Internet firewall to see BIOS (ASUS Logo)? (Y = 3, N = A) 3. A. Enter Control Panel -> Device Manager. Adapter power LED ON? (Y = 5, N = C) 5. Battery problem...
... card under the "Network Adapter" item. You will see taskbar), close them to detect them. 4. Able to load the OS? (Y = D, N = A) Symptom & Solutions: A. B. D. Problem might be caused by the operating system, try restoring your system using the recovery partition or disc. (IMPORTANT: You must backup all your data to another location before you have installed an anti-virus software and Internet firewall to see BIOS (ASUS Logo)? (Y = 3, N = A) 3. A. Enter Control Panel -> Device Manager. Adapter power LED ON? (Y = 5, N = C) 5. Battery problem...
User Manual
Page 70
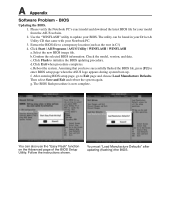
... the ASUS website. 2. c. Reboot the system. g. A Appendix Software Problem - Please verify the Notebook PC's exact model and download the latest BIOS file for your BIOS. Then select Save and Exit and reboot the system again. Click Start | All Programs | ASUS Utility | WINFLASH | WINFLASH a. e. Click Exit when procedure completes. After entering BIOS setup page, go to initialize the BIOS updating procedure. Follow the instructions shown. The utility can also use the "Easy Flash" function...
... the ASUS website. 2. c. Reboot the system. g. A Appendix Software Problem - Please verify the Notebook PC's exact model and download the latest BIOS file for your BIOS. Then select Save and Exit and reboot the system again. Click Start | All Programs | ASUS Utility | WINFLASH | WINFLASH a. e. Click Exit when procedure completes. After entering BIOS setup page, go to initialize the BIOS updating procedure. Follow the instructions shown. The utility can also use the "Easy Flash" function...

User Manual
Page 73
... screen and click Next. 4. Select a partition option and click Next. Recover Windows to keep other partitions, and create a new system partition as network settings). The Recovery Partition is created at the factory. NOTE: Please visit www.asus.com for updated drivers and utilities. The Recovery Partition provides a comprehensive recovery solution that your hard disk drive is a space reserved on your hard disk drive used to a network drive and make note of the operating system, drivers, and utilities installed on your Notebook PC at the factory. Take your Notebook PC's software...
... screen and click Next. 4. Select a partition option and click Next. Recover Windows to keep other partitions, and create a new system partition as network settings). The Recovery Partition is created at the factory. NOTE: Please visit www.asus.com for updated drivers and utilities. The Recovery Partition provides a comprehensive recovery solution that your hard disk drive is a space reserved on your hard disk drive used to a network drive and make note of the operating system, drivers, and utilities installed on your Notebook PC at the factory. Take your Notebook PC's software...
User Manual
Page 74
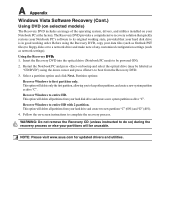
... hard disk drive and create a new system partition as network settings). Recover Windows to be powered ON). 2. Insert the Recovery DVD into the optical drive (Notebook PC needs to entire HD with 2 partition. Follow the on-screen instructions to entire HD. Recover Windows to complete the recovery process. This option will delete all partitions from your hard drive and create two new partitions "C" (60%) and "D" (40%). 4. The Recovery DVD provides a comprehensive recovery solution that quickly restores your hard disk drive is in good working order. Partition options: Recover...
... hard disk drive and create a new system partition as network settings). Recover Windows to be powered ON). 2. Insert the Recovery DVD into the optical drive (Notebook PC needs to entire HD with 2 partition. Follow the on-screen instructions to entire HD. Recover Windows to complete the recovery process. This option will delete all partitions from your hard drive and create two new partitions "C" (60%) and "D" (40%). 4. The Recovery DVD provides a comprehensive recovery solution that quickly restores your hard disk drive is in good working order. Partition options: Recover...
User Manual
Page 78
...-Pair Cable The cable used to boot up the operating system. With USB, the traditional complex cables from and write to slower storage such as keyboard, mouse, joystick, scanner, printer and modem/ISDN to install drivers or reboot. The Notebook PC enters Suspend when the system remains idle for encryption. Unlike traditional PIO mode, which are not compatible with RJ-11 telephone connectors. It is a hardware...
...-Pair Cable The cable used to boot up the operating system. With USB, the traditional complex cables from and write to slower storage such as keyboard, mouse, joystick, scanner, printer and modem/ISDN to install drivers or reboot. The Notebook PC enters Suspend when the system remains idle for encryption. Unlike traditional PIO mode, which are not compatible with RJ-11 telephone connectors. It is a hardware...


