User Manual
Page 66
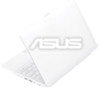
Activates Webcam 4-30 Chapter 4: Using the Eee PC Webcam Click Webcam and start video recording or image capture. Video Manager Starts the Video Manager Changes the view mode Changes the display window Switches to tree display Shows the properties of the selected item Moves the selected item to trash can ASUS Eee PC supports video and audio files in the following format: wmv, DVD, MPEG1, MPEG2, MPEG4 SP, Xvid, mp3, wma, ogg, wav, MPEG4 AAC, PCM, Dolby digital (2.0 decode) format. The actual supported codecs vary depending on model.
Activates Webcam 4-30 Chapter 4: Using the Eee PC Webcam Click Webcam and start video recording or image capture. Video Manager Starts the Video Manager Changes the view mode Changes the display window Switches to tree display Shows the properties of the selected item Moves the selected item to trash can ASUS Eee PC supports video and audio files in the following format: wmv, DVD, MPEG1, MPEG2, MPEG4 SP, Xvid, mp3, wma, ogg, wav, MPEG4 AAC, PCM, Dolby digital (2.0 decode) format. The actual supported codecs vary depending on model.

User Manual
Page 87
Reformatting the USB flash disk To use the USB disk on the left and select ASUS Linux USB Flash Utility. 3. Connect your USB flash disk to another PC/NB and insert the Support CD to reformat your Windows operating system normally, follow the instructions below to that PC/NB at the same time. 2. ASUS Eee PC 5-7 Select Format the USB flash disk back to complete the disk formatting. Click OK to Windows format (FAT16) and click Run. 4. Click Utilities on your USB disk. 1.
Reformatting the USB flash disk To use the USB disk on the left and select ASUS Linux USB Flash Utility. 3. Connect your USB flash disk to another PC/NB and insert the Support CD to reformat your Windows operating system normally, follow the instructions below to that PC/NB at the same time. 2. ASUS Eee PC 5-7 Select Format the USB flash disk back to complete the disk formatting. Click OK to Windows format (FAT16) and click Run. 4. Click Utilities on your USB disk. 1.
User Manual
Page 91
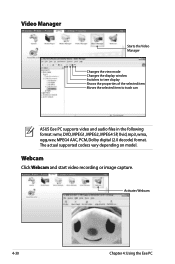
...- After entering Windows, insert the Support CD to your data after deleting all drivers. 5. After the Windows® XP installation screen appears. You will lose all your Eee PC. 7. After the Windows® XP OS...process. 9. Restart the system and press on bootup and the Please select boot device screen appears. ASUS Eee PC 6-3 Select USB:XXXXXX (may be labled as the ODD brand name) to enter the BIOS setup...configuration and reboot the system. 11. Press and select Format the partition using the NTFS file system to install all existing disk partitions. Drivers Installation ...
...- After entering Windows, insert the Support CD to your data after deleting all drivers. 5. After the Windows® XP installation screen appears. You will lose all your Eee PC. 7. After the Windows® XP OS...process. 9. Restart the system and press on bootup and the Please select boot device screen appears. ASUS Eee PC 6-3 Select USB:XXXXXX (may be labled as the ODD brand name) to enter the BIOS setup...configuration and reboot the system. 11. Press and select Format the partition using the NTFS file system to install all existing disk partitions. Drivers Installation ...

User Manual
Page 95
... update the Eee PC BIOS in Portable Document Format (PDF). This utility requires an Internet connection either through a network or an Internet Service Provider (ISP). Ethernet Utility Installs the Ethernet utility. ASUS Eee PC 6-7 ASUS OS Cleaner Installs ASUS OS cleaner application. ASUS InstAll - ADOBE Acrobat Reader Installs the Adobe® Acrobat® Reader that the Eee PC supports. ASUS Linux USB Flash...
... update the Eee PC BIOS in Portable Document Format (PDF). This utility requires an Internet connection either through a network or an Internet Service Provider (ISP). Ethernet Utility Installs the Ethernet utility. ASUS Eee PC 6-7 ASUS OS Cleaner Installs ASUS OS cleaner application. ASUS InstAll - ADOBE Acrobat Reader Installs the Adobe® Acrobat® Reader that the Eee PC supports. ASUS Linux USB Flash...


