User Manual
Page 17
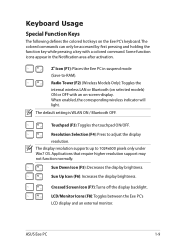
...the function key while pressing a key with an on-screen-display. Sun Up Icon (F6): Increases the display brightness. Radio Tower (F2) (Wireless Models Only):Toggles the internal wireless LAN or Bluetooth (on the Eee PC's keyboard. Touchpad (F3): Toggles the touchpad ON/OFF....Down Icon (F5): Decreases the display brightness. Crossed Screen Icon (F7): Turns off the display backlight. ASUS Eee PC 1-9 Zz Icon (F1): Places the Eee PC in the Notification area after activation. LCD/Monitor Icons (F8): Toggles between the Eee PC's LCD display and an external monitor. Keyboard Usage ...
...the function key while pressing a key with an on-screen-display. Sun Up Icon (F6): Increases the display brightness. Radio Tower (F2) (Wireless Models Only):Toggles the internal wireless LAN or Bluetooth (on the Eee PC's keyboard. Touchpad (F3): Toggles the touchpad ON/OFF....Down Icon (F5): Decreases the display brightness. Crossed Screen Icon (F7): Turns off the display backlight. ASUS Eee PC 1-9 Zz Icon (F1): Places the Eee PC in the Notification area after activation. LCD/Monitor Icons (F8): Toggles between the Eee PC's LCD display and an external monitor. Keyboard Usage ...

User Manual
Page 25
ASUS Eee PC 2-5 Select the network's location. 10. Double-click them to different models. Desktop There are several shortcuts on the desktop. The actual Desktop screen may vary according to launch the corresponding applications and enter the specified folders. Click Next to continue. Some applications would form minimized icons in the Notification area. The initialization is finished. 9.
ASUS Eee PC 2-5 Select the network's location. 10. Double-click them to different models. Desktop There are several shortcuts on the desktop. The actual Desktop screen may vary according to launch the corresponding applications and enter the specified folders. Click Next to continue. Some applications would form minimized icons in the Notification area. The initialization is finished. 9.
User Manual
Page 33
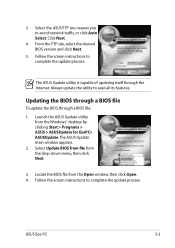
... avoid network traffic, or click Auto Select. Launch the ASUS Update utility from the Open window, then click Open. 4. Select the ASUS FTP site nearest you to avail all its features. Follow the screen instructions to complete the update process. ASUS Eee PC 3-3 Click Next. 4. Follow the screen instructions to complete the update process. Select Update BIOS...
... avoid network traffic, or click Auto Select. Launch the ASUS Update utility from the Open window, then click Open. 4. Select the ASUS FTP site nearest you to avail all its features. Follow the screen instructions to complete the update process. ASUS Eee PC 3-3 Click Next. 4. Follow the screen instructions to complete the update process. Select Update BIOS...
User Manual
Page 39
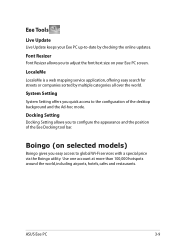
... background and the Ad-hoc mode. Eee Tools Live Update Live Update keeps your Eee PC screen. LocaleMe LocaleMe is a web mapping service application, offering easy search for streets or companies sorted by checking the online updates. Boingo (on your Eee PC up-to the configuration of the Eee Docking tool bar. ASUS Eee PC 3-9 Use one account at more...
... background and the Ad-hoc mode. Eee Tools Live Update Live Update keeps your Eee PC screen. LocaleMe LocaleMe is a web mapping service application, offering easy search for streets or companies sorted by checking the online updates. Boingo (on your Eee PC up-to the configuration of the Eee Docking tool bar. ASUS Eee PC 3-9 Use one account at more...
User Manual
Page 45
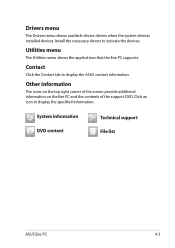
... shows the applications that the Eee PC supports. System information DVD content Technical support File list ASUS Eee PC 4-3 Drivers menu The Drivers menu shows available device drivers when the system detects installed devices. Other information The icons on the top right corner of the screen provide additional information on the Eee PC and the contents of the...
... shows the applications that the Eee PC supports. System information DVD content Technical support File list ASUS Eee PC 4-3 Drivers menu The Drivers menu shows available device drivers when the system detects installed devices. Other information The icons on the top right corner of the screen provide additional information on the Eee PC and the contents of the...

User Manual
Page 47
...a new system. Select and click Yes. DO NOT use the F9 recovery to select boot device continue. 3. Visit the ASUS website at www.asus.com for Eee PC only. ASUS Eee PC 4-5 Press on other partitions. Press and then press any updates. Options are: Recover system to a partition This option will ...hard disk drive and restore the operating system. Ensure that you make a backup of it on bootup and the Please select boot device screen appears. This support DVD is completed, restart the computer. 6. Follow the onscreen instructions to entire HD, the entire hard disk drive...
...a new system. Select and click Yes. DO NOT use the F9 recovery to select boot device continue. 3. Visit the ASUS website at www.asus.com for Eee PC only. ASUS Eee PC 4-5 Press on other partitions. Press and then press any updates. Options are: Recover system to a partition This option will ...hard disk drive and restore the operating system. Ensure that you make a backup of it on bootup and the Please select boot device screen appears. This support DVD is completed, restart the computer. 6. Follow the onscreen instructions to entire HD, the entire hard disk drive...
User Manual
Page 48
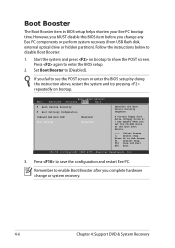
... you set the CD-ROM drive as the first boot device. ←→ Select Screen ↑↓ Select Item Enter Go to disable Boot Booster: 1. If you complete hardware change any Eee PC components or perform system recovery (from USB flash disk, external optical drive or hidden partition...). Press again to see the POST screen or enter the BIOS setup by doing the instruction above, restart the ...
... you set the CD-ROM drive as the first boot device. ←→ Select Screen ↑↓ Select Item Enter Go to disable Boot Booster: 1. If you complete hardware change any Eee PC components or perform system recovery (from USB flash disk, external optical drive or hidden partition...). Press again to see the POST screen or enter the BIOS setup by doing the instruction above, restart the ...


