User Manual
Page 3
...this manual...10 Safety information...11 Setting up your system...11 Care during use...11 Welcome 12 Package contents...12 Getting to know your EeeTop PC 13 Front view...13 Rear view...16 Side views...18 Using the touch screen...19 Cleaning the touch screen...19 Using the keyboard...20 ...Function keys...21 Positioning your EeeTop PC 22 Placing on the desktop...22 Setting up your EeeTop PC 23 Connecting the wired keyboard and mouse 23 Connecting the wireless keyboard and mouse 23 Powering on the system...24...
...this manual...10 Safety information...11 Setting up your system...11 Care during use...11 Welcome 12 Package contents...12 Getting to know your EeeTop PC 13 Front view...13 Rear view...16 Side views...18 Using the touch screen...19 Cleaning the touch screen...19 Using the keyboard...20 ...Function keys...21 Positioning your EeeTop PC 22 Placing on the desktop...22 Setting up your EeeTop PC 23 Connecting the wired keyboard and mouse 23 Connecting the wireless keyboard and mouse 23 Powering on the system...24...
User Manual
Page 14
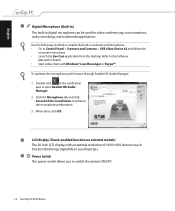
... > Scanners and Cameras > USB Video Device #2 and follow the onscreen instructions. • Launch the Eee Cam application from the desktop. Click the Microphone tab and click Acoustic Echo Cancellation to switch the system ON/OFF. 14 EeeTop PC ET20 Series To optimize the microphone performance through Realtek HD Audio Manager: 1. English 3 Digital Microphone...
... > Scanners and Cameras > USB Video Device #2 and follow the onscreen instructions. • Launch the Eee Cam application from the desktop. Click the Microphone tab and click Acoustic Echo Cancellation to switch the system ON/OFF. 14 EeeTop PC ET20 Series To optimize the microphone performance through Realtek HD Audio Manager: 1. English 3 Digital Microphone...

User Manual
Page 15
EeeTop PC ET20 Series 15 Press to scroll down when navigating the menu. 10 Home Button Press to increase the display brightness. English 6 Hard disk drive LED Indicates hard disk drive activity. Wireless LAN LED Indicates that the internal wireless LAN is enabled. (Windows® software settings are necessary to use the wireless LAN.) 7 Menu Button Press to display the menu. 8 Up Button Press to switch between system desktop and applications. Press to scroll up when navigating the menu. 9 Down Button Press to decrease the display brightness.
EeeTop PC ET20 Series 15 Press to scroll down when navigating the menu. 10 Home Button Press to increase the display brightness. English 6 Hard disk drive LED Indicates hard disk drive activity. Wireless LAN LED Indicates that the internal wireless LAN is enabled. (Windows® software settings are necessary to use the wireless LAN.) 7 Menu Button Press to display the menu. 8 Up Button Press to switch between system desktop and applications. Press to scroll up when navigating the menu. 9 Down Button Press to decrease the display brightness.

User Manual
Page 22
English Positioning your EeeTop PC Placing on the desktop Place your EeeTop PC on a flat surface such as a table or desk, and �p�u�l�l�t�h��e�s��ta��n�d��o��p�e�n��u��n�t�i�l�i�t snaps in place. Then, tilt the display panel to an angle of between 12 and 27 degrees from an upright position. 12° 0° 27° 0° 22 EeeTop PC ET20 Series
English Positioning your EeeTop PC Placing on the desktop Place your EeeTop PC on a flat surface such as a table or desk, and �p�u�l�l�t�h��e�s��ta��n�d��o��p�e�n��u��n�t�i�l�i�t snaps in place. Then, tilt the display panel to an angle of between 12 and 27 degrees from an upright position. 12° 0° 27° 0° 22 EeeTop PC ET20 Series

User Manual
Page 25
English Calibrating the screen EeeTop PC comes with the following software tool that allows you to end the calibration process. Touch and hold the center of the onscreen mark at each location and the screen will adjust automatically. Press the Esc key on selected models. 1. From the Windows® desktop, click Start > All Programs > Touch Panel Tool > Touch Panel Calibration. 2. EeeTop PC ET20 Series 25 The touch-enabled screen is available on the keyboard to adjust touch screen precision.
English Calibrating the screen EeeTop PC comes with the following software tool that allows you to end the calibration process. Touch and hold the center of the onscreen mark at each location and the screen will adjust automatically. Press the Esc key on selected models. 1. From the Windows® desktop, click Start > All Programs > Touch Panel Tool > Touch Panel Calibration. 2. EeeTop PC ET20 Series 25 The touch-enabled screen is available on the keyboard to adjust touch screen precision.


