
User Manual
Page 2
..., and are correct and up to make changes without the express written permission of their respective owners. English E5009 First Edition V1 August 2009 Copyright © 2009 ASUSTeK COMPUTER INC. No part of this manual, including the products and software described in it, may not be reproduced...corporate names mentioned in any form or by any language in this manual are used for backup purposes, without prior notice. However, the manufacturer makes no guarantee regarding the accuracy of this manual may or may be registered trademarks or copyrights of ASUSTeK COMPUTER, INC...
..., and are correct and up to make changes without the express written permission of their respective owners. English E5009 First Edition V1 August 2009 Copyright © 2009 ASUSTeK COMPUTER INC. No part of this manual, including the products and software described in it, may not be reproduced...corporate names mentioned in any form or by any language in this manual are used for backup purposes, without prior notice. However, the manufacturer makes no guarantee regarding the accuracy of this manual may or may be registered trademarks or copyrights of ASUSTeK COMPUTER, INC...
User Manual
Page 3
... Getting to know your EeeTop PC 13 Front view...13 Rear view...16 Side views...18 Using the touch screen...19 Cleaning the touch screen...19 Using the keyboard...20 Function keys...21 Positioning your EeeTop PC 22 Placing on the desktop...22 Setting up your EeeTop PC 23 Connecting the wired keyboard and mouse 23 Connecting the wireless keyboard and mouse 23 Powering on the system...24...
... Getting to know your EeeTop PC 13 Front view...13 Rear view...16 Side views...18 Using the touch screen...19 Cleaning the touch screen...19 Using the keyboard...20 Function keys...21 Positioning your EeeTop PC 22 Placing on the desktop...22 Setting up your EeeTop PC 23 Connecting the wired keyboard and mouse 23 Connecting the wireless keyboard and mouse 23 Powering on the system...24...

User Manual
Page 4
English Calibrating the screen...25 Configuring a wireless connection 26 Configuring the audio output...27 Speaker configurations...27 Connecting to speakers...27 Configuring audio output settings 28 Recovering your system 29 Using the support DVD...29 Using the hidden partition...30
English Calibrating the screen...25 Configuring a wireless connection 26 Configuring the audio output...27 Speaker configurations...27 Connecting to speakers...27 Configuring audio output settings 28 Recovering your system 29 Using the support DVD...29 Using the hidden partition...30
User Manual
Page 5
... with provided instructions and the antenna(s) used in a particular installation. CAUTION: Any changes or modifications not expressly approved by turning the equipment off and on, the user is connected. • Consult the dealer or an experienced radio/TV technician for this transmitter must be installed and operated in accordance with the limits for a Class B digital device, pursuant to Part 15 of...
... with provided instructions and the antenna(s) used in a particular installation. CAUTION: Any changes or modifications not expressly approved by turning the equipment off and on, the user is connected. • Consult the dealer or an experienced radio/TV technician for this transmitter must be installed and operated in accordance with the limits for a Class B digital device, pursuant to Part 15 of...

User Manual
Page 6
... any interference, including interference that may cause undesired operation of the device. IC Radiation Exposure Statement for an uncontrolled environment. Wireless Operation Channel for radio noise emissions from digital apparatus set forth for Canada This equipment complies with Canadian ICES... • This device may not cause interference and • This device must follow the specific operating instructions for electromagnetic compatibility in [EN 301 489-1] & [EN 301 489-17] • Effective use of the radio spectrum as in [Article 3.2] • Radio test suites according to...
... any interference, including interference that may cause undesired operation of the device. IC Radiation Exposure Statement for an uncontrolled environment. Wireless Operation Channel for radio noise emissions from digital apparatus set forth for Canada This equipment complies with Canadian ICES... • This device may not cause interference and • This device must follow the specific operating instructions for electromagnetic compatibility in [EN 301 489-1] & [EN 301 489-17] • Effective use of the radio spectrum as in [Article 3.2] • Radio test suites according to...
User Manual
Page 11
... you read the following technical problems with ambient temperatures between 0˚C and 40˚C. • If you leave plenty of the devices plugged into the system. • The system does not function properly even if you follow all power, modem, and network cables from foreign objects or excessive dust accumulation. Always unplug all instructions in environments with the...
... you read the following technical problems with ambient temperatures between 0˚C and 40˚C. • If you leave plenty of the devices plugged into the system. • The system does not function properly even if you follow all power, modem, and network cables from foreign objects or excessive dust accumulation. Always unplug all instructions in environments with the...
User Manual
Page 12
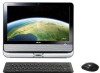
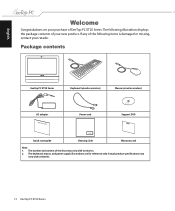
... content of the discs may vary with territories. 2. If any of the following illustration displays the package contents of EeeTop PC ET20 Series. Package contents EeeTop PC ET20 Series Keyboard (wired or wireless) Mouse (wired or wireless) AC adapter Quick Guide Power cord Support DVD Quick start guide Cleaning cloth Warranty card Note: 1. Actual product specifications may vary with territories. 12 EeeTop PC ET20 Series The keyboard, mouse, and power supply illustrations are for...
... content of the discs may vary with territories. 2. If any of the following illustration displays the package contents of EeeTop PC ET20 Series. Package contents EeeTop PC ET20 Series Keyboard (wired or wireless) Mouse (wired or wireless) AC adapter Quick Guide Power cord Support DVD Quick start guide Cleaning cloth Warranty card Note: 1. Actual product specifications may vary with territories. 12 EeeTop PC ET20 Series The keyboard, mouse, and power supply illustrations are for...
User Manual
Page 14
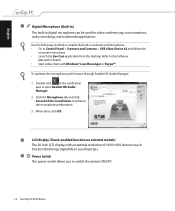
.... 5 Power switch The power switch allows you to Control Panel > Scanners and Cameras > USB Video Device #2 and follow the onscreen instructions. • Launch the Eee Cam application from the desktop. Use the following methods to enable the built-in webcam and microphone. • Go to switch the system ON/OFF. 14 EeeTop PC ET20 Series To optimize the microphone performance through Realtek HD Audio Manager: 1. Refer to the Software Manual...
.... 5 Power switch The power switch allows you to Control Panel > Scanners and Cameras > USB Video Device #2 and follow the onscreen instructions. • Launch the Eee Cam application from the desktop. Use the following methods to enable the built-in webcam and microphone. • Go to switch the system ON/OFF. 14 EeeTop PC ET20 Series To optimize the microphone performance through Realtek HD Audio Manager: 1. Refer to the Software Manual...

User Manual
Page 15
English 6 Hard disk drive LED Indicates hard disk drive activity. Press to scroll down when navigating the menu. 10 Home Button Press to decrease the display brightness. Press to scroll up when navigating the menu. 9 Down Button Press to switch between system desktop and applications. EeeTop PC ET20 Series 15 Wireless LAN LED Indicates that the internal wireless LAN is enabled. (Windows® software settings are necessary to use the wireless LAN.) 7 Menu Button Press to display the menu. 8 Up Button Press to increase the display brightness.
English 6 Hard disk drive LED Indicates hard disk drive activity. Press to scroll down when navigating the menu. 10 Home Button Press to decrease the display brightness. Press to scroll up when navigating the menu. 9 Down Button Press to switch between system desktop and applications. EeeTop PC ET20 Series 15 Wireless LAN LED Indicates that the internal wireless LAN is enabled. (Windows® software settings are necessary to use the wireless LAN.) 7 Menu Button Press to display the menu. 8 Up Button Press to increase the display brightness.

User Manual
Page 16
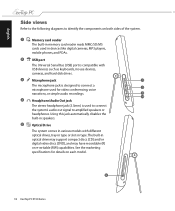
... upright. 2 Kensington® Lock port The Kensington® lock port allows the computer to be secured using Kensington® compatible security products. These security products usually include a metal cable and lock that prevent the computer to be removed from a fixed object. 3 USB port The Universal Serial Bus (USB) port is compatible with USB devices such as keyboards, mouse devices, cameras, and hard disk drives. 16 EeeTop PC ET20 Series
... upright. 2 Kensington® Lock port The Kensington® lock port allows the computer to be secured using Kensington® compatible security products. These security products usually include a metal cable and lock that prevent the computer to be removed from a fixed object. 3 USB port The Universal Serial Bus (USB) port is compatible with USB devices such as keyboards, mouse devices, cameras, and hard disk drives. 16 EeeTop PC ET20 Series

User Manual
Page 17
... cover the adapter and keep it away from your body. LAN port The eight-pin RJ-45 LAN port supports a standard Ethernet cable for connection to a local network. 6 Power input (DC 19V) The supplied power adapter converts AC power to DC power for use with this jack supplies power to the PC, always use . English 4 5 HDMI In Port HDMI (High-Definition Multimedia Interface) is an uncompressed all-digital audio/ video interface between any audio/video source, such as a set-top box, DVD...
... cover the adapter and keep it away from your body. LAN port The eight-pin RJ-45 LAN port supports a standard Ethernet cable for connection to a local network. 6 Power input (DC 19V) The supplied power adapter converts AC power to DC power for use with this jack supplies power to the PC, always use . English 4 5 HDMI In Port HDMI (High-Definition Multimedia Interface) is an uncompressed all-digital audio/ video interface between any audio/video source, such as a set-top box, DVD...
User Manual
Page 18
...-in type or slot-in type. Using this jack automatically disables the built-in speakers. 5 Optical Drive The system comes in various models with USB devices such as keyboards, mouse devices, cameras, and hard disk drives. 3 Microphone jack 1 The microphone jack is designed to connect a 2 microphone used for details on both sides of the system. 1 Memory card reader The built-in memory card reader reads MMC/SD/MS cards used in optical drive may support compact discs (CD) and/or digital video discs (DVD...
...-in type or slot-in type. Using this jack automatically disables the built-in speakers. 5 Optical Drive The system comes in various models with USB devices such as keyboards, mouse devices, cameras, and hard disk drives. 3 Microphone jack 1 The microphone jack is designed to connect a 2 microphone used for details on both sides of the system. 1 Memory card reader The built-in memory card reader reads MMC/SD/MS cards used in optical drive may support compact discs (CD) and/or digital video discs (DVD...

User Manual
Page 19
... on the mouse • The touch-enabled screen is available on selected models. • The Stylus function is only available on the screen. • Do not use an abrasive cleaner or a coarse cloth when cleaning the screen. Keep the screen clean from the wall. • Spray a small amount of the stylus pen, you can make EeeTop PC work at your...
... on the mouse • The touch-enabled screen is available on selected models. • The Stylus function is only available on the screen. • Do not use an abrasive cleaner or a coarse cloth when cleaning the screen. Keep the screen clean from the wall. • Spray a small amount of the stylus pen, you can make EeeTop PC work at your...
User Manual
Page 21
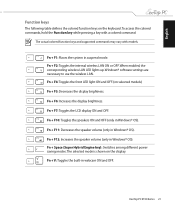
... the speakers ON and OFF (only in Windows® OS). Fn + F6: Increases the display brightness. Fn + F11: Decreases the speaker volume (only in Windows® OS). Fn + Space (Super Hybrid Engine key): Switches among different power saving modes. When enabled, the corresponding wireless LAN LED lights up. Windows® software settings are necessary to use the wireless LAN. English Function keys The following table defines the colored function keys on the keyboard.
... the speakers ON and OFF (only in Windows® OS). Fn + F6: Increases the display brightness. Fn + F11: Decreases the speaker volume (only in Windows® OS). Fn + Space (Super Hybrid Engine key): Switches among different power saving modes. When enabled, the corresponding wireless LAN LED lights up. Windows® software settings are necessary to use the wireless LAN. English Function keys The following table defines the colored function keys on the keyboard.

User Manual
Page 23
.... Install batteries to the keyboard USB port ( 2 ). 1 2 Connecting the wireless keyboard and mouse 1. Push the buttons at the back of the keyboard and mouse may vary with the EeeTop PC. 3. EeeTop PC ET20 Series 23 You can begin using the wireless keyboard and mouse. Actual appearances and specifications (wired or wireless) of both the keyboard and mouse to connect with territories. English Setting up your EeeTop PC Connecting the wired keyboard and mouse Connect the keyboard to the USB port on the rear panel...
.... Install batteries to the keyboard USB port ( 2 ). 1 2 Connecting the wireless keyboard and mouse 1. Push the buttons at the back of the keyboard and mouse may vary with the EeeTop PC. 3. EeeTop PC ET20 Series 23 You can begin using the wireless keyboard and mouse. Actual appearances and specifications (wired or wireless) of both the keyboard and mouse to connect with territories. English Setting up your EeeTop PC Connecting the wired keyboard and mouse Connect the keyboard to the USB port on the rear panel...

User Manual
Page 24
... display, or press any key on the keyboard. • To shut down the system completely, follow the normal Windows shutdown process or press and hold the Power switch for five seconds. 24 EeeTop PC ET20 Series English Powering on the system Connect the supplied AC adapter to the DC IN jack on the rear panel ( 1 2 3 ) and then press the Power switch on the front panel ( 4 ) to turn...
... display, or press any key on the keyboard. • To shut down the system completely, follow the normal Windows shutdown process or press and hold the Power switch for five seconds. 24 EeeTop PC ET20 Series English Powering on the system Connect the supplied AC adapter to the DC IN jack on the rear panel ( 1 2 3 ) and then press the Power switch on the front panel ( 4 ) to turn...

User Manual
Page 27
... speaker set is a left panel and their functions. For stereo speakers or headphones Audio jack Description Connects to the table below for the audio jacks on the left -right, two channel speaker system. Speaker configurations Set up the system using stereo speakers. A multi-channel audio speaker has a left-right front and left-right rear (surround) channel. EeeTop PC ET20 Series 27 Set up the system with the following speaker configurations...
... speaker set is a left panel and their functions. For stereo speakers or headphones Audio jack Description Connects to the table below for the audio jacks on the left -right, two channel speaker system. Speaker configurations Set up the system using stereo speakers. A multi-channel audio speaker has a left-right front and left-right rear (surround) channel. EeeTop PC ET20 Series 27 Set up the system with the following speaker configurations...

User Manual
Page 28
Select a playback device and click Properties to configure the speaker settings: 1. Right-click the speaker icon in the Windows® notification area and click Sounds. 2. English Configuring audio output settings After connecting a speaker system to your EeeTop PC, follow the steps below to configure the settings. 3. Click OK to finish the configurations. 28 EeeTop PC ET20 Series Do the advanced configurations, such as adjusting the speaker level and output rate.
Select a playback device and click Properties to configure the speaker settings: 1. Right-click the speaker icon in the Windows® notification area and click Sounds. 2. English Configuring audio output settings After connecting a speaker system to your EeeTop PC, follow the steps below to configure the settings. 3. Click OK to finish the configurations. 28 EeeTop PC ET20 Series Do the advanced configurations, such as adjusting the speaker level and output rate.

User Manual
Page 29
... hard disk drive and restore factory settings. EeeTop PC ET20 Series 29 English Recovering your system Using the support DVD The support DVD includes an image of the operating system installed on your system at www.asus.com for EeeTop PC only. Ensure that you make note of it on your data files (such as the boot device. After the system recovery is for any customized configuration settings (such as network settings). 1. Before using the support DVD...
... hard disk drive and restore factory settings. EeeTop PC ET20 Series 29 English Recovering your system Using the support DVD The support DVD includes an image of the operating system installed on your system at www.asus.com for EeeTop PC only. Ensure that you make note of it on your data files (such as the boot device. After the system recovery is for any customized configuration settings (such as network settings). 1. Before using the support DVD...
User Manual
Page 30
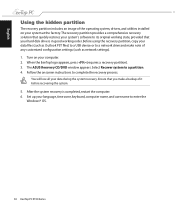
... recovery is in good working state, provided that you make note of it before recovering the system. 5. When the EeeTop logo appears, press (requires a recovery partition). 3. English Using the hidden partition The recovery partition includes an image of the operating system, drivers, and utilities installed on your data files (such as Outlook PST files) to a USB device or to a network drive and make a backup of any customized configuration settings (such as network settings). 1. Set...
... recovery is in good working state, provided that you make note of it before recovering the system. 5. When the EeeTop logo appears, press (requires a recovery partition). 3. English Using the hidden partition The recovery partition includes an image of the operating system, drivers, and utilities installed on your data files (such as Outlook PST files) to a USB device or to a network drive and make a backup of any customized configuration settings (such as network settings). 1. Set...


