Asus ESC8000-E11 Support and Manuals
Get Help and Manuals for this Asus item
View All Support Options Below
Free Asus ESC8000-E11 manuals!
Problems with Asus ESC8000-E11?
Ask a Question
Free Asus ESC8000-E11 manuals!
Problems with Asus ESC8000-E11?
Ask a Question
Asus ESC8000-E11 Videos

16 x GTX 1080 Ti , 4 x E5-2699 V4, 1,5TB RAM, stack by dual Asus ESC8000 G3 | AZPC TV
Duration: 4:20
Total Views: 11,864,724
Duration: 4:20
Total Views: 11,864,724
16 x GTX 1080 Ti , 4 x E5 2699 V4, 1,5TB RAM, stack by dual Asus ESC8000 G3 AZPC TV
Duration: 2:16
Total Views: 252
Duration: 2:16
Total Views: 252
ESC8000-G4 ???? GPU ?? ?? ASUS GPU Server Assembly
Duration: 10:24
Total Views: 383
Duration: 10:24
Total Views: 383
Popular Asus ESC8000-E11 Manual Pages
User Manual - Page 6
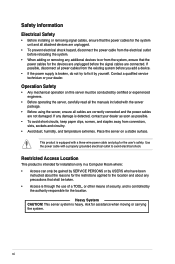
... installation only in a Computer Room where: • Access can only be gained by SERVICE PERSONS or by USERS who have been
instructed ...about the reasons for the restrictions applied to or from the system, ensure that shall be conducted by certified or experienced engineers.
• Before operating the server, carefully read all the manuals...
User Manual - Page 7

Chapter 3: BIOS Setup This chapter tells how to perform when installing or removing system components. 3. Chapter 4: Driver Installation This chapter provides instructions for installing the necessary drivers for system integrators and experienced users with at least basic knowledge of the server, including sections on front panel and rear panel specifications. 2.
Chapter 1: Product ...
User Manual - Page 8

... to help you must type the command exactly as shown, then supply the required item or value enclosed in brackets.
ASUS Control Center (ACC) user guide
This manual tells how to complete a task. IMPORTANT: Instructions that you must press the enclosed key.
If you perform certain tasks properly, take note of the following sources...
User Manual - Page 11

... xxSxxxxxxxxx. See the figure below. LAN 2
LAN 1
DM
ASUS ESC8000-E11
1-3
1.2 Serial number label
Before requesting support from the ASUS Technical Support team, you must take note of the product, ASUS Technical Support team members can then offer a quicker and satisfying solution to your problems.
ESC8000-E11
xxSxxxxxxxxx
Q code
CLEAR CMOS
RESET
LAN 1 LAN 2
M.2
The serial number...
User Manual - Page 12
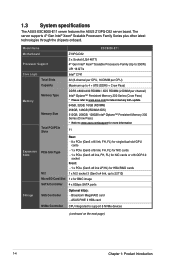
Model Name
ESC8000-E11
Motherboard
Processor Support... 300 Series (Crow Pass) * Please refer to www.asus.com for latest memory AVL update 64GB, 32GB, 16GB (RDIMM) 256GB, 128GB (RDIMM 3DS...supports 4th Gen Intel® Xeon® Scalable Processors Family Series plus other latest technologies through the chipsets onboard.
1.3 System specifications
The ASUS ESC8000-E11 server features the ASUS...
User Manual - Page 15
ASUS ESC8000-E11
1-7
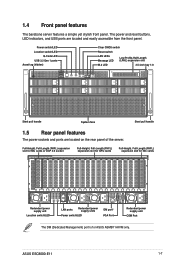
1.4 Front panel features
The barebone server features a simple yet stylish front panel. Power switch/LED Location switch/LED
Q-Code LED USB 3.2 Gen 1 ports Asset tag (hidden)
Clear CMOS switch
Reset switch
LAN LEDs Message LED
Low-Profile, Half-Length (LPHL) expansion slot
M.2 LED
3.5-inch bay 1-8
Q code
CLEAR CMOS
RESET
LAN 1 LAN 2
M.2
Q code
CLEAR CMOS...
User Manual - Page 17

... on the front or rear panel if you need to any of the USB ports on the system for sufficient heat dissipation.
*WARNING* HAZARDOUS MOVING PARTS KEEP FINGERS AND OTHER BODY PARTS AWAY
ASUS ESC8000-E11
1-9 Remove the protection film before shipping. 1.7 Internal features
The barebone server includes the basic components as shown...
User Manual - Page 35

...•
•
4 DIMMs •
• •
•
8 DIMMs
16 DIMMs
32 DIMMs
ASUS ESC8000-E11
2-13 For optimum compatibility, it is recommended that you obtain memory modules from the same vendor. or 128GB,... memory configurations in this section.
• Refer to ASUS Server AVL for the updated list of compatible DIMMs.
• Always install DIMMs with the same CAS latency.
User Manual - Page 37

... the retaining clips. ASUS ESC8000-E11
2-15 Locked Retaining Clip Always insert the DIMM into the socket.
Hold the DIMM by both ends of its ends then insert the DIMM vertically into the socket VERTICALLY to prevent DIMM notch damage.
2.4.4 Removing a DIMM
1. For more information, see the Chassis cover section.
2. Support the DIMM lightly...
User Manual - Page 39
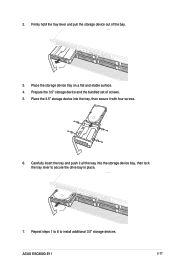
... 3.5" storage device and the bundled set of the bay.
3. 2. Firmly hold the tray lever and pull the storage device out of screws. 5. Place the 3.5" storage device into the storage device bay, then lock the tray lever to install additional 3.5" storage devices. Repeat steps 1 to 6 to secure the drive bay in place.
7. ASUS ESC8000-E11
2-17
User Manual - Page 41
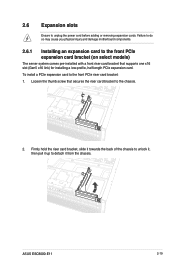
... to the front PCIe riser card bracket:
1. ASUS ESC8000-E11
2-19
Firmly hold the riser card bracket, slide it towards the back of the chassis to unlock it, then pull it from the chassis. Loosen the thumb screw that supports one x16 slot (Gen5 x16 link) for installing a low-profile, half-length PCIe expansion card...
User Manual - Page 43

... or RAID card. 2. (Optional) To install an ASUS PIKE II 3108 card and cache vault, follow the below
instructions to install the cache vault add-on card:
a. Align the two spacers with the screw holes on the ASUS PIKE II card, then secure the two spacers with two screws.
ASUS ESC8000-E11
2-21
c. Connect the bundled power cable...
User Manual - Page 45

Unscrew the two screws securing the Cache Vault bracket to the three screw holes on the Cache Vault bracket, then secure the clip with the three (3) bundled screws. ASUS ESC8000-E11
2-23 Align the three screw holes on the Cache Vault Power Module clip to the chassis, then remove the bracket.
2.
2.6.3 Installing the Cache Vault Power Module
1.
User Manual - Page 47

ASUS ESC8000-E11
2-25 Remove the screws from the metal cover, then remove the metal cover.
3. PCIe Gen5 x8 link ... of the PCIe card into the PCIe slot, then secure it using the screw removed earlier.
2.6.4 Installing an expansion card to the rear PCIe expansion card slots (on select models)
Follow the below instructions to install an expansion card to the rear PCIe expansion card slots.
User Manual - Page 49

ASUS ESC8000-E11
2-27 Align and connect the PFR module to the PFR module connector.
3. Push the PFR module down so that it is seated securely on the PFR module connector, then secure it using a screw. 2.
Asus ESC8000-E11 Reviews
We have not received any reviews for Asus yet.