User Manual
Page 2
No part of this manual, including the products and software described in it, may be reproduced, transmitted, transcribed, stored in a retrieval system, or translated into any language in this manual are used for backup purposes, without prior notice. Every effort has been made to ... up to make changes without the express written permission of their respective owners. All trademarks are the property of this manual may or may not be registered trademarks or copyrights of ASUSTeK COMPUTER, INC. ("ASUS"). All Rights Reserved. However, the manufacturer makes no guarantee regarding...
No part of this manual, including the products and software described in it, may be reproduced, transmitted, transcribed, stored in a retrieval system, or translated into any language in this manual are used for backup purposes, without prior notice. Every effort has been made to ... up to make changes without the express written permission of their respective owners. All trademarks are the property of this manual may or may not be registered trademarks or copyrights of ASUSTeK COMPUTER, INC. ("ASUS"). All Rights Reserved. However, the manufacturer makes no guarantee regarding...
User Manual
Page 3
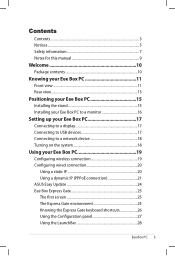
... Box PC 11 Front view 11 Rear view...13 Positioning your Eee Box PC 15 Installing the stand 15 Installing your Eee Box PC to a monitor 16 Setting up your Eee Box PC 17 Connecting to a display 17 Connecting to USB devices 17 Connecting to a network device 18 Turning on the system 18 Using your Eee Box PC 19 Configuring wireless connection 19 Configuring wired connection 20 Using a static IP 20 Using a dynamic IP (PPPoE connection 21 ASUS Easy Update 24...
... Box PC 11 Front view 11 Rear view...13 Positioning your Eee Box PC 15 Installing the stand 15 Installing your Eee Box PC to a monitor 16 Setting up your Eee Box PC 17 Connecting to a display 17 Connecting to USB devices 17 Connecting to a network device 18 Turning on the system 18 Using your Eee Box PC 19 Configuring wireless connection 19 Configuring wired connection 20 Using a static IP 20 Using a dynamic IP (PPPoE connection 21 ASUS Easy Update 24...

User Manual
Page 5
... a Class B digital device, pursuant to Part 15 of the monitor to the graphics card is encouraged to try to correct the interference by the party responsible for connection of the FCC Rules. These limits are designed to provide reasonable protection against harmful interference in a residential installation.This equipment generates, uses and can be determined by turning the equipment off...
... a Class B digital device, pursuant to Part 15 of the monitor to the graphics card is encouraged to try to correct the interference by the party responsible for connection of the FCC Rules. These limits are designed to provide reasonable protection against harmful interference in a residential installation.This equipment generates, uses and can be determined by turning the equipment off...
User Manual
Page 7
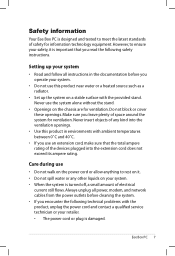
... or your retailer. • The power cord or plug is designed and tested to ensure your system. • Do not use an extension cord, make sure that you leave plenty of safety for information technology equipment. Setting up your system • Read and follow all power, modem, and network cables from the power outlets before you operate your safety, it . •...
... or your retailer. • The power cord or plug is designed and tested to ensure your system. • Do not use an extension cord, make sure that you leave plenty of safety for information technology equipment. Setting up your system • Read and follow all power, modem, and network cables from the power outlets before you operate your safety, it . •...

User Manual
Page 11
Knowing your Eee Box PC Front view Refer to the diagram below to identify the components on this side of the system. 1 2 3 4 5 6 1 Hard disk LED The hard disk LED blinks when data is being written into or read from the hard disk drive. 2 Power switch The power switch allows powering ON and OFF the system. 3 Memory card slot The built-in memory card reader reads MMC/SD/SDHC/MS/ MS Pro cards used in devices like digital cameras, MP3 players, mobile phones, and PDAs. Eee Box PC 11
Knowing your Eee Box PC Front view Refer to the diagram below to identify the components on this side of the system. 1 2 3 4 5 6 1 Hard disk LED The hard disk LED blinks when data is being written into or read from the hard disk drive. 2 Power switch The power switch allows powering ON and OFF the system. 3 Memory card slot The built-in memory card reader reads MMC/SD/SDHC/MS/ MS Pro cards used in devices like digital cameras, MP3 players, mobile phones, and PDAs. Eee Box PC 11

User Manual
Page 12
..., with USB devices such as additional plug-in sites or hubs. 5 Headphone/Audio Out jack The stereo headphone jack (3.5mm) is used to connect the system's audio out signal to amplified speakers or headphones. 6 Microphone jack The microphone jack is compatible with some peripheral acting as keyboards, mouse devices, cameras, and hard disk drives. 4 USB port The USB (Universal Serial Bus) port is designed to connect the microphone used for video conferencing...
..., with USB devices such as additional plug-in sites or hubs. 5 Headphone/Audio Out jack The stereo headphone jack (3.5mm) is used to connect the system's audio out signal to amplified speakers or headphones. 6 Microphone jack The microphone jack is compatible with some peripheral acting as keyboards, mouse devices, cameras, and hard disk drives. 4 USB port The USB (Universal Serial Bus) port is designed to connect the microphone used for video conferencing...
User Manual
Page 13
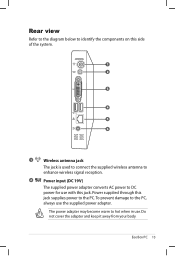
... PC, always use with this jack. Rear view Refer to the diagram below to identify the components on this side of the system. 1 2 3 4 5 6 1 Wireless antenna jack The jack is used to connect the supplied wireless antenna to enhance wireless signal reception. 2 Power input (DC 19V) The supplied power adapter converts AC power to DC power for use the supplied power adapter. The power adapter may become warm to the PC. Power supplied through this jack supplies power...
... PC, always use with this jack. Rear view Refer to the diagram below to identify the components on this side of the system. 1 2 3 4 5 6 1 Wireless antenna jack The jack is used to connect the supplied wireless antenna to enhance wireless signal reception. 2 Power input (DC 19V) The supplied power adapter converts AC power to DC power for use the supplied power adapter. The power adapter may become warm to the PC. Power supplied through this jack supplies power...
User Manual
Page 14
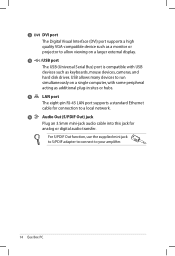
... external display. 4 USB port The USB (Universal Serial Bus) port is compatible with some peripheral acting as keyboards, mouse devices, cameras, and hard disk drives. For S/PDIF Out function, use the supplied mini jack to S/PDIF adapter to connect to a local network. 6 Audio Out (S/PDIF Out) jack Plug an 3.5mm mini-jack audio cable into this jack for connection to your amplifier. 14 Eee Box PC 3 DVI port The Digital Visual Interface (DVI) port supports a high quality VGA...
... external display. 4 USB port The USB (Universal Serial Bus) port is compatible with some peripheral acting as keyboards, mouse devices, cameras, and hard disk drives. For S/PDIF Out function, use the supplied mini jack to S/PDIF adapter to connect to a local network. 6 Audio Out (S/PDIF Out) jack Plug an 3.5mm mini-jack audio cable into this jack for connection to your amplifier. 14 Eee Box PC 3 DVI port The Digital Visual Interface (DVI) port supports a high quality VGA...

User Manual
Page 17
Connecting to a display Connect one end of a DVI cable to the display ( 1 ) and the other end to the DVI port on the system rear panel ( 2 ). 2 1 Connecting to USB devices Connect USB devices like keyboards, mouse devices, and printers to connect peripherals before using your Eee Box PC. Eee Box PC 17 Setting up your Eee Box PC You need to the USB ports on the system rear panel.
Connecting to a display Connect one end of a DVI cable to the display ( 1 ) and the other end to the DVI port on the system rear panel ( 2 ). 2 1 Connecting to USB devices Connect USB devices like keyboards, mouse devices, and printers to connect peripherals before using your Eee Box PC. Eee Box PC 17 Setting up your Eee Box PC You need to the USB ports on the system rear panel.

User Manual
Page 18
Connecting to a network device Connect one end of a network cable to a hub or switch. Network cable with RJ-45 connectors Network hub or switch Turning on the system Connect the supplied AC adapter to the DC IN jack on the system rear panel, and then press the power switch on the front panel to turn on the system rear panel and the other end to the LAN port on the system. 3 2 4 1 18 Eee Box PC
Connecting to a network device Connect one end of a network cable to a hub or switch. Network cable with RJ-45 connectors Network hub or switch Turning on the system Connect the supplied AC adapter to the DC IN jack on the system rear panel, and then press the power switch on the front panel to turn on the system rear panel and the other end to the LAN port on the system. 3 2 4 1 18 Eee Box PC

User Manual
Page 19
From the Windows® notification area, right-click the wireless network icon and select View Available Wireless Networks. 2. After connection was established, you want to connect to enhance wireless signal reception. 1. Using your Eee Box PC Configuring wireless connection To connect to a wireless network, follow the instructions below: Connect the supplied wireless antenna to your Eee Box PC to from the list and click Connect. Enter the network security key if necessary. 3. Select the wireless network you will see Connected. Eee Box PC 19
From the Windows® notification area, right-click the wireless network icon and select View Available Wireless Networks. 2. After connection was established, you want to connect to enhance wireless signal reception. 1. Using your Eee Box PC Configuring wireless connection To connect to a wireless network, follow the instructions below: Connect the supplied wireless antenna to your Eee Box PC to from the list and click Connect. Enter the network security key if necessary. 3. Select the wireless network you will see Connected. Eee Box PC 19
User Manual
Page 22
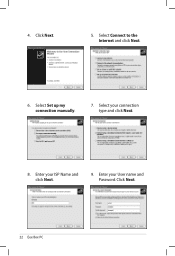
Enter your User name and Password. Select Set up my connection manually. 7. Enter your ISP Name and click Next. 9. Click Next. 5. Click Next. 22 Eee Box PC 4. Select Connect to the Internet and click Next. 6. Select your connection type and click Next. 8.
Enter your User name and Password. Select Set up my connection manually. 7. Enter your ISP Name and click Next. 9. Click Next. 5. Click Next. 22 Eee Box PC 4. Select Connect to the Internet and click Next. 6. Select your connection type and click Next. 8.
User Manual
Page 23
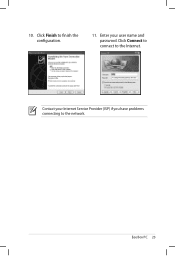
10. Click Connect to connect to finish the configuration. 11. Enter your Internet Service Provider (ISP) if you have problems connecting to the network. Eee Box PC 23 Click Finish to the Internet. Contact your user name and password.
10. Click Connect to connect to finish the configuration. 11. Enter your Internet Service Provider (ISP) if you have problems connecting to the network. Eee Box PC 23 Click Finish to the Internet. Contact your user name and password.

User Manual
Page 24
ASUS Easy Update ASUS Easy Update is a software tool that automatically detects and downloads the latest BIOS, drivers, and applications for your system. 3. From the Windows® notification area, right-click the ASUS Easy Update icon. 2. Select Update to update your Eee Box PC. 1. Check the item(s) you can download. 5. Click OK to display the items you want to activate the update. 4. Select Schedule to set how often you want to download, and then click OK. 24 Eee Box PC
ASUS Easy Update ASUS Easy Update is a software tool that automatically detects and downloads the latest BIOS, drivers, and applications for your system. 3. From the Windows® notification area, right-click the ASUS Easy Update icon. 2. Select Update to update your Eee Box PC. 1. Check the item(s) you can download. 5. Click OK to display the items you want to activate the update. 4. Select Schedule to set how often you want to download, and then click OK. 24 Eee Box PC

User Manual
Page 26
Knowing the Express Gate keyboard shortcuts The following are frequently-used Express Gate keyboard shortcuts. You can switch to open or switch among applications. Right-clicking anywhere on the desktop opens a menu of applications. In the first screen: Key PAUSE/BREAK ESC DEL F8 Function Power-off Enter OS Enter BIOS setup Enter boot priority selection In the Express Gate environment: Key ALT + TAB Function Switch among applications by pressing ALT...
Knowing the Express Gate keyboard shortcuts The following are frequently-used Express Gate keyboard shortcuts. You can switch to open or switch among applications. Right-clicking anywhere on the desktop opens a menu of applications. In the first screen: Key PAUSE/BREAK ESC DEL F8 Function Power-off Enter OS Enter BIOS setup Enter boot priority selection In the Express Gate environment: Key ALT + TAB Function Switch among applications by pressing ALT...

User Manual
Page 27
... Keyboard: sets your language and keyboard preferences. • LaunchBar Settings: customizes your speaker or microphone. Eee Box PC 27 Click an icon to open a configuration tool. Using the Configuration panel The configuration panel allows you enter the Express Gate environment. • Screen Settings: sets the optimal resolution for your display. • Volume Control: adjusts the volume of your LaunchBar. • Network: establishes a wireless/wired network connection. • Environment Settings: restores the Express Gate environment to its factory settings...
... Keyboard: sets your language and keyboard preferences. • LaunchBar Settings: customizes your speaker or microphone. Eee Box PC 27 Click an icon to open a configuration tool. Using the Configuration panel The configuration panel allows you enter the Express Gate environment. • Screen Settings: sets the optimal resolution for your display. • Volume Control: adjusts the volume of your LaunchBar. • Network: establishes a wireless/wired network connection. • Environment Settings: restores the Express Gate environment to its factory settings...

User Manual
Page 28
... the hard disk drive and USB drives and to download files to change volume. Express Gate allows you access to configure network settings. Shows volume status; click to USB drives only. Starts the Chat instant messaging tool. Opens Configuration Panel to the World Wide Web. Shows network status; Start the Skype application. In rare cases when one of the screen. Starts the Web Browser for quick access to configure network settings and other preferences. If a USB device is...
... the hard disk drive and USB drives and to download files to change volume. Express Gate allows you access to configure network settings. Shows volume status; click to USB drives only. Starts the Chat instant messaging tool. Opens Configuration Panel to the World Wide Web. Shows network status; Start the Skype application. In rare cases when one of the screen. Starts the Web Browser for quick access to configure network settings and other preferences. If a USB device is...
User Manual
Page 30
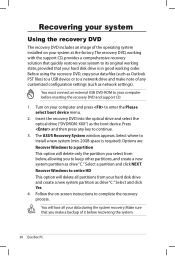
... boot device menu. 2. You will delete only the partition you select from your hard disk drive and create a new system partition as drive "C." Insert the recovery DVD into the optical drive and select the optical drive ("DVDROM: XXX") as network settings). Options are: Recover Windows to a partition This option will lose all partitions from below, allowing you make note of any customized configuration settings (such as the boot device. You must connect an external USB DVD-ROM to keep other partitions, and create a new system partition...
... boot device menu. 2. You will delete only the partition you select from your hard disk drive and create a new system partition as drive "C." Insert the recovery DVD into the optical drive and select the optical drive ("DVDROM: XXX") as network settings). Options are: Recover Windows to a partition This option will lose all partitions from below, allowing you make note of any customized configuration settings (such as the boot device. You must connect an external USB DVD-ROM to keep other partitions, and create a new system partition...
User Manual
Page 31
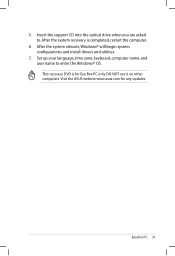
DO NOT use it on other computers. 5. Set up your language, time zone, keyboard, computer name, and user name to . This recovery DVD is completed, restart the computer. 6. Visit the ASUS website www.asus.com for Eee Box PC only. After the system reboots, Windows® will begin system configurations and install drivers and utilities. 7. Insert the support CD into the optical drive when you are asked to enter the Windows® OS. After the system recovery is for any updates. Eee Box PC 31
DO NOT use it on other computers. 5. Set up your language, time zone, keyboard, computer name, and user name to . This recovery DVD is completed, restart the computer. 6. Visit the ASUS website www.asus.com for Eee Box PC only. After the system reboots, Windows® will begin system configurations and install drivers and utilities. 7. Insert the support CD into the optical drive when you are asked to enter the Windows® OS. After the system recovery is for any updates. Eee Box PC 31
User Manual
Page 32
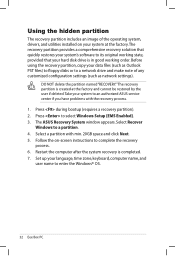
... your system at the factory and cannot be restored by the user if deleted.Take your hard disk drive is in good working order. Using the hidden partition The recovery partition includes an image of any customized configuration settings (such as Outlook PST files) to floppy disks or to a network drive and make note of the operating system, drivers, and utilities installed on -screen instructions to an authorized ASUS service center if you have problems with min. 20GB...
... your system at the factory and cannot be restored by the user if deleted.Take your hard disk drive is in good working order. Using the hidden partition The recovery partition includes an image of any customized configuration settings (such as Outlook PST files) to floppy disks or to a network drive and make note of the operating system, drivers, and utilities installed on -screen instructions to an authorized ASUS service center if you have problems with min. 20GB...

