Asus E500 G5 Support and Manuals
Get Help and Manuals for this Asus item
View All Support Options Below
Free Asus E500 G5 manuals!
Problems with Asus E500 G5?
Ask a Question
Free Asus E500 G5 manuals!
Problems with Asus E500 G5?
Ask a Question
Asus E500 G5 Videos

Yeni Sunucumuz Kutusundan Ç?k?yor: ASUS E500 G5 Workstation
Duration: 15:20
Total Views: 59,210
Duration: 15:20
Total Views: 59,210
The No Nonsense Sleek Workstation - ASUS E500 G5 SFF
Duration: 3:55
Total Views: 881
Duration: 3:55
Total Views: 881
Popular Asus E500 G5 Manual Pages
User Manual - Page 10
... number label
Before requesting support from the ASUS Technical Support team, you must take note of the above items is damaged or missing, contact your problems.
Smart Card
SD/MMC/MS
E500 G5 xxS0xxxxxxxx
1-2
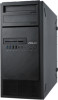
Chapter 1: Product Introduction 1.1 System package contents
Check your system package for the following items.
Model Name E500 G5
Accessories
1 x E500 G5 Support DVD 1 x Windows 10...
User Manual - Page 11
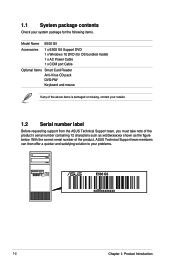
1.3 E500 G5 specifications summary
The ASUS E500 G5 is a workstation featuring the ASUS WS C246 PRO motherboard. Intel® C246 Chipset 4 (2-channel per CPU, 4 DIMM per CPU)
Capacity
Maximum up to 128GB (UDIMM)
Memory
4 x DDR4 2666/2400/2133 MHz*, ECC / non-ECC UDIMM Memory Type
* Refer to www.asus.com for the latest update
Memory Size 32GB, 16GB, 8GB, 4GB...
User Manual - Page 12
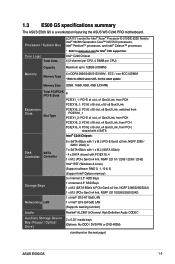
E500 G5 specifications summary
Front I/O
Rear I/O
Switch/LED
Security Options OS Support Dimension (HH x WW x DD) Net Weight Kg (CPU, DRAM & HDD not inclu ded) Power Supply ...Reset switch 1 x HDD Access LED
Trusted Platform Module (TPM 2.0) Windows® 10
* Refer to http://www.asus.com/ for the latest OS support.
423 mm x 190 mm x 435 mm
12.65 Kg
300W 80PLUS Single Power Supply, Bronze (100-127...
User Manual - Page 13

ASUS E500 G5
1-5 Optical Drive (Optional)
Empty 5.25-inch bay
Card reader
USB 3.2 Gen 1 ports USB 2.0 ports*
Headphone port Microphone port
Smart Card
SD/MMC/MS
Reset button Power button
Power LED HDD access LED
Refer to the Front panel LEDs section for easy access. 1.4 Front panel features
The E500 G5 workstation features a simple yet stylish...
User Manual - Page 27
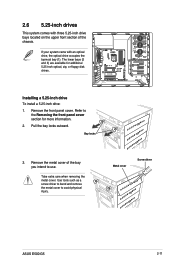
...the bay locks outward. Use tools such as a screw driver to bend and remove the metal cover to use. Remove the front panel cover. Installing a 5.25-inch drive To install a 5.25-inch drive:
1. The lower bays (2... the topmost bay (1). Take extra care when removing the metal cover. Metal cover
Screw driver
ASUS E500 G5
2-11 If your system came with three 5.25-inch drive bays located on the upper...
User Manual - Page 31
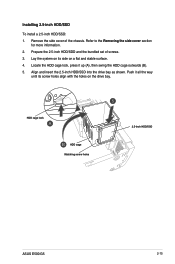
.../SSD into the drive bay as shown. HDD cage lock
HDD cage Matching screw holes
2.5-inch HDD/SSD
ASUS E500 G5
2-15 Installing 2.5-inch HDD/SSD
To install a 2.5-inch HDD/SSD: 1. Lay the system on its screw holes align with the holes on a ... side cover of screws. 3. Prepare the 2.5-inch HDD/SDD and the bundled set of the chassis.
Push it up (A), then swing the HDD cage outwards (B). 5.
User Manual - Page 33
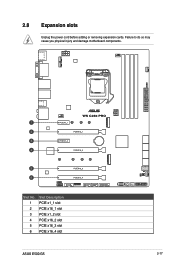
Slot No. 1 2 3 4 5 6
Slot Description PCIE x1_1 slot PCIE x16_1 slot PCIE x1_2 slot PCIE x16_2 slot PCIE x16_3 slot PCIE x16_4 slot
ASUS E500 G5
2-17 Failure to do so may cause you physical injury and damage motherboard components. 2.8 Expansion slots
Unplug the power cord before adding or removing expansion cards.
User Manual - Page 35
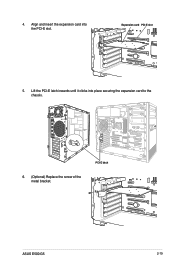
PCI-E latch
ASUS E500 G5
2-19
Lift the PCI-E latch inwards until it clicks into the PCI-E slot. Align and insert the expansion card into place securing the expansion card to the chassis.
6. (Optional) Replace the screw of the metal bracket.
4. Expansion card PCI-E slot
5.
User Manual - Page 37
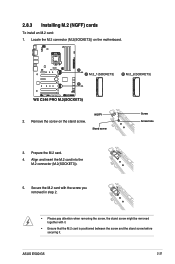
...) cards
To install an M.2 card: 1. Stand screw
3. ASUS E500 G5
2-21
Remove the screw on the motherboard. Align and insert the M.2 card into the
M.2 connector (M.2(SOCKET3)).
5. Prepare the M.2 card. 4.
Secure the M.2 card with it.
• ...
User Manual - Page 39
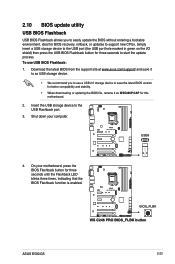
... save the latest BIOS version for better compatibility and stability.
• When downloading or updating the BIOS file, rename it
to as WSC246P.CAP for BIOS recovery, rollback, or updates to support new CPUs. ASUS E500 G5
2-23 2.10 BIOS update utility USB BIOS Flashback
USB BIOS Flashback allows you to use USB BIOS Flashback: 1. Shut down...
User Manual - Page 41
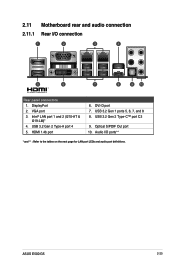
USB 3.2 Gen 2 Type-A port 4 5. HDMI 1.4b port
6. USB 3.2 Gen 2 Type-C™ port C3
9. Optical S/PDIF Out port 10.
ASUS E500 G5
2-25 DisplayPort 2. USB 3.2 Gen 1 ports 5, 6, 7, and 8 8. DVI-D port 7. 2.11 Motherboard rear and audio connection 2.11.1 Rear I /O ports**
* and ** : Refer to the tables on the next ...
User Manual - Page 43

2.11.2 Audio I/O connections
Audio I/O ports Connect to Headphone and Mic
Connect to Stereo Speakers
Connect to 2-channel Speakers
ASUS E500 G5
2-27
User Manual - Page 79
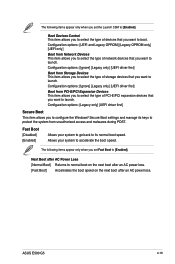
... Boot to [Enabled]. Configuration options: [Ignore] [Legacy only] [UEFI driver first]
Boot from Network Devices This item allows you to select the type of storage devices that you want to boot. ASUS E500 G5
4-19 The following items appear only when you set the Launch CSM to [Enabled].
Allows your system to go back to...
User Manual - Page 97
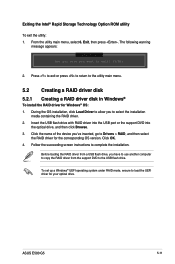
... to use another computer to copy the RAID driver from the support DVD to Drivers > RAID, and then select
the RAID driver for your optical drive. ASUS E500 G5
5-11 During the OS installation, click Load Driver to allow you 've inserted, go to the USB flash drive. Follow the succeeding screen instructions to the utility main menu.
5.2 Creating a RAID...
User Manual - Page 103
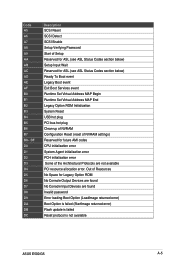
... Set Virtual Address MAP End Legacy Option ROM Initialization System Reset USB hot plug PCI bus hot plug Clean-up of NVRAM Configuration Reset (reset of the Architectural Protocols are found Invalid password Error loading Boot Option (LoadImage returned error) Boot Option is failed (StartImage returned error) Flash update is failed Reset protocol is not available
ASUS E500 G5...
Asus E500 G5 Reviews
We have not received any reviews for Asus yet.