
Users Manual Traditional ChineseSimplified Chinese
Page 1
... Gen 1 連接埠/ USB 3.1 Gen 1 接口 Microphone port Headphone port Optical disk drive bay Power button D340MC (S340MC) ETC14409 / Second Edition / May 2018 ETC14409_D340MC_QSG_V2.indd 1 6/12/2018 8:15:56 PM Actual product specifications may vary Function...DoC) from the ASUS support site at http://www.asus.com/support https://www.asus.com/tw/support DoC)。 https://www.asus.com.cn/support DoC)。 D340MC (S340MC) D340MC (S340MC) • Illustrations are for ventilation. Desktop PC Installation Guide 1 &#...
... Gen 1 連接埠/ USB 3.1 Gen 1 接口 Microphone port Headphone port Optical disk drive bay Power button D340MC (S340MC) ETC14409 / Second Edition / May 2018 ETC14409_D340MC_QSG_V2.indd 1 6/12/2018 8:15:56 PM Actual product specifications may vary Function...DoC) from the ASUS support site at http://www.asus.com/support https://www.asus.com/tw/support DoC)。 https://www.asus.com.cn/support DoC)。 D340MC (S340MC) D340MC (S340MC) • Illustrations are for ventilation. Desktop PC Installation Guide 1 &#...

Users Manual
Page 3
... a USB storage device 23 Connecting microphone and speakers 24 Changing to the external audio output 27 Chapter 3 Using your computer Proper posture when using your Desktop PC 29 Using the optical drive (optional 30 Configuring the USB ports using the BIOS 31 Configuring the HDD security setting using the BIOS 32 Chapter...
... a USB storage device 23 Connecting microphone and speakers 24 Changing to the external audio output 27 Chapter 3 Using your computer Proper posture when using your Desktop PC 29 Using the optical drive (optional 30 Configuring the USB ports using the BIOS 31 Configuring the HDD security setting using the BIOS 32 Chapter...
Users Manual
Page 9
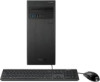
...its benefits to sleep after 10 and 30 minutes of user inactivity. energystar.gov for detail information on Freedos and Linux-based products. All ASUS products with the ENERGY STAR logo comply with ambient temperatures between 5˚C (41˚F) and 40˚C (104˚F). • ... through energy efficient products and practices. DO NOT short circuit the contacts. Department of warm water then remove any foreign objects into the Desktop PC. • DO NOT expose to strong magnetic or electrical fields. • DO NOT expose to dirty or dusty environments. Seek servicing...
...its benefits to sleep after 10 and 30 minutes of user inactivity. energystar.gov for detail information on Freedos and Linux-based products. All ASUS products with the ENERGY STAR logo comply with ambient temperatures between 5˚C (41˚F) and 40˚C (104˚F). • ... through energy efficient products and practices. DO NOT short circuit the contacts. Department of warm water then remove any foreign objects into the Desktop PC. • DO NOT expose to strong magnetic or electrical fields. • DO NOT expose to dirty or dusty environments. Seek servicing...
Users Manual
Page 11
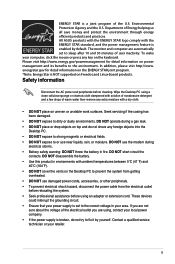
Package contents ASUS Desktop PC D340MC Keyboard x1 Mouse x1 Power cord x1 Support DVD x1 Installation Guide Recovery DVD x1 (Optional) ASUS mouse pad x 1 (Optional) Installation Guide x1 Warranty card x1 • If any of the above items is damaged or missing, contact your retailer. • The illustrated items above are for reference only. Actual product specifications may vary with different models. 11
Package contents ASUS Desktop PC D340MC Keyboard x1 Mouse x1 Power cord x1 Support DVD x1 Installation Guide Recovery DVD x1 (Optional) ASUS mouse pad x 1 (Optional) Installation Guide x1 Warranty card x1 • If any of the above items is damaged or missing, contact your retailer. • The illustrated items above are for reference only. Actual product specifications may vary with different models. 11
Users Manual
Page 13
... Card before setting up your computer Illustrations are encapsulated in a stunningly futuristic and stylish system casing. Getting to prevent the risk of injury. ASUS Desktop PC 13 The ASUS Desktop PC provides cutting-edge performance, uncompromised reliability, and user-centric utilities. All these values are for reference only. The ports and their locations, and the chassis...
... Card before setting up your computer Illustrations are encapsulated in a stunningly futuristic and stylish system casing. Getting to prevent the risk of injury. ASUS Desktop PC 13 The ASUS Desktop PC provides cutting-edge performance, uncompromised reliability, and user-centric utilities. All these values are for reference only. The ports and their locations, and the chassis...
Users Manual
Page 15
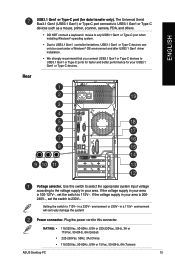
..., 3A or 115Vac, 50-60Hz, 6A (Global) • 220-230Vac, 50Hz, 3A.(China) • 115/230Vac, 50-60Hz, 6/3A or 15Vac, 50-60Hz, 6A (Taiwan) ASUS Desktop PC 15 Setting the switch to this switch to select the appropriate system input voltage according to USB3.1 Gen1 or Type-C ports for faster and better...
..., 3A or 115Vac, 50-60Hz, 6A (Global) • 220-230Vac, 50Hz, 3A.(China) • 115/230Vac, 50-60Hz, 6/3A or 15Vac, 50-60Hz, 6A (Taiwan) ASUS Desktop PC 15 Setting the switch to this switch to select the appropriate system input voltage according to USB3.1 Gen1 or Type-C ports for faster and better...

Users Manual
Page 17
...LAN) through a network hub. Connect a parallel device such as a VGA monitor. These vents allow air ventilation. ASUS Graphics Card (on the chassis. LAN (RJ-45) port. Remove the expansion slot bracket when installing an expansion ...ASUS Graphics Card may vary with different models. LAN port LED indications ACT/LINK LED SPEED LED Activity/Link LED Status Description OFF No link ORANGE Linked BLINKING Data activity Speed LED Status OFF ORANGE GREEN Description 10Mbps connection 100Mbps connection 1Gbps connection LAN port Serial port. Air vents. ASUS Desktop PC...
...LAN) through a network hub. Connect a parallel device such as a VGA monitor. These vents allow air ventilation. ASUS Graphics Card (on the chassis. LAN (RJ-45) port. Remove the expansion slot bracket when installing an expansion ...ASUS Graphics Card may vary with different models. LAN port LED indications ACT/LINK LED SPEED LED Activity/Link LED Status Description OFF No link ORANGE Linked BLINKING Data activity Speed LED Status OFF ORANGE GREEN Description 10Mbps connection 100Mbps connection 1Gbps connection LAN port Serial port. Air vents. ASUS Desktop PC...

Users Manual
Page 19
ENGLISH Using the onboard display output ports Connect your computer comes with an ASUS Graphics Card, the graphics card is set as the primary display device in Chapter 1 of your monitor to the onboard display output port. Connect a VGA ... the graphics card. • To connect multiple external monitors to your computer, refer to Connecting multiple external display in the BIOS. Hence, connect your computer. 2. ASUS Desktop PC 19 Plug the monitor to a power source. • If your monitor to a display output port on the rear panel of this guide for details. To...
ENGLISH Using the onboard display output ports Connect your computer comes with an ASUS Graphics Card, the graphics card is set as the primary display device in Chapter 1 of your monitor to the onboard display output port. Connect a VGA ... the graphics card. • To connect multiple external monitors to your computer, refer to Connecting multiple external display in the BIOS. Hence, connect your computer. 2. ASUS Desktop PC 19 Plug the monitor to a power source. • If your monitor to a display output port on the rear panel of this guide for details. To...

Users Manual
Page 21
...during POST. Refer to Setting up multiple displays: 1. Configure the settings for details on your displays. ENGLISH Connecting multiple external displays Your desktop PC may come with VGA, HDMI, or DisplayPort ports and allows you are allowed to set display modes. Turn on how to connect ...a monitor to connect multiple external displays. From the Start menu, click Settings > System > Display. 5. ASUS Desktop PC 21 The dual display function works only under Windows. Connect the two monitors to your computer and connect the power cords to enlarge your ...
...during POST. Refer to Setting up multiple displays: 1. Configure the settings for details on your displays. ENGLISH Connecting multiple external displays Your desktop PC may come with VGA, HDMI, or DisplayPort ports and allows you are allowed to set display modes. Turn on how to connect ...a monitor to connect multiple external displays. From the Start menu, click Settings > System > Display. 5. ASUS Desktop PC 21 The dual display function works only under Windows. Connect the two monitors to your computer and connect the power cords to enlarge your ...
Users Manual
Page 23
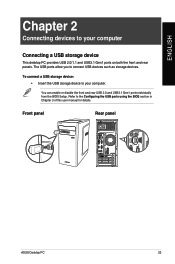
... Chapter 2 Connecting devices to your computer. To connect a USB storage device: • Insert the USB storage device to your computer Connecting a USB storage device This desktop PC provides USB 2.0/1.1 and USB3.1 Gen1 ports on both the front and rear panels. Front panel Rear panel...
... Chapter 2 Connecting devices to your computer. To connect a USB storage device: • Insert the USB storage device to your computer Connecting a USB storage device This desktop PC provides USB 2.0/1.1 and USB3.1 Gen1 ports on both the front and rear panels. Front panel Rear panel...

Users Manual
Page 24
.... • When your computer The audio I/O ports located on both the front and rear panels. ENGLISH Connecting microphone and speakers This desktop PC comes with an internal speaker, the audio output will be from the Control Panel. Connecting Headphone and Mic 24 Chapter 2: Connecting devices to your... Desktop PC comes with microphone ports and speaker ports on the rear panel allow you to the internal speaker from the internal speaker. •...
.... • When your computer The audio I/O ports located on both the front and rear panels. ENGLISH Connecting microphone and speakers This desktop PC comes with an internal speaker, the audio output will be from the Control Panel. Connecting Headphone and Mic 24 Chapter 2: Connecting devices to your... Desktop PC comes with microphone ports and speaker ports on the rear panel allow you to the internal speaker from the internal speaker. •...

Users Manual
Page 25
ENGLISH LINE OUT Connecting 2.1-channel Speakers Connecting 4.1-channel Speakers LINE OUT ASUS Desktop PC 25
ENGLISH LINE OUT Connecting 2.1-channel Speakers Connecting 4.1-channel Speakers LINE OUT ASUS Desktop PC 25

Users Manual
Page 27
To change to the rear Line Out port. ASUS Desktop PC 27 For the location of the rear Line Out port, refer to the section Getting to know your Desktop PC, enable the audio device output to ensure a clear audio quality. Tick Line In, then click OK. Tick Front Speaker Out, then click OK. 3. The audio...
To change to the rear Line Out port. ASUS Desktop PC 27 For the location of the rear Line Out port, refer to the section Getting to know your Desktop PC, enable the audio device output to ensure a clear audio quality. Tick Line In, then click OK. Tick Front Speaker Out, then click OK. 3. The audio...

Users Manual
Page 29
.... • Take regular mini-breaks from using and fully enjoying your Desktop PC. ENGLISH Chapter 3 Using your computer Proper posture when using your Desktop PC When using your Desktop PC, maintaining the proper posture is firmly supported and angled slightly backward. •... using your thighs. This section provides you with tips on your wrists while typing. • Use your Desktop PC in front of you, and turn the top of the monitor screen even with your knees, elbows and ... necessary, use a wrist rest for support to relax the backs of your Desktop PC. ASUS Desktop PC 29
.... • Take regular mini-breaks from using and fully enjoying your Desktop PC. ENGLISH Chapter 3 Using your computer Proper posture when using your Desktop PC When using your Desktop PC, maintaining the proper posture is firmly supported and angled slightly backward. •... using your thighs. This section provides you with tips on your wrists while typing. • Use your Desktop PC in front of you, and turn the top of the monitor screen even with your knees, elbows and ... necessary, use a wrist rest for support to relax the backs of your Desktop PC. ASUS Desktop PC 29
Users Manual
Page 31
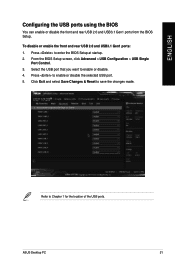
... Control. 3. Select the USB port that you want to enter the BIOS Setup at startup. 2. Press to Chapter 1 for the location of the USB ports. ASUS Desktop PC 31 Refer to enable or disable the selected USB port. 5. ENGLISH Configuring the USB ports using the BIOS You can enable or disable the front...
... Control. 3. Select the USB port that you want to enter the BIOS Setup at startup. 2. Press to Chapter 1 for the location of the USB ports. ASUS Desktop PC 31 Refer to enable or disable the selected USB port. 5. ENGLISH Configuring the USB ports using the BIOS You can enable or disable the front...
Users Manual
Page 33
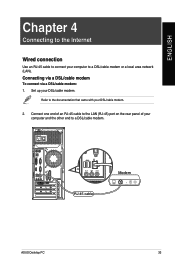
Refer to the documentation that came with your DSL/cable modem. RJ-45 cable Modem ASUS Desktop PC 33 Connecting via a DSL/cable modem To connect via a DSL/cable modem: 1. Set up your DSL/cable modem. 2. ENGLISH Chapter 4 Connecting to the Internet Wired connection Use an RJ-45 cable to connect your computer and the other end to a DSL/cable modem. Connect one end of an RJ-45 cable to the LAN (RJ-45) port on the rear panel of your computer to a DSL/cable modem or a local area network (LAN).
Refer to the documentation that came with your DSL/cable modem. RJ-45 cable Modem ASUS Desktop PC 33 Connecting via a DSL/cable modem To connect via a DSL/cable modem: 1. Set up your DSL/cable modem. 2. ENGLISH Chapter 4 Connecting to the Internet Wired connection Use an RJ-45 cable to connect your computer and the other end to a DSL/cable modem. Connect one end of an RJ-45 cable to the LAN (RJ-45) port on the rear panel of your computer to a DSL/cable modem or a local area network (LAN).

Users Manual
Page 35
On the ASUS Manager setup screen, select the applications you to install. 4. The system will prompt you want to reboot your system once installation is complete. Insert your ASUS support DVD into your ASUS computer. ENGLISH Chapter 5 Using ASUS Business Manager ASUS Business Manager ASUS Manager provides a set of tools for customizing and maintaining your optical drive. 2. On the support CD window, click Utilities > ASUS Business Manager. 3. ASUS Desktop PC 35 Installing ASUS Business Manager 1. Click Install. 5.
On the ASUS Manager setup screen, select the applications you to install. 4. The system will prompt you want to reboot your system once installation is complete. Insert your ASUS support DVD into your ASUS computer. ENGLISH Chapter 5 Using ASUS Business Manager ASUS Business Manager ASUS Manager provides a set of tools for customizing and maintaining your optical drive. 2. On the support CD window, click Utilities > ASUS Business Manager. 3. ASUS Desktop PC 35 Installing ASUS Business Manager 1. Click Install. 5.
Users Manual
Page 37
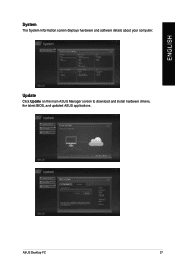
Update Click Update on the main ASUS Manager screen to download and install hardware drivers, the latest BIOS, and updated ASUS applications. ASUS Desktop PC 37 ENGLISH System The System Information screen displays hardware and software details about your computer.
Update Click Update on the main ASUS Manager screen to download and install hardware drivers, the latest BIOS, and updated ASUS applications. ASUS Desktop PC 37 ENGLISH System The System Information screen displays hardware and software details about your computer.
Users Manual
Page 39
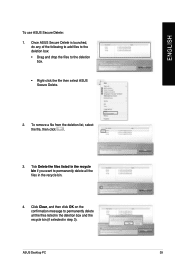
To remove a file from the deletion list, select the file, then click . 3. ENGLISH To use ASUS Secure Delete: 1. Click Clear, and then click OK on the confirmation message to permanently delete all the files in step 3). Tick Delete the files listed ... file then select ASUS Secure Delete. 2. Once ASUS Secure Delete is launched, do any of the following to add files to the deletion box: • Drag and drop the files to permanently delete all the files listed in the deletion box and the recycle bin (if selected in the recycle bin. 4. ASUS Desktop PC 39
To remove a file from the deletion list, select the file, then click . 3. ENGLISH To use ASUS Secure Delete: 1. Click Clear, and then click OK on the confirmation message to permanently delete all the files in step 3). Tick Delete the files listed ... file then select ASUS Secure Delete. 2. Once ASUS Secure Delete is launched, do any of the following to add files to the deletion box: • Drag and drop the files to permanently delete all the files listed in the deletion box and the recycle bin (if selected in the recycle bin. 4. ASUS Desktop PC 39
Users Manual
Page 41
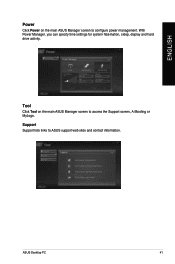
Support Support lists links to configure power management. With Power Manager, you can specity time settings for system hibernation, sleep, display and hard drive activity. ENGLISH Power Click Power on the main ASUS Manager screen to access the Support screen, Ai Booting or MyLogo. ASUS Desktop PC 41 Tool Click Tool on the main ASUS Manager screen to ASUS support web sites and contact information.
Support Support lists links to configure power management. With Power Manager, you can specity time settings for system hibernation, sleep, display and hard drive activity. ENGLISH Power Click Power on the main ASUS Manager screen to access the Support screen, Ai Booting or MyLogo. ASUS Desktop PC 41 Tool Click Tool on the main ASUS Manager screen to ASUS support web sites and contact information.


