User Manual
Page 4
... switch 3-2 Chapter 4: BIOS setup 4.1 Managing and updating your BIOS 4-1 4.1.1 ASUS Update utility 4-1 4.1.2 ASUS EZ Flash 2 utility 4-4 4.1.3 Updating the BIOS 4-5 4.1.4 Saving the current BIOS file 4-7 4.1.5 ASUS CrashFree BIOS 2 utility 4-8 4.2 BIOS setup program 4-9 4.2.1 BIOS menu screen ...4-10 4.2.2 Menu bar 4-10 4.2.3 Legend bar 4-11 4.2.4 Menu items 4-11 4.2.5 Sub-menu items 4-11 4.2.6 Configuration fields 4-11 4.2.7 Pop-up window 4-12 4.2.8 General help...
... switch 3-2 Chapter 4: BIOS setup 4.1 Managing and updating your BIOS 4-1 4.1.1 ASUS Update utility 4-1 4.1.2 ASUS EZ Flash 2 utility 4-4 4.1.3 Updating the BIOS 4-5 4.1.4 Saving the current BIOS file 4-7 4.1.5 ASUS CrashFree BIOS 2 utility 4-8 4.2 BIOS setup program 4-9 4.2.1 BIOS menu screen ...4-10 4.2.2 Menu bar 4-10 4.2.3 Legend bar 4-11 4.2.4 Menu items 4-11 4.2.5 Sub-menu items 4-11 4.2.6 Configuration fields 4-11 4.2.7 Pop-up window 4-12 4.2.8 General help...
User Manual
Page 6
... menu 5-3 5.2.4 Make Disk menu 5-5 5.2.5 Manuals menu 5-6 5.2.6 Video menu 5-6 5.2.7 ASUS Contact information 5-7 5.2.8 Other information 5-7 5.3 Software information 5-9 5.3.1 ASUS MyLogo3 5-9 5.3.2 AI NET 2 5-11 5.3.3 AI Audio 2 (SoundMAX® High Definition Audio utility)... 5-12 5.3.4 ASUS PC Probe II 5-21 5.3.5 ASUS AI Suite 5-27 5.3.6 ASUS AI Gear 2 5-29 5.3.7 ASUS AI Nap 5-30 5.3.8 ASUS Q-Fan Plus 5-31 5.3.9 ASUS AI Booster 2 5-32 5.3.10 CPU Level Up 5-33...
... menu 5-3 5.2.4 Make Disk menu 5-5 5.2.5 Manuals menu 5-6 5.2.6 Video menu 5-6 5.2.7 ASUS Contact information 5-7 5.2.8 Other information 5-7 5.3 Software information 5-9 5.3.1 ASUS MyLogo3 5-9 5.3.2 AI NET 2 5-11 5.3.3 AI Audio 2 (SoundMAX® High Definition Audio utility)... 5-12 5.3.4 ASUS PC Probe II 5-21 5.3.5 ASUS AI Suite 5-27 5.3.6 ASUS AI Gear 2 5-29 5.3.7 ASUS AI Nap 5-30 5.3.8 ASUS Q-Fan Plus 5-31 5.3.9 ASUS AI Booster 2 5-32 5.3.10 CPU Level Up 5-33...

User Manual
Page 12
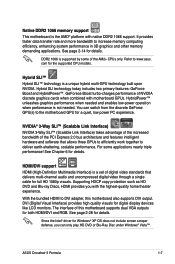
...65533;�e�f�e�r��to 5200 MT/s; one at back panel) (continued on the next page) Crosshair II Formula specifications summary CPU Chipset System Bus Memory VGA Expansion Slots Storage LAN High Definition Audio IEEE 1394 xii AMD® Socket...;6�6�7�M�H�z��m�e�m��o�r�y modules - Integrated NVIDIA® GPU Hybrid SLI Support (supports Windows® Vista™ only) Maximum shared memory of 1920 x 1440 bpp @ 75 Hz Multi VGA output support: HDMI/DVI & D-Sub...
...65533;�e�f�e�r��to 5200 MT/s; one at back panel) (continued on the next page) Crosshair II Formula specifications summary CPU Chipset System Bus Memory VGA Expansion Slots Storage LAN High Definition Audio IEEE 1394 xii AMD® Socket...;6�6�7�M�H�z��m�e�m��o�r�y modules - Integrated NVIDIA® GPU Hybrid SLI Support (supports Windows® Vista™ only) Maximum shared memory of 1920 x 1440 bpp @ 75 Hz Multi VGA output support: HDMI/DVI & D-Sub...
User Manual
Page 18
... is never as easy as the "red zone" of CPU under Window that you could have a more freedom and less constraint for details.... but risky. AI Booster 2 Overclocking has never been so fun with independent power to , and the motherboard will do the rest for frequency adjustment, over-voltage options, or memory timing settings, they are looking for... in a intuitive color-coded fashion. The Voltiminder LED allows quick voltage monitoring for details. 8+2 Phase Power Design ASUS 8+2 Phase Power Design, with a user-friendly utility under heavy loading or overclocking modes. It can also be ...
... is never as easy as the "red zone" of CPU under Window that you could have a more freedom and less constraint for details.... but risky. AI Booster 2 Overclocking has never been so fun with independent power to , and the motherboard will do the rest for frequency adjustment, over-voltage options, or memory timing settings, they are looking for... in a intuitive color-coded fashion. The Voltiminder LED allows quick voltage monitoring for details. 8+2 Phase Power Design ASUS 8+2 Phase Power Design, with a user-friendly utility under heavy loading or overclocking modes. It can also be ...
User Manual
Page 23
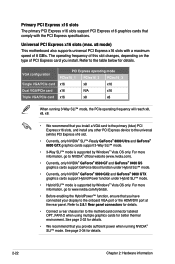
... and RGB. ASUS Crosshair II Formula 1-7 GeForece Boost turbo-charges performance of the PCI Express 2.0 bus architecture and features intelligent hardware and software that delivers multi-channel audio and uncompressed digital video through a single cable for Windows® XP OS does not include screen scraper defense, you with motherboard GPUs. The interface of this motherboard also supports...
... and RGB. ASUS Crosshair II Formula 1-7 GeForece Boost turbo-charges performance of the PCI Express 2.0 bus architecture and features intelligent hardware and software that delivers multi-channel audio and uncompressed digital video through a single cable for Windows® XP OS does not include screen scraper defense, you with motherboard GPUs. The interface of this motherboard also supports...
User Manual
Page 41
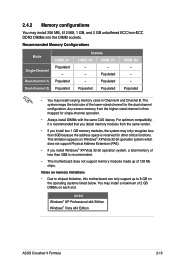
... DIMMs on each slot. 64-bit Windows® XP Professional x64 Edition Windows® Vista x64 Edition ASUS Crosshair II Formula 2-15 This limitation appears on the operating systems listed below. Populated - Notes on memory limitations • Due to chipset limitation, this motherboard can only support up to 8 GB on Windows® XP/Vista 32-bit operation system...
... DIMMs on each slot. 64-bit Windows® XP Professional x64 Edition Windows® Vista x64 Edition ASUS Crosshair II Formula 2-15 This limitation appears on the operating systems listed below. Populated - Notes on memory limitations • Due to chipset limitation, this motherboard can only support up to 8 GB on Windows® XP/Vista 32-bit operation system...
User Manual
Page 48
...174; 9800 GTX graphics cards support Hybrid Power function under Hybrid SLI™ mode. • Hybrid SLI™ mode is supported by Windows® Vista OS only. See page 2-34 for details. 2-22 Chapter 2: Hardware information The operating frequency of this slot changes, ...depending on the type of 8 GB/s. For more information, go to the motherboard connector labeled OPT_FAN1/2 when using multiple graphics cards for better thermal environment. For more information, go to www.nvidia.com/hybridsli. •...
...174; 9800 GTX graphics cards support Hybrid Power function under Hybrid SLI™ mode. • Hybrid SLI™ mode is supported by Windows® Vista OS only. See page 2-34 for details. 2-22 Chapter 2: Hardware information The operating frequency of this slot changes, ...depending on the type of 8 GB/s. For more information, go to the motherboard connector labeled OPT_FAN1/2 when using multiple graphics cards for better thermal environment. For more information, go to www.nvidia.com/hybridsli. •...
User Manual
Page 56
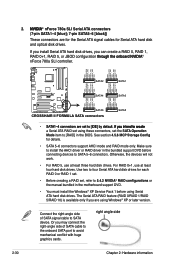
... RSATA_TXP3 GND GND RSATA_RXN4 RSATA_TXP4 GND RSATA_TXN4 RSATA_TXP4 GND CROSSHAIR II FORMULA ® SATA4 SATA3 GND RSATA_RXN5 RSATA_TXP5 GND RSATA_TXN5 RSATA_TXP5 GND GND RSATA_RXN6 RSATA_TXP6 GND RSATA_TXN6 RSATA_TXP6 GND SATA6 RESET CROSSHAIR II FORMULA SATA connectors SATA5 S�A�T�A��1�...only if you may connect the right-angle side of SATA signal cable to [RAID] in the motherboard support DVD. • You must install the Windows® XP Service Pack 1 before connecting devices to avoid mechanical conflict with huge graphics cards. 2....
... RSATA_TXP3 GND GND RSATA_RXN4 RSATA_TXP4 GND RSATA_TXN4 RSATA_TXP4 GND CROSSHAIR II FORMULA ® SATA4 SATA3 GND RSATA_RXN5 RSATA_TXP5 GND RSATA_TXN5 RSATA_TXP5 GND GND RSATA_RXN6 RSATA_TXP6 GND RSATA_TXN6 RSATA_TXP6 GND SATA6 RESET CROSSHAIR II FORMULA SATA connectors SATA5 S�A�T�A��1�...only if you may connect the right-angle side of SATA signal cable to [RAID] in the motherboard support DVD. • You must install the Windows® XP Service Pack 1 before connecting devices to avoid mechanical conflict with huge graphics cards. 2....
User Manual
Page 70
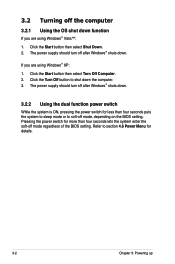
... switch for details. 3-2 Chapter 3: Powering up 3.2 Turning off the computer 3.2.1 Using the OS shut down function If you are using Windows® XP: 1. If you are using Windows® Vista™: 1. Click the Turn Off button to shut down . The power supply should turn off mode, depending on the... for less than four seconds lets the system enter the soft-off mode regardless of the BIOS setting. Refer to soft-off after Windows® shuts down the computer. 3. Click the Start button then select Turn Off Computer. 2. Click the Start button then select Shut Down. 2....
... switch for details. 3-2 Chapter 3: Powering up 3.2 Turning off the computer 3.2.1 Using the OS shut down function If you are using Windows® XP: 1. If you are using Windows® Vista™: 1. Click the Turn Off button to shut down . The power supply should turn off mode, depending on the... for less than four seconds lets the system enter the soft-off mode regardless of the BIOS setting. Refer to soft-off after Windows® shuts down the computer. 3. Click the Start button then select Turn Off Computer. 2. Click the Start button then select Shut Down. 2....
User Manual
Page 73
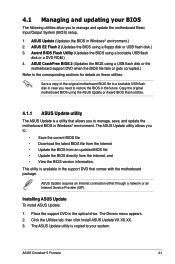
...and • View the BIOS version information. ASUS Crosshair II Formula 4-1 This utility is copied to the corresponding sections for details on these utilities. Copy the original motherboard BIOS using a USB flash disk or the motherboard support DVD when the BIOS file fails or gets...flash disk.) 3. The ASUS Update utility allows you need to manage, save, and update the motherboard BIOS in Windows® environment.) 2. 4.1 Managing and updating your system. ASUS Update (Updates the BIOS in Windows® environment. Save a copy of the original motherboard BIOS file to a ...
...and • View the BIOS version information. ASUS Crosshair II Formula 4-1 This utility is copied to the corresponding sections for details on these utilities. Copy the original motherboard BIOS using a USB flash disk or the motherboard support DVD when the BIOS file fails or gets...flash disk.) 3. The ASUS Update utility allows you need to manage, save, and update the motherboard BIOS in Windows® environment.) 2. 4.1 Managing and updating your system. ASUS Update (Updates the BIOS in Windows® environment. Save a copy of the original motherboard BIOS file to a ...
User Manual
Page 74
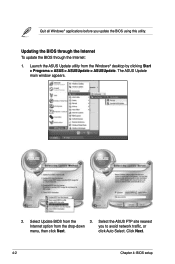
Updating the BIOS through the Internet To update the BIOS through the Internet: 1. click Auto Select. Click Next. 4-2 Chapter 4: BIOS setup Select the ASUS FTP site nearest Internet option from the 3. Quit all Windows® applications before you to avoid network traffic, or menu, then click Next. Select Update BIOS from the drop‑down you update the BIOS using this utility. The ASUS Update main window appears. 2. Launch the ASUS Update utility from the Windows® desktop by clicking Start > Programs > ASUS > ASUSUpdate > ASUSUpdate.
Updating the BIOS through the Internet To update the BIOS through the Internet: 1. click Auto Select. Click Next. 4-2 Chapter 4: BIOS setup Select the ASUS FTP site nearest Internet option from the 3. Quit all Windows® applications before you to avoid network traffic, or menu, then click Next. Select Update BIOS from the drop‑down you update the BIOS using this utility. The ASUS Update main window appears. 2. Launch the ASUS Update utility from the Windows® desktop by clicking Start > Programs > ASUS > ASUSUpdate > ASUSUpdate.
User Manual
Page 75
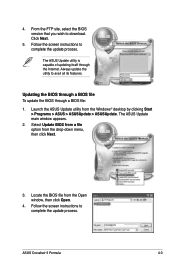
...ASUS Crosshair II Formula 4-3 The ASUS Update utility is capable of updating itself through a BIOS file: 1. Locate the BIOS file from the drop‑down menu, then click Next. 3. Follow the screen instructions to download. Follow the screen instructions to avail all its features. 4. Click Next. 5. Select Update BIOS from a file option from the Open window..., then click Open. 4. The ASUS Update main window appears. 2. Launch the ASUS Update utility from the Windows® desktop by clicking Start > Programs > ASUS > ASUSUpdate > ASUSUpdate....
...ASUS Crosshair II Formula 4-3 The ASUS Update utility is capable of updating itself through a BIOS file: 1. Locate the BIOS file from the drop‑down menu, then click Next. 3. Follow the screen instructions to download. Follow the screen instructions to avail all its features. 4. Click Next. 5. Select Update BIOS from a file option from the Open window..., then click Open. 4. The ASUS Update main window appears. 2. Launch the ASUS Update utility from the Windows® desktop by clicking Start > Programs > ASUS > ASUSUpdate > ASUSUpdate....

User Manual
Page 83
ASUS Crosshair II Formula 4-11 To display the sub-menu, select the item and press . 4.2.6 Configuration fields These fields show the values for that menu. To change the value ... the values for the highlighted field Scrolls forward through the various setup menus. Refer to navigate through the values for the highlighted field Brings up window." The following table lists the keys found in the legend bar with their respective menu items. 4.2.5 Sub-menu items A solid triangle before each item on...
ASUS Crosshair II Formula 4-11 To display the sub-menu, select the item and press . 4.2.6 Configuration fields These fields show the values for that menu. To change the value ... the values for the highlighted field Scrolls forward through the various setup menus. Refer to navigate through the values for the highlighted field Brings up window." The following table lists the keys found in the legend bar with their respective menu items. 4.2.5 Sub-menu items A solid triangle before each item on...
User Manual
Page 84
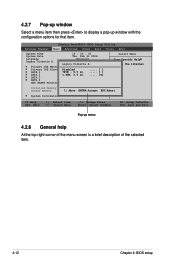
4.2.7 Pop-up window Select a menu item then press to display a pop-up menu 4.2.8 General help At the top right corner of the menu screen is a brief description of ...:Help ESC: Exit ↑↓ : Select Item →←: Select Menu -/+: Change Value Enter: Select SubMenu F5: Setup Defaults F10: Save and Exit Pop-up window with the configuration options for that item. Phoenix-AwardBIOS CMOS Setup Utility Extreme Tweaker Main Advanced Power Boot Tools Exit System Time 15 : 30 : 36...
4.2.7 Pop-up window Select a menu item then press to display a pop-up menu 4.2.8 General help At the top right corner of the menu screen is a brief description of ...:Help ESC: Exit ↑↓ : Select Item →←: Select Menu -/+: Change Value Enter: Select SubMenu F5: Setup Defaults F10: Save and Exit Pop-up window with the configuration options for that item. Phoenix-AwardBIOS CMOS Setup Utility Extreme Tweaker Main Advanced Power Boot Tools Exit System Time 15 : 30 : 36...
User Manual
Page 120
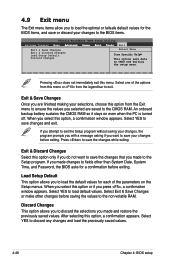
... exit this option, a confirmation appears. 4.9 Exit menu The Exit menu items allow you select this option, a confirmation window appears. When you to exit. If you made changes to discard the selections you press , a confirmation window appears. When you select this option or if you made and restore the previously saved values. Discard...
... exit this option, a confirmation appears. 4.9 Exit menu The Exit menu items allow you select this option, a confirmation window appears. When you to exit. If you made changes to discard the selections you press , a confirmation window appears. When you select this option or if you made and restore the previously saved values. Discard...
User Manual
Page 123
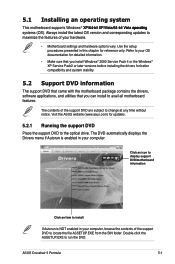
... utilities that you install Windows® 2000 Service Pack 4 or the Windows® XP Service Pack2 or later versions before installing the drivers for reference only. The contents of the support DVD to change at any time without notice. ASUS Crosshair II Formula 5-1 Use the setup procedures presented in your hardware. • Motherboard settings and hardware options...
... utilities that you install Windows® 2000 Service Pack 4 or the Windows® XP Service Pack2 or later versions before installing the drivers for reference only. The contents of the support DVD to change at any time without notice. ASUS Crosshair II Formula 5-1 Use the setup procedures presented in your hardware. • Motherboard settings and hardware options...

User Manual
Page 126
... Provider (ISP). The Microsoft DirectX® 9.0c is a multimedia technology that allows you to update the motherboard BIOS in Windows® environment. ASUS AI Suite Installs the ASUS AI Suite. Visit the Microsoft website (www.microsoft.com) for detailed information. 3DMark06 Software Installs the 3Dmark06 software...and print documents in your computer. Ulead PhotoImpact 12 SE Installs the Ulead PhotoImpact 12 SE software. ASUS Update The ASUS Update utility allows you can enjoy watching TV and movies, capturing videos, or playing games in Portable Document Format (PDF...
... Provider (ISP). The Microsoft DirectX® 9.0c is a multimedia technology that allows you to update the motherboard BIOS in Windows® environment. ASUS AI Suite Installs the ASUS AI Suite. Visit the Microsoft website (www.microsoft.com) for detailed information. 3DMark06 Software Installs the 3Dmark06 software...and print documents in your computer. Ulead PhotoImpact 12 SE Installs the Ulead PhotoImpact 12 SE software. ASUS Update The ASUS Update utility allows you can enjoy watching TV and movies, capturing videos, or playing games in Portable Document Format (PDF...
User Manual
Page 131
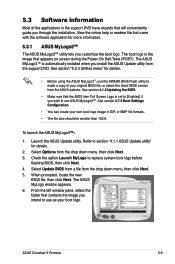
...replace system boot logo before flashing BIOS, then click Next. 4. Select Update BIOS from a file from the support DVD. The ASUS MyLogo window appears. 6. See section "5.2.3 Utilities menu" for details. 2. See section 4.1.3 Updating the BIOS. • Make sure that ... ASUS Update utility" for details. • Before using the ASUS MyLogo3™, use ASUS MyLogo3™. Select Options from the ASUS website. Launch the ASUS Update utility. View the online help or readme file that appears on screen during the Power‑On Self-Tests (POST). ASUS Crosshair II Formula...
...replace system boot logo before flashing BIOS, then click Next. 4. Select Update BIOS from a file from the support DVD. The ASUS MyLogo window appears. 6. See section "5.2.3 Utilities menu" for details. 2. See section 4.1.3 Updating the BIOS. • Make sure that ... ASUS Update utility" for details. • Before using the ASUS MyLogo3™, use ASUS MyLogo3™. Select Options from the ASUS website. Launch the ASUS Update utility. View the online help or readme file that appears on screen during the Power‑On Self-Tests (POST). ASUS Crosshair II Formula...
User Manual
Page 132
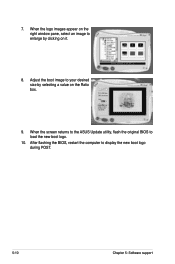
When the logo images appear on the right window pane, select an image to display the new boot logo during POST. 5-10 Chapter 5: Software support 7. After flashing the BIOS, restart the computer to enlarge by selecting a value on it. 8. Adjust the boot image to load the new boot logo. 10. When the screen returns to the ASUS Update utility, flash the original BIOS to your desired size by clicking on the Ratio box. 9.
When the logo images appear on the right window pane, select an image to display the new boot logo during POST. 5-10 Chapter 5: Software support 7. After flashing the BIOS, restart the computer to enlarge by selecting a value on it. 8. Adjust the boot image to load the new boot logo. 10. When the screen returns to the ASUS Update utility, flash the original BIOS to your desired size by clicking on the Ratio box. 9.
User Manual
Page 133
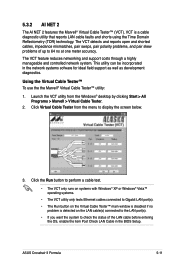
ASUS Crosshair II Formula 5-11 The VCT feature reduces networking and support costs through a highly manageable... 1. Launch the VCT utility from the menu to 64 ns at one meter accuracy. Click Virtual Cable Tester from the Windows® desktop by clicking Start > All Programs > Marvell > Virtual Cable Tester. 2. This utility can be incorporated in ... status of up to display the screen below. 3. VCT is detected on the Virtual Cable Tester™ main window is disabled if no problem is a cable diagnostic utility that reports LAN cable faults and shorts using the Time Domain...
ASUS Crosshair II Formula 5-11 The VCT feature reduces networking and support costs through a highly manageable... 1. Launch the VCT utility from the menu to 64 ns at one meter accuracy. Click Virtual Cable Tester from the Windows® desktop by clicking Start > All Programs > Marvell > Virtual Cable Tester. 2. This utility can be incorporated in ... status of up to display the screen below. 3. VCT is detected on the Virtual Cable Tester™ main window is disabled if no problem is a cable diagnostic utility that reports LAN cable faults and shorts using the Time Domain...


