
User Guide
Page 4
... dual function power switch 2-44 Chapter 3: BIOS setup 3.1 Managing and updating your BIOS 3-1 3.1.1 ASUS Update utility 3-1 3.1.2 ASUS EZ Flash 2 utility 3-4 3.1.3 ASUS CrashFree BIOS 3 utility 3-5 3.2 BIOS setup program 3-6 3.2.1 BIOS menu screen 3-7 3.2.2 Menu bar... 3-7 3.2.3 Navigation keys 3-7 3.2.4 Menu items 3-8 3.2.5 Submenu items 3-8 3.2.6 Configuration fields 3-8 3.2.7 Pop-up window 3-8 3.2.8 Scroll bar 3-8 3.2.9 ...
... dual function power switch 2-44 Chapter 3: BIOS setup 3.1 Managing and updating your BIOS 3-1 3.1.1 ASUS Update utility 3-1 3.1.2 ASUS EZ Flash 2 utility 3-4 3.1.3 ASUS CrashFree BIOS 3 utility 3-5 3.2 BIOS setup program 3-6 3.2.1 BIOS menu screen 3-7 3.2.2 Menu bar... 3-7 3.2.3 Navigation keys 3-7 3.2.4 Menu items 3-8 3.2.5 Submenu items 3-8 3.2.6 Configuration fields 3-8 3.2.7 Pop-up window 3-8 3.2.8 Scroll bar 3-8 3.2.9 ...
User Guide
Page 7
...ASUS TurboV 4-25 4.4 RAID configurations 4-27 4.4.1 RAID definitions 4-27 4.4.2 Installing Serial ATA hard disks 4-28 4.4.3 Setting the RAID item in BIOS 4-28 4.4.4 AMD® Option ROM Utility 4-28 4.5 Creating a RAID driver disk 4-32 4.5.1 Creating a RAID driver disk without entering the OS.... 4-32 4.5.2 Creating a RAID/SATA driver disk in Windows... 4-32 4.5.3 Installing the RAID driver during Windows® OS installation 4-32 4.5.4 Using a USB floppy disk drive 4-33 Chapter 5: ATI&#...
...ASUS TurboV 4-25 4.4 RAID configurations 4-27 4.4.1 RAID definitions 4-27 4.4.2 Installing Serial ATA hard disks 4-28 4.4.3 Setting the RAID item in BIOS 4-28 4.4.4 AMD® Option ROM Utility 4-28 4.5 Creating a RAID driver disk 4-32 4.5.1 Creating a RAID driver disk without entering the OS.... 4-32 4.5.2 Creating a RAID/SATA driver disk in Windows... 4-32 4.5.3 Installing the RAID driver during Windows® OS installation 4-32 4.5.4 Using a USB floppy disk drive 4-33 Chapter 5: ATI&#...
User Guide
Page 13
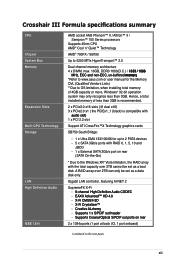
... to the Windows XP/ Vista limitation, the RAID array with RAID 0, 1, 5, 10 and JBOD - 1 x External SATA 3Gb/s port on the next page) xiii Crosshair III Formula specifications summary ...CPU Chipset System Bus Memory Expansion Slots Multi-GPU Technology Storage LAN High Definition Audio IEEE 1394 AMD socket AM3 Phenom™ II / Athlon™ II / Sempron™ 100 Series...;��m����o��r�y *Refer to www.asus.com or user manual for up to OS limitation, when installing total memory...
... to the Windows XP/ Vista limitation, the RAID array with RAID 0, 1, 5, 10 and JBOD - 1 x External SATA 3Gb/s port on the next page) xiii Crosshair III Formula specifications summary ...CPU Chipset System Bus Memory Expansion Slots Multi-GPU Technology Storage LAN High Definition Audio IEEE 1394 AMD socket AM3 Phenom™ II / Athlon™ II / Sempron™ 100 Series...;��m����o��r�y *Refer to www.asus.com or user manual for up to OS limitation, when installing total memory...

User Guide
Page 44
...information The system maps the total size of 256 megabit (Mb) chips or less. • The default memory operation frequency is dependent on the motherboard, the actual usable memory for the OS can be about 3GB or less. Under the default state, some memory modules for overclocking may install ...from the same vendor. • Due to the memory address limitation on 32-bit Windows OS, when you install a 64-bit Windows OS when having 4GB or more memory installed on the motherboard. • This motherboard does not support DIMMs made up of the lower-sized channel for the dual-channel ...
...information The system maps the total size of 256 megabit (Mb) chips or less. • The default memory operation frequency is dependent on the motherboard, the actual usable memory for the OS can be about 3GB or less. Under the default state, some memory modules for overclocking may install ...from the same vendor. • Due to the memory address limitation on 32-bit Windows OS, when you install a 64-bit Windows OS when having 4GB or more memory installed on the motherboard. • This motherboard does not support DIMMs made up of the lower-sized channel for the dual-channel ...
User Guide
Page 59
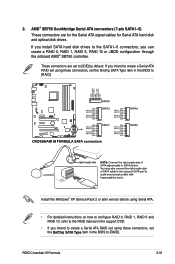
...SATA1-5 connectors, you can create a RAID 0, RAID 1, RAID 5, RAID 10 or JBOD configuration through the onboard AMD® SB750 controller. Install the Windows® XP Service Pack 2 or later version before using Serial ATA. • For detailed instructions on how to configure RAID 0, RAID 1, RAID 5 ... to [IDE] by default. These connectors are for the Serial ATA signal cables for Serial ATA hard disk and optical disk drives. ROG Crosshair III Formula 2-31 AMD® SB750 Southbridge Serial ATA connectors (7-pin SATA1-5) These connectors are set the Onchip SATA Type item in the BIOS to...
...SATA1-5 connectors, you can create a RAID 0, RAID 1, RAID 5, RAID 10 or JBOD configuration through the onboard AMD® SB750 controller. Install the Windows® XP Service Pack 2 or later version before using Serial ATA. • For detailed instructions on how to configure RAID 0, RAID 1, RAID 5 ... to [IDE] by default. These connectors are for the Serial ATA signal cables for Serial ATA hard disk and optical disk drives. ROG Crosshair III Formula 2-31 AMD® SB750 Southbridge Serial ATA connectors (7-pin SATA1-5) These connectors are set the Onchip SATA Type item in the BIOS to...

User Guide
Page 72
... 2: Hardware information Refer to shut down the computer. 3. 2.10 Turning off the computer 2.10.1 Using the OS shut down function If you are using Windows® XP: 1. Pressing the power switch for less than four seconds lets the system enter the soft-off mode regardless of the BIOS setting. The... power supply should turn off after Windows® shuts down . 2.10.2 Using the dual function power switch While the system is ON, pressing the power switch for more than four seconds...
... 2: Hardware information Refer to shut down the computer. 3. 2.10 Turning off the computer 2.10.1 Using the OS shut down function If you are using Windows® XP: 1. Pressing the power switch for less than four seconds lets the system enter the soft-off mode regardless of the BIOS setting. The... power supply should turn off after Windows® shuts down . 2.10.2 Using the dual function power switch While the system is ON, pressing the power switch for more than four seconds...
User Guide
Page 75
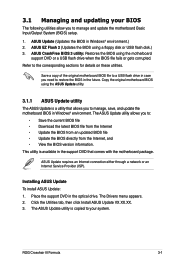
...ISP). The ASUS Update utility is copied to the corresponding sections for details on these utilities. ROG Crosshair III Formula 3-1 Refer to your BIOS The following utilities allow you to manage, save, and update the motherboard BIOS in Windows® environment. Save a copy of the original motherboard BIOS file to...Update the BIOS directly from the Internet, and • View the BIOS version information. Copy the original motherboard BIOS using the ASUS Update utility. 3.1.1 ASUS Update utility The ASUS Update is available in the support DVD that allows you to manage and update the...
...ISP). The ASUS Update utility is copied to the corresponding sections for details on these utilities. ROG Crosshair III Formula 3-1 Refer to your BIOS The following utilities allow you to manage, save, and update the motherboard BIOS in Windows® environment. Save a copy of the original motherboard BIOS file to...Update the BIOS directly from the Internet, and • View the BIOS version information. Copy the original motherboard BIOS using the ASUS Update utility. 3.1.1 ASUS Update utility The ASUS Update is available in the support DVD that allows you to manage and update the...
User Guide
Page 76
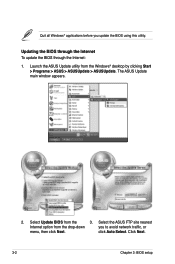
Select Update BIOS from the Windows® desktop by clicking Start > Programs > ASUS > ASUSUpdate > ASUSUpdate. The ASUS Update main window appears. 2. Launch the ASUS Update utility from the 3. Select the ASUS FTP site nearest Internet option from the drop‑down you update the BIOS using this utility. click Auto Select. Click Next. 3-2 Chapter 3: BIOS setup Updating the BIOS through the Internet To update the BIOS through the Internet: 1. Quit all Windows® applications before you to avoid network traffic, or menu, then click Next.
Select Update BIOS from the Windows® desktop by clicking Start > Programs > ASUS > ASUSUpdate > ASUSUpdate. The ASUS Update main window appears. 2. Launch the ASUS Update utility from the 3. Select the ASUS FTP site nearest Internet option from the drop‑down you update the BIOS using this utility. click Auto Select. Click Next. 3-2 Chapter 3: BIOS setup Updating the BIOS through the Internet To update the BIOS through the Internet: 1. Quit all Windows® applications before you to avoid network traffic, or menu, then click Next.

User Guide
Page 77
... > ASUSUpdate. 4. Follow the screen instructions to download. Always update the utility to complete the update process. Launch the ASUS Update utility from the Open window, then click Open. 4. CROSSHAIRIIIFORMULA.ROM CROSSHAIRIIIFORMULA ROG Crosshair III Formula 3-3 Updating the BIOS through a BIOS file To update the BIOS through the Internet. Select Update BIOS from a file option from...
... > ASUSUpdate. 4. Follow the screen instructions to download. Always update the utility to complete the update process. Launch the ASUS Update utility from the Open window, then click Open. 4. CROSSHAIRIIIFORMULA.ROM CROSSHAIRIIIFORMULA ROG Crosshair III Formula 3-3 Updating the BIOS through a BIOS file To update the BIOS through the Internet. Select Update BIOS from a file option from...

User Guide
Page 82
...Disabled] ACPI APIC support [EDniasbalbelde]d Enabled APM Configuration Hardware Monitor Use [ENTER], [TAB] or [SHIFT-TAB] to display a pop-up window with the configuration options for that is a brief description of the menu screen is not user-configurable. Scroll bar Pop-up... window Select a menu item then press to select a field. Refer to 3.2.7 Pop-up window. 3.2.7 Pop-up window 3.2.9 General help At the top right corner of the selected item. 3-8 Chapter 3: BIOS setup...
...Disabled] ACPI APIC support [EDniasbalbelde]d Enabled APM Configuration Hardware Monitor Use [ENTER], [TAB] or [SHIFT-TAB] to display a pop-up window with the configuration options for that is a brief description of the menu screen is not user-configurable. Scroll bar Pop-up... window Select a menu item then press to select a field. Refer to 3.2.7 Pop-up window. 3.2.7 Pop-up window 3.2.9 General help At the top right corner of the selected item. 3-8 Chapter 3: BIOS setup...

User Guide
Page 121
... previously saved values. ROG Crosshair III Formula 3-47 After selecting this menu. Pressing does not immediately exit this option, a confirmation appears. When you select this option only if you do not want to save the changes that you press , a confirmation window appears. Select YES to... and restore the previously saved values. Press to save the changes while exiting. Exit & Discard Changes Select this option, a confirmation window appears. Select YES to Sub Screen F1 General Help F10 Save and Exit ESC Exit v02.61 (C)Copyright 1985-2009, American Megatrends,...
... previously saved values. ROG Crosshair III Formula 3-47 After selecting this menu. Pressing does not immediately exit this option, a confirmation appears. When you select this option only if you do not want to save the changes that you press , a confirmation window appears. Select YES to... and restore the previously saved values. Press to save the changes while exiting. Exit & Discard Changes Select this option, a confirmation window appears. Select YES to Sub Screen F1 General Help F10 Save and Exit ESC Exit v02.61 (C)Copyright 1985-2009, American Megatrends,...
User Guide
Page 125
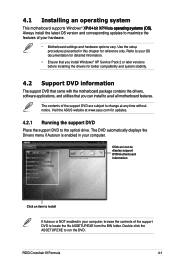
... computer, browse the contents of your computer. Visit the ASUS website at any time without notice. ROG Crosshair III Formula 4-1 The contents of the support DVD are subject to maximize the features of the support DVD to avail all motherboard features. 4.1 Installing an operating system This motherboard supports Windows® X��P�/�6�4��...
... computer, browse the contents of your computer. Visit the ASUS website at any time without notice. ROG Crosshair III Formula 4-1 The contents of the support DVD are subject to maximize the features of the support DVD to avail all motherboard features. 4.1 Installing an operating system This motherboard supports Windows® X��P�/�6�4��...
User Guide
Page 127
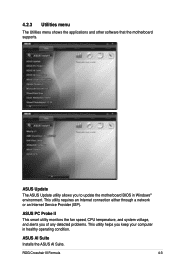
... operating condition. ASUS AI Suite Installs the ASUS AI Suite. 4.2.3 Utilities menu The Utilities menu shows the applications and other software that the motherboard supports. ASUS Update The ASUS Update utility allows you keep your computer in Windows® environment. This utility requires an Internet connection either through a network or an Internet Service Provider (ISP). ROG Crosshair III Formula 4-3
... operating condition. ASUS AI Suite Installs the ASUS AI Suite. 4.2.3 Utilities menu The Utilities menu shows the applications and other software that the motherboard supports. ASUS Update The ASUS Update utility allows you keep your computer in Windows® environment. This utility requires an Internet connection either through a network or an Internet Service Provider (ISP). ROG Crosshair III Formula 4-3

User Guide
Page 133
... drop down menu, then click Next. 3. Refer to replace system boot logo before flashing BIOS, then click Next. 4. Launch the ASUS Update utility. The ASUS MyLogo window appears. 6. ROG Crosshair III Formula 4-9 To launch the ASUS MyLogo3 1. View the online help or readme file that the BIOS item Full Screen Logo is the image that appears on...
... drop down menu, then click Next. 3. Refer to replace system boot logo before flashing BIOS, then click Next. 4. Launch the ASUS Update utility. The ASUS MyLogo window appears. 6. ROG Crosshair III Formula 4-9 To launch the ASUS MyLogo3 1. View the online help or readme file that the BIOS item Full Screen Logo is the image that appears on...

User Guide
Page 134
After flashing the BIOS, restart the computer to load the new boot logo. 10. When the logo images appear on the right window pane, select an image to your desired size by clicking on the Ratio box. 9. 7. Adjust the boot image to enlarge by selecting a value on it. 8. When the screen returns to the ASUS Update utility, flash the original BIOS to display the new boot logo during POST. 4-10 Chapter 4: Software support
After flashing the BIOS, restart the computer to load the new boot logo. 10. When the logo images appear on the right window pane, select an image to your desired size by clicking on the Ratio box. 9. 7. Adjust the boot image to enlarge by selecting a value on it. 8. When the screen returns to the ASUS Update utility, flash the original BIOS to display the new boot logo during POST. 4-10 Chapter 4: Software support

User Guide
Page 139
... Probe II. 3. Launching PC Probe II You can launch the PC Probe II right after installation or anytime from the Windows® desktop, click Start > All Programs > ASUS > PC Probe II > PC Probe II v1.xx.xx. Click this utility, you are assured that monitors the computer's vital...the triangle on the main window right handle. By default, the main window displays the Preference section. Using PC Probe II Main window The PC Probe II main window allows you to start monitoring your computer the moment you can close the Preference panel ROG Crosshair III Formula 4-15 Double-click the setup...
... Probe II. 3. Launching PC Probe II You can launch the PC Probe II right after installation or anytime from the Windows® desktop, click Start > All Programs > ASUS > PC Probe II > PC Probe II v1.xx.xx. Click this utility, you are assured that monitors the computer's vital...the triangle on the main window right handle. By default, the main window displays the Preference section. Using PC Probe II Main window The PC Probe II main window allows you to start monitoring your computer the moment you can close the Preference panel ROG Crosshair III Formula 4-15 Double-click the setup...

User Guide
Page 140
... displayed, the monitor panel for details. Button Function Opens the Configuration window Opens the Report window Opens the Desktop Management Interface window Opens the Peripheral Component Interconnect window Opens the Windows Management Instrumentation window Opens the hard disk drive, memory, CPU usage window Shows/Hides the Preference section Minimizes the application Closes the application Sensor alert When...
... displayed, the monitor panel for details. Button Function Opens the Configuration window Opens the Report window Opens the Desktop Management Interface window Opens the Peripheral Component Interconnect window Opens the Windows Management Instrumentation window Opens the hard disk drive, memory, CPU usage window Shows/Hides the Preference section Minimizes the application Closes the application Sensor alert When...

User Guide
Page 141
... the or buttons. You can also adjust the threshold values using a magnetic effect. You can now move together using the Config window. Click to increase value Click to detach a monitor panel from the group, click the horseshoe magnet icon. The hardware monitor panels... and voltages. Moving the monitor panels All monitor panels move or reposition the panel independently. When you want to decrease value ROG Crosshair III Formula 4-17 If you check the Enable Monitoring Panel option from the Preference section, the monitor panels appear on your computer's desktop....
... the or buttons. You can also adjust the threshold values using a magnetic effect. You can now move together using the Config window. Click to increase value Click to detach a monitor panel from the group, click the horseshoe magnet icon. The hardware monitor panels... and voltages. Moving the monitor panels All monitor panels move or reposition the panel independently. When you want to decrease value ROG Crosshair III Formula 4-17 If you check the Enable Monitoring Panel option from the Preference section, the monitor panels appear on your computer's desktop....

User Guide
Page 142
... Large display WMI browser Click to display the DMI (Desktop Management Interface) browser. DMI browser Click to display the WMI (Windows Management Instrumentation) browser. Refer to display on the right panel. Click an item from the left panel to the illustrations below...4-18 Chapter 4: Software support Click the plus sign (+) before DMI Information to display the available information. This browser displays various Windows® management information. You can enlarge or reduce the browser size by dragging the bottom right corner of the browser. This ...
... Large display WMI browser Click to display the DMI (Desktop Management Interface) browser. DMI browser Click to display the WMI (Windows Management Instrumentation) browser. Refer to display on the right panel. Click an item from the left panel to the illustrations below...4-18 Chapter 4: Software support Click the plus sign (+) before DMI Information to display the available information. This browser displays various Windows® management information. You can enlarge or reduce the browser size by dragging the bottom right corner of the browser. This ...

User Guide
Page 143
... information on your system. If the CPU has an enabled Hyper‑Threading, two separate line graphs display the operation of the window represents the used and available hard disk drive space. Hard disk drive space usage The Hard Disk tab displays the used (blue) and...line graph representation. The pie chart at the bottom of the two logical processors. Click to display the information on the right panel. ROG Crosshair III Formula 4-19 Click a hard disk drive to display the Usage browser. Click the plus sign (+) before the PCI Information item to display the PCI...
... information on your system. If the CPU has an enabled Hyper‑Threading, two separate line graphs display the operation of the window represents the used and available hard disk drive space. Hard disk drive space usage The Hard Disk tab displays the used (blue) and...line graph representation. The pie chart at the bottom of the two logical processors. Click to display the information on the right panel. ROG Crosshair III Formula 4-19 Click a hard disk drive to display the Usage browser. Click the plus sign (+) before the PCI Information item to display the PCI...


