
User Manual
Page 3
...LIMITED TO THE IMPLIED WARRANTIES OR CONDITIONS OF MERCHANTABILITY OR FITNESS FOR A PARTICULAR PURPOSE. or (2) the serial number of ASUSTeK Computer Inc. ("ASUS"). SPECIFICATIONS AND INFORMATION CONTAINED IN THIS MANUAL ARE FURNISHED FOR INFORMATIONAL USE ONLY, AND ARE SUBJECT TO CHANGE AT ANY TIME WITHOUT... NOTICE, AND SHOULD NOT BE CONSTRUED AS A COMMITMENT BY ASUS. English E5313 First Edition V1 January 2010 Copyright © 2010 ASUSTeK Computer Inc. ii ASUS ASSUMES NO RESPONSIBILITY OR LIABILITY FOR ANY ERRORS OR INACCURACIES THAT MAY APPEAR IN THIS ...
...LIMITED TO THE IMPLIED WARRANTIES OR CONDITIONS OF MERCHANTABILITY OR FITNESS FOR A PARTICULAR PURPOSE. or (2) the serial number of ASUSTeK Computer Inc. ("ASUS"). SPECIFICATIONS AND INFORMATION CONTAINED IN THIS MANUAL ARE FURNISHED FOR INFORMATIONAL USE ONLY, AND ARE SUBJECT TO CHANGE AT ANY TIME WITHOUT... NOTICE, AND SHOULD NOT BE CONSTRUED AS A COMMITMENT BY ASUS. English E5313 First Edition V1 January 2010 Copyright © 2010 ASUSTeK Computer Inc. ii ASUS ASSUMES NO RESPONSIBILITY OR LIABILITY FOR ANY ERRORS OR INACCURACIES THAT MAY APPEAR IN THIS ...

User Manual
Page 4
...Where to find more information viii Package contents ix Chapter 1: Getting started Welcome!...1-1 Getting to know your computer 1-1 Setting up your computer 1-5 Turning your computer ON/OFF 1-8 Chapter 2: Using Windows® 7 Starting for the first time 2-1 Using Windows®...7 desktop 2-2 Managing your files and folders 2-7 Restoring your system 2-10 Protecting your computer 2-11 Getting Windows® Help and Support 2-15 Chapter 3: Connecting devices to your computer Connecting a USB storage device 3-1 Connecting microphone and speakers 3-2 Connecting multiple external displays...
...Where to find more information viii Package contents ix Chapter 1: Getting started Welcome!...1-1 Getting to know your computer 1-1 Setting up your computer 1-5 Turning your computer ON/OFF 1-8 Chapter 2: Using Windows® 7 Starting for the first time 2-1 Using Windows®...7 desktop 2-2 Managing your files and folders 2-7 Restoring your system 2-10 Protecting your computer 2-11 Getting Windows® Help and Support 2-15 Chapter 3: Connecting devices to your computer Connecting a USB storage device 3-1 Connecting microphone and speakers 3-2 Connecting multiple external displays...
User Manual
Page 11
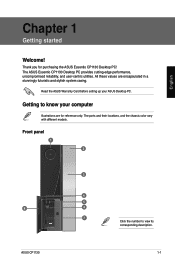
... Card before setting up your computer Illustrations are encapsulated in a stunningly futuristic and stylish system casing. All these values are for purchasing the ASUS Essentio CP1130 Desktop PC! ASUS CP1130 1-1 Getting to view its corresponding description. Front panel 1 2 3 4 5 8 6 7 Click the number to know your ASUS Desktop PC. The ASUS Essentio CP1130 Desktop PC provides cutting-edge performance, uncompromised...
... Card before setting up your computer Illustrations are encapsulated in a stunningly futuristic and stylish system casing. All these values are for purchasing the ASUS Essentio CP1130 Desktop PC! ASUS CP1130 1-1 Getting to view its corresponding description. Front panel 1 2 3 4 5 8 6 7 Click the number to know your ASUS Desktop PC. The ASUS Essentio CP1130 Desktop PC provides cutting-edge performance, uncompromised...

User Manual
Page 12
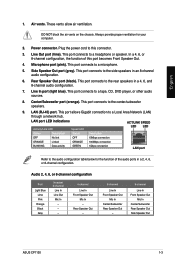
Press this button to view its corresponding description. 1-2 Chapter 1: Getting started This port connects to turn on your computer. 2. Optical disk drive eject button. Microphone port (pink). This port connects to USB 2.0 devices such as a mouse, printer, scanner, camera, PDA, and others. 7. USB 2.0 ports. ...
Press this button to view its corresponding description. 1-2 Chapter 1: Getting started This port connects to turn on your computer. 2. Optical disk drive eject button. Microphone port (pink). This port connects to USB 2.0 devices such as a mouse, printer, scanner, camera, PDA, and others. 7. USB 2.0 ports. ...
User Manual
Page 13
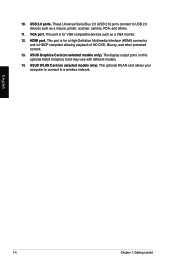
... Speaker Out Mic In Center/Subwoofer Rear Speaker Out - 8-channel Line In Front Speaker Out Mic In Center/Subwoofer Rear Speaker Out Side Speaker Out ASUS CP1130 1-3 This port connects to a Local Area Network (LAN) through a network hub. In a 4, 6, or 8-channel configuration, the function of the audio...port connects to the rear speakers in an 8-channel audio configuration. 6. This port connects to the audio configuration table below for your computer. 2. Center/Subwoofer port (orange). LAN (RJ-45) port. LAN port LED indications Activity/Link LED Speed LED ACT/LINK ...
... Speaker Out Mic In Center/Subwoofer Rear Speaker Out - 8-channel Line In Front Speaker Out Mic In Center/Subwoofer Rear Speaker Out Side Speaker Out ASUS CP1130 1-3 This port connects to a Local Area Network (LAN) through a network hub. In a 4, 6, or 8-channel configuration, the function of the audio...port connects to the rear speakers in an 8-channel audio configuration. 6. This port connects to the audio configuration table below for your computer. 2. Center/Subwoofer port (orange). LAN (RJ-45) port. LAN port LED indications Activity/Link LED Speed LED ACT/LINK ...
User Manual
Page 14
USB 2.0 ports. HDMI port. ASUS Graphics Card (on this optional ASUS Graphics Card may vary with different models. 14. This port is for a High-Definition Multimedia Interface (HDMI) connector, and is for VGA-compatible devices such ... others. 11. This port is HDCP compliant allowing playback of HD DVD, Blu-ray, and other protected content. 13. This optional WLAN card allows your computer to connect to USB 2.0 devices such as a VGA monitor. 12. 10. These Universal Serial Bus 2.0 (USB 2.0) ports connect to a wireless network. The display output ports...
USB 2.0 ports. HDMI port. ASUS Graphics Card (on this optional ASUS Graphics Card may vary with different models. 14. This port is for a High-Definition Multimedia Interface (HDMI) connector, and is for VGA-compatible devices such ... others. 11. This port is HDCP compliant allowing playback of HD DVD, Blu-ray, and other protected content. 13. This optional WLAN card allows your computer to connect to USB 2.0 devices such as a VGA monitor. 12. 10. These Universal Serial Bus 2.0 (USB 2.0) ports connect to a wireless network. The display output ports...
User Manual
Page 15
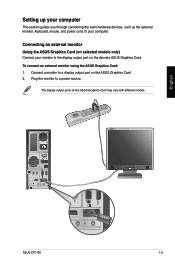
Connect a monitor to a display output port on the discrete ASUS Graphics Card. English ASUS CP1130 1-5 Connecting an external monitor Using the ASUS Graphics Card (on selected models only) Connect your computer. Setting up your computer This section guides you through connecting the main hardware devices, such as the external monitor, keyboard, mouse, and power cord, to your...
Connect a monitor to a display output port on the discrete ASUS Graphics Card. English ASUS CP1130 1-5 Connecting an external monitor Using the ASUS Graphics Card (on selected models only) Connect your computer. Setting up your computer This section guides you through connecting the main hardware devices, such as the external monitor, keyboard, mouse, and power cord, to your...

User Manual
Page 16
.... Hence, connect your monitor to a display output port on the graphics card. • To connect multiple external monitors to your computer, refer to the HDMI port on the rear panel of this user manual for details. 1-6 Chapter 1: Getting started English • If your... computer comes with an ASUS Graphics Card, the graphics card is set as the primary display device in Chapter 3 of your computer. 2. Using the onboard display output ports Connect your monitor to a power source. Connect a...
.... Hence, connect your monitor to a display output port on the graphics card. • To connect multiple external monitors to your computer, refer to the HDMI port on the rear panel of this user manual for details. 1-6 Chapter 1: Getting started English • If your... computer comes with an ASUS Graphics Card, the graphics card is set as the primary display device in Chapter 3 of your computer. 2. Using the onboard display output ports Connect your monitor to a power source. Connect a...
User Manual
Page 17
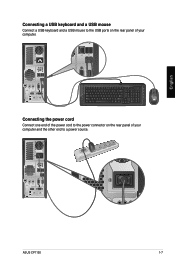
C Connecting the power cord Connect one end of your computer. ASUS CP1130 1-7 English Connecting a USB keyboard and a USB mouse Connect a USB keyboard and a USB mouse to the USB ports on the rear panel of your computer and the other end to the power connector on the rear panel of the power cord to a power source.
C Connecting the power cord Connect one end of your computer. ASUS CP1130 1-7 English Connecting a USB keyboard and a USB mouse Connect a USB keyboard and a USB mouse to the USB ports on the rear panel of your computer and the other end to the power connector on the rear panel of the power cord to a power source.

User Manual
Page 18
Turning your computer OFF To turn your computer ON: 1. Click to turn on/off your computer after setting up your monitor ON. 2. Turn your computer. Press the power button on the Windows® desktop. 3. Click on your computer OFF: 1. Turning your computer ON To turn your computer. Power button 3. Wait until the operating system loads automatically. Close all running applications. 2. English Turning your computer ON/OFF This section describes how to shut down the operating system. 1-8 Chapter 1: Getting started
Turning your computer OFF To turn your computer ON: 1. Click to turn on/off your computer after setting up your monitor ON. 2. Turn your computer. Press the power button on the Windows® desktop. 3. Click on your computer OFF: 1. Turning your computer ON To turn your computer. Power button 3. Wait until the operating system loads automatically. Close all running applications. 2. English Turning your computer ON/OFF This section describes how to shut down the operating system. 1-8 Chapter 1: Getting started
User Manual
Page 19
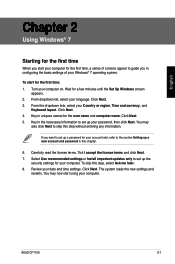
... You may now start using your computer. To skip this chapter. 6. The system loads the new settings and restarts. From dropdown list, select your date and time settings. Key in the necessary information to skip this step without entering any information. ASUS CP1130 2-1 If you want to set up... a password for the user name and computer name. Review your language. Key in uniques names for your account later, refer to guide you...
... You may now start using your computer. To skip this chapter. 6. The system loads the new settings and restarts. From dropdown list, select your date and time settings. Key in the necessary information to skip this step without entering any information. ASUS CP1130 2-1 If you want to set up... a password for the user name and computer name. Review your language. Key in uniques names for your account later, refer to guide you...

User Manual
Page 20
.... English Start menu Taskbar Notification area Using the Start menu The Start menu gives you want to programs, utilities, and other useful items on your computer.
.... English Start menu Taskbar Notification area Using the Start menu The Start menu gives you want to programs, utilities, and other useful items on your computer.
User Manual
Page 21
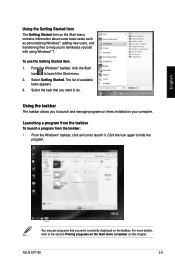
... 7. Launching a program from the taskbar To launch a program from the taskbar: • From the Windows® taskbar, click an icon to launch the Start menu. 2. ASUS CP1130 2-3 English Using the Getting Started item The Getting Started item on the Start menu contains information about some basic tasks such as personalizing Windows®... on the Start menu or taskbar on this chapter. Select the task that you to launch and manage programs or items installed on your computer. To use the Getting Started item: 1. Select Getting Started. For more details, refer to hide the program.
... 7. Launching a program from the taskbar To launch a program from the taskbar: • From the Windows® taskbar, click an icon to launch the Start menu. 2. ASUS CP1130 2-3 English Using the Getting Started item The Getting Started item on the Start menu contains information about some basic tasks such as personalizing Windows®... on the Start menu or taskbar on this chapter. Select the task that you to launch and manage programs or items installed on your computer. To use the Getting Started item: 1. Select Getting Started. For more details, refer to hide the program.
User Manual
Page 25
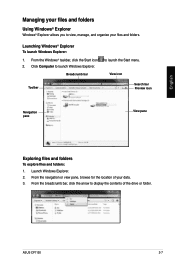
Click Computer to view, manage, and organize your files and folders. From the breadcrumb bar, click the arrow to launch the Start menu. English Managing your files ... to launch Windows Explorer. From the Windows® taskbar, click the Start icon 2. Launch Windows Explorer. 2. Breadcrumb bar to display the contents of your data. 3. ASUS CP1130 2-7 From the navigation or view pane, browse for the location of the drive or folder. View icon Toolbar Search bar Preview icon Navigation pane View...
Click Computer to view, manage, and organize your files and folders. From the breadcrumb bar, click the arrow to launch the Start menu. English Managing your files ... to launch Windows Explorer. From the Windows® taskbar, click the Start icon 2. Launch Windows Explorer. 2. Breadcrumb bar to display the contents of your data. 3. ASUS CP1130 2-7 From the navigation or view pane, browse for the location of the drive or folder. View icon Toolbar Search bar Preview icon Navigation pane View...

User Manual
Page 28
... Windows® 7 Click > All Programs > Accessories > System Tools > System Restore. 3. If you to restore or undo changes to your computer's system settings without affecting your personal data. It allows you select Let Windows choose, Windows will not back up a backup: 1. Select Let Windows... or Let me choose as your system: 1. Restoring your system The Windows® System Restore feature creates a restore point where the computer's system settings are 1GB or more. 5. Close all running applications. 2. Follow the onscreen instructions to finish the process. Backing up ...
... Windows® 7 Click > All Programs > Accessories > System Tools > System Restore. 3. If you to restore or undo changes to your computer's system settings without affecting your personal data. It allows you select Let Windows choose, Windows will not back up a backup: 1. Select Let Windows... or Let me choose as your system: 1. Restoring your system The Windows® System Restore feature creates a restore point where the computer's system settings are 1GB or more. 5. Close all running applications. 2. Follow the onscreen instructions to finish the process. Backing up ...

User Manual
Page 29
English ASUS CP1130 2-11 For more details, refer to the previous section Customizing icons and notifications in this chapter. Launching Windows® 7 Action Center To launch Windows® 7 ... 7 Action Center, click the task that you with alert notifications, security information, system maintenance information, and the option to automatically troubleshoot and fix some common computer problems. You may customize the notifications. Protecting your computer Using Windows® 7 Action Center Windows® 7 Action Center provides you want to do.
English ASUS CP1130 2-11 For more details, refer to the previous section Customizing icons and notifications in this chapter. Launching Windows® 7 Action Center To launch Windows® 7 ... 7 Action Center, click the task that you with alert notifications, security information, system maintenance information, and the option to automatically troubleshoot and fix some common computer problems. You may customize the notifications. Protecting your computer Using Windows® 7 Action Center Windows® 7 Action Center provides you want to do.

User Manual
Page 30
Using Windows® Update Windows Update allows you want to do. Launching Windows® Update To launch Windows® Update: 1. Select All Programs > Windows Update. 3. From the Windows Update screen, click the task that you to check and install the latest updates to launch the Start menu. 2. English 2-12 Chapter 2: Using Windows® 7 From the Windows® taskbar, click the Start icon to enhance the security and performance of your computer.
Using Windows® Update Windows Update allows you want to do. Launching Windows® Update To launch Windows® Update: 1. Select All Programs > Windows Update. 3. From the Windows Update screen, click the task that you to check and install the latest updates to launch the Start menu. 2. English 2-12 Chapter 2: Using Windows® 7 From the Windows® taskbar, click the Start icon to enhance the security and performance of your computer.

User Manual
Page 31
Setting up a user account To set up a user account and password You may create user accounts and passwords for people who will use your computer. Select Create a new account. 4. Select Manage another account. 3. When done, click Create Account. Setting up a user account: 1. Select either Standard user or Administrator as the user type. 6. English ASUS CP1130 2-13 From the Windows® taskbar, click > Getting Started > Add new users. 2. Key in the name of the new user. 5.
Setting up a user account To set up a user account and password You may create user accounts and passwords for people who will use your computer. Select Create a new account. 4. Select Manage another account. 3. When done, click Create Account. Setting up a user account: 1. Select either Standard user or Administrator as the user type. 6. English ASUS CP1130 2-13 From the Windows® taskbar, click > Getting Started > Add new users. 2. Key in the name of the new user. 5.
User Manual
Page 33
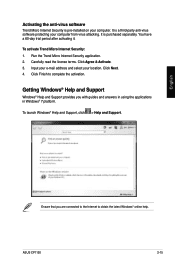
...have a 60-day trial period after activating it. Carefully read the license terms. Click Agree & Activate. 3. ASUS CP1130 2-15 Click Next. 4. It is pre-installed on your computer. To activate Trend Micro Internet Security: 1. Getting Windows® Help and Support Windows® Help and Support ... that you with guides and answers in using the applications in Windows® 7 platform. Input your e-mail address and select your computer from virus attacking. Click Finish to obtain the latest Windows® online help. It is a third-party anti-virus software protecting ...
...have a 60-day trial period after activating it. Carefully read the license terms. Click Agree & Activate. 3. ASUS CP1130 2-15 Click Next. 4. It is pre-installed on your computer. To activate Trend Micro Internet Security: 1. Getting Windows® Help and Support Windows® Help and Support ... that you with guides and answers in using the applications in Windows® 7 platform. Input your e-mail address and select your computer from virus attacking. Click Finish to obtain the latest Windows® online help. It is a third-party anti-virus software protecting ...

User Manual
Page 34
... both the front and rear panels. DO NOT remove a USB storage device when data transfer is in progress. ASUS CP1130 3-1 Doing so may cause data loss or damage the USB storage device. Click from your computer, then click Eject USB2.0 FlashDisk. Rear panel 2. English Front panel To remove a USB storage device: 1. Chapter 3 Connecting...
... both the front and rear panels. DO NOT remove a USB storage device when data transfer is in progress. ASUS CP1130 3-1 Doing so may cause data loss or damage the USB storage device. Click from your computer, then click Eject USB2.0 FlashDisk. Rear panel 2. English Front panel To remove a USB storage device: 1. Chapter 3 Connecting...


